13 Soft Tissue Lasers in Orthodontics
Choosing a Laser for Orthodontics
Although manufacturers claim all wavelengths are capable of performing soft tissue procedures, most orthodontists should avoid lasers that can ablate hard tissue, such as the erbium family of lasers (Er:YAG, Er,Cr:YSGG). Laser portability and movement from chair to chair are critical in orthodontic therapy, so the bulky, heavy erbium lasers are a poor choice. Diode lasers, currently available in four distinct wavelengths (810-830, 940, 980, and 1064 nm), and neodymium-doped yttrium-aluminum-garnet (Nd:YAG, 1064 nm) lasers are well absorbed by hemoglobin and melanin and thus work well for ablation of pigmented and vascular tissues such as oral mucosa.1 Diode lasers have a much shallower depth of penetration than Nd:YAG lasers and may be less likely to cause pulpal damage, making diodes an excellent choice in orthodontics.2,3 Carbon dioxide (CO2) lasers are well absorbed by water. Oral mucosa is more than 90% water, so CO2 lasers would also be an excellent option for an orthodontist. Although CO2 lasers are portable units, capable of moving from chair to chair, they are larger and more expensive than diode lasers.
Therefore the two major advantages of diode lasers are cost and portability. Diode lasers are the least expensive and most portable of all laser wavelengths. Currently, diodes vary in price from $4000 to $13,000, and although some orthodontists are reluctant to charge for procedures to avoid offending their general dentist colleagues and other professional referrals, the cost of a diode laser is easily justified without charging for procedures. If an orthodontist purchases an $11,000 diode laser and finances it at 7% interest over 5 years, the monthly payment is just under $218. The Journal of Clinical Orthodontics reports that the value of an orthodontic appointment is between $200 and $400 (calculated by dividing the total fee collected by the number of appointments).4 Thus, if an orthodontist is able to save even one appointment per month, the cost of a laser is easily justified.
In reality, orthodontists who have adopted laser use save appointments several times a day. By charging for some or all procedures, the return on investment can occur more quickly. The orthodontist establishes a fee based on a combination of the time necessary for a given procedure and the investment cost of the equipment and training. Depending on the personal business philosophy, the patient can be billed for the procedures, or the fees can be submitted to the patient’s dental or medical insurance. When submitting for reimbursement for any laser procedure, it is not necessary to specify that a laser was used. For example, a laser gingivectomy would be submitted using the usual American Dental Association (ADA) code for a gingivectomy (D4210 or D4211), depending on the number of teeth involved). When submitting for a lingual frenotomy (releasing a tongue-tie), it is often more effective to submit to the medical insurance policy for reimbursement. For this purpose, use a “Medical Insurance Claim Form” number 1500 (blank forms can be downloaded from the Internet or purchased from software or office supply companies). When submitting for medical insurance, both a diagnosis code and a procedure code must be specified. In general, providing two or three diagnosis codes and a single procedure code is optimal for each procedure (Table 13-1).

Although studies have detailed the use of CO2,5,6 diode,7 and argon8 lasers in orthodontics, this chapter focuses on diode lasers in orthodontic treatment. No “ideal” laser exists for every orthodontic practice; all soft tissue lasers will perform the procedures quickly and easily. The selection of the proper laser is based on each practitioner’s individual preference. The reader is strongly urged to take multiple courses. Make certain that the instructors have experience performing procedures with multiple wavelengths. Find mentors who have experience with multiple wavelengths (see Chapter 16).
Procedural Steps
Prepare the Laser
Most diode lasers have two temporal emission modes: continuous wave (CW) and pulsed or “chopped” wave. Using a pulsed wave reduces the heat to surrounding tissues,9 but if the procedure can be carried out without charring, CW mode is more effective. Newer diode lasers have “superpulsed” modes, in which the laser can emit a very short pulse of high power for a very short period. These superpulsed lasers cut with better efficiency and less charring than conventional CW or gated-pulse models (see Chapter 2).
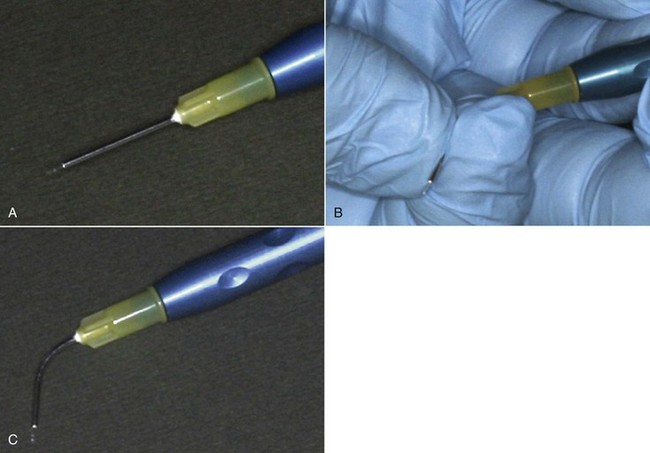
It is standard protocol to cleave (cut) the fiberoptic cable at the end of each procedure to ensure the laser is ready for the next procedure (Figure 13-1). The fiberoptic cables are made of quartz/glass. After repeated use, the quartz/glass fiber tip can become scratched and will not emit laser energy or ablate soft tissue as efficiently. Cleaving removes the scratched part of the fiberoptic cable, exposing a fresh, highly polished cable surface capable of transmitting laser energy to the tissue efficiently.
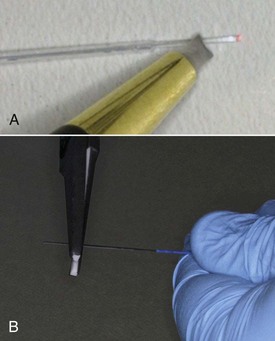
If the end of the fiberoptic cable has not yet been cleaved, first make sure that sufficient cable (1-2 inches [2.5-5 cm]) extends out of the protective plastic jacket. If not, remove the protective jacket as suggested by the manufacturer (Figure 13-2). Next, cleave a few millimeters of the fiberoptic cable. If cleaving involves scoring, hold the cable flat against a hard surface and score it with the glass-cutting device supplied by the manufacturer, then break the end off at the score line. A well-scored fiber should break off cleanly. When glass cutting scissors are provided for cleaving, make sure the scissors are perpendicular to the fiber when cleaving. In either case, confirm that the cleave left no sharp edges by shining the cable against a flat surface, and confirm that the aiming beam describes a circular pattern without a “comet tail” or oval appearance (Figure 13-3). If the beam is irregular, recleave to obtain a clean cut. Using a laser without a sharp cleave can result in bleeding as the tissues are “cut” by the irregular glass of the fiberoptic cable.
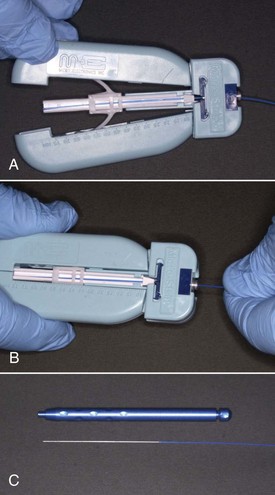
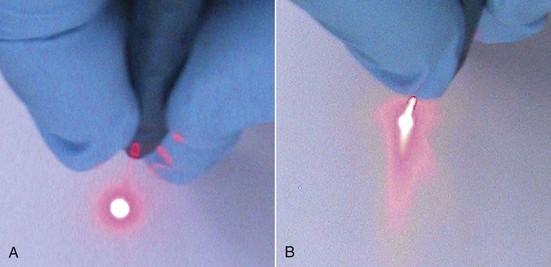
FIGURE 13-3 • A, Appearance of aiming beam from a well-cleaved fiber. B, Comet-tail appearance of unevenly cleaved fiber.
Place the fiberoptic cable into the handpiece, then slip it through the appropriate guide, leaving 3 to 4 mm beyond the guide. Most diode lasers use a plastic fiber guide (Figure 13-4). With a plastic guide, it is necessary to “straighten” the guide as much as possible when inserting the fiber. Attempting to insert the fiber without straightening the guide can result in binding and fracture of the fiber inside the plastic guide, thereby wasting fiber. After feeding the fiberoptic through the guide, confirm fiber integrity by shining the aiming beam against a smooth surface. If it is not visible, check if you can see the aiming beam within the plastic guide, which would indicate a broken fiber. In this case, carefully refeed the fiber through the guide without breakage.
Some lasers use a metal tube as a guide; keep the metal tube straight while feeding through the fiberoptic tube. Once the fiberoptic cable extends 3 to 4 mm beyond the end of the metal tube, carefully bend the metal tube to the desired angle, taking care not to kink or “overbend” the tube, which could fracture the fiber (Figure 13-5). Testing the integrity of the fiberoptic cable is critical; a fracture within a metal tube would result in the laser energy being converted to heat and the metal tube burning the patient’s tissues or lips.
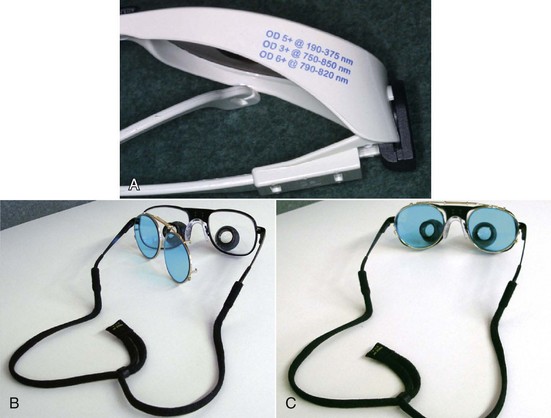
Soft tissue lasers can be hazardous to eyes. Federal regulations mandate that all personnel in the treatment area wear safety glasses that protect against the specific wavelength used, which must be listed on the frame or the lens itself.9 All laser units provide three sets of safety glasses: for the patient, assistant, and operator. Clip-on lenses are available for clinicians who use loupes (Figure 13-6).
With patient and laser prepared and anesthesia profound, the clinician turns the laser from standby to on, positions the fiberoptic cable properly, then gently touches the treatment site while activating the foot pedal, using a slow, brushing motion to ablate the tissues to be removed. Hand speed is critically important to the success of the procedure (see Chapter 2). The assistant holds high-speed suction as close to the tissue as possible to collect the laser “plume,” reduce any odors that may arise, and cool the tissue. The assistant also holds a moist 2 × 2–inch cotton gauze to wipe ablated tissue from the fiberoptic tip. Once complete, a moist cotton pledget may be used to clean the area; hydrogen peroxide works well. At this point, the tooth is ready for bonding if so desired.
Types of Orthodontic Procedures
Many procedures can be performed with a soft tissue laser, but the vast majority that orthodontists might perform fall into two categories: access gingivectomies1 and esthetic procedures. Access gingivectomies involve gaining or improving access to a tooth or allowing earlier or more idea/>
Stay updated, free dental videos. Join our Telegram channel
VIDEdental - Online dental courses


