
INTRODUCTION
INDICATIONS OF METAL INLAY AND ONLAY
CONTRAINDICATIONS OF METAL INLAY AND ONLAY
ADVANTAGES OF CAST METAL RESTORATIONS
DISADVANTAGES OF CAST METAL RESTORATIONS
PRINCIPLES OF TOOTH PREPARATION FOR CAST METAL INLAY
• Preparation Path
• Inlay Taper
• Circumferential Tie
STEPS OF TOOTH PREPARATION FOR INLAY
• Occlusal Outline Form
• Proximal Box Preparation
• Resistance and Retention Form
• Placement of Grooves, Bevels and Flares
MODIFICATIONS IN CLASS II TOOTH PREPARATION FOR INLAY
• In Mandibular First Premolar
• For Esthetic Reasons
• In Maxillary Molars with Unaffected and Strong Oblique Ridge
• Capping of Cusp
ADDITIONAL RETENTION AND RESISTANCE FORM FEATURES FOR CAST RESTORATION
TECHNIQUE FOR MAIUNG CAST METAL RESTORATION
• Impression Taking for Cast Metal Restoration
• Record of Interocclusal Relationship
• Temporary (Interim) Restoration
• Working Cast
• Working Die
• Wax Pattern Fabrication
• Spruing
• Washing of Wax Pattern
• Investing
• Casting Procedure
• Cleaning of Casting
• Trying in the Casting
• Cementation of the Casting
CASTING DEFECTS
• Surface Roughness and Irregularities
• Distortion
• Incomplete Casting and Rounded Margins
• Discoloration
• Porosity
PIN RETAINED CAST RESTORATIONS
• Indications for Pin Retained Cast Restorations
INTRODUCTION
Though various defects of teeth can be restored using different restorative materials like amalgam, composite resins, direct filling gold and cast metal restorative materials. Each material has its own indications, contraindications, advantages and disadvantages. When sufficient tooth structure is not present for the support of restoration, then cast metal restorations are indicated. Cast metal restorations were introduced in dentistry about 100 years ago and soon they became a subject of great interest to both dentists and patients. Most advantageous properties of gold alloy is its malleability, and when properly manipulated, it has wear similarly to that of tooth structure. Cast gold restorations became most popular from the 1930s to the 1970s because of their acceptable functions and restorative longevity. Most of the cast metal restorations are made from alloys formed by combination of gold with other metals such as silver, copper, zinc, platinum and palladium. Casting procedures have been used for replacement of teeth by means of fixed and removable partial denture prosthesis, and full mouth restorations.
In operative dentistry, cast metal restorations are mainly used in three forms:
1. Inlay
2. Onlay
3. Partial crown.
After 1970s, restorative materials providing esthetics came into light. And after that there was increase in awareness of tooth colored restorations in comparison to cast gold restorations.
History of casting of objects in gold by the wax elimination process dates back to four or five thousand years ago by Chinese. Italian artisan Benvenuto Cellini described the use of this technique to make statues and artistic pieces. Dr Taggart developed a technique of casting gold inlays by the invested wax pattern method, introduced this to the profession in 1907.
In 1897, Dr Philbrook read a paper “Cast Fillings”.
In 1908, Dr JG Lane developed casting into a hot mold using an investment with a high silica content.
In 1909, Dr CS Van Horn evaluated wax expansion, this was an attempt to overcome the effects of shrinkage of the gold alloy.
In 1930, Dr Carl Scheu discovered the phenomenon of hygroscopic setting expansion.
Dr GV Black’s principles of cavity preparation were vital to success of cast metal restorations then as they are today.
Inlay: An inlay is an indirect intracoronal restoration which is fabricated extraorally and cemented in the prepared tooth. Inlay may cover none, or all but one cusp of a tooth.
Onlay: An onlay is a combination of intracoronal and extracoronal cast restoration which covers one or more cusps.
Class II inlay: Class II inlay essentially involves proximal surface or surfaces of a posterior tooth, usually may involve occlusal surface and also may involve facial and/or lingual surface(s) and covers none or may cover all but one cusp of a tooth (Fig. 12.1).
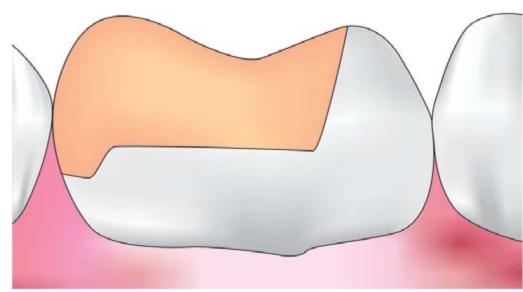
Fig. 12.1: Class II inlay
Class II onlay: Class II onlay is a modification of the inlay and involves the proximal surface or surfaces, and may involve facial and/or lingual surface/s of a posterior tooth and covers all the cusps (Fig. 12.2).
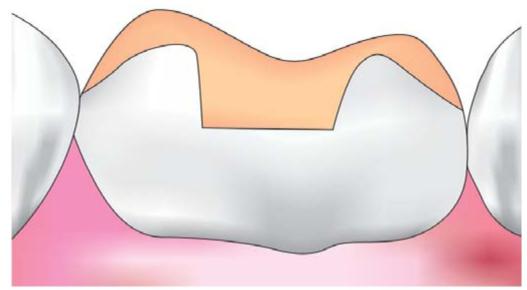
Fig. 12.2: Onlay
Partial crown: In partial crown, a part of the crown remains uncovered and rest of the crown is covered like three quarter crown and seven-eighth crown.
Crown: A crown completely covers the crown of the tooth (Fig. 12.3).
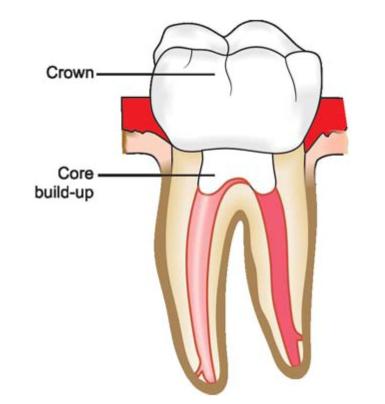
Fig. 12.3: Crown given on root canal treated tooth
INDICATIONS OF METAL INLAY AND ONLAY
• In extensive proximal surface caries in posterior teeth involving buccal and lingual line angles.
• In patients with good oral hygiene and low caries index.
• Postendodontic restoration are preferably restored by onlay to strengthen the remaining tooth structure and to distribute occlusal forces.
• In teeth with extensive restoration, sometimes fracture line is present in enamel and dentin. Inlay/onlay can brace the tooth and prevent fragmentation of the tooth.
• To maintain and restore proper interproximal contact and contour and for occlusal plane correction.
• When there are other teeth present already restored with cast metal restorations.
• Abutment teeth of removable partial denture are indicated for onlay because they provide superior physical properties to withstand the forces imparted by the partial denture. Moreover, the contours of the rest seats, guiding planes, and other aspects of contour are better controlled when the indirect technique is used.
• In posterior teeth with heavy occlusal forces and attrition.
CONTRAINDICATIONS OF METAL INLAY AND ONLAY
• Where esthetics is prime consideration because metal inlay and onlay display metal color.
• Patient having high caries index.
• When patient cannot come for second visit.
• In young patients, usually direct restorations are preferred since they require longer and more number of appointments. Also the chances of iatrogenic pulp exposure are more in these patients because of high pulp horns.
• Where expected life of a tooth is short, i.e. periodontally involved teeth in aged persons.
• In cases where extensive caries are present in facial, lingual and multiple surfaces. In such cases, full crown is indicated.
• For patient of low economic status, inlay and onlay are not given because of higher costs.
• In patients having restorations with different metals since dissimilar metals cause galvanic currents when they come in contact with each other.
• When there are extensive occlusal wear facets involving the remaining marginal ridge of the tooth.
ADVANTAGES OF CAST METAL RESTORATIONS
• Since they are fabricated by indirect technique, there is better reproduction of contacts and contours.
• Cast metal restorations are much more wear resistant than direct composite restorations, especially when restoring the occlusal surface.
• More biocompatible with better tissue response.
• Strengthens remaining tooth structure. In grossly carious lesion the remaining tooth structure is weakened and can be strengthened by the adhesive bonding of indirect inlays/onlays.
• Less chairside time is required.
• Since cast metal restorations are build in bulk and not in increments, there are less chances of voids and internal stresses.
• Extraoral polishing is easy.
DISADVANTAGES OF CAST METAL RESTORATIONS
• It requires patient’s subsequent appointment, with need for temporary restoration.
• More expensive than direct restorations.
• They are more technique sensitive.
• Repair is difficult with these restoration.
• Bonding of these restoration to tooth is weak at tooth cement casting junction. It can lead to microleakage of the restoration with time.
• Cast metal restorations are not acceptable esthetically.
PRINCIPLES OF TOOTH PREPARATION FOR CAST METAL INLAY
Preparation of inlay requires some fundamental steps. Each step has equal importance and although some steps are easier to accomplish, each step should be given the same careful attention for successful results.
1. Tooth preparation
2. Impression
3. Die
4. Wax pattern
5. Mold for casting
6. Gold casting.
Any flaw in any of above mentioned steps or lack of attention could result in a failure or unsatisfactory restoration. Among these the single step which can contribute to a large number of failures and which requires a special efforts from the clinician is the tooth preparation. An optimally prepared tooth should meet the standard criteria of a outline form, resistance and retention form, and the other requirements given by GV Black, and also it should be smooth and accurate in both its internal and external form. Ultimately, this accurate, smooth, optimally tapered preparation with sharp margins and internal angles makes it possible to carryout each of the other steps with accuracy.
The purpose of proper diagnosis and treatment plan is gone if care is not taken during tooth preparation. The preparation to receive a gold inlay should not only be designed to gain perfection of margins and restore occlusion, but should be made to enhance the strength of the tooth as well.
Since cast metal restorations involves making a wax pattern which should be removed from cast or die without any distortion. For this purpose, some fundamental basic designs are incorporated during preparation of class II inlay. These are:
Preparation Path
Preparation should have single insertion path opposite to the occlusal load and parallel to the long axis of tooth (Figs 12.4A and B). This helps in retention of the restoration (Fig. 12.5).
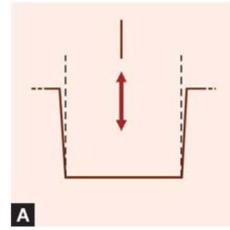
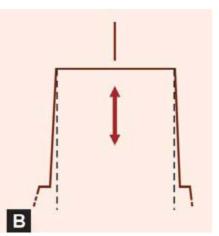
Figs 12.4A and B: Inlay preparation should have single path of insertion parallel to long axis of tooth
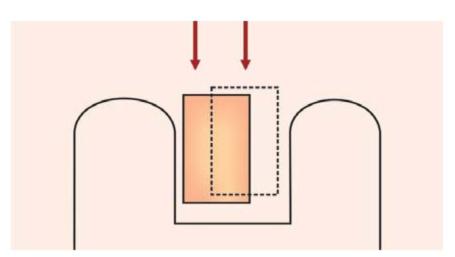
Fig. 12.5: With multiple paths of insertion, there is no retention for inlay even if walls are parallel to each other
Inlay Taper
To have unhindered removal and placement of the wax pattern and seating of the final casting, intracoronal and extracoronal tooth preparation should have some taper. Ideally, a tooth preparation should have slight diverging walls from gingival to occlusal surface. This is the concept of taper (Fig. 12.6).
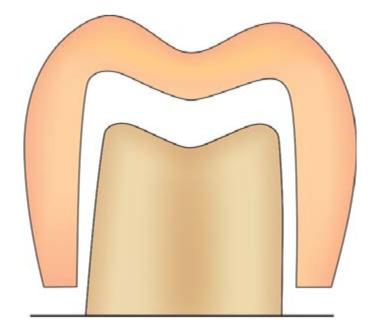
Fig. 12.6: A 2°-5° of taper provides optimal retention for inlay
If possible, throughout the tooth preparation, the cutting instrument should be kept parallel to the long axis of the tooth and thus the preparation develops a line of withdrawal. This line of withdrawal also describes the path of insertion and removal of the casting and is the axis of taper. The optimal taper should lie in the range of 2° to 5° per wall. But if longitudinal walls of preparation are short, a maximum of 2° taper is given, and if longitudinal height of preparation is more, then taper should also be increased, although it should never exceed 10° (Fig. 12.7). Also the preparation should never have one side with more taper than the other since it can result in more than one path of insertion (Fig. 12.8).
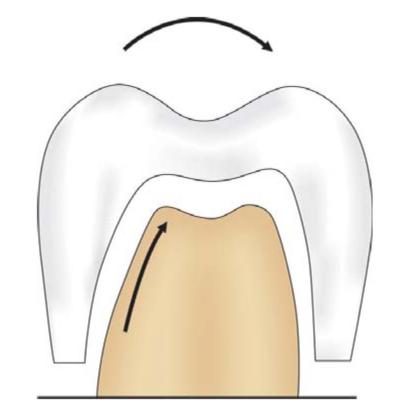
Fig. 12.7: Giving more than required taper in preparation walls results in reduced retention of inlay
For shallow preparations, the axis of taper is usually parallel to the long axis of the tooth and for class V preparations, the axis of taper is perpendicular to the long axis of the tooth. The angle formed by the convergence of the tapered preparation walls to a point of their intersection is bisected by line of withdrawal. The amount of taper upon opposing preparation walls is described by this convergent angle.
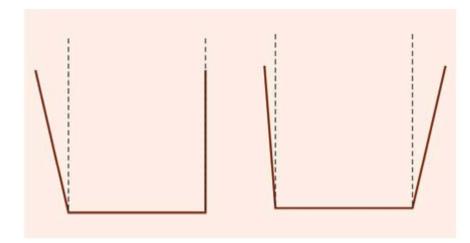
Fig. 12.8: Uneven taper of preparation walls result in failure of inlay
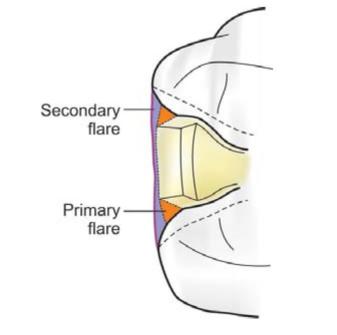
Circumferential Tie
Circumferential tie refers to the design of cavosurface margin of an inlay tooth preparation. This junction between tooth cement inlay is the weakest part of the cast metal restoration. For the success of restoration, the margins of restoration should be designed so as to achieve its maximum adaptation to tooth structure. Cavosurface margins of an inlay preparation can be of two types:
1. Bevels
2. Flares.
Bevels
Bevel is defined as the inclination that one surface makes with another when not at right angles. An accurate wax pattern and casting may not have precise adaptation to the margins of tooth preparation if bevel is not given.
Objective of bevel is to form a metal wedge of 30° to 35°, thus enhancing the chance to achieve closure at the interface of cast gold and tooth (Fig. 12.9). By beveling, a strong enamel margin with an angle of 140° to 150° can be produced.
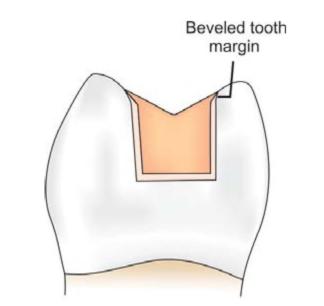
Fig. 12.9: Bevel helps in better adaptation of restoration to the tooth surface
Types of bevel (Figs 12.10A to G): According to shape and type of tissue involved, bevels can be:
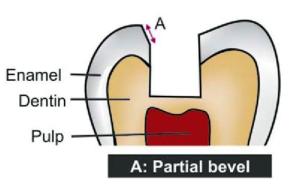
Figs 12.10A to G: Diagrammatic representation of different bevels
a. Ultrashort or partial bevel
• Beveling of less than two-third of the total enamel thickness.
• Used to trim the enamel rods from preparation margins.
• Used in type I casting alloys.
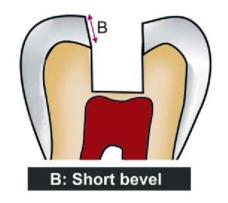
b. Short bevel
• Beveling of full thickness of enamel wall but not dentin.
• Used mostly for restorations with types I and II casting alloys.
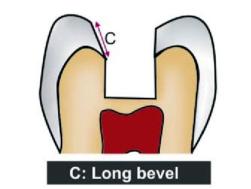
c. Long bevel
• Includes full thickness of enamel and half or less than half thickness of dentin.
• Preserves the internal “boxed up” resistance and retention features of the preparations.
• Used in types I, II and III of cast gold alloys.
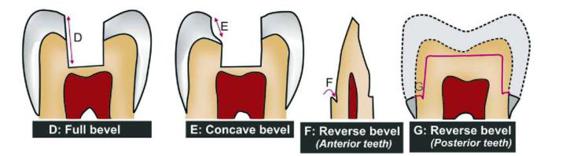
d. Full bevel
• Includes full enamel and dentinal wall.
• It deprives the preparation of its internal resistance
• Full bevel should be avoided except in cases where it is a must.
e. Hollowground (concave) bevel
• Hollow ground is concave in shape and not a bevel in true sense.
• It is rarely used.
f. Counter bevel
• Used when capping of the cusps is done to protect and support them.
• It is opposite to an axial wall of the preparation on the facial or lingual surface of the tooth.
• It has a gingival inclination facially or lingually.
g. Reverse or inverted bevel in anterior teeth: It is beveling in the reverse or inverted shape given on the gingival seat in the axial wall toward the root in anterior teeth.
h. Reverse or inverted bevel in posterior teeth: In posterior teeth (in MOD preparations for full cast metal restorations), it is used to prevent tipping of cast restoration and to increase the resistance and retention form.
Functions of bevels:
• By beveling, weak enamel is removed.
• Beveling produce obtuse angled tooth margins. Resultant cavosurface angle of 135° to 140° forms the strongest and the bulkiest configuration.
• Acute angled metal margins (35°-45°) allow the metal margins to be burnished against tooth surface (Fig. 12.11).
Fig. 12.11: Bevels allow better finishing and burnishing of metal margins against tooth
• Beveling increases retention, resistance, aesthetics and color matching.
• It improves junctional relationship between the restorative material and tooth (Fig. 12.12).
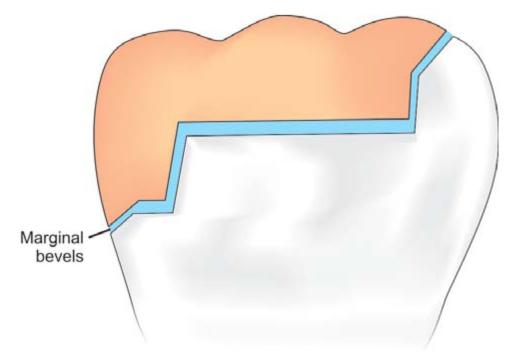
Fig. 12.12: Marginal bevels reduce the space between tooth structure and the restoration, thus help in better retention
• The types of margin of tooth preparation depends mainly on the compressive strength, edge strength and tensile strength of the restorative material.
• Bevels are the flexible extensions, i.e. they allow inclusion of faults, wear facets, etc. without overextending the preparation margins.
• Gingival margins become finishable and cleansable because of gingival bevels.
• Counter bevel increases the resistance form to remaining tooth structure.
• Because of beveling, the gingival margin has a lap sliding fit which provides better fit at this region (Fig. 12.13).

Fig. 12.13: Lap sliding fit of restoration because of bevel
Flares
Flares are concave or flat peripheral portions of the facial or lingual proximal walls. These are of two types:
Primary flare: It is basic part of circumferential tie. It is like a long bevel and is always directed 45° to the inner dentinal wall proper (Fig. 12.14).
Indications:
• Primary flare is indicated when normal contacts are present.
• When there is minimal extension of caries in buccolingual direction.
Functions:
• Weak enamel is removed.
• Improves junctional relationship between the restorative material and tooth.
• Maintains the marginal seal.
• Brings the facial and lingual margins to cleansable and finishable areas.
Secondry flare:
• It is a flat plane superimposed peripherally to the primary flare (Fig. 12.14).
Fig. 12.14: Primary flare and secondary flare
• It may have different angulations, involvement and extent depending upon requirement.
• Secondary flare is not given in the areas where esthetics is more important.
Indications of secondary flares:
• When broad contact area is present.
• To include the faults present on facial and lingual walls beyond primary flare (Fig. 12.15).
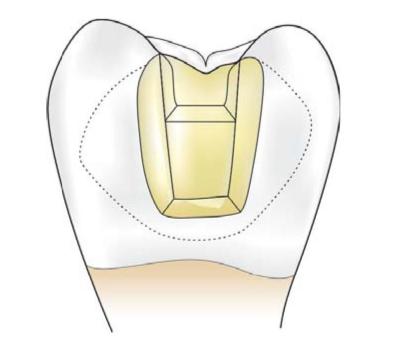
Fig. 12.15: Secondary flare is extended beyond primary flare to involve all faults and defects
• When caries are widely extended in buccolingual direction.
• To include the undercuts present at cervical aspect of facial and lingual walls.
Advantages of secondary flare:
• Secondary flare encourages self-cleansing margins because it is extended into the embrasures.
• Permits easy finishing of the restoration.
• Allows better burnishing of the metal.
• Produces more blunted and stronger margins.
STEPS OF TOOTH PREPARATION FOR INLAY
The following steps are involved in the tooth preparation for class II inlay:
Occlusal Outline Form
Anesthetize the tooth and apply a rubber dam to give better visibility, tissue retraction, and ease of operation. Penetrate the tooth with no. 271 bur held parallel to long axis of the tooth. The entry point should be closest to the involved marginal ridge (for example, mesial) (Fig. 12.16). First establish the occlusal outline. Keeping the bur parallel, extend the tooth preparation while maintaining the initial pulpal depth of 1.5 mm. At the same time as the occlusal outline is being established, a flat pulpal floor of proper depth and the occlusal walls of a uniform taper are being prepared with the same bur (Fig. 12.17). Care is used to avoid overcutting (Fig. 12.18). While maintaining the established pulpal depth and with the bur held parallel to the long axis of the tooth, extend the preparation towards the contact area of the tooth, ending short by 0.8 mm of cutting through the marginal ridge. Now extend the bur to the opposite side of marginal ridge (distal side) and move the bur facially and lingually to make occlusal dovetail which provides retention to the restoration (Fig. 12.19). Conserve the marginal ridge on the sound side of the tooth and if any faulty shallow fissure is present, it should be managed during preparation either by enameloplasty or including it using cavosurface bevel.
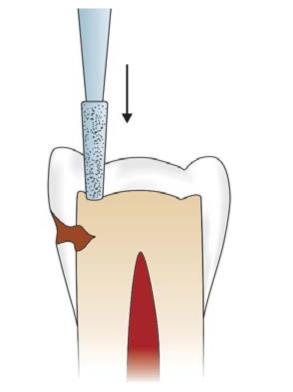
Fig. 12.16: Penetrate the bur closest to the involved marginal ridge
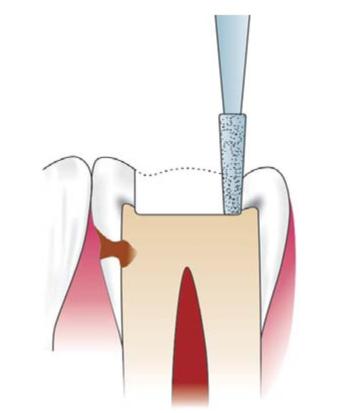
Fig. 12.17: Keeping the same depth (1.5 mm), establish the occlusal outline
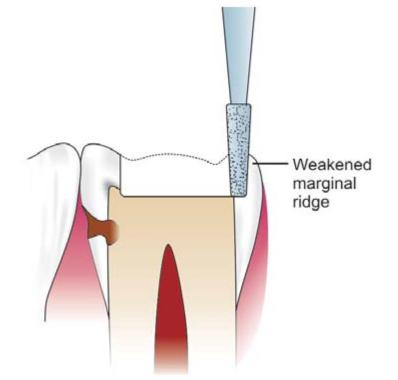
Fig. 12.18: Overcutting can result in weakening of marginal ridge
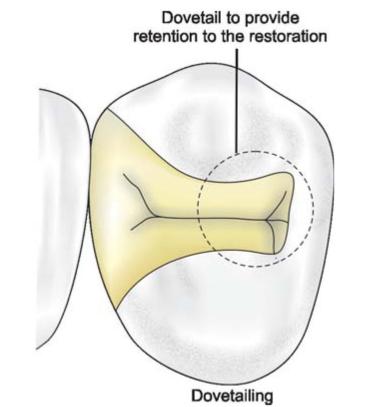
Fig. 12.19: Extension of preparation and dovetail
The width of the isthmus of the preparation on the occlusal surface should be maintained to a minimal extension for conservation of tooth structure.
Outline form should be carried onto smooth areas of the buccal and lingual slopes of the cusps of the tooth. This extension will place the margins of the casting in areas where they may be easily finished.
Proximal Box Preparation
Using the same bur, isolate the distal enamel by proximal ditch cut. Width of this cut should be 0.8 mm with 0.5 mm in dentin and 0.3 mm in enamel. Extend this ditch facially and lingually to the sound tooth structure and proceed gingivally (Fig. 12.20).
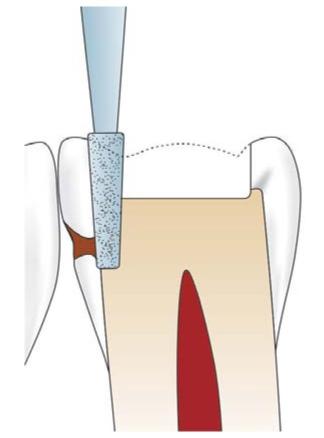
Fig. 12.20: The proximal ditch is given after occlusal preparation
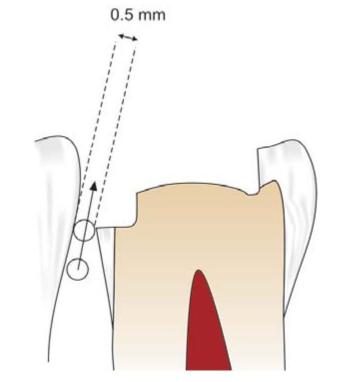
Fig. 12.21: The gingival floor should provide at least 0.5 mm clearance from the adjacent tooth
Gingival extension should remove any caries present on the gingival floor and it should provide at least 0.5 mm clearance from the adjacent tooth (Fig. 12.21). To break the contact from the adjacent tooth, make two cuts with no. 271 bur; one on facial limit and other at lingual limit of the proximal box. Extend these cuts gingivally till the bur is through the marginal ridge. Keep a small slice of enamel at the contact area to prevent accidental damage to the adjacent tooth. If there is any doubt that accidental damage to the adjacent tooth can occur, use a metal matrix band interdentally. This will offer some protection to the adjacent tooth.
The remaining thin slice of unsupported enamel wall can be removed using han/>
Stay updated, free dental videos. Join our Telegram channel
VIDEdental - Online dental courses


