TOOTH PREPARATION FOR CLASS I AMALGAM RESTORATION
• Initial Tooth Preparation
• Final Tooth Preparation
• Tooth Preparation on Occlusal Surface of Different Teeth
• Tooth Preparation on Occlusal Surface with Buccal or Lingual Extension
CLASS II TOOTH PREPARATION FOR AMALGAM RESTORATION
• Modifications in Class II Preparation Design
CLASS III TOOTH PREPARATION FOR AMALGAM RESTORATION
CLASS V TOOTH PREPARATION FOR AMALGAM RESTORATION
CLASS VI TOOTH PREPARATION FOR AMALGAM RESTORATION
STEPS OF AMALGAM RESTORATION
TOOTH PREPARATION FOR CLASS I AMALGAM RESTORATION
Class I.• Pit and fissure preparations occur on the occlusal surfaces of premolars and molars, the occlusal two-third of buccal and lingual surface of molars, lingual surface of incisors and any other abnormal position.
The basic principles of tooth preparation are as follows:
1. Initial tooth preparation:
• Outline form
• Primary resistance form
• Primary retention form
• Convenience form
2. Final tooth preparation:
• Management of remaining caries
• Secondary resistance and retention form
• Pulp protection, if required
• Finishing of enamel margins
0 Final inspection of the preparation
1. Initial Tooth Preparation
Outline Form
The outline form means extending the preparation margins to the place they will occupy in the final preparation. Following facts, must be kept in mind while making outline form:
• Removal of all carious and defective pits and fissures to healthy tooth structure.
• Removal of all unsupported enamel rods
• To avoid ending preparation margins in high stress areas like cusp tip and crest of the ridges.
• Placing margins on sound tooth structure.
Steps
• With the help of no. 245 bur, establish the external outline form to extend all margins into sound tooth tissue.
• Bur should be kept parallel to long axis of the tooth to make a ditch in the carious portion of the tooth and it should be rotating when applied to the tooth and should not stop rotating until removed.
• Maintain the initial depth of 1.5 mm, this is approximately one-half the length of the cutting bur. This should be, at least 0.2 to 0.5 mm in dentin to provide adequate strength to resist fracture due to occlusal forces (Fig. 10.1). While maintaining the same depth and bur orientation, move the bur to extend the outline to include the central fissure. The margins of preparation not only extend into sound tooth tissue but also involve adjacent deep pits and fissures in the preparation.
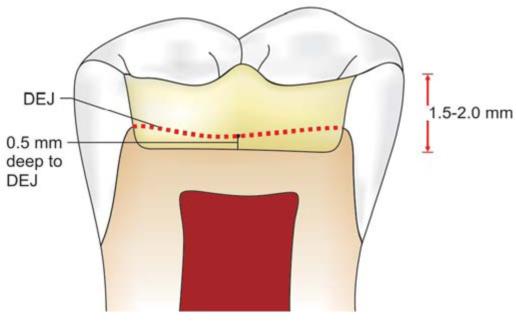
Fig. 10.1: Initial depth of 1.5 mm should be maintained while preparing outline form
• Extend the margin mesially and distally but do not involve marginal ridges. These walls should have dovetail shape to provide retention to the restoration (Figs 10.2A and B).
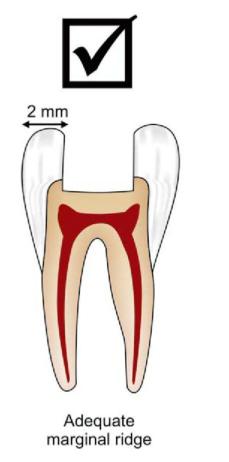
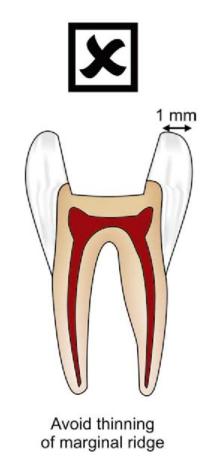
Figs 10.2A and B: (A) Sufficient marginal ridge, (B) Overcutting of marginal ridge causes thinning
• While working towards mesial and distal surface, orient the bur towards respective marginal ridge. This will result in slight divergence of mesial and distal walls which helps to provide dentinal support for marginal ridges (Fig. 10.3).
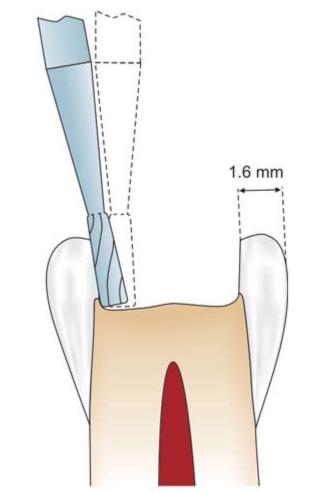
Fig. 10.3: Sometimes slight divergence of mesial and distal wall is done so as to have dentinal support of marginal ridges
• The isthmus width should be as narrow as possible, it should not be wider than the intercuspal distance.
• The deep pit and fissure defects less than 0.5 mm apart should be included within the outline form.
• The external outline form should have smooth curves, straight lines and rounded angles. All unsupported and demineralized enamel should be removed.
• Enameloplasty is the careful removal of sharp and irregular enamel margins by “rounding” or “saucering” it and forming a easily cleansable area. The enameloplasty should not extend the outline form. The use of enamelo-plasty should be done in ends of fissures whenever needed.
Primary Resistance Form
Resistance form is that shape given to a preparation planned to afford such a seat for the restoration so as to best enable it to withstand the occlusal stresses. Primary resistance form should have following features:
• Shape of the preparation should be like a box with flat floor (Fig. 10.4). This helps the tooth to resist occlusal masticatory forces without any displacement. Though it should be flat, at the same time it should follow the contour of occlusal surface (Fig. 10.5).
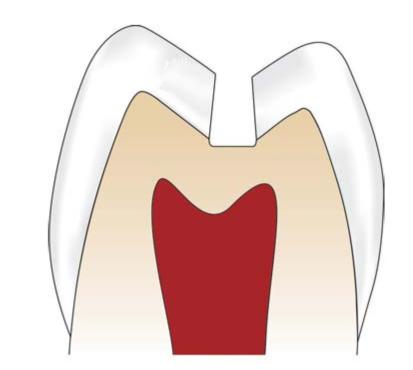
Fig. 10.4: Box shaped preparation to provide resistance form
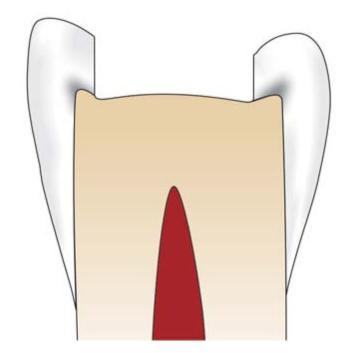
Fig. 10.5: Though pulpal floor is flat but it should follow the contour of occlusal surface
• To provide adequate thickness of amalgam keep the minimum occlusal depth of 1.5 mm.
• Provide the cavosurface angle of 90° (Fig. 10.6).
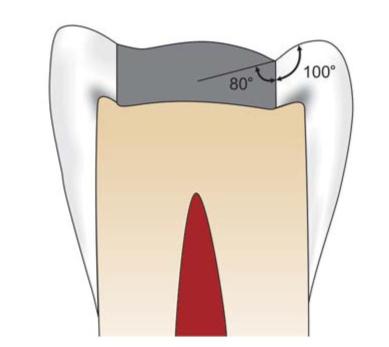
Fig. 10.6: Amalgam-tooth interface should have butt joint
• Restrict the extension of external walls so as to have strong marginal ridge areas with sufficient dentin support.
• Include all the weakened tooth structure.
• Round off all the internal line and point angles (Figs 10.7A and B).
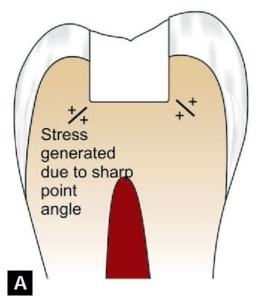
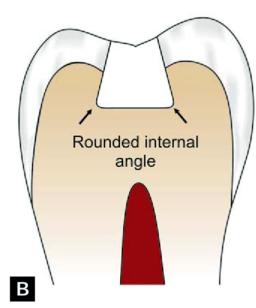
Figs 10.7A and B: Internal angles of preparation should be round; (A) Sharp angles lead to stress concentration, (B) Rounded internal angle
• Consider capping of cusp for preserving cuspal strength.
Primary Retention Form
Primary retention form prevents the restoration from being displaced.
Retention can be increased by the following:
• Occlusal convergence (about 2 to 5%) of buccal and lingual walls (Fig. 10.8).
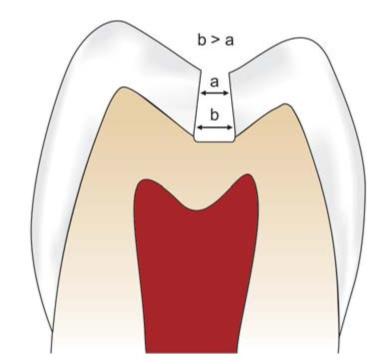
Fig. 10.8: Convergence of walls to provide retention to amalgam restoration
• Giving slight undercut in dentin near the pulpal wall (Figs 10.9A and B).
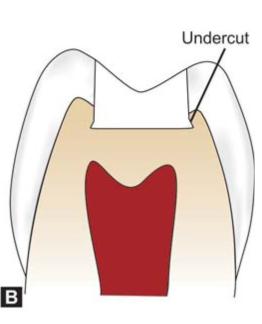
Figs 10.9A and B: Undercuts in dentin wall to provide retention of restoration
• Conserving the marginal ridges.
• Occlusal dovetail.
Convenience Form
The convenience form of the preparation facilitates and provides sufficient visibility, accessibility and ease of operation in preparation and restoration of the tooth. For amalgam restoration, it is the form or shape that also permits access of condensing and carving instruments.
2. Final Tooth Preparation
Removal of Remaining Carious Dentin
In this, remaining caries, old restorative material and adjacent deep pits and fissures are also removed and involved in the preparation.
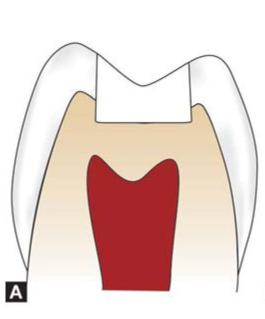
In the large preparations with soft caries, the removal of carious dentin is done with spoon excavator or slow speed round bur (Figs 10.10A and B). In this, two-step pulpal floor is made, i.e. only portion of tooth which is affected by caries is removed, leaving the remaining, floor untouched (Figs 10.11A to C).
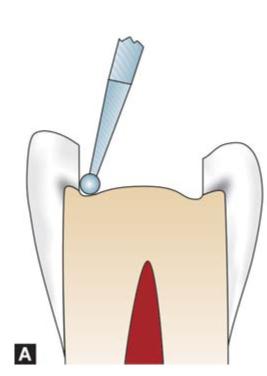
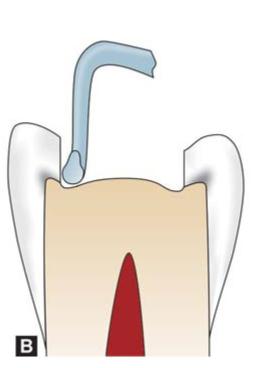
Figs 10.10A and B: (A) Removal of remaining caries using round bur, (B) Removal of caries using spoon excavator
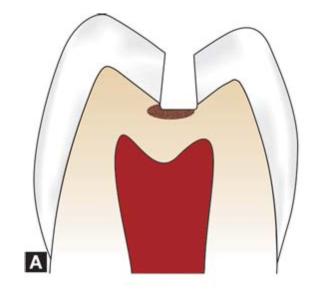

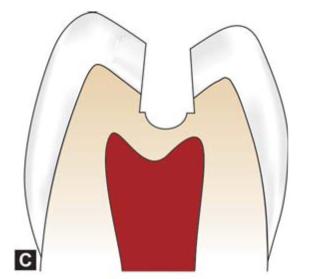
Figs 10.11Ato C: (A) Caries present beyond tooth preparation, (B) Overpreparation of tooth in an attempt to involve caries, (C) Stepped pulpal floor to involve carious lesion
Protection of Pulp if Needed
Use of pulp protective materials depends upon following factors:
• A base is not needed in shallow preparations, as it compromises thickness and thus compressive strength of amalgam.
• In a deep preparation, a base is placed on the deepest part in the thickness of 0.5 to 0.75 mm, so as to protect pulp (Fig. 10.12).
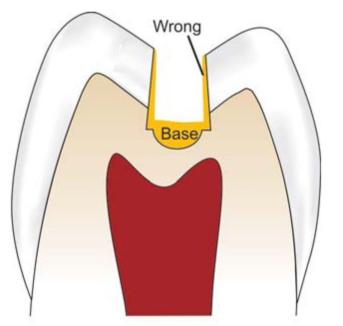
Be sure that no trace of the base material remains on enamel walls of preparation (Fig. 10.13), as this would eventually dissolve in the oral fluids leaving a gap between the restoration and the tooth resulting in microleakage and recurrent caries.
The selection of bases for amalgam restorations are based on two factors:
• It should have sufficient strength to support the forces of amalgam condensation
• It should be able to strengthen the restoration under masticatory stresses.
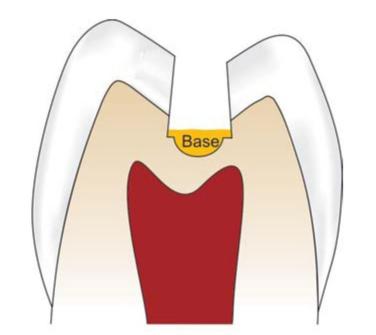
Fig. 10.12: In deep preparations, base is applied on pulpal floor so as to protect pulp
Fig. 10.13: Do not place base on walls as it would ultimately dissolve in oral fluids, leaving a gap between tooth and restoration
The strength of the bases depends upon the size, thickness and mechanical properties of base along with preparation design, position and amount of occlusal load.
Finishing of the Enamel Walls and Margins
Finishing of walls and margins is guided by the knowledge of dental histology. At this stage all unsupported enamel is removed. Cavosurface angle, i.e. angle between enamel wall and amalgam interface should be made 90° butt joint type. This provides bulk to restoration, which in turn provides maximum strength.
Final Cleaning and Inspection of the Preparation
The final stage of tooth preparation is to clean the preparation thoroughly with water and air spray. Then dry it with moist air and inspect it for final approval.
Tooth Preparation on Occlusal Surface of Different Teeth (Figs 10.14 to 10.16)
Fig. 10.14: Conservative tooth preparation on occlusal surface of maxillary first molar showing preservation of oblique ridge
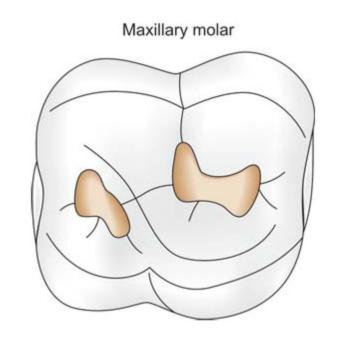
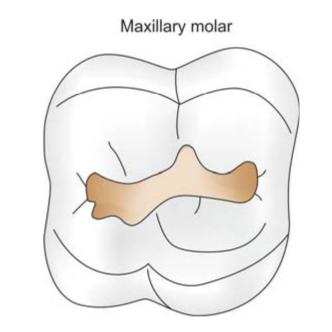
Fig. 10.15: Conventional tooth preparation of maxillary first molar involving oblique ridge
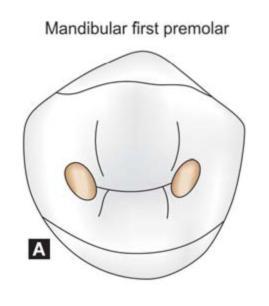
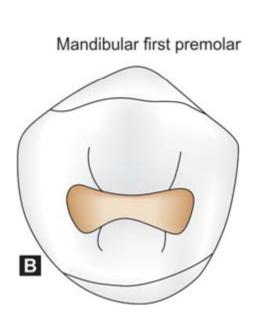
Figs 10.16Aand B: (A) Conservative class I preparation of mandibular first premolar, (B) Conventional class I preparation of mandibular first premolar
Tooth Preparation on Occlusal Surface with Buccal or Lingual Extension (Fig. 10.17)
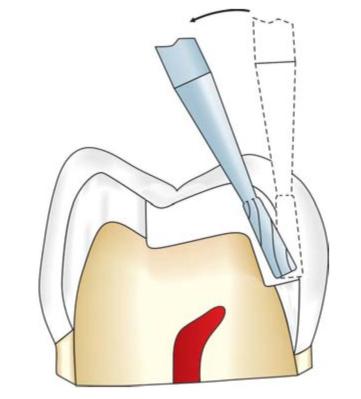
Fig. 10.17: Tooth preparation on occlusal surface with buccal or lingual extension
• For removal of caries from buccal or lingual pits and fissures, slight modification in preparation is needed.
• In this, extend the pulpal floor in the same plane to include the caries.
• Make a box type preparation with mesial and distal walls parallel.
• Place retention grooves in the mesial and distal walls.
• Remove all the unsupported enamel by using slow speed bur.
• Finally inspect the preparation to evaluate the need of additional cleaning and additional finishing.
CLASS II TOOTH PREPARATION FOR AMALGAM RESTORATION
Class II restoration involves the proximal (mesial or distal) surfaces of premolars and molars.
Class II preparation is initiated same as Class I preparation, i.e. entrance through occlusal surface.
Outline of proximal preparations is controlled by the following factors:
• Caries susceptibility of the patient.
• Age of the patient.
• Position of gingiva
• Extent of the caries on the proximal side.
• Dimensions of the contact area
• Masticatory forces.
• Esthetic requirement of the patient.
Outline form: The outline form for occlusal portion follows the same principles as given for pit and fissure lesions except that the external outline is extended proximally toward defective proximal surface.
• Using high-speed bur with air water spray, enter the pit on occlusal surface which is nearest to the involved proximal surface. Keep long axis of the bur parallel to the long axis of the tooth and maintain the initial depth of 1.5 to 2.0 mm (Fig. 10.18).
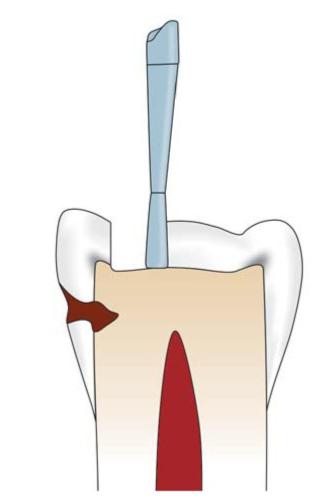
Fig. 10.18: Extend the bur keeping it parallel to the long axis of tooth
• Extend the outline to include the central fissure while maintaining uniformity in depth of pulpal floor (Fig. 10.19).
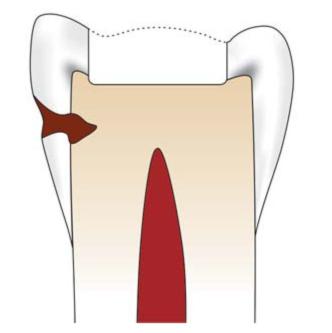
Fig. 10.19: Make the occlusal box with the uniform depth of pulpal floor
Stay updated, free dental videos. Join our Telegram channel
VIDEdental - Online dental courses


