13
Endodontic Complications
Complications not provoked by the operator may occur during endodontic treatment. However, more often they are the result of deviations from the accepted principles of endodontic treatment. The most common complications that occur during the various phases of endodontic treatment are discussed below.
Incomplete Analgesia
Is is often difficult to obtain complete local analgesia when treating inflamed pulps. The reason for this appears to be that commonly used local anesthetics like lidocaine have an inadequate effect on the C-fibers of the pulp. These fibers are activated and participate in the transmission of pain when the pulp is inflamed. However, unlike lidocaine, a local anesthetic like eugenol affects both A- and C-fibers. When applied liberally to exposed dentin and left for 1–2 minutes, eugenol will in most instances penetrate into the pulp in concentrations sufficient to have an analgesic effect on pain mediated by both A- and C-fibers. As a result, the pulp can be exposed with minimal pain. However, the effect of the eugenol is limited to only a small area of the pulp tissue immediately subjacent to the cavity. An intrapulpal injection of 0.2–0.4 mL of lidocaine or similar is, therefore, given under pressure when exposure of the pulp has been obtained. The pressure potentiates the effect of the drug and adequate anesthesia of the pulp is routinely obtained with this technique.
The intrapulpal injection is rather painful and it is important that the patient is informed beforehand about what is going to happen and why it is necessary. However, the effect of the intrapulpal injection is so profound that the patient will soon understand the benefits of enduring a short moment of pain when, as a result, further treatment is performed without symptoms.
Access Cavity
It may appear that the majority of operational mishaps and complications during endodontic treatment either occur during the preparation of the access cavity or arise from the fact that the access cavity is not given a proper size or form. The most common mistake is that the access cavity is too small (Fig. 13.1). This leads to entrapment of tissue, especially in the pulp horn areas of the crown, and to discoloration of the tooth. It also leads to difficulties in locating the canal orifices, and canals may readily be missed. In addition, if the access opening is not adequate, the root canal instruments may be improperly guided by the walls of the access cavity, increasing the risk of root perforations. Remember that the root canal orifices in a tooth with more than one canal are in the peripheral corners of the floor of the pulp chamber.
The reduction of cusp height is often beneficial in improving access to a root canal. Weak cusps should always be cut or reduced, also to prevent crown or crown-root fractures. Such fractures are often untreatable and in most instances could have been prevented if a cusp were cut in conjunction with the access cavity preparation.
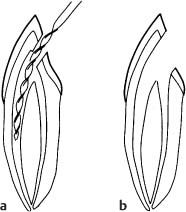
Fig. 13.1
a Diagram illustrating the effect of an access cavity that is too small. The lingual canal cannot be located and will be missed.
b Correct access cavity. The root canal orifices are visualized and both canals can be instrumented.
Perforations from the Pulp Chamber
A common complication during access cavity preparation is perforation of the root with a bur (Fig. 13.2). This usually occurs because the operator has not studied the dimensions and form of the crown and pulp chamber of the tooth and the direction of its roots. A good radiograph taken with the paralleling technique is helpful in this regard.
Due to the limited length of the shank of the bur, perforations from the pulp chamber will be in the cervical area of the tooth, either laterally or in the furcation region. The lateral perforations should, if at all possible, be exposed surgically and restored like a class 5 cavity. A furcation perforation, on the other hand, if restorable, has to be repaired from the pulp chamber. In principle, the materials that are used for retrograde root canal fillings can be used for this purpose, and success or failure will depend on whether or not it is possible to seal the perforation and to prevent an infection becoming established in the periodontal tissues (Fig. 13.3). Therefore, time is of the essence and if a furcation perforation occurs, it should be repaired immediately.
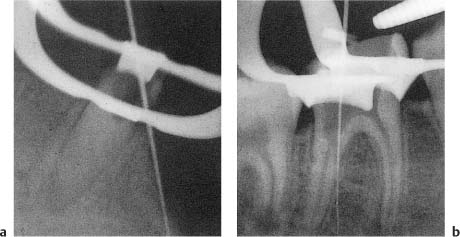
Fig. 13.2 Radiographs of teeth with root perforations with burs during attempts to locate root canal orifices.
a Lateral perforation.
b Furcation perforation. The rubber dam has caused the operator to lose his sense of direction and it should not have been applied until the root canal was located.
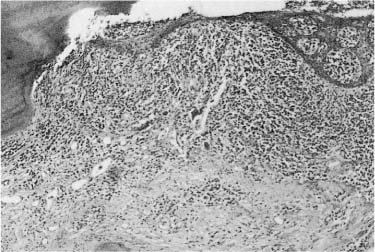
Fig. 13.3 Section from a tooth with unsuccessful treatment of a furcation perforation. The bone in the furcation area has resorbed and granulomatous tissue is present. The inflammation has resulted in the development of a periodontal pocket, and epithelium has grown down from the sulcus and is covering the tissue in the furcation (hematoxylin-eosin).
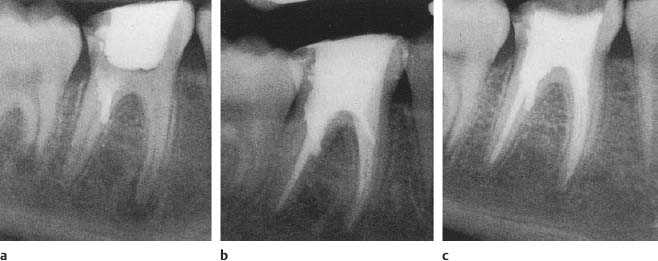
Fig. 13.4 Radiographs showing treatment of the tooth in Fig. 13.2b.
a The perforation canal is filled with material (s) forming a bacteria-tight seal. The pulp chamber is then sealed and the patient is dismissed.
b The endodontic treatment is completed at the second visit when the material in the perforation canal has set so that the seal is not disturbed.
c One-year control. Normal interradicular and periapical conditions are observed.
The treatment is done aseptically. The pulp chamber is cleansed with sterile saline or anesthetic solution and the bleeding is stopped with sterile cotton pellets and paper points. A material which gives a bacteria-tight seal is then carefully packed into the perforation cavity (Fig. 13.4). If the opening to the periodontal ligament is wide, it is advantageous to pack calcium hydroxide against the periodontal tissues as a matrix against which the material may be condensed. In this way, the impingement of the material on the periodontium may be somewhat limited. When the perforation has been sealed, the access cavity is immediately closed and the treatment is not continued until a following visit.
Root Perforations
Apical Perforations
Root perforations may also occur during the instrumentation of the root canal. They usually occur in the apical third of curved roots at the outer-curve aspect of the root (Fig. 13.5). There are three main reasons for this perforation: An inadequate access cavity, failure to precurve a rigid steel root canal instrument, especially if it also has an active tip, and the use of too large an instrument too quickly to reach the working length. Often it is a combination of two or all three of these mistakes. However, with the availability of flexible nickel-titanium instruments with noncutting tips today, perforations of curved roots fortunately have been greatly reduced.
When a perforation has been diagnosed, an effort has to be made to get back into the root canal using a small (no. 8–15), sharply curved K-file and liberal amounts of a chelating agent (ethylenediamine tetraacetic acid, EDTA). If the original canal is found, it is instrumented in the normal fashion and is filled, ignoring the perforation. Tissue fluids and blood will then fill the perforation canal and if a bacterial infection was prevented or has been eliminated, will be organized to new connective tissue (see pp. 98, 99) (Fig. 13.6).
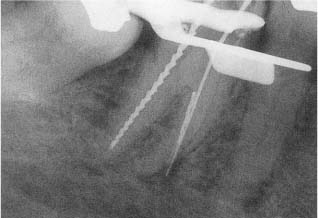
Fig. 13.5 Radiograph of a mandibular molar with apical perforation at the outer-curve aspect of the mesial root during instrumentation.
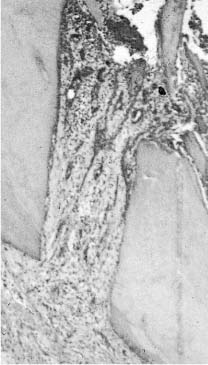
Fig. 13.6 Section of a tooth with apical root perforation. Connective tissue from the periodontal ligament has grown into the perforation canal (hematoxylin-eosin).

Fig. 13.7 Radiograph of a mandibular molar with apical perforation at the outer-curve aspect of the mesial root. In this instance it was possible to regain access to the root canal apically to the perforation so that it could be instrumented. Perforation canal and root canal were then obturated.
However, if the perforation canal is 3 mm or longer, it should be filled like a branching root canal (Fig. 13.7). This may be extremely difficult. An electronic apex locator is useful in such instances to aid in determining the exact location of the root surface. As a basis for the obturation attempt, it must be understood that overfilling is almost inevitable because of the tubal shape of the canal without the slightest indication of an apical stop. A gutta-percha point is selected which gives some tug back 1 mm from the root surface as indicated by the apex locator. The gutta-percha point is then marked at an occlusal point of reference, taken out, coated sparingly with a sealer, and reinserted into the canal to the predetermined level. It is immediately seared off with a hot K-type instrument at the entrance to the perforation canal and smoothed against the root canal wall so as not to interfere with the obturation of the canal proper.
The treatment approach described above often fails because of technical difficulties. Attempts have been made, therefore, to treat root perforations long term with calcium hydroxide to obtain a hard-tissue barrier at the perforation opening (Fig. 13.8). However, for reasons not fully understood, a hard-tissue barrier forms less readily on the lateral aspects of the root than at the apical foramen, and a considerably longer induction period is needed. This method, therefore, will in most instances not be practical. On the other hand, a surgical approach may save the tooth if the perforation is in an area of the root where it can be surgically exposed. A cavity encompassing the perforation opening is then prepared into the root and filled with materials used for obturation of retrograde cavities (Fig. 13.9).
Special problems arise if the original root canal cannot be renegotiated after the root is perforated. If the perforation has occurred in an area 1–4 mm from the apex of a vital tooth, the root canal should be instrumented and filled to a level 1 mm short of the perforation opening (use an apex locator), ignoring the uninstrumented apical part of the root canal. This approach may be tried in non-vital teeth as well, but here the only chance of success is if the infection in the uninstrumented apical part of the root canal can be eliminated (Fig. 13.10). In other words, the tooth is treated as if the inaccessible part of the main root canal were a lateral canal inaccessible to instrumentation. Long-term calcium hydroxide treatment is the method of choice in these teeth since calcium hydroxide with its continuous disassociation in the tissue fluids and its long-lasting antibacterial effect renders a most effective influence on bacteria in the areas of the root canal system which are inaccessible to the instruments. However, this treatment approach may be unsuccessful. A surgical approach with removal of the uninstrumented part of the root is then usually the method of choice (Fig. 13.11).
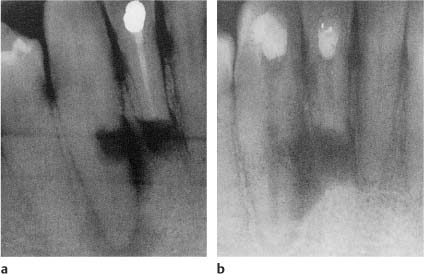
Fig. 13.8
a Radiograph of a mandibular canine with lateral perforation of the root since apicoectomy of the neighboring lateral incisor.
b Following treatment with calcium hydroxide for 26 months, a hard tissue barrier has formed, bridging the lateral perforation defect.
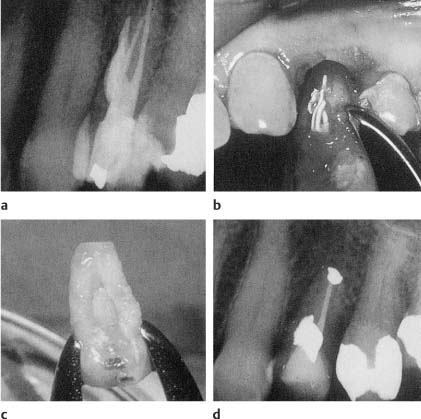
Fig. 13.9
a Radiograph of a maxillary pre-molar with root perforation/>
Stay updated, free dental videos. Join our Telegram channel
VIDEdental - Online dental courses


