Chapter 11
Dental impression materials
DEFINITION
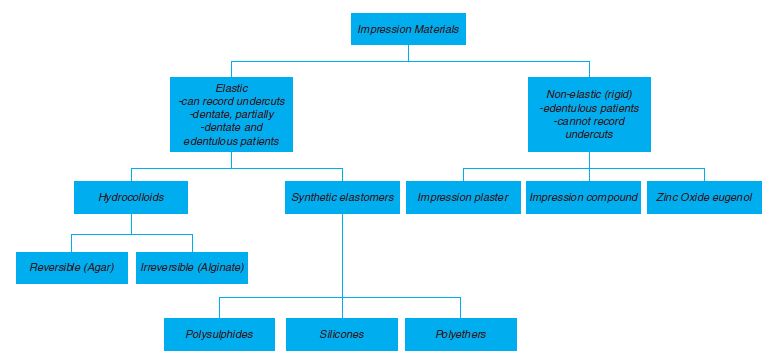
Impressions are used in the dental surgery to produce accurate (varying degrees of accuracy) negative reproductions of the patients’ teeth, surrounding tissues and dental arches. Casts (positive reproductions) are created from dental impressions and are used to fabricate various dental prostheses. Different types of impression materials are available. Technique, accuracy, taste, ease of manipulation, cost, dimensional stability and the operator’s preference will dictate the choice of impression materials (Figure 11.1).
Figure 11.1 Impression material classification (elastic properties).
Impression materials are loaded into trays in their initial low viscous form (with the exception of impression compound) and then placed in the patient’s mouth. The impression material will set chemically or physically and then may be removed from the mouth for use extra orally.
TYPES OF IMPRESSION TRAYS
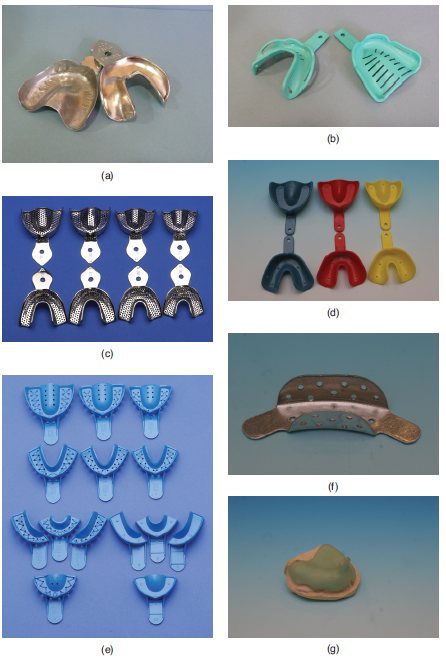
Impression trays are used to hold the impression material, allowing the operator to place it into the patients’ mouth. They may be perforated for better retention of the impression material. Different types of impression trays are shown and listed below with their distinguishing characteristics. Adhesives may be indicated with the use of some trays to aid in the retention of the impression materials.
- For use with edentulous patients
- Autoclavable
- Available in different sizes
- Not easily adapted
- Available in perforatedand non-perforated trays
- May be used in conjunction with an adhesive
- For use with edentulous patients
- Single use
- Available in different sizes
- Easily adapted using a heat source and/or impression compound
- Available in perforated and non-perforated trays
- May be used in conjunction with an adhesive
- May have a separate metal handle that is autoclavable
- For use with dentate patients
- Autoclavable
- Available in different sizes (the size is usually engraved on the handle of the tray)
- Not easily adapted
- Available in perforated and non-perforated trays
- May be used in conjunction with an adhesive
- For use with dentate patients
- Single use
- Available in different sizes (usually denoted by colours)
- Easily adapted using a heat source and/or impression compound
- Available in perforated and non-perforated trays
- May be used in conjunction with an adhesive
- For use with dentate patients
- Used for impressions of a specific areas of the mouth
- Easily adapted as it is fabricated from flexible metal
- Available in perforated and non-perforated trays
- May be used in conjunction with an adhesive
- Fabricated from a plaster model of the patient’s dentate or edentulous arch
- Fabricated from an acrylic material
- Single use
- May be used in conjunction with an adhesive
- Used to take an impression of both arches simultaneously
- Fabricated from a combination of plastic and flexible webbing material
- Different sizes available
- Single use
- May be used in conjunction with an adhesive
Figure 11.2 (a) Edentulous metal impression trays. (b) Edentulous plastic perforated impression trays. (c) Dentate metal perforated impression trays. (d, e) Dentate plastic perforated ‘stock’ trays. (f) Universal sectional impression trays. (g) Custom/special tray. (h–m) Triple tray®. (n, o) Set up for Reversible Hydrocolloid Impression Material.
DECONTAMINATION OF IMPRESSIONS
It is necessary to decontaminate impressions to prevent cross-contamination. Once an impression is removed from the patient’s mouth, the following procedure should be undertaken:
Wearing personal protective equipment:
- Inspect the dental impression for blood and/or debris. Wash in a designated sink to remove the same
- The disinfection process will be impeded without adequate removal of blood and/or debris
- Follow the manufacturer’s instructions in relation to the immersion of the dental impression in a disinfectant solution for material compatibility and length of immersion
- After impression decontamination, rinse impression in the designated sink
- It is essential that good cross-infection control practices are followed during impression decontamination; avoid contamination of immersion bath and sink. If contamination occurs, disinfect
- Disinfected impressions should be prepared for the laboratory by placing in a sealable bag, taking care to not cross-contaminate the bag. Seal the bag
- Complete laboratory prescription ensuring that the date, time and solution of disinfectant is recorded
- Staple laboratory prescription to the sealed bag above the seal, taking care to not perforate bag
- Transport to the dental laboratory
When receiving laboratory work, disinfect and rinse prior to inserting into the patient’s mouth.
(Adapted from the Cross Infection Control Policy, Dublin Dental Hospital, 2010.)
ELASTIC IMPRESSION MATERIALS – HYDROCOLLOID IMPRESSION MATERIALS
A. Reversible Hydrocolloid Impression Material (Agar)
Agar impression materials have been largely replaced by rubber impression materials.
Material constituents/composition
Supplied as a gel in a tube
- Agar
- Borax
- Potassium sulphate
- Alkyl benzoate
- Colours
- Flavours
- Water
Properties
- The material has two forms: sol (fluid) and gel (more viscous)
- Hydrophilic
- Once set to the gel state, given the right temperature, it can be reversed to the liquid (sol) state
Advantages
- Accurate
- High definition
- Easy to manipulate
- Used for hard and soft tissue impressions
- Economical
- Non-toxic
- Non-staining
- Hydrophilic
Disadvantages
- Longer preparation time
- Tears easily
- Long setting time
- Needs to be poured immediately
- Initially expensive to purchase specialised equipment
- Dimensionally unstable
- Claims to be reusable, but due to infection control issues this is not acceptable
Indications and contraindications for use
Indications
- Full-arch impressions
- Quadrant impressions
- Partial denture impressions
Contraindications
- Trays are very bulky and may not be tolerated by certain patients
Trade names
| Trade name | Manufacturer |
| Hydrocolloid Agar Blue | VanR |
Manipulation
There is no manipulation needed for agar impression materials, but a special water bath with three compartments (Figure 11.1n) is needed to facilitate the use of this impression material. Care must be taken to ensure that the water bath is not contaminated during use (Figures 11.2n–11.2o).
Mixing time
- There is no mixing needed
Setting time
- 5 minutes
Instruments and materials used in set-up
- Desired impression material
- Syringe, needle
- Impression tray
- Tubing
- Tissue and rinse cup for the patient
- Laboratory bag
- Laboratory prescription
- Special water bath with three compartments
B. Irreversible Hydrocolloid Impression Material (Alginate)
Alginate is one of the most commonly used impression materials in the dental surgery with wide range of uses. It is mixed with water to achieve the desired mixture.
Material constituents/composition
Available in jars, bulk packaging and pre-measured packs. A measuring scoop and water measure are included with the alginate materials.
- Salt of alginic acid
- Trisodium phosphate
- Fillers (diatomaceous earth)
- Colours
- Flavours
- Calcium sulphate dehydrate
- Potassium sulphate
Properties
- Available in regular and fast-set forms
- Dust-free powder
- Working and setting times may be adjusted by increasing or decreasing the temperature of the water (increasing temperature, decreases working and setting times and decreasing temperature increases working and setting times)
- Optimal water temperature is 21ºC
- Some materials are available that change colour as they change state; this aids in ensuring that materials are completely set prior to removal from the mouth
Advantages
- Easy to manipulate
- Cheap
- Rapid setting
- Elastic properties make it a suitable material for taking impressions where there are undercuts
- Hydrophilic
Disadvantages
- Poor dimensional stability
- Models must be poured within one hour and kept moist until poured
- Not as precise as secondary impression materials
- Room temperature and humidity can affect working and setting time of alginate
Indications and contraindications for use
Indications
Impressions for:
- Study models
- Removable partial dentures
- Fabrication of temporary/provisional crowns and bridges
- Fabrication of custom/special trays
- Orthodontic applicances
- Bleaching trays
- Mouth guards
Contraindications
- Not as accurate as other products so they are not suitable for crown and bridge impressions
- Care must be taken when taking impressions of patients with strong gag reflexes
Trade names
| Trade name | Manufacturer |
| Blueprint Cremex | Dentsply |
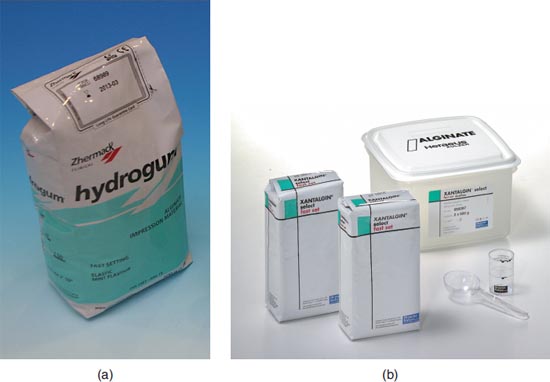
| Hydrogum® (Figure 11.3a) | Zhermack |
| IntegraTM | Kerr |
| Jeltrate® | Carson Dental |
| Kromopan® 100 | Kromopan |
| Xantalgin® Select (Figure 11.3b) | Heraeus |
Figure 11.3 (a) Hydrogum® – Ahermack. (b) Xantalgin® Select – Heraeus.
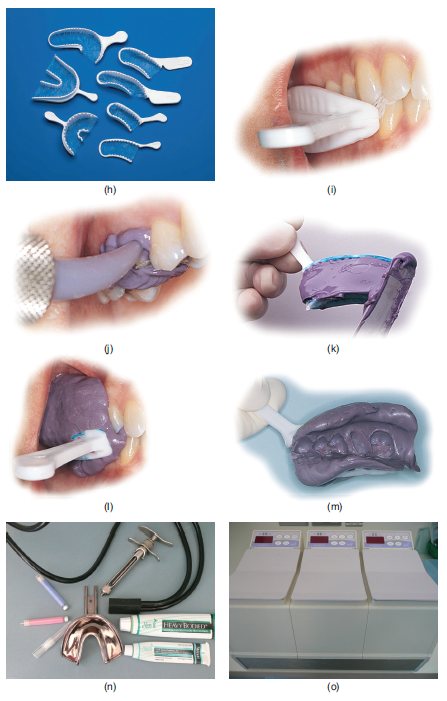
Manipulation (Figures 11.4a–11.4k)
Wearing personal protective equipment:
- The patient’s oral cavity should be free of debris prior to taking alginate impressions
- Pass the operator the impression tray (maxillary or mandibular) for try-in (if needed, add impression compound to alter or extend the impression tray)
- Ensuring to not cross-contaminate the bottle, use a disposable applicator brush to apply tray adhesive to the impression tray if indicated (it is best practice to dispense some adhesive and then use a disposable brush to apply over the impression tray to avoid contamination)
- Ensure that tray adhesive is painted on the rim area of the impression tray as well as the body
- Fluff the alginate in the jar and dispense the alginate powder using the measuring scoop provided by the manufacturer (overfill the scoop from jar and level using a disposable tongue depressor or a sterilised fish tailed spatula)
- The size of the selected impression tray will dictate the amount of material to be dispensed
- Using the water measure supplied by the manufacturer, measure out the water needed (this corresponds to the amount of powder dispensed)
- The ideal temperature for the water is 21°C
- Communicate with the dentist when the mixing should commence and add the powder and water
- Mix the powder and water with a stirring motion, using the tip of the spatula
- Turn the bowl on its side in the palm of your hand and rotate the bowl, continuing to mix the material with the wide part of the spatula blade until a homogenous mixture is achieved
- Gather the alginate in the bowl and using the blade of the spatula, pick up the material to load the impression tray
- Load the impression tray using the spatula
- The mandibular tray is loaded from the lingual using an overlapping technique to ensure the tray is completely filled
- The maxillary tray is filled from the posterior region and material is continuously added with pressure until the tray is full
- Extra impression material may be required for the operator to manually insert in the event that a patient has a high palate
- Leave some excess material on the back of your gloved hand – this is used to check if the material is set after placement in the oral cavity
- Once the impression tray is filled, hand the tray to the operator extending the tray handle first
- Remove excess material from spatula and flexible mixing bowl and dispose of in the contaminated waste bin
Figure 11.4 (a) Irreversible Hydrocolloid Impression material set-up. (b) Step 3 – Painting the stock tray with adhesive on an impression tray prior to use. (c–e) Step 4 – dispensing the powder. (f) Step 5 – Water mea/>
Stay updated, free dental videos. Join our Telegram channel
VIDEdental - Online dental courses


