10 Facial Implants
Treatment options for midfacial rejuvenation include lifting procedures,1–7 injectable synthetic fillers,8–12 autologous fat13–16 and facial implants.17–21 Each treatment option carries advantages and disadvantages, but in this author’s opinion, midface implants are an optimum choice in the average patient for multiple reasons. Facial implants are a unique solution to augmenting the aging face and enhancing the youthful face. Although many types of lifting and filling procedures exist, facial implants offer a permanent but reversible solution. This sounds like an oxymoron, but the fact is that when placed in the subperiosteal plane and anchored with screw fixation, there is nowhere for them go. They will not descend or displace with the rest of the soft tissues of the aging face; hence they are permanent. Silicone implants can easily be removed, because they become surrounded with a well-defined tissue capsule, and removal generally only takes minutes. Lifting procedures will relapse, temporary fillers will be resorbed, injected fat can atrophy, and permanent fillers can become ptotic with the surrounding soft tissues, so the advantages of permanent augmentation are obvious.
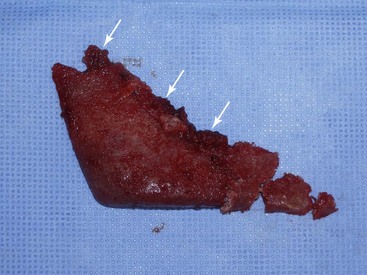
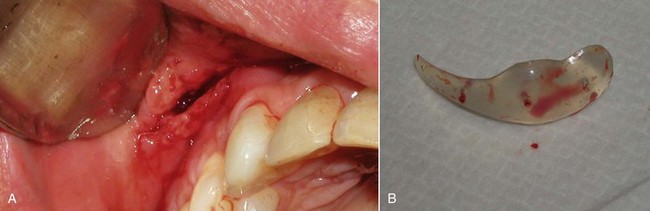
Numerous materials exist for U.S. Food and Drug Administration (FDA) approved implants: silicone rubber, expanded polytetrafluoroethylene (ePTFE; Gore-Tex), and porous polyethylene. All these implants are biocompatible, and although any implant can be successful when properly integrated, each material has advantages and disadvantages. At the time of this publication, no major U.S. company sells solid ePTFE facial implants. Many surgeons utilize porous polyethylene implants, but these can have significant drawbacks. Being rigid, they do not conform to underlying bony anatomy, as do flexible implants, and are more difficult to trim or adjust. When placing flexible implants, smaller incisions can be utilized, and the implants can be twisted and bent to facilitate insertion. If a hard, solid implant sits off the bone, its ridge can be very sharp and palpable, whereas a soft, flexible implant will be much less noticeable. Most of these drawbacks are noncritical, but the biggest drawback to porous polyethylene implants is their difficulty of removal. The porous nature of the material makes tissue integration significant. This can be a positive influence in terms of stabilizing the implant but also present extreme difficulties when attempting removal. As have other surgeons, I have spent many difficult hours removing porous polyethylene implants. Since there is no distinct fibrous encapsulation and distinct tissue ingrowth, the removal can be very traumatic. It is not uncommon to disrupt muscle and other soft tissue that become attached to the implant surface (Figure 10-1). This can also damage surrounding nerves that become entrapped in the tissue mass. These implants can become so adherent that they fragment upon removal, leaving remnant tiny pieces that are difficult to completely débride or remove.
Midface Implants
Implant Selection
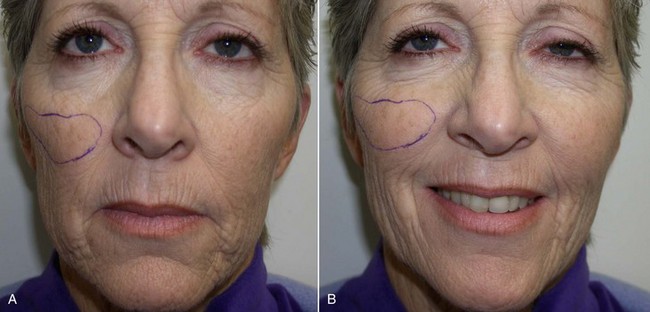
An example of submalar deficiency is illustrated in Figure 10-2, A. Figure 10-3, A shows the approximate positioning of the submalar implant. The submalar implant (ImplanTech Inc., Ventura, CA) is used in approximately 95% of my midface implant patients and is thus by far my most common implant.
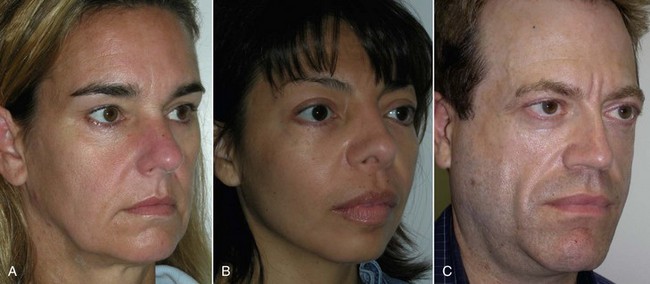
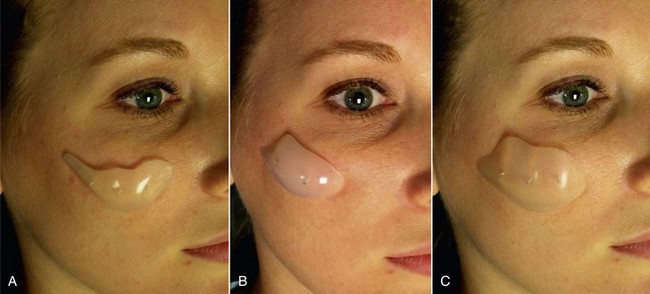
The second type of common facial aesthetic deficiency is apparent in patients who have adequate submalar and anterior maxillary fill but have deficient “cheekbones” (see Figure 10-2, B). This is the patient who has hypoplasia of the zygomaticomalar regions or simply desires a more defined or “chiseled” appearance, or in layman’s terms, “higher cheekbones.” I treat these patients with the malar shell implant (ImplanTech Inc.) (see Figure 10-3, B), which I use in approximately 1% to 2% of patients.
The third type of common midfacial aging change is seen in the patient with submalar deficiency and a need for zygomaticomalar augmentation. These patients benefit from both anterior maxillary (submalar) fill and malar (“high cheekbone”) augmentation (see Figure 10-2, C). These can be patients who have lost volume as a result of aging in both areas, or those patients who have underdeveloped skeletal anatomy. Such patients are well suited for treatment with the combined submalar shell implant (ImplanTech Inc.) (see Figure 10-3, C). This implant is designed to augment the submalar region as well as zygomatic and malar regions; it constitutes 4% to 5% of my implant cases.
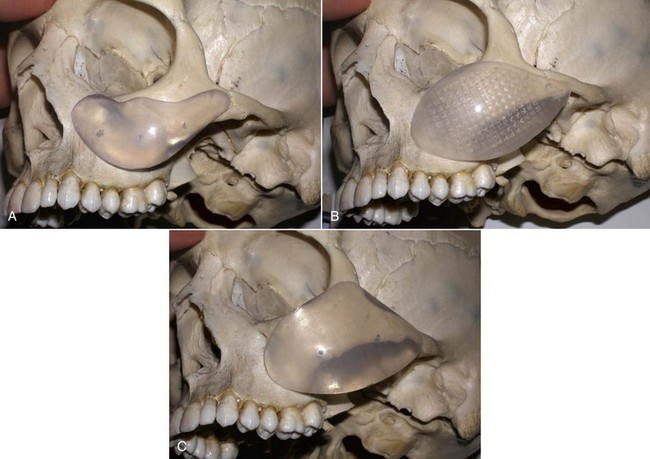
Figure 10-4 shows approximate skeletal positioning of the described implants. As stated earlier, these three implant configurations are used for the described aging changes and satisfy all of the author’s aesthetic midfacial enhancement indications.
Preoperative Planning
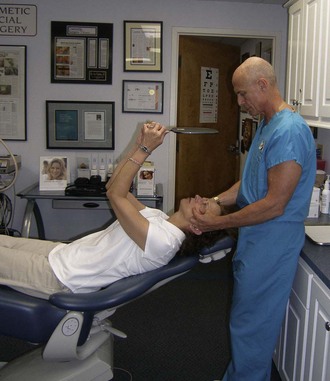
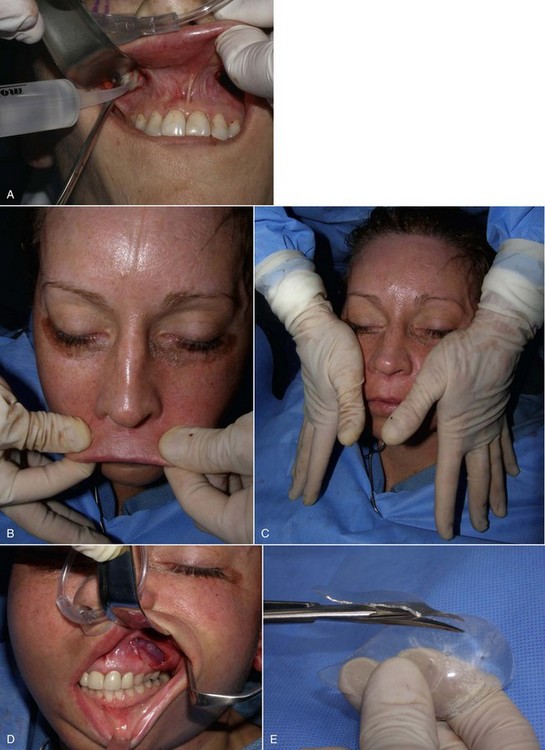
As with other facial procedures, laying the patient back in the chair and negating gravity will allow the ptotic tissues to assume a normalized position and give the surgeon and patient an idea of the surgical result (Figure 10-5).
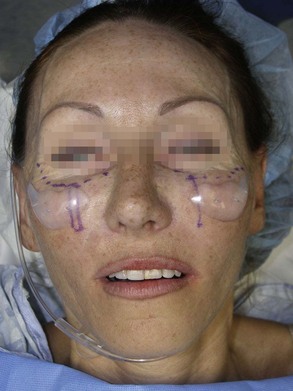
Drawing the approximate implant position on the cheeks or outlining a sample implant will provide guidance for the surgeon when the implant is placed. Care is given to making sure that both implant outlines are symmetric and in the region of desired augmentation (Figure 10-6).
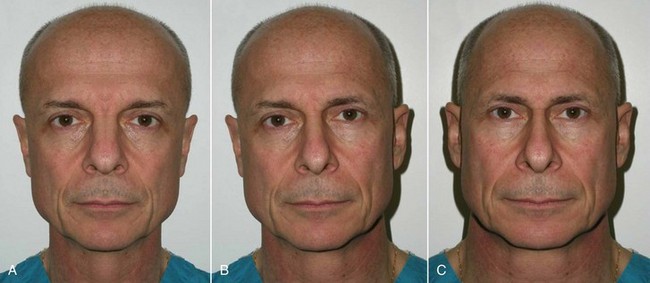
It is important to note, discuss, and document existing asymmetries with the patient before surgery. It is common for patients to have one side of the cheeks or midface bigger than the other. In extreme cases, a medium implant may be placed on one side and a large implant on the other. Most frequently, the degree of asymmetry is such that it does not alter the final result when using the same implant on both sides. To illustrate the difference in symmetry, I keep a picture of me in each consult room that shows my normal portrait and a mirrored image of the right and left halves of my face (Figure 10-7). The difference is remarkable, and I explain to the patient that the average person has similar asymmetry. Numerous times over the years, I have had to construct a similar image of a patient to point this out to them.
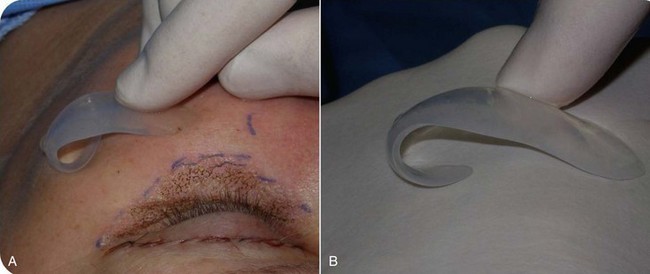
Implants can also be placed on the patient’s face just before placement; indexing marks are made to verify symmetric positioning (Figure 10-8). Noting where the medial edge of the implant lies can serve as a guide for comparison when the implants are placed intraorally. In other words, if the medial edge of the implant lies in line with the pupil or limbus, this can serve as an indexing guide when the implant is in place.
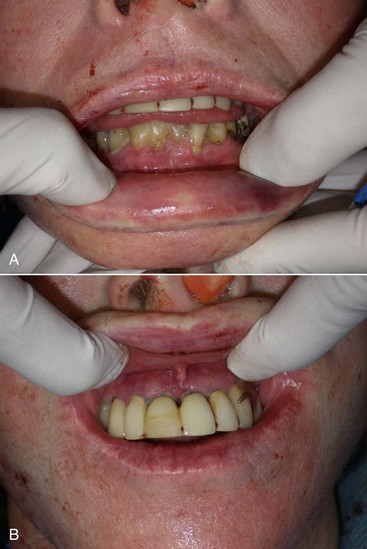
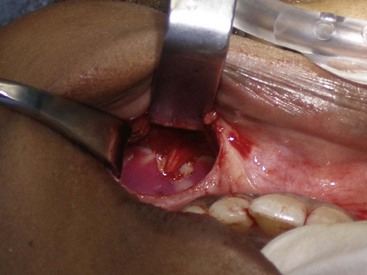
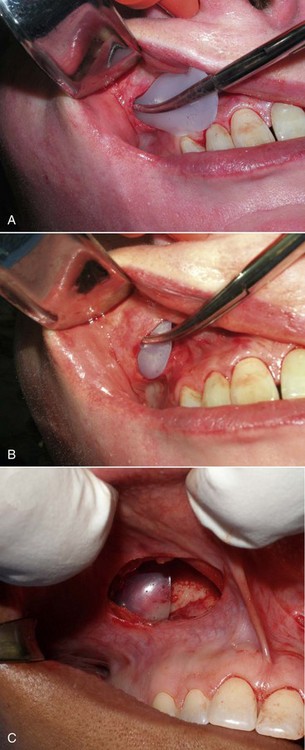
During preoperative evaluation, it is also important to evaluate the patient’s oral health. Placing implants in the presence of dental or periodontal disease can severely compromise the case and result in infection (Figure 10-9). Patients with oral disease must be treated to achieve a normal state of oral health prior to implant placement.
Surgical Placement
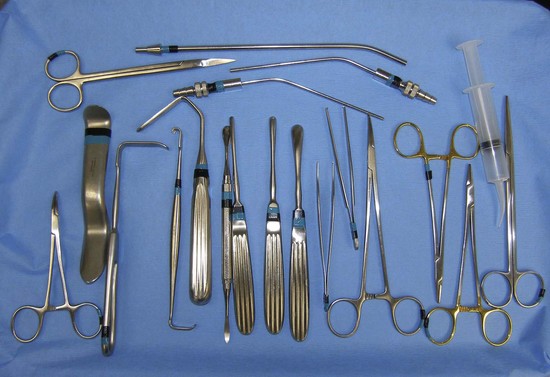
The surgical armamentarium is relatively simple for midface implant placement and does not require highly specialized instruments (Figure 10-10). A number 9 periosteal elevator, a long thin-tipped tonsil hemostat, an Aufricht nasal retractor, and a Minnesota cheek retractor are useful instruments.
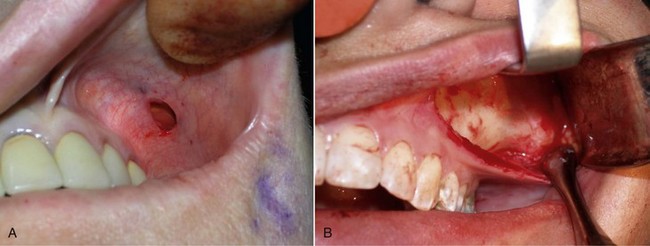
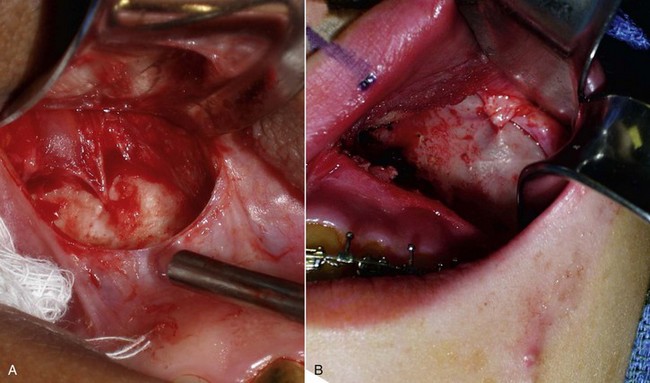
The procedure is begun by injecting about 5 mL of 2% lidocaine, 1 : 100,000 epinephrine transcutaneously in the subperiosteal plane along the region to be dissected. Since many surgeons outline the implant on the cheek, the marked area serves as a template for local injection, and the local is taken 1 cm past all margins. This usually includes the anterior maxilla, malar region, and anterior zygomatic arch region. Additionally, approximately 3 mL of the same anesthetic are infiltrated in the soft-tissue planes in the mouth above the canine tooth, primarily to reduce incisional bleeding. A 1-cm incision is made approximately 10 to 15 mm above the canine tooth (Figure 10-11). Using a radiowave microneedle to incise the mucosa and soft tissues is hemostatic, and the incision is carried to the periosteal level of the canine fossa region. The oral mucosa is very pliable, and even with a small incision, the surgical site can be well visualized when retracted (Figure 10-12). The extent of the dissection is dictated by the shape and size of the intended implant. Small or medium submalar implants require smaller dissection than combined submalar or malar shell implants. The larger or more superolaterally placed implants require a larger dissection pocket to accommodate them. The combined submalar and shell implants also require more dissection over the malar and zygomatic regions. It is important to not overdissect the implant pocket; a large pocket can contribute to implant mobility. The dissected pocket should be just slightly larger than the actual implant (Figure 10-13).
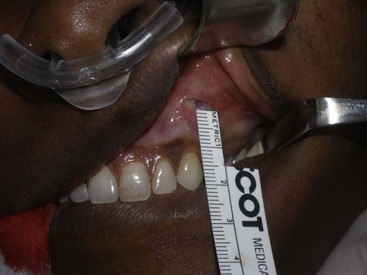
FIGURE 10-11 The initial incision is made 10 to 15 mm above the canine tooth in the unattached gingival mucosa.
When beginning the dissection, it is unnecessary to dissect medially to the pyriform (also spelled piriform) aperture (nasal region), because no part of the implant lies in this region. The subperiosteal dissection is begun in the anterior maxillary region, and the initial dissection vector is superior, so it is important to protect the infraorbital neurovascular bundle (Figure 10-14, A). The implants rarely impinge on the infraorbital nerve, and therefore aggressive infraorbital dissection is unnecessary. An exception is placing cheek implants in edentulous patients. These patients have less maxillary bone and ride higher, which can impinge on the nerve. A relief notch can be made to accommodate the nerve when necessary (Figure 10-15). When performing the initial subperiosteal dissection on the anterior maxilla, a smaller neurovascular bundle may be encountered and mistaken for the infraorbital nerve (Figure 10-16, A). The surgeon should keep in mind that the actual infraorbital nerve is 5 to 8 mm inferior to the orbital rim and not confuse it with this smaller vessel which can be sacrificed. Figure 10-16, B shows the actual infraorbital nerve exiting the foramen.
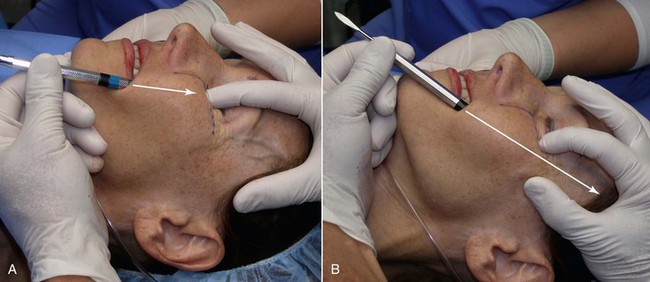
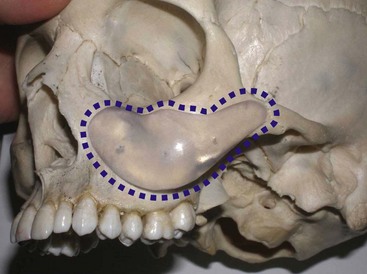
After the anterior maxilla is dissected, the periosteal elevator is angled, and the remainder of the dissection is primarily in an oblique vector (see Figure 10-14, B). This oblique vector of dissection is carried out over the malar region and extends over the medial portion of the zygomatic arch. For small or medium submalar implants, minor zygomatic dissection is required, but for combined submalar and malar shell implants, more aggressive malar and zygomatic dissection is necessary. These larger implants also require more aggressive inferolateral dissection. It is not uncommon to encounter the origin of the masseteric tendon (or muscle) while dissecting in the area (Figure 10-17). There is no need to violate or dissect this tendon or muscle, because the silicone implant can safely lie over these soft-tissue structures without a problem and frequently do with the larger-style implants.
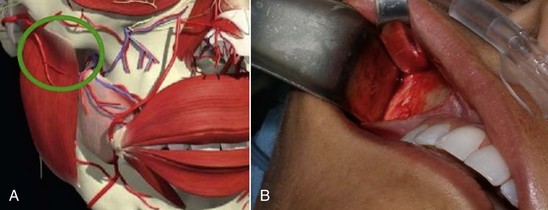
FIGURE 10-17 A, The area of the masseteric tendon and the zygoma (circle). B, Same area in a live patient.
(A Courtesy Primal Pictures Ltd., London, www.primalpictures.com.)
If the submalar implant is used, not much dissection is necessary over the zygomatic region, only enough to accommodate the tail. For larger implants such as the malar shell and combined submalar shell, more dissection may be required to accommodate the implant. By performing a sweeping maneuver in the lateral pocket, the pocket is expanded (Figure 10-18). This is especially useful over the masseteric tendon area. For very large implants, extended dissection over the malar and zygomatic arch may be necessary (Figure 10-19).
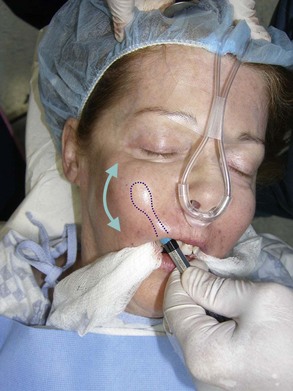
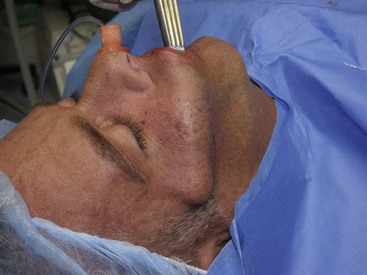
FIGURE 10-19 Larger implant styles may require more aggressive dissection at the malar and zygomatic regions.
After the implant pocket is dissected, the area is checked for hemostasis, which is imperative to prevent hematoma formation. The pocket is then irrigated with antibiotic solution and the implant placed. A long, thin tonsil clamp facilitates placement in the narrow pocket (Figure 10-20). An Aufricht nasal retractor or a Minnesota retractor is also convenient to assist visualization and placement in the pocket. The implant is grasped so that the tail is stabilized and placed into the pocket. If the pocket is correct for the implant, the prosthesis will lie passively and self-seat (Figure 10-21).
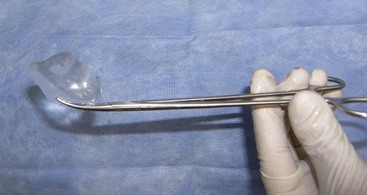
FIGURE 10-20 A long, thin tonsil hemostat is useful to place the pliable implant into a small cavity.
When inserting the implant, caution is exercised to prevent the thin implant tail from folding over on itself (Figure 10-22). Implants can be easily trimmed with scissors to further control position and augmentation.
After the implant is inserted into the dissection pocket, it is again irrigated with antibiotic solution (Figure 10-23, A). The surgeon then pushes on the external cheeks and manipulates the upper lip (see Figure 10-23, B). If these maneuvers displace the implant from the pocket or cause it to protrude out of the incision, the pocket is enlarged or the implant trimmed (see Figure 10-23, C). Trimming implants to customize them for specific anatomy is common, and there is no harm in doing this. If an implant does not fit, the surgeon can expand the pocket, trim the implant, or use a smaller configuration.
When the implant is successfully placed, a decision is made in reference to fixation. A well-conforming implant in a tight pocket can be placed without fixation, and experience has shown the implants to remain stable; some surgeons forego fixation. If the pocket is considerably larger than the implant, if the implant does not stay in the desired position, or if there is increased mobility of the implant, a single fixation screw can be placed. I have placed well over 100 cheek implants without screw fixation, but experience has shown that the procedure is more predictable when using a single fixation screw. I have since utilized rigid fixation screws on an additional several hundred cheek implants, and it is now my standard of care. I have never experienced a single case of implant shifting since switching to screw fixation and hence, recommend it. The easiest means of using screw fixation is to use 1.5- or 2-mm diameter self-drilling screws (Figure 10-24, A). This allows easy seating of the screw without the need for a drill. I generally place the screw through the implant towards its periphery (as opposed to the thick center of the implant) so a shorter screw can be used. It is important not to overtighten the screw, or it can sink into the soft implant and not hold. Additionally, the self-drilling screws are usually not available in lengths longer than 8 mm. It is important not to place the fixation in the thin bone of the anterior sinus wall; it is vulnerable to perforation or loss of fixation. The fixation screw is best placed in the thicker bone of the buttress area (see Figure 10-24, B to D). An alternate means of fixation is to place a 4-0 Vicryl suture from the anterior medial portion of the implant to the deep tissues in that area, but this is a mobile fixation and not as stable as a screw. Many facial plastic surgeons advocate the use of transcutaneous bolster sutures. I have never used these and don’t feel they are necessary. In addition, this is an unpleasant experience for the patient—no one appreciates stitches protruding through their cheek.
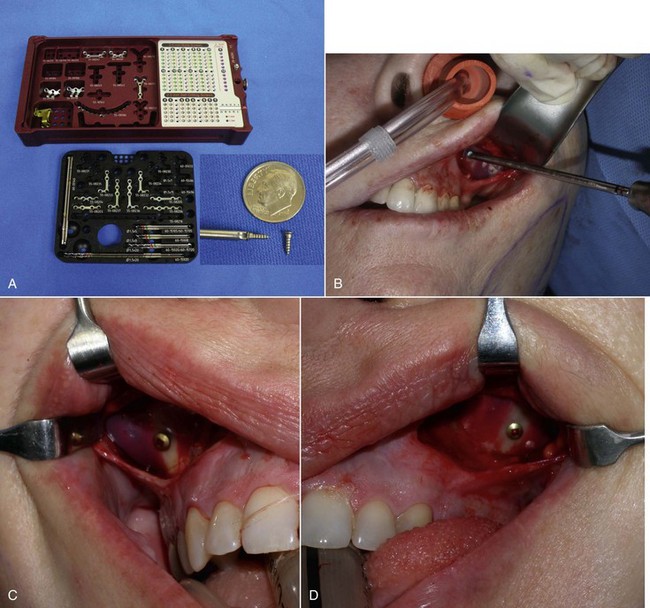
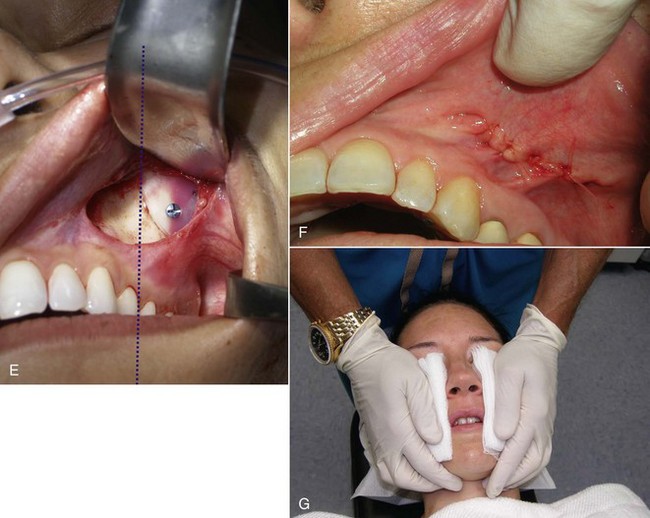
The final step is to confirm that both implants are placed in the correct position and symmetrically. This can be estimated by observing the position of the implant relative to the teeth or predrawn index marks on the face (see Figure 10-24, E).
The incision is closed with interrupted 4-0 gut suture (see Figure 10-24, F). At the end of the procedure, several layers of 4 × 4 gauze are placed on the external cheeks and palmed with the hand for 5 minutes to compress the surgical pocket (see Figure 10-24, G).
Sequelae and Complications
Although numerous complications have been described,22–28 they have been rare in the author’s experience.
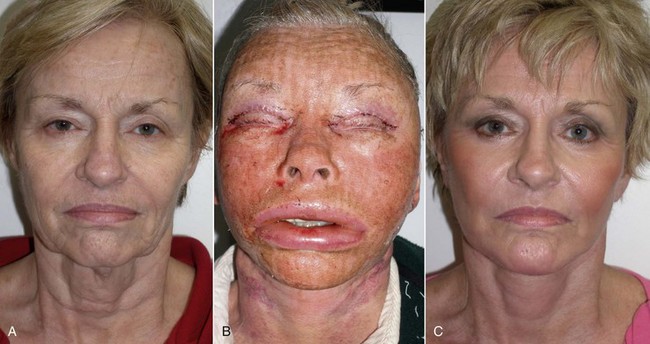
Significant edema can occur in the early postoperative period, especially if large implants are used or when implants are placed concomitantly with other cosmetic facial procedures (Figure 10-25). Cold packs and tapering steroids are routinely used. Severe swelling may indicate hematoma formation, and if the surgeon feels there is a significant hematoma, it must be drained (Figure 10-26). This can usually be done by opening the incision and suctioning the blood or clot from under or around the implant, without compromising the result (Figure 10-27). An extremely large hematoma or a continued bleeding source will require implant removal and replacement. Minor hematomas or seromas will usually heal uneventfully without treatment but in rare instances are aspirated.

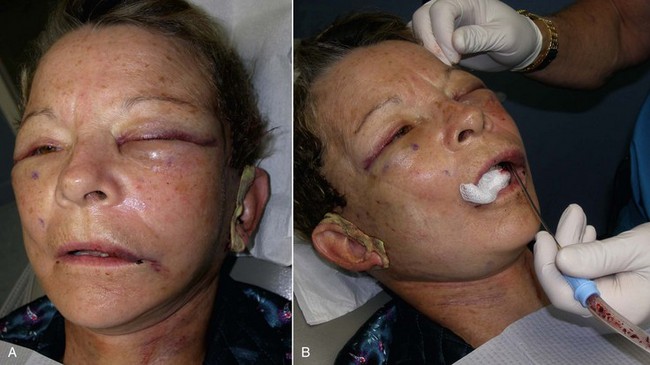
Occasionally subconjunctival or periorbital ecchymosis is seen but remains an uncommon finding (Figure 10-28).

FIGURE 10-28 Although seromas are rare, serous collections can happen and can be aspirated intraorally or percutaneously.
Infection has been an uncommon experience. It usually manifests in the first week or two and appears to be more common in smokers. Infection is generally manifested by one side failing to heal, with complaints of pain, increased swelling, periorbital edema, and purulent drainage with a bad taste. (Figures 10-29 and 10-30). The incision site will frequently be very inflamed and sometimes open. It is possible to salvage a minor infection with open incision and drainage, irrigation, and systemic antibiotics. If an implant becomes infected and is secured with screw fixation, I will attempt salvage with incision and drainage, antibiotic rinses, and systemic antibiotics. The lack of mobility assists in healing. In my experience, attempting to salvage a mobile implant is futile and should not be attempted. Resistant infections warrant implant removal, and the implant can be replaced after healing. Because the explanted site will have scar tissue and remnant implant capsule, the result is often unnoticeable. I have taken out a single implant and not replaced it, without any noticeable cosmetic deficit. In other cases, the deficient side is noticeable and must be reimplanted.
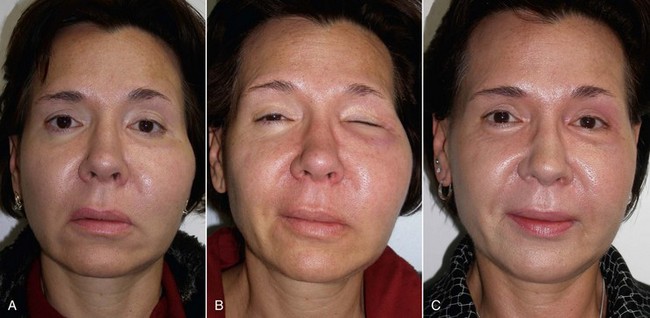
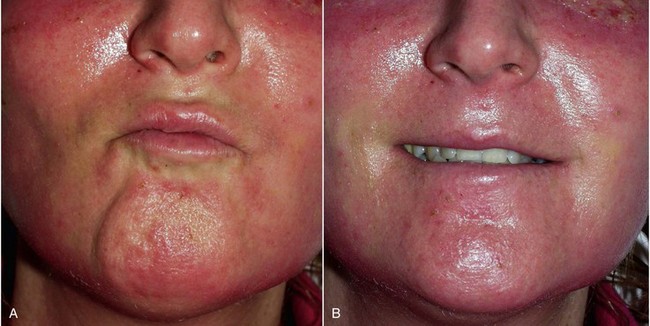
The patient must be warned that during the first 1 to 2 weeks, they will experience abnormal animation when smiling and puckering and possibly have difficulty pronouncing some words (Figure 10-31). The initial implant dissection violates the orbicularis oris and lip elevator musculature, which heals uneventfully with the return of normal animation. Patients must be made aware of this in the consent process. Occasionally, return of normal animation can take longer.
Stay updated, free dental videos. Join our Telegram channel
VIDEdental - Online dental courses


