Class I, II, and VI Direct Composite Restorations and Other Tooth-Colored Restorations
Class I, II, and VI Direct Composite Restorations
Posterior composite restorations were introduced in the late 1960s and early 1970s.1–7 Because of the improved physical properties of composites and bonding systems, studies typically report successful results for their use in posterior teeth.8–15 The American Dental Association (ADA) indicates the appropriateness of composites for use as pit-and-fissure sealants, preventive resin restorations, and Class I and II restorations for initial and moderate-sized lesions, using modified conservative tooth preparations.16 The ADA further states that “when used correctly in the primary and permanent dentition, the expected lifetime of resin-based composites can be comparable to that of amalgam in Class I, Class II, and Class V restorations.”17 The longevity of posterior composites, however, is directly related to factors such as the size of the restoration, the patient’s caries risk, and operator technique.15,18–23
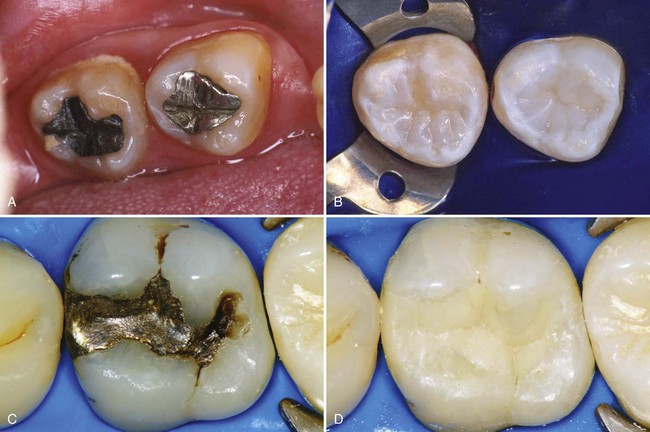
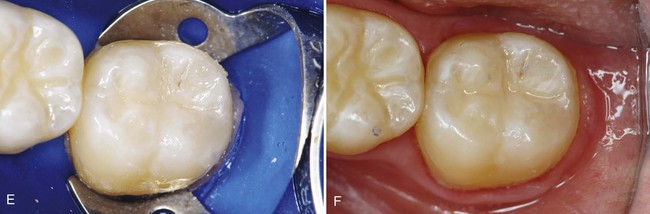
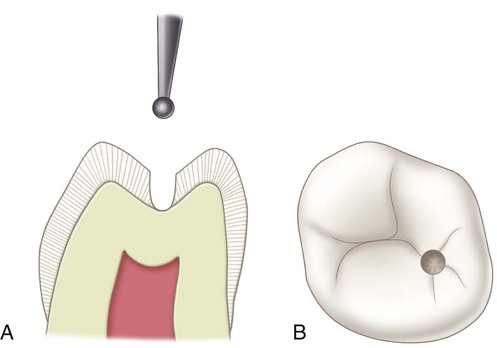
This chapter presents information about typical Class I, II, and VI direct composite restorations (Fig. 10-1), also known as posterior composite restorations. The chapter also presents information and techniques for pit-and-fissure sealants, preventive resin or conservative composite restorations, extensive Class II restorations, and foundations.
Pertinent Material Qualities and Properties
As presented in Chapter 8, composite is a material that has sufficient strength for Class I and II restorations. It is insulative and, in most cases, does not require pulpal protection with bases. Because composite is bonded to enamel and dentin, tooth preparations for composite can be very conservative. A composite restoration not only is retained well in the tooth, but also can strengthen the remaining unprepared tooth structure.24,25 Class I and II composite restorations also have all the other benefits of bonding presented in Chapters 4 and 8.
Contraindications
The main contraindication for use of composite for Class I, II, and VI restorations is an operating area that cannot be adequately isolated. Class I and II composites also may be contraindicated for large restorations when heavy occlusal stresses are present.26 In restorations in which the proximal box extends onto the root surface, posterior composites should only be used if absolutely required because of the difficulty in predictably bonding to the gingival wall absent an enamel margin. Extended (deep) gingival margins also can be more difficult to light-activate owing to their location. Whenever a defect extends onto the root surface, negative effects for the restoration may occur, no matter what restorative material is being used. Any extension onto the root surface requires the best and most meticulous efforts of the operator to ensure a successful, long-lasting restoration. This chapter presents information of alternative restorative techniques for such cases.
Disadvantages
The disadvantages of Class I and II direct composite restorations are as follows:
Pit-and-Fissure Sealants
Pits and fissures typically result from an incomplete coalescence of enamel and are particularly prone to caries. These areas can be sealed with a low-viscosity fluid resin after acid-etching. Long-term clinical studies indicate that pit-and-fissure sealants provide a safe and effective method of preventing caries.31–33 In children, sealants are most effective when they are applied to the pits and fissures of permanent posterior teeth immediately on eruption of the clinical crowns, provided proper isolation can be achieved. Adults also can benefit from the use of sealants if the individual experiences an increase in caries susceptibility because of a change in diet, lack of adequate saliva, or a particular medical condition. Most currently used sealant materials are light-activated urethane dimethacrylate or BIS-GMA (bisphenol A–glycidyl methacrylate) resins. Opaquers and tints frequently are added to sealants to produce color contrast to aid in visual assessment.
Indications
In assessing the occlusal surfaces of posterior teeth as potential candidates for a sealant procedure, the primary decision is whether or not a cavitated lesion exists. This decision is based primarily on radiographic and clinical examinations, although other technologies for occlusal caries detection are available. Explorers must be used judiciously in the detection of caries, as a sharp explorer tine may cause a cavitation. The clinical examination should be primarily focused on visual assessments of a clean tooth surface, preferably under adequate light and magnification. If the examination reveals chalkiness or softening of the tooth structure at the base or walls of the pit or groove, brown-gray discoloration radiating peripherally from the pit or groove, or radiolucency beneath the enamel surface on the radiograph, it is likely that an active caries lesion is present and a sealant may not be indicated. The patient’s caries risk also should be considered when considering treatment options. See Chapter 3 for a discussion of emerging technologies for occlusal caries detection and monitoring, including laser fluorescence and alternative current (AC) impedance spectroscopy.
Although studies show that sealants can be applied over small, cavitated lesions, with no subsequent progression of caries, sealants should be used primarily for the prevention of caries rather than for the treatment of existing caries lesions.34,35 A bitewing radiograph should be obtained and evaluated before sealant placement to ensure that no dentinal or proximal caries is evident. Only caries-free pits and fissures or incipient lesions in enamel not extending to the dentinoenamel junction (DEJ) currently are recommended for treatment with pit-and-fissure sealants.36
Clinical Technique
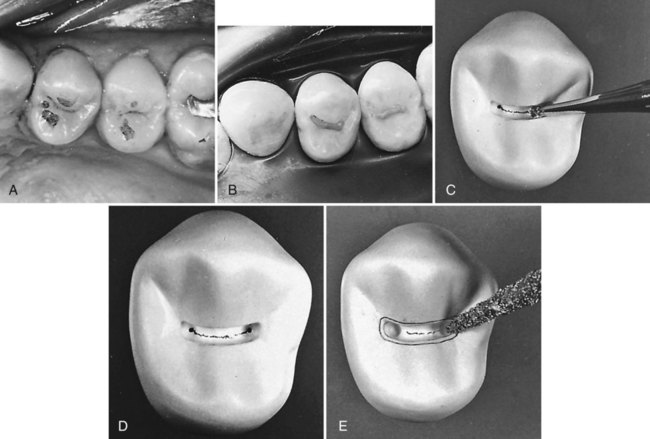
Because materials and techniques vary, it is important to follow the manufacturer’s instructions for the sealant material being used. A standard method for applying sealants to posterior teeth is presented here. Each quadrant is treated separately and may involve one or more teeth. The following discussion deals with a fissure present on a mandibular first permanent molar (Fig. 10-2, A). The tooth is isolated by using a rubber dam (or another effective isolation method such as cotton rolls or Isolite). Isolation of the area is crucial to the success of the sealant. Sealant placement in younger patients is more common, and since molar teeth are often not fully erupted in these patients, isolation can be difficult. If proper isolation cannot be obtained, the bond of the sealant material to the tooth surface can be compromised, resulting in either loss of the sealant or caries under the sealant. The area is cleaned with a slurry of pumice on a bristle brush (see Fig. 10-2, B). Bristles reach into faulty areas better than a rubber prophy cup can, which tends to burnish debris and pumice into the pits and fissures. The tooth is rinsed thoroughly, while the explorer tip is used carefully to remove residual pumice or additional debris. The tooth surface is dried, and etched with 35% to 40% phosphoric acid for 15 to 30 seconds. Liquid acid etchants were used in the past, but gel etchants are more popular now because they are easier to apply and to control. However, only gels that are sufficiently fluid to penetrate the grooves and fissures should be used. Airborne particle abrasion techniques have been advocated for preparing pits and grooves before sealant placement, but their effectiveness has not been fully investigated yet.37
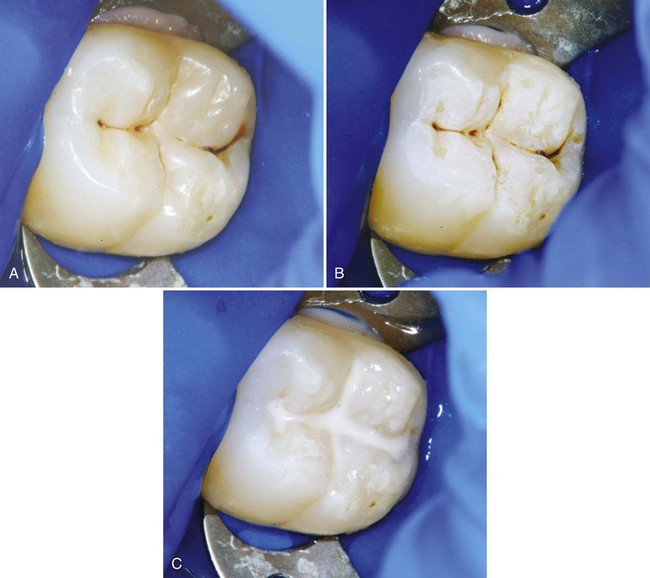
Properly acid-etched enamel surface has a lightly frosted appearance (see Fig. 10-2, C). Fluoride-rich, acid-resistant enamel may need to be etched for a longer time. Any brown stains that originally may have been in the pits and fissures still may be present and should be allowed to remain. The sealant material is then applied with an applicator or small hand instrument. The sealant is gently teased into place, to avoid entrapping air, and it should overfill slightly all pits and fissures, but it should not extend onto unetched surfaces. If too much sealant is applied, excess can be removed with a microbrush prior to light-activation. After light-activation and removal of the rubber dam, if used, the occlusion is evaluated by using articulating paper. If necessary, a round carbide finishing bur or white stone is used to remove any excess sealant. The surface usually does not require further polishing.
Preventive Resin and Conservative Composite Restorations
When restoring minimally carious pits and fissures on an unrestored tooth, an ultraconservative preparation design is recommended. This design allows for restoration of the lesion or defect with minimal removal of the tooth structure and often may be combined with the use of flowable composite or sealant to seal radiating non-carious fissures or pits that are at high risk for subsequent caries activity (Fig. 10-3). Originally referred to as a preventive resin restoration, this type of ultraconservative restoration is now termed conservative composite restoration at the University of North Carolina.38,39 An accurate diagnosis is essential before restoring the occlusal surface of a posterior tooth. The crucial factor in this clinical assessment is whether or not the suspicious pit or fissure has active caries that requires restorative intervention. Usually, a conservative composite restoration is the treatment of choice for the primary occlusal caries lesion as the tooth preparation can be minimally invasive.
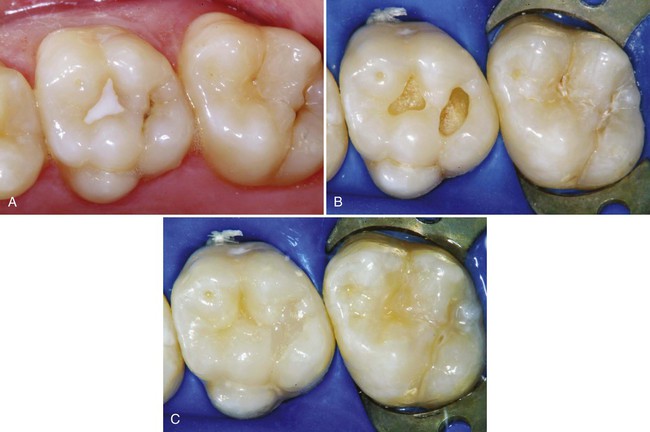
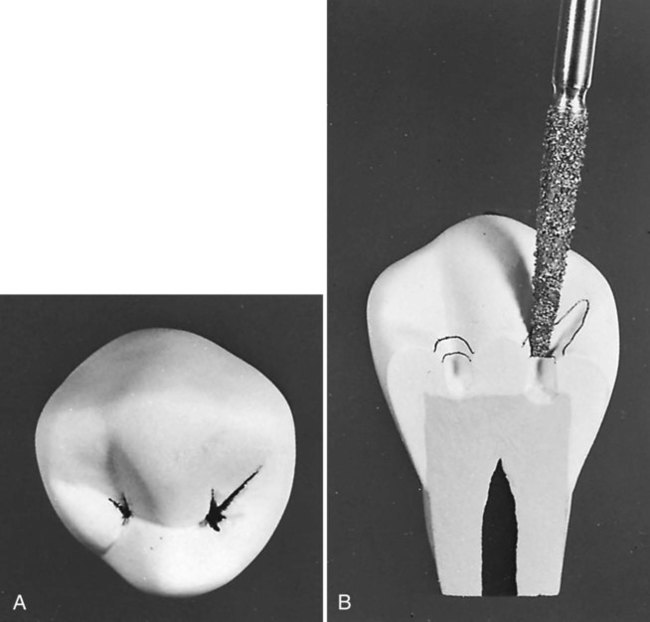
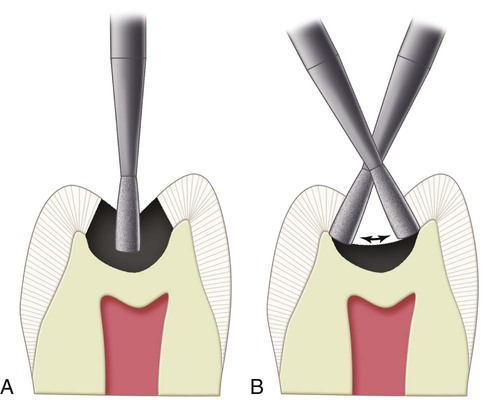
Sometimes, if a definitive diagnosis of caries cannot be made, an exploratory preparation of the suspicious area is performed with a small bur or diamond (Fig. 10-4). This approach is particularly indicated in patients at high risk for caries. The objective of this procedure is to explore suspicious pits or grooves with a very small bur or diamond to determine the extent of the suspected fault. As the tooth preparation is deepened, an assessment is made in the suspicious areas to determine whether or not to continue the preparation toward the DEJ (see Fig. 10-4, C). If the suspicious fault is removed or found to be sound at a shallow preparation depth (minimal dentin caries), the conservative exploratory preparation and adjacent pits and fissures are etched with 35% to 40% phosphoric acid for 15 to 30 seconds, rinsed thoroughly, and lightly dried. The etched surfaces then are treated with an adhesive, which is placed and light-activated, according to manufacturer’s instructions. The conservatively prepared area can then be restored with a flowable composite, which is placed and light-activated, according to manufacturer’s instructions. The adjacent etched pits and fissures, if judged to be at risk, can then be sealed using a pit-and-fissure sealant or the same flowable composite following the technique described previously. If the suspicious area is found to be carious, the preparation depth is extended until all of the caries is removed, and the prepared area is then restored with composite as described later in this chapter (Class I direct composite restoration), and unprepared pits and fissures are sealed. In the example presented in Fig. 10-4, the preparation was restored with composite.
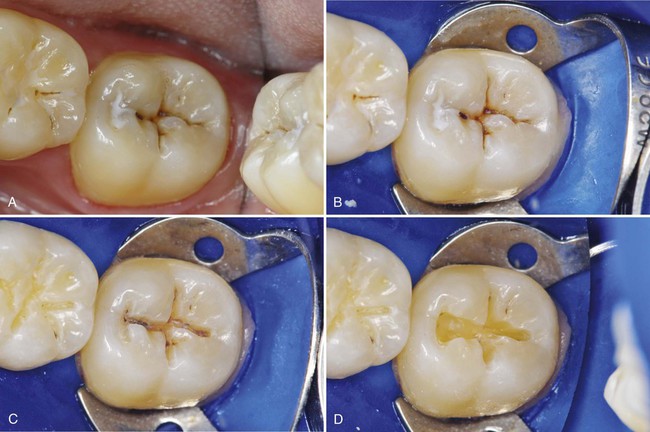
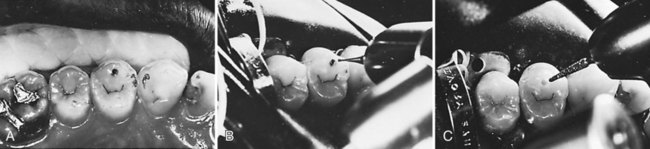
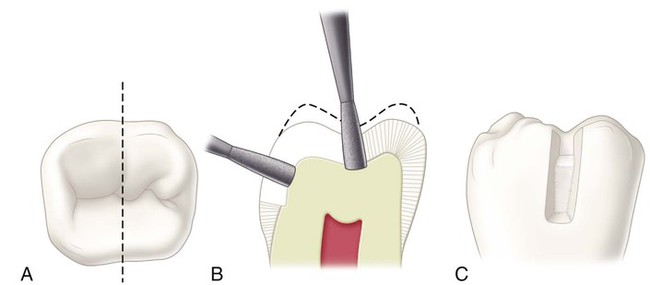
An example of a conservative composite restoration is illustrated in Figure 10-5, A. All initial examinations are inconclusive relative to a definitive diagnosis of active caries in this site. Figure 10-5, B through D, shows the initial, exploratory tooth preparation of the fissure. The initial depth is kept just into dentin where caries is present. Where caries is not present, the preparation stops on enamel. The occlusal extension is complete when a caries-free DEJ is reached. If dentin at the pulpal floor is judged to be infected as evidenced by a soft feel or “stick” of the explorer, a larger round bur, No. 330 bur or diamond, or No. 245 bur or diamond is used to extend the preparation pulpally into these areas. It is not necessary to extend the preparation in a pulpal direction if only a hard, dark line remains that cannot be penetrated by a sharp explorer, and the radiograph is negative for dentinal caries. If necessary, the preparation is completed by using a flame-shaped diamond instrument to flare the cavosurface margin (see Fig. 10-5, E). This flare may be widened to include any terminal ends of fissures, as illustrated in Figure 10-6. If no radiating fissures exist, the flaring is not necessary because of the enamel rod direction in this area, especially if steep cuspal inclines are present.
Clinical Technique for Class VI Direct Composite Restorations
One of the most conservative indications for a directly placed posterior composite is a small faulty developmental pit located on a cusp tip. Figure 10-7, A, is an example of a Class VI defect on the facial cusp tip of a maxillary premolar. The typical Class VI tooth preparation should be as small in diameter and as shallow in depth as possible. The faulty pit is entered with an appropriate round bur or diamond oriented perpendicular to the surface and extended pulpally to eliminate the lesion (see Fig. 10-7, B). Visual examination and probing with an explorer often reveal that the fault is limited to enamel because the enamel in this area is quite thick. If a faulty restoration or extensive caries is present on the cusp tip, a round bur of appropriate size is used for removing the faulty restoration or excavating remaining infected dentin. Stains that appear through the translucent enamel should be removed; otherwise, they may be seen after the composite restoration is completed. Some undermined, but not friable, enamel may be left and bonded to the composite.
Clinical Technique for Class I Direct Composit Restorations
Initial Clinical Procedures
The same general procedures described previously in Chapters 7 and 8 regarding anesthesia, shade selection, occlusal relationship, and isolation of the operating field are necessary before beginning a Class I composite restoration.
Tooth Preparation
Small to Moderate Class I Direct Composite Restorations
Small to moderate Class I direct composite restorations may use minimally invasive tooth preparations and do not require typical resistance and retention form features. Instead, these conservative preparations typically use more flared cavosurface forms without uniform or flat pulpal or axial walls. These preparations are less specific in form, having a scooped-out appearance. They are prepared with a small round or elongated pear diamond or bur with round features. The initial pulpal depth is approximately 0.2 mm inside the DEJ but may not be uniform (i.e., the pulpal floor is not flat throughout its length). Usually, a more rounded, and perhaps smaller, cutting instrument is used for this preparation, in an attempt to be as conservative as possible in the removal of the tooth structure. If a round instrument is used, the resulting cavosurface margin angle may be more flared (obtuse) than if an elongated pearl instrument is used (Fig. 10-8).
Various cutting instruments may be used for Class I and II tooth preparations; the size and shape of the instrument generally are dictated by the size of the lesion or other defect or by the type of defective restoration being replaced. Both carbide and diamond instruments can be used effectively. It should be noted that diamond instruments create a thicker smear layer, however, which might make bonding more difficult for self-etch bonding systems.40–43
Moderate to Large Class I Direct Composite Restorations
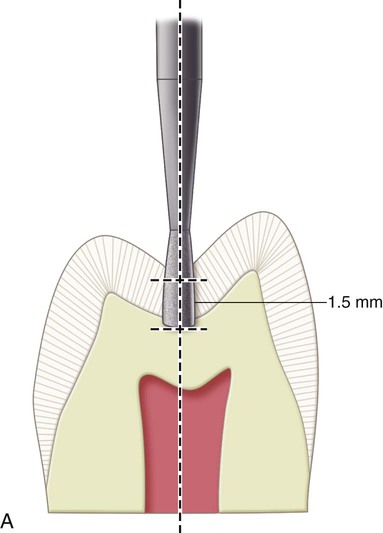
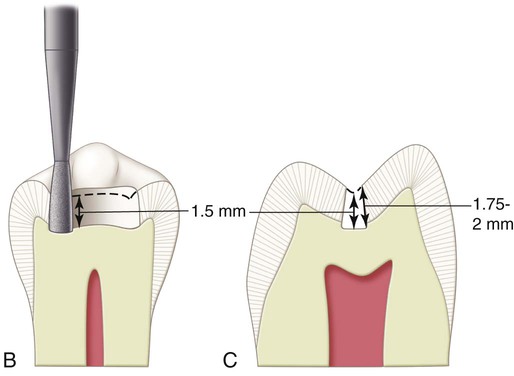
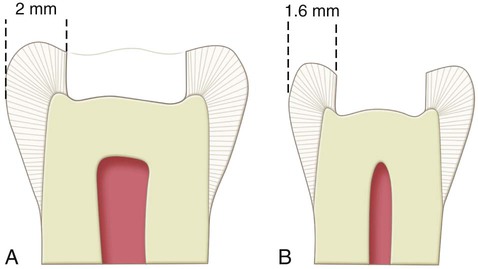
In large composite restorations, the tooth is entered in the area most affected by caries, with the elongated pearl diamond or bur positioned parallel to the long axis of the crown. When it is anticipated that the entire mesiodistal length of a central groove will be prepared, it is easier to enter the distal portion first and then transverse mesially. This technique permits better vision to the operator during the preparation. The pulpal floor is prepared to an initial depth that is approximately 0.2 mm internal to the DEJ (Fig. 10-9). The instrument is moved mesially, following the central groove, and any fall and rise of the DEJ (see Fig. 10-9, B). Mesial, distal, facial, and lingual extensions are dictated by the caries, old restorative material, or defect, always using the DEJ as a reference for both extensions and pulpal depth. The cuspal and marginal ridge areas should be preserved as much as possible. Although the final bonded composite restoration would help restore some of the strength of weakened, unprepared tooth structure, the outline form should be as conservative as possible. Extensions toward cusp tips should be as minimal as possible. Extensions into marginal ridges should result in at least 1.5 mm of remaining tooth structure (measured from the internal extension to the proximal height of contour) for premolars and approximately 2 mm for molars (Fig. 10-10). These limited extensions help preserve the dentinal support of the marginal ridge enamel and cusp tips.
As the instrument is moved along the central groove, the resulting pulpal floor is usually moderately flat (as a result of the shape of the tip of the instrument) and follows the rise and fall of the DEJ. If extension is required toward the cusp tips, the same depth that is approximately 0.2 mm inside the DEJ is maintained, usually resulting in the pulpal floor rising occlusally (Fig. 10-11). The same uniform depth concept also is appropriate when extending a facial or lingual groove radiating from the occlusal surface. When a groove extension is through the cusp ridge, the instrument prepares the facial (or lingual) portion of the faulty groove at an axial depth of 0.2 mm inside the DEJ and gingivally to include all caries and other defects (Fig. 10-12).
Restorative Technique
Placement of the Adhesive
Techniques for the placement of the adhesive are the same as described in Chapter 9. See Chapter 4 for a more extensive discussion on adhesives. When using an etch-and-rinse adhesive, over-drying the etched dentin can compromise dentin bonding.44–46 Aqueous solutions containing glutaraldehyde and 2-hydroxyethyl methacrylate (HEMA) can be used as a re-wetting agent when using etch-and-rinse systems.47–50 The bonding agent is applied to the entire preparation with a microbrush, in accordance with the manufacturer’s instructions. After application, the adhesive is polymerized with a light-activation unit, as recommended by the manufacturer.
When the final tooth preparation is judged to be near the pulp in vital teeth, the operator may elect to use a base material prior to placing the adhesive and the composite. If the remaining dentin thickness (RDT) is between 0.5 and 1.5 mm, a resin-modified glass ionomer (RMGI) base is used; if the RDT is less than 0.5 mm, a calcium hydroxide liner should be applied to the deepest aspect of the preparation, then protected with an RMGI base prior to adhesive placement.51
Insertion and Light-Activation of the Composite
Composite insertion hand instruments or a compule may be used to insert the composite material. The dispenser, for example, a syringe or compule, must be kept covered when not in use to prevent premature hardening of the material. Small increments of composite material are added and successively light-activated (Fig. 10-13). It is important to place (and light-activate) the composite incrementally to maximize the polymerization depth of cure and possibly to reduce the negative effects of polymerization shrinkage.

Stay updated, free dental videos. Join our Telegram channel
VIDEdental - Online dental courses


