Class III and V Amalgam Restorations
Lee W. Boushell, Theodore M. Roberson and Aldridge D. Wilder, Jr.
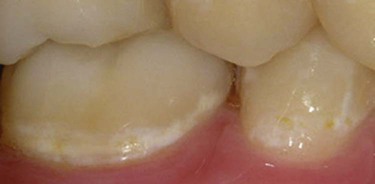
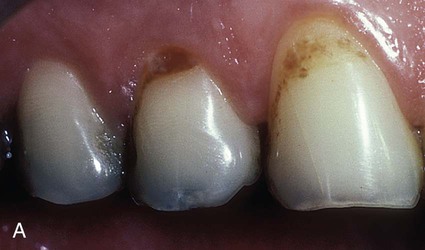
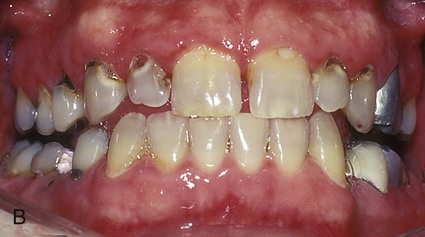
Incipient, smooth-surface enamel caries appears as a chalky white line just occlusal or incisal to the crest of the marginal gingiva (usually on the facial surface) (Fig. 15-1). These areas often are overlooked in the oral examination, unless teeth are free of debris, isolated with cotton rolls, and dried gently with the air syringe. When incipient cervical caries has not decalcified the enamel sufficiently to result in cavitation (i.e., a break in the continuity of the surface), the lesion may be remineralized by appropriate techniques, including patient motivation toward proper diet and hygiene. Occasionally, an enamel surface that is only slightly cavitated may be treated successfully by smoothing with sandpaper disks, polishing, and treating with a fluoride varnish or a dentin adhesive in an attempt to prevent further caries that may require treatment. This prophylactic, preventive treatment cannot be instituted if caries has progressed to decalcify and soften enamel to an appreciable depth. In this instance, a Class V tooth preparation and restoration is indicated, particularly if caries has penetrated to the dentinoenamel junction (DEJ) (Fig. 15-2, A). When numerous cervical lesions are present (see Fig. 15-2, B), a relatively high caries index is obvious. In addition to the restorative treatment, the patient should be instructed and encouraged to implement an aggressive prevention program to avoid recurrent decay.
Pertinent Material Qualities and Properties
Material qualities and properties important for Class III and V amalgam restorations are strength, longevity, ease of use, and past success. See Chapter 13 for a discussion of the pertinent material qualities and properties of amalgam.
Indications
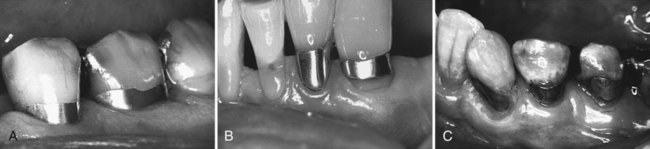
One measure of clinical success of cervical amalgam restorations is the length of time the restoration serves without failing (Fig. 15-3). Properly placed Class V amalgams have the potential to be clinically acceptable for many years. Some cervical amalgam restorations show evidence of failure, however, even after a short period. Inattention to tooth preparation principles, improper manipulation of the restorative material, and moisture contamination contribute to early failure. Extended service depends on the operator’s care in following accepted treatment techniques and proper care by the patient.
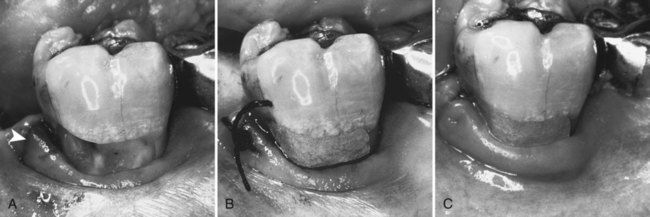
Amalgam may be used on partial denture abutment teeth because amalgam resists wear as clasps move over the restoration. Contours prepared in the restoration to retentive areas for the clasp tips may be achieved relatively easily and maintained when an amalgam restoration is used. Occasionally, amalgam is preferred when the caries lesion extends gingivally enough that a mucoperiosteal flap must be reflected for adequate access and visibility (Fig. 15-4). Proper surgical procedures must be followed, including sterile technique, careful soft tissue management, and complete debridement of the surgical and operative site before closure.
Contraindications
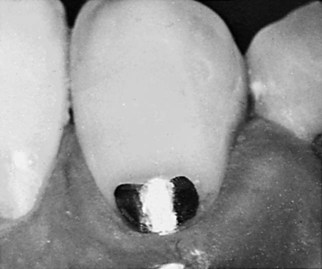
Class III and V amalgam restorations usually are contraindicated in esthetically important areas because many patients object to metal restorations that are visible (Fig. 15-5). Generally, Class V amalgams placed on the facial surface of mandibular canines, premolars, and molars are not readily visible. Amalgams placed on maxillary premolars and first molars may be visible. The patient’s esthetic demands should be considered when planning treatment.
Clinical Technique for Class III Amalgam Restorations
Tooth Preparation
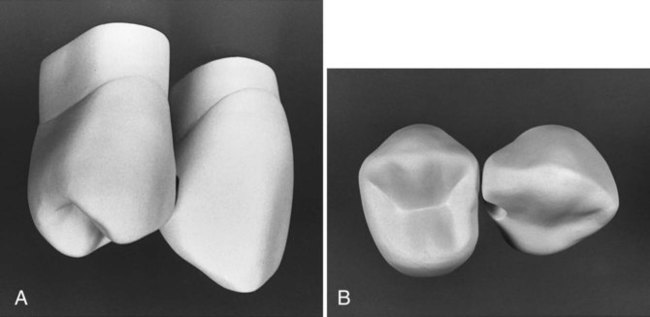
A lingual access preparation on the distal surface of the maxillary canine is described here because the use of amalgam in that location is more likely. For esthetic reasons, use of amalgam is best suited for caries that can be accessed from the lingual rather from the facial. A facial approach for a mandibular canine may be indicated, however, if the lesion is more facial than lingual. The mandibular restoration is often not visible at conversational distance (Fig. 15-6).
Initial Tooth Preparation
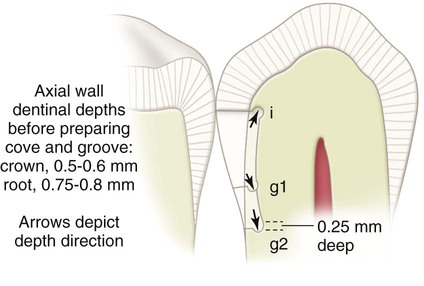
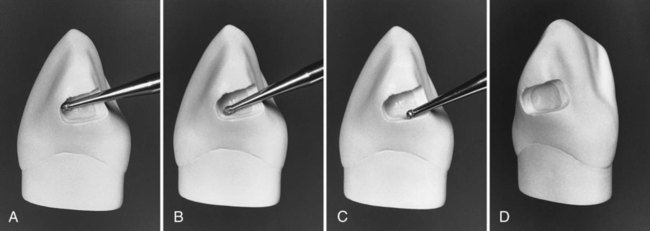
Bur size selection depends on the anticipated size of the lesion. Bur options may include a No. 2 (or smaller) round bur or No. 330 bur. The bur is positioned so that the entry cut penetrates into the caries lesion, which is usually apical to (and slightly into) the contact area. Ideally, the bur is positioned so that its long axis is perpendicular to the lingual surface of the tooth, but directed at a mesial angle as close to the adjacent tooth as possible. (The bur position may be described as perpendicular to the distolingual line angle of the tooth.) This position conserves the marginal ridge enamel (Fig. 15-7, A through C). Penetration through enamel positions the bur so that additional cutting isolates the proximal enamel affected by caries and removes some or all of the infected dentin. In addition, penetration should be at a limited initial axial depth (i.e., 0.5–0.6 mm) inside the DEJ (see Fig. 15-7, C and D) or at a 0.75-0.8-mm axial depth when the gingival margin is on the root surface (in cementum) (Fig. 15-8). This 0.75-mm axial depth on the root surface allows a 0.25-mm distance (the diameter of the No.  bur is 0.5 mm) between the retention groove (which is placed later) and the gingival cavosurface margin. Infected dentin that is deeper than this limited initial axial depth is removed later during final tooth preparation.
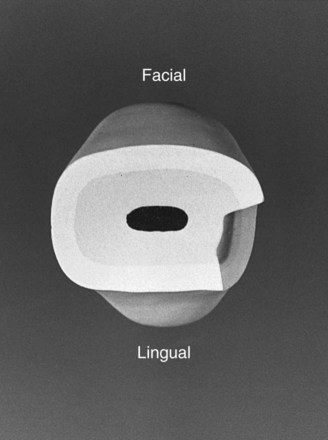
For a small lesion, the facial margin is extended 0.2-0.3 mm into the facial embrasure (if necessary), with a curved outline from the incisal to the gingival margin (resulting in a less visible margin). The lingual outline blends with the incisal and gingival margins in a smooth curve, creating a preparation with little or no lingual wall. The cavosurface angle should be 90 degrees at all margins. The facial, incisal, and gingival walls should meet the axial wall at approximately right angles (although the lingual wall meets the axial wall at an obtuse angle or may be continuous with the axial wall) (Fig. 15-9). If a large round bur is used, the internal angles are more rounded. The axial wall should be uniformly deep into dentin and follow the faciolingual contour of the external tooth surface (Fig. 15-10). The initial axial wall depth may be in sound dentin (i.e., shallow lesion), in infected dentin (i.e., moderate to deep lesion), or in existing restorative material, if a restoration is being replaced.
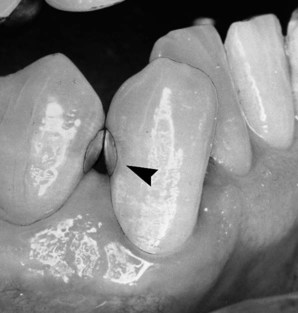
Incisal extension to remove carious tooth structure may eliminate the proximal contact (Fig. 15-11). It is important to conserve as much of the distoincisal tooth structure as possible to reduce the risk for subsequent fracture. When possible, it is best to leave the incisal margin in contact with the adjacent tooth.
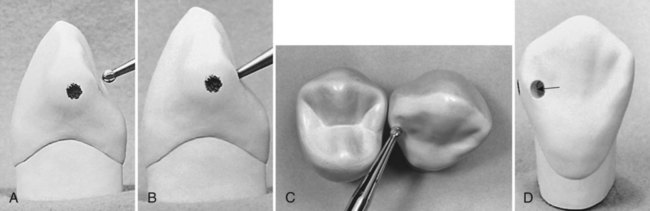
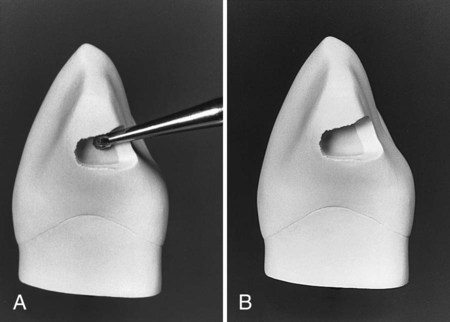
The initial tooth preparation is completed by using a No.  round bur to accentuate the axial line angles (Fig. 15-12, A and B), particularly the axiogingival angle. This facilitates the subsequent placement of retention grooves and leaves the internal line angles slightly rounded. Rounded internal preparation angles permit more complete condensation of the amalgam. The No.
  round bur also may be used to smooth any roughened, undermined enamel produced at the gingival and facial cavosurface margins (see Fig. 15-12, C). The incisal margin of the minimally extended preparation is often not accessible to the larger round bur without marring the adjacent tooth (see Fig. 15-12, D). Further finishing of the incisal margin is presented later. At this point, the initial tooth preparation is completed.
Final Tooth Preparation
Final tooth preparation involves removing any remaining infected dentin; protecting the pulp; developing secondary resistance and retention forms; finishing external walls; and cleaning, inspecting, and desensitizing or bonding. Any remaining infected carious dentin on the axial wall is removed by using a slowly revolving round bur (No. 2 or No. 4), appropriate spoon excavators, or both. (See Chapter 5 for the indications and technique for placing a liner.)
The gingival retention groove is prepared by placing a No.  round bur (rotating at low speed) in the axio-facio-gingival point angle. It is positioned in the dentin to maintain 0.2 mm of dentin between the groove and the DEJ. The rotating bur is moved lingually along the axiogingival line angle, with the angle of cutting generally bisecting the angle between the gingival and axial walls. Ideally, the direction of the gingival groove is slightly more gingival than axial (and the direction of an incisal [i.e., occlusal] groove would be slightly more incisal [i.e., occlusal] than axial) (Fig. 15-13; see also Fig. 15-8).
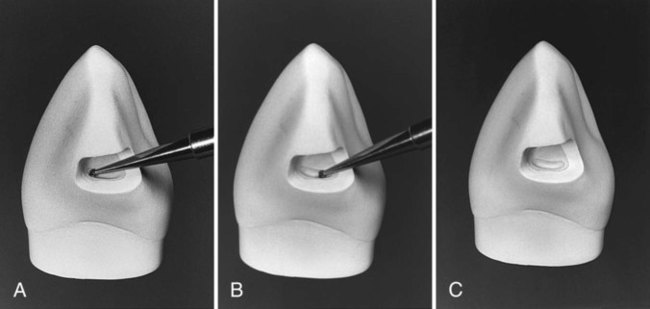
 round bur in axio-facio-gingival point angle. B, Advancing the bur lingually to prepare the groove along the axiogingival line angle. (See Fig. 15-8 regarding location, depth direction, and direction depth of groove.) C, Completed gingival retention groove.
Stay updated, free dental videos. Join our Telegram channel
VIDEdental - Online dental courses


