Supragingival Simple and Complex Onlay Preparation

An ideal onlay preparation relies on adhesion for retention; resistance and retention form are unnecessary.
Introduction
Correct preparation is crucial to the success of bonded onlays and partial crowns. In many cases, less than ideal results occur because clinicians have followed habits created by traditional school training and years of working in the same way. Crown preparation and gold onlay preparation require tooth preparation with exacting geometric features, retention and resistance form (Figure 6.1) Thus, when presented with a preparation for partial or full coverage porcelain onlay, instinctively it is assumed that this preparation will have similar mechanical features and only minor variations will be made to the preparation, as experience and the literature attest [1,2,3]. Additionally, lack of trust in the long-term success of adhesion continues to encourage clinicians to use mechanical retention during bonded onlay preparation. There is great variation in what is suggested to be the “ideal” onlay preparation. Some suggest modifications to geometric preparations, with time-consuming routine buildups to soften boxes, and other geometric features [4]. Others recommend flat preparations with limited features, and unbroken contacts, which some call flat-top design. This type of preparation has the disadvantage of the lack of indexing during fabrication and the inability to find a positive seating at cementation. Some consider that badly worn or damaged teeth are contraindicated for bonded onlays, and thus encourage full coverage (Figure 6.2a–d) [3,5]. While others suggest super-thin composite or ceramic occlusal veneers for severely worn teeth, which could easily lead to a short clinical life, as occlusion will wear through the restoration (Figure 6.3) [6,7]. Etemadi and colleagues determined that, in prosthodontic practice, the variation in tooth preparation design for all ceramic posterior restorations is quite large, and suggested that more needs to be known about the consequences of such variation [8]. Adhesively retained, partial-coverage bonded porcelain onlays do not require exacting tapers on axial walls, internal angles, offsets, grooves, and other retention and resistance features used in mechanically retained restorations. Adhesion is sufficient to retain the final restoration.

Figure 6.1 Geometric gold onlay preparation.

Figure 6.2 (a) This severe bruxer had a full mouth rehabilitation with feldspathic bonded onlays and veneers. (b) Fifteen-year postoperative facial view. (c) Fifteen-year postoperative lingual view. (d) The same patient 16 years postoperatively; the patient had fractures on the lower first molar onlay, showing minimal preparation, no catastrophic failures for the tooth, replacement onlay with e-max was simple.
Procedures which employ adhesive retention and have no need for mechanical retentive features have many advantages. Many years of experience and thousands of restorations have shown that bonded onlays can be used successfully in cases when the tooth is only missing a limited amount of structure (for example, one or two cusps, and for badly damaged endodontically treated teeth (Figure 6.4a–d). Clearly, the preparation required for a simple tooth should be different from the preparation for a complex, badly damaged tooth. Correct use and a proper understanding of adhesion and new restorative materials should allow the restorative dentist to select a material that best fits the condition of the tooth.

Figure 6.3 Partial coverage composite onlay at 10-year recall.

Figure 6.4 (a) Very weak root canal treated tooth. (b) Preparation and buildup. (c) Side view. (d) Completed restoration.
Purpose of Tooth Preparation and Universal Principles
The purpose of tooth preparation is first to remove the damaged and carious tooth structure, and then to create space for the restorative material. Tooth preparation should also include retention and resistance forms (for traditional mechanically retained restorations), creating a design that facilitates laboratory fabrication of the restoration, simplifies cementation or adhesive bonding of the restoration. An additional preparation requirement, unique to the supragingival approach, is the use of a protocol which avoids or greatly limits the risk of placing the restorative material subgingivally. Clearly, retention and resistance forms are unnecessary when we use adhesion. Supragingival minimally invasive bonded restoration requires a preparation that preserves more of the tooth. It is tissue protective and is, in fact, simpler to perform than traditional crown and bridge work. To achieve the above requirements, there are some universal rules that should be applied to all bonded onlay preparations. While some principles are widely agreed upon, some are open to the interpretation of the available literature [9,10] mixed with clinical experience.
Basic Universal Principles for Onlay Preparations
A minimum thickness of 2 mm is desirable for the restorative material [11]. Some studies suggest that very thin restorative material becomes weaker and more likely to fracture [3], although other studies show that strong materials such as lithium disilicate and zirconia can perform well when thinner, or when bonded with resin cement [12,13]. Thus a 2 mm space or reduction should be the goal, on the understanding that sometimes, during occlusal adjustment, porcelain will be removed and the final thickness will be less.
It is reassuring to realize that the pulp is farther away from the occlusal surface of the tooth. Thus, occlusal reduction will cause the least trauma to the pulp, compared with other surface reductions, especially axial reduction (Figure 6.5). Sufficient reduction is important so it is desirable to confirm the space using an occlusal reduction ring of the clinician’s choice or a flexible clearance tab, to ensure an accurate 2 mm reduction (Figure 6.6). A thermoplastic tab may be used, on which the patient bites down after it has been softened by hot water. The space is then measured with calipers (Figure 6.7).
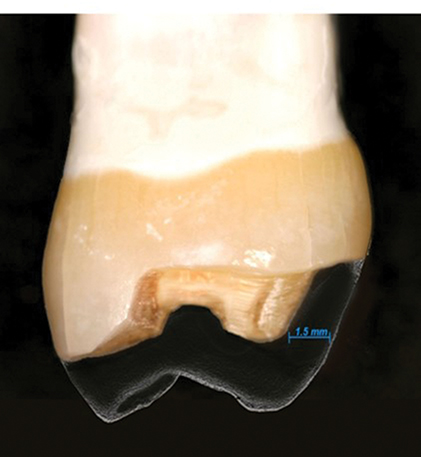
Figure 6.5 Occlusal reduction compared with axial reduction.

Figure 6.6 An easy way to confirm sufficient occlusal clearance is the use of Clearance Tab (Kerr).

Figure 6.7 Measuring thermoplastic tab with calipers.
A flatter preparation is desirable, as it preserves more tooth structure. Geometrical preparations can prevent full seating of a restoration, owing to the film thickness of the adhesive cement (Figure 6.8). The occlusal reduction should follow the same morphology of the natural tooth, and not be a full flat-top reduction. If the condition of the tooth is such that, after occlusal reduction and caries removal, the preparation is flat, it is unnecessary to reduce it further to create grooves of isthmus – a flat preparation will be well retained by the adhesive. Proximal ridge areas are prepared to be more concave, but not as a box (Figure 6.9). Reduction follows the inclination of the cusp and grooves. The result is a wavy preparation which resembles the initial natural occlusal surface. A nicely sloped and anatomical occlusal reduction preserves more tooth structure and also serves for indexing when seating the restoration: the onlay should only fit one way (Figure 6.10).

Figure 6.8 Internal boxes and retention line angles create areas where the cement film thickness interferes with full seating of the restoration. Increasing cement thickness has a negative effect on cement polymerization shrinkage. Courtesy of Dr Raymond L. Bertolotti.

Figure 6.9 U-shaped proximal reduction.

Figure 6.10 Finish occlusal reduction correctly following cusp inclinations and ondulations.
In partial occlusal coverage inlay/onlay combination, the preparation must always ensure a minimum of 2 mm in the transitional areas (Figure 6.11). The prepared tooth should have internal rounded angles.
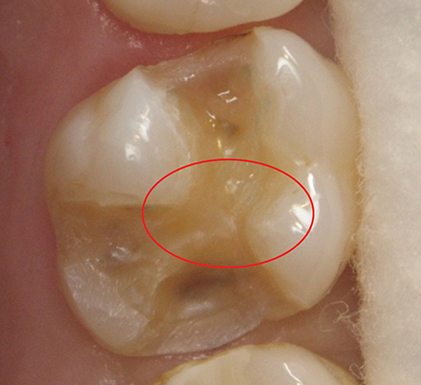
Figure 6.11 Transition area (red circle) must be 2 mm minimum thickness in any direction.
Great effort should be taken to maintain supragingival, or at least equigingival margins. This can be achieved by the implementation of the five rules of supragingival dentistry previously discussed in Chapter 3. Ideally, enamel margins should be retained if at all possible. However, if this is not possible, it is not a contraindication. Procedures to ensure preservation of enamel margins should be used [14].
Use compressive force on porcelain, whenever possible, and avoid shear force. This generally means avoiding axial reduction, as in traditional mechanically retained crowns. Axial reduction increases shear forces on the final restoration (Figure 6.12).

Figure 6.12 Axial reduction enhances the effect of shear forces.
After occlusal reduction of the lingual cusps, when indicated, create a shallow 1 mm bevel, fully within the enamel, to ensure better enamel rod direction. Avoid this step if you are in danger of getting too close to the gingiva or the subgingival margin. It is acceptable to leave a lingual butt margin.
Facial bevel for esthetic blending of the onlay restoration is ideal. The bevel should be entirely within the enamel, at approximately 45 degrees (Figures 6.13a–c, 6.14a,b). The thin, knife-edge porcelain at the end of the bevel will provide for maximum blending capacity. Knife-edge margins can be easily fabricated with pressable lithium disilicate. Fabricating this type of thin margin with a computer-aided designed and manufactured (CAD-CAM) restoration may be more challenging, overbulking the margins at CAD design and after adhesive cementation. Finishing the restoration to the thin design is a way of circumventing the limitations of CAD-CAM design. While some consider thin porcelain margins to be contraindicated [15], other studies may suggest equal success with bevelled and unbevelled onlays [16]. My own extensive clinical experience of thousands of restorations, with not one fracture at the margin, shows that clinical reality sometimes does not follow “supposed truths” or even in-vitro testing.

Figure 6.13 (a) Onlay without a bevel but with a margin, allowing for poor marginal blending and less than desirable esthetic results. (b) Too small a bevel for transition will affect the transition blending. (c) Poor margin blending as a result of lack of sufficient bevel and opacious material.

Figure 6.14 (a) A 2–3 mm facial bevel on enamel for maximum blending, visible on the cast; (b) good blending with a high-translucency onlay.
Slight interproximal separation, while not absolutely necessary [15], is desirable, to allow the laboratory or the scanner to easily view the restoration margins and to provide clean margins. Unclear margins lead to defective margins (Figure 6.15).

Figure 6.15 Taking impression with tooth in contact will increase difficulty for the laboratory to give accurate restorative margins.
Three Variations Based on Tooth Damage
Stay updated, free dental videos. Join our Telegram channel
VIDEdental - Online dental courses


