Supragingival Simple and Complex Onlay Preparation

Introduction
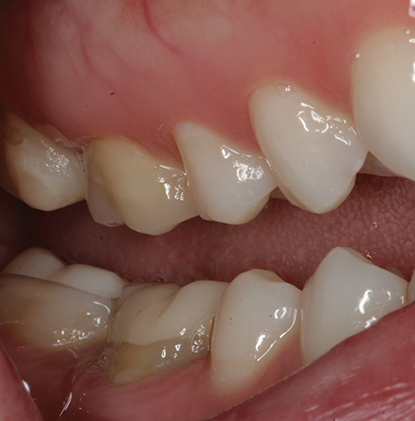
Correct preparation is crucial to the success of bonded onlays and partial crowns. In many cases, less than ideal results occur because clinicians have followed habits created by traditional school training and years of working in the same way. Crown preparation and gold onlay preparation require tooth preparation with exacting geometric features, retention and resistance form (Figure 6.1) Thus, when presented with a preparation for partial or full coverage porcelain onlay, instinctively it is assumed that this preparation will have similar mechanical features and only minor variations will be made to the preparation, as experience and the literature attest [1,2,3]. Additionally, lack of trust in the long-term success of adhesion continues to encourage clinicians to use mechanical retention during bonded onlay preparation. There is great variation in what is suggested to be the “ideal” onlay preparation. Some suggest modifications to geometric preparations, with time-consuming routine buildups to soften boxes, and other geometric features [4]. Others recommend flat preparations with limited features, and unbroken contacts, which some call flat-top design. This type of preparation has the disadvantage of the lack of indexing during fabrication and the inability to find a positive seating at cementation. Some consider that badly worn or damaged teeth are contraindicated for bonded onlays, and thus encourage full coverage (Figure 6.2a–d) [3,5]. While others suggest super-thin composite or ceramic occlusal veneers for severely worn teeth, which could easily lead to a short clinical life, as occlusion will wear through the restoration (Figure 6.3) [6,7]. Etemadi and colleagues determined that, in prosthodontic practice, the variation in tooth preparation design for all ceramic posterior restorations is quite large, and suggested that more needs to be known about the consequences of such variation [8]. Adhesively retained, partial-coverage bonded porcelain onlays do not require exacting tapers on axial walls, internal angles, offsets, grooves, and other retention and resistance features used in mechanically retained restorations. Adhesion is sufficient to retain the final restoration.

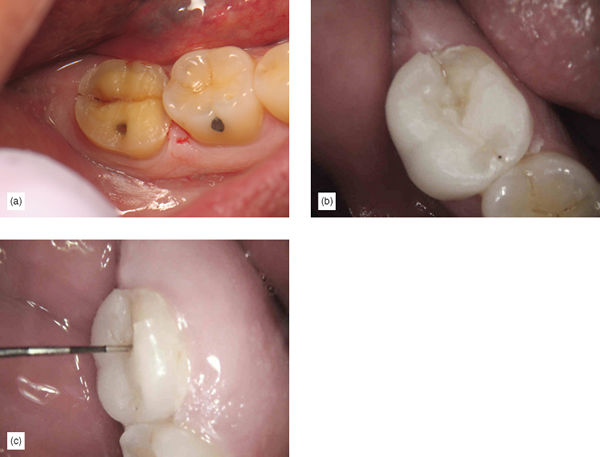
Procedures which employ adhesive retention and have no need for mechanical retentive features have many advantages. Many years of experience and thousands of restorations have shown that bonded onlays can be used successfully in cases when the tooth is only missing a limited amount of structure (for example, one or two cusps, and for badly damaged endodontically treated teeth (Figure 6.4a–d). Clearly, the preparation required for a simple tooth should be different from the preparation for a complex, badly damaged tooth. Correct use and a proper understanding of adhesion and new restorative materials should allow the restorative dentist to select a material that best fits the condition of the tooth.


Purpose of Tooth Preparation and Universal Principles
The purpose of tooth preparation is first to remove the damaged and carious tooth structure, and then to create space for the restorative material. Tooth preparation should also include retention and resistance forms (for traditional mechanically retained restorations), creating a design that facilitates laboratory fabrication of the restoration, simplifies cementation or adhesive bonding of the restoration. An additional preparation requirement, unique to the supragingival approach, is the use of a protocol which avoids or greatly limits the risk of placing the restorative material subgingivally. Clearly, retention and resistance forms are unnecessary when we use adhesion. Supragingival minimally invasive bonded restoration requires a preparation that preserves more of the tooth. It is tissue protective and is, in fact, simpler to perform than traditional crown and bridge work. To achieve the above requirements, there are some universal rules that should be applied to all bonded onlay preparations. While some principles are widely agreed upon, some are open to the interpretation of the available literature [9,10] mixed with clinical experience.
Basic Universal Principles for Onlay Preparations
A minimum thickness of 2 mm is desirable for the restorative material [11]. Some studies suggest that very thin restorative material becomes weaker and more likely to fracture [3], although other studies show that strong materials such as lithium disilicate and zirconia can perform well when thinner, or when bonded with resin cement [12,13]. Thus a 2 mm space or reduction should be the goal, on the understanding that sometimes, during occlusal adjustment, porcelain will be removed and the final thickness will be less.
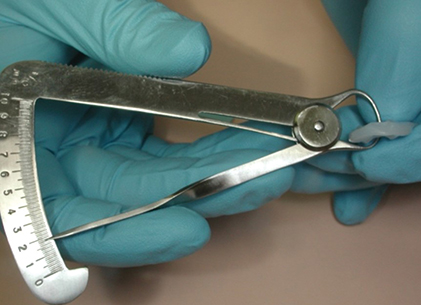
It is reassuring to realize that the pulp is farther away from the occlusal surface of the tooth. Thus, occlusal reduction will cause the least trauma to the pulp, compared with other surface reductions, especially axial reduction (Figure 6.5). Sufficient reduction is important so it is desirable to confirm the space using an occlusal reduction ring of the clinician’s choice or a flexible clearance tab, to ensure an accurate 2 mm reduction (Figure 6.6). A thermoplastic tab may be used, on which the patient bites down after it has been softened by hot water. The space is then measured with calipers (Figure 6.7).


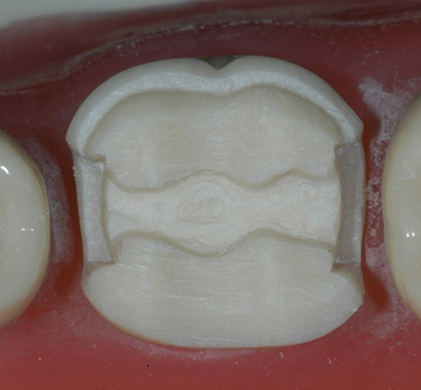
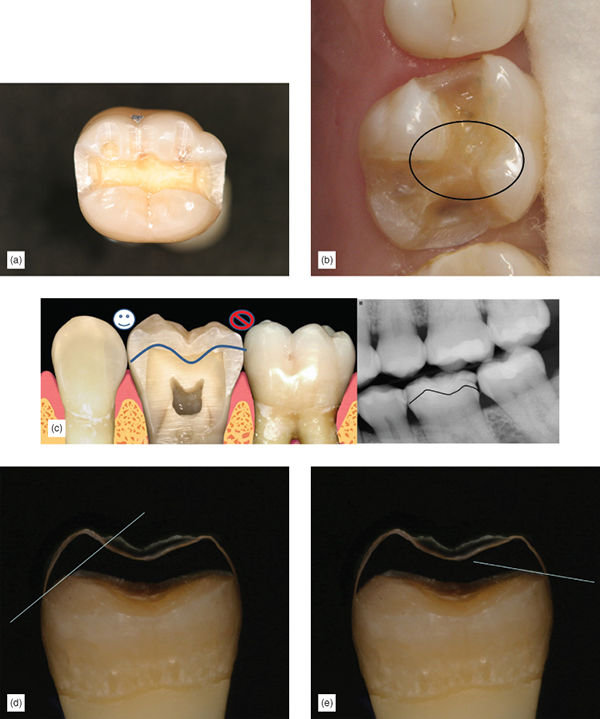
A flatter preparation is desirable, as it preserves more tooth structure. Geometrical preparations can prevent full seating of a restoration, owing to the film thickness of the adhesive cement (Figure 6.8). The occlusal reduction should follow the same morphology of the natural tooth, and not be a full flat-top reduction. If the condition of the tooth is such that, after occlusal reduction and caries removal, the preparation is flat, it is unnecessary to reduce it further to create grooves of isthmus – a flat preparation will be well retained by the adhesive. Proximal ridge areas are prepared to be more concave, but not as a box (Figure 6.9). Reduction follows the inclination of the cusp and grooves. The result is a wavy preparation which resembles the initial natural occlusal surface. A nicely sloped and anatomical occlusal reduction preserves more tooth structure and also serves for indexing when seating the restoration: the onlay should only fit one way (Figure 6.10).


In partial occlusal coverage inlay/onlay combination, the preparation must always ensure a minimum of 2 mm in the transitional areas (Figure 6.11). The prepared tooth should have internal rounded angles.

Great effort should be taken to maintain supragingival, or at least equigingival margins. This can be achieved by the implementation of the five rules of supragingival dentistry previously discussed in Chapter 3. Ideally, enamel margins should be retained if at all possible. However, if this is not possible, it is not a contraindication. Procedures to ensure preservation of enamel margins should be used [14].
Use compressive force on porcelain, whenever possible, and avoid shear force. This generally means avoiding axial reduction, as in traditional mechanically retained crowns. Axial reduction increases shear forces on the final restoration (Figure 6.12).

After occlusal reduction of the lingual cusps, when indicated, create a shallow 1 mm bevel, fully within the enamel, to ensure better enamel rod direction. Avoid this step if you are in danger of getting too close to the gingiva or the subgingival margin. It is acceptable to leave a lingual butt margin.
Facial bevel for esthetic blending of the onlay restoration is ideal. The bevel should be entirely within the enamel, at approximately 45 degrees (Figures 6.13a–c, 6.14a,b). The thin, knife-edge porcelain at the end of the bevel will provide for maximum blending capacity. Knife-edge margins can be easily fabricated with pressable lithium disilicate. Fabricating this type of thin margin with a computer-aided designed and manufactured (CAD-CAM) restoration may be more challenging, overbulking the margins at CAD design and after adhesive cementation. Finishing the restoration to the thin design is a way of circumventing the limitations of CAD-CAM design. While some consider thin porcelain margins to be contraindicated [15], other studies may suggest equal success with bevelled and unbevelled onlays [16]. My own extensive clinical experience of thousands of restorations, with not one fracture at the margin, shows that clinical reality sometimes does not follow “supposed truths” or even in-vitro testing.


Slight interproximal separation, while not absolutely necessary [15], is desirable, to allow the laboratory or the scanner to easily view the restoration margins and to provide clean margins. Unclear margins lead to defective margins (Figure 6.15).

Three Variations Based on Tooth Damage
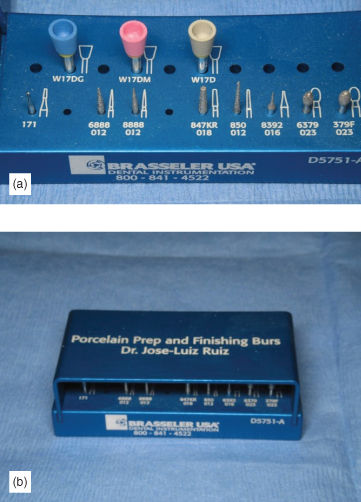
Teeth requiring bonded onlay will have different amounts of damage and, for that reason, the complexity of the preparation will be different. It is very successful and time efficient to prepare teeth with simple problems using a simple approach, while reserving buildups and other time-consuming techniques for more complex cases. There are three variations to the preparation, based on the amount of tooth damage: simple partial and full coverage for vital teeth, complex full occlusal coverage requiring buildup on vital teeth, and finally complex full coverage for endodontically treated teeth or vertical fractures. Each one has variation based on the tooth condition, but they all fulfill the above general guidelines. In real clinical practice, all the above preparations use the simplified bur and diamond armamentarium, which help to keep things uncomplicated (Figure 6.16).
Simple Partial and Full Coverage for Vital Teeth
Preparations are simple because the tooth condition is ideal. The remaining tooth structure is sufficient to support the restoration without buildup, and the cervical margin placement will end up supragingival, with an enamel periphery, or a supragingival dentin margin, without the need for buildup, using careful caries removal techniques (using the first principle, as outlined in Chapter 3). If the existing old restoration or caries goes up to the equigingival margin or to 1 mm subgingivally in a small segment of the tooth (e.g., distal box), the preparation can be finished without the need to elevate the margin. Experience shows that these margins should be easy to control during bonded cementation. The distance to the pulp is sufficient to not require dentin sealing. The vital tooth shade is acceptable, allowing for very supragingival margin placement, as good blending of the restoration and the tooth can be achieved with a translucent material (Figure 6.17).
Simple Partial Coverage Step by Step
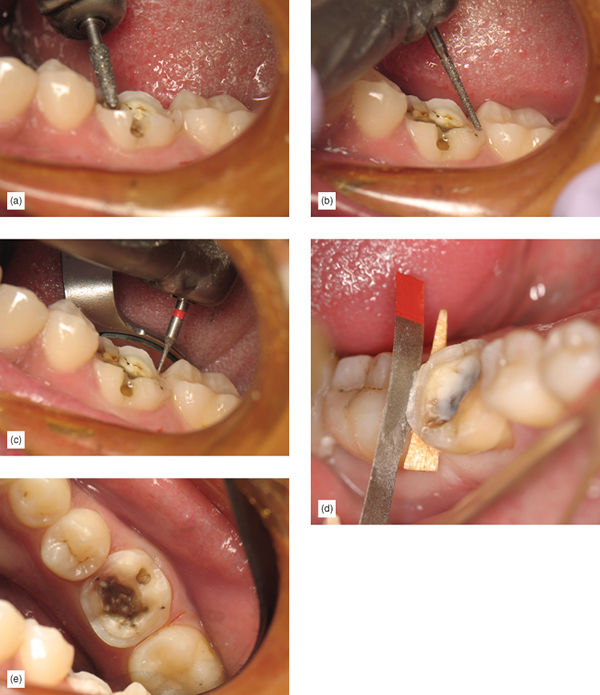
Step 1: Using a 2 mm taper occlusal reduction with proper inclination and a Brasseler 6826-025 diamond bur, perform occlusal reduction. Dipping the bur fully to create multiple depth cuts, and then joining them together helps to achieve this rapidly and accurately (Figure 6.18a). Avoid subgingival margins or unnecessary axial reduction.
Step 2: Carefully remove all other existing caries and old restorative material, using principle 1. Remember to be extra careful around cervical margin areas to prevent unnecessary subgingival margins; use a caries indicator. When partial coverage is required, ensure that all isthmus and transitional areas have a minimum thickness of 2.5 mm, as these tend to be the areas where restoration fracture can occur. The isthmus should have a slight taper of 10 degrees or greater (Figure 6.18b).
Step 3: If a box is not present when removing proximal caries and preparing the tooth for appropriate restorative material thickness in the proximal areas, avoid making a traditional box (the third principle). Instead, use proximal margin separation to avoid creating subgingival margin placement unnecessarily. Use a diamond bur at the proximal area, using a U-shaped motion, create the 2 mm reduction. An interproximal tooth shield can prevent unnecessary damage to the adjacent tooth. Only after viewing 2 mm of the adjacent proximal tooth should the margin separation procedure be performed, using a safe-side metal strip or a “mosquito” bur. Use an interproximal tooth shield to avoid touching the adjacent tooth. If the adjacent tooth is still in heavy contact, it is better to perform a more proximal reduction, as long as it does not go subgingival, to allow for easier margin separation (Figure 6.18c). There will often be existing boxes present, which should be carefully cleaned, and any sharp internal angles softened.
Step 4: Check that all margins flow, with no major sharp-angled transitions between proximal and facial lingual margins.
Step 5: If medium to small undercuts are present, remove them with a bur, including them in the preparation to avoid the need for buildups. Very small undercuts can be left, as the laboratory can block those out. If undercuts are larger and it is necessary to undertake buildup with bonded composite, the preparation will be more complex (if this is the case, see the section on complex preparation below).
Step 6: If any facial cusp was included, make a 2–3 mm bevel of the facial surface for improved blending of the restoration (Figure 6.18d). The ideal restorative material for these cases and bevel design would be lithium disilicate (e-Max, Ivoclar), or pressable leucite-reinforced porcelain (such as ZCR Press, Noritake, or EmPress, Ivoclar) for highly esthetic cases in a maxillary first premolar.
Step 7: Finalize the preparation by creating a shallow 1 mm bevel on the lingual margin to ensure better enamel rod direction. Avoid this step if it might lead to getting too close to the gingiva or subgingival margin (Figure 6.18e).
Step 8: Take a final impression and provisionalize.
Simple Full Coverage for a Vital Tooth, Step by Step
Step 1: Using a 2 mm taper occlusal reduction with proper inclination and a Brasseler 6826-025 diamond bur, perform an occlusal reduction. Dipping the bur fully to create multiple depth cuts, and then joining them together helps to achieve this rapidly and accurately (Figure 6.19a), avoiding subgingival margins and unnecessary axial reduction.
Step 2: Carefully remove all other existing caries and old restorative material (Figure 6.19b). Remembering the first principle, be extra careful around cervical margin areas to prevent unnecessary subgingival margin placement, and use a caries indicator (Figure 6.19c).
Step 3: When removing proximal caries and preparing the tooth for appropriate restorative material thickness in the proximal areas, if a box is not present, avoid making a traditional box (third principle), and use proximal margin separation, to avoid creating subgingival margins unnecessarily. Use a Brasseler 6826-025 diamond bur at the proximal area, with a U-shaped motion, to create the 2 mm reduction. An interproximal tooth shield can prevent unnecessary damage to adjacent tooth. Only after viewing 2 mm of the adjacent proximal tooth should the margin separation procedure be performed, using a safe-side metal strip or a “mosquito” bur. Use an interproximal tooth shield such as FenderWedge (Garrison) to avoid touching the adjacent tooth. If the adjacent tooth is still in heavy contact, it is better to perform a more proximal reduction, as long as it does not go subgingival, to allow for easier margin separation (Figure 6.19d). If boxes are present, carefully clean them, and soften any sharp internal angles.
Step 4: Check that all margins flow, with no major sharp-angled transitions between proximal and facial–lingual margins.
Step 5: If medium to small undercuts are present, remove them with a bur, including them in the preparation to avoid the need for buildups. Very small undercuts can be left, as the laboratory can block those out. Blocking undercuts out with bonded flowable composite is an option, but the time involved doing a buildup, plus the additional complication to provisionalize, make this option less desirable (Figure 6.19e).
Step 6: On the facial cusp, make a 2–3 mm bevel of the facial surface for improved blending of the restoration. Ideal restorative material for these cases and bevel design would be lithium disilicate, or pressable leucite-reinforced porcelain for highly esthetic cases in a maxillary first premolar.
Step 7: Finalize the preparation by creating a shallow 1 mm bevel on the lingual margin to ensure better enamel rod direction. Avoid this step if it might lead to getting too close to the gingiva or subgingival margin.
Step 8: Take a final impression and provisionalize.
Complex Full Occlusal Coverage Requiring Buildup in Vital Teeth
Complex onlay preparations in vital teeth are complicated by the excessive damage to the existing tooth. These cases will require one or more of the following processes:
- Dentin sealing may be required to avoid pulp irritation if the distance to the pulp became less than 2 mm during preparation and caries removal.
- Buildup may be necessary if large undercuts are present due to extensive caries.
- Enamel margin preservation may be necessary because gingival caries is extensive and the remaining healthy enamel can be preserved allowing the cavosurface margin to remain supragingival.
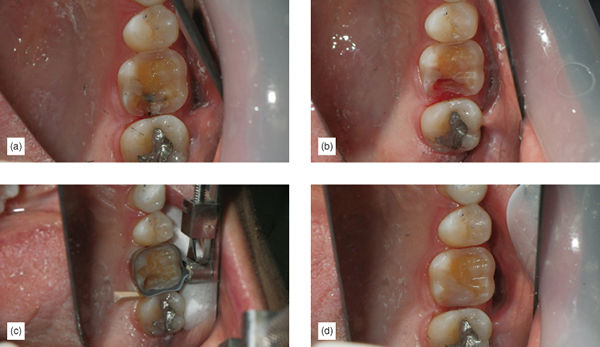
- Margin elevation may be necessary because caries or old restorative material is in fact subgingival to more than 1.5 mm and it is expected that, without margin elevation, bonded cementation will be unpredictable. The tooth is vital, so the margin can be placed anywhere and a good restoration blend can be anticipated (Figure 6.20a–c).
Complex Partial or Full Occlusal Coverage Step by Step
Step 1: Using a 2 mm taper occlusal reduction with proper inclination and a diamond bur, perform an occlusal reduction. Dipping the bur fully to create multiple depth cuts, and then joining them together helps to achieve this rapidly and accurately (Figure 6.21a), avoiding subgingival margins or unnecessary axial reduction.
Step 2: Carefully remove all other existing caries and old restorative material. With the first principle in mind, remember to be extra careful around cervical margin areas to avoid unnecessary subgingival margins, and use caries indicator (Figure 6.21b). When partial coverage is required, ensure that all isthmus and transitional areas have a minimum thickness of 2.5 mm, as these tend to be areas where restoration fractures can occur. The isthmus should have a slight taper 10 degrees or greater.
Step 3: After caries removal, assess what type of buildup will be required, whether there is a need for dentin sealing, whether there is a large undercut or weak cusp repair, if there is a need for enamel margin preservation or elevation. Perform all repairs and buildups at the same time. Pay attention to correct bonding and repair techniques (discussed in Chapters 3, 4 and 9), as well as minimizing polymerization shrinking while building up the tooth (discussed in detail in Chapters 3 and 9). Use an oxygen inhibitor to do the final cure of the buildups (Figure 6.21c).
Step 4: Finish the preparation, treating the composite buildup as for a tooth.
Step 5: If a box is not present when removing proximal caries and preparing the tooth for appropriate restorative material thickness in the proximal areas, avoid making a traditional box (third principle). Instead, use a U-shaped reduction and proximal margin separation, to avoid creating subgingival margins unnecessarily (Figure 6.21d). Use a diamond bur at the proximal area, with a U-shaped motion, to create the 2 mm reduction. An interproximal tooth shield can prevent unnecessary damage to the adjacent tooth. Only after viewing 2 mm of the adjacent proximal tooth should the margin separation procedure be performed, using a safe-side metal strip or a “mosquito” bur. Use an interproximal tooth shield to avoid touching the adjacent tooth. If the adjacent tooth is still in heavy contact, it is better to perform a more proximal reduction, as long as it does not go subgingival, to allow for easier margin separation. There will often be existing boxes present. Carefully clean them, and soften any sharp internal angles.
Step 6: Check that all margins flow, with no major sharp-angled transitions between proximal and facial–lingual margins. Create a shallow 1 mm bevel on the lingual margin to ensure a better direction for the enamel rod. Avoid this step if it may lead to getting too close to the gingiva or the subgingival margin.
Step 7: Make an esthetic bevel of 2–3 mm in the facial surface for improved blending of the translucent restoration. Make a lingual bevel. Ideal restorative materials for these cases and bevel design would be lithium disilicate, or pressable leucite-reinforced porcelain for highly esthetic cases.
Step 8: Take a final impression and provisionalize.
Complex Full Coverage for Endodontically Treated or Vital Teeth with Vertical Fractures
The literature suggests that if the marginal ridges are intact and there are no fractures present on endodontically treated molars, the stiffness of the tooth may not be compromised [17] and full coverage may not be necessary. However, an endodontically treated tooth fracture is usually a catastrophic event resulting in the loss of the tooth, and in view of some studies showing up to a sixfold increase of tooth loss for endodontically treated teeth without a full-coverage crown [18], it would be wise to consider full coverage on endodontically treated posterior teeth. Tooth protection can be better achieved witha more tooth-preserving procedure such as a full-occlusal coverage bonded onlay, rather than the more tooth-destroying option of a full-coverage crown. Reducing the axial wall makes no sense, as it further weakens the tooth [19].
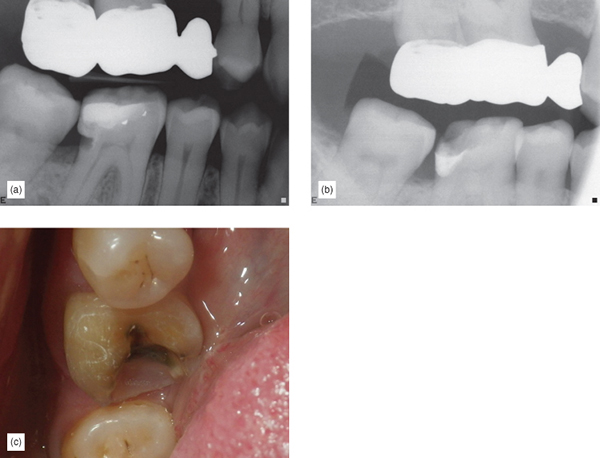
These are badly damaged teeth, which have lost their intrinsic rigidity, and they often have a history of vertical fractures or fracture syndrome. The literature and clinical experience show that this category of bonded onlay restoration has a higher rate of failure (Figure 6.22a–c) [20,21,22] and some modification in the preparation and choice of restorative material is necessary. These teeth will require proper buildup to repair the pulp chamber, endodontic access will be needed, and they will often also require enamel margin preservation; margin elevation may also be required. Because these restorations are more prone to fractures, ensuring an increase in thickness of the restorative material is desirable, as well as using a restorative material with increased strength. The minimum thickness of the restorative material must be ensured, as the weaker, less rigid tooth is not a reliably strong substrate to support the bonded onlay. In these cases, the strength of the restorative material is necessary to ensure durability and strength; thicker restorative material will increase stiffness and strength [23]. Occlusal reduction for lithium disilicate should be 2.5 mm to account for the usually necessary occlusal adjustment, and to ensure a minimum final thickness of 2 mm. When zirconia is used, a 2 mm occlusal reduction or space must be achieved, also accounting for some occlusal adjustment, which should leave a restoration of no less than 1.5 mm occlusal thickness. Additionally, some minor internal mechanical retentive features are desirable with bonded zirconia onlays. It should be mentioned that bonded gold is a very good alternative in cases where the tooth is not visible or the patient is willing to pay the extra laboratory costs and is not concerned with esthetics.
Complex Endodontically Treated or Vital Teeth with Vertical Fractures Step By Step
Step 1: Endodontically treated or vital teeth with vertical fractures require extra material thickness for strength. If lithium disilicate is being used, a 2.5 mm reduction or space is the minimum desirable; if zirconia is used, 2 mm is necessary, avoiding subgingival margins or unnecessary axial reduction.
Step 2: Carefully remove all other existing caries and old restorative material. Using the first principle, remember to be extra careful around cervical margin areas to avoid unnecessary subgingival margins.
Step 3: After caries removal, assess what buildup, endodontic access repair, large undercut or weak cusp repair, enamel margin preservation, or margin elevation will be required. Perform all the repairs and buildups at the same time. Endodontic access should be filled to 1 mm above the level of the top of the pulp chamber, with bonded composite. Pay attention to correct bonding and repair techniques (discussed in Chapters 3, 4 and 9) and minimize polymerization shrinking while building up the tooth (discussed in detail in Chapters 3 and 9). Use an oxygen inhibitor to do final cure of buildups.
Step 4: Finish the preparation, treating the composite buildup as if it were a tooth.
Step 5: If a box is not present when removing proximal caries and preparing the tooth for appropriate restorative material thickness in the proximal areas, avoid making a traditional box (third principle), and use proximal margin separation to avoid creating subgingival margins unnecessarily. Use a diamond bur at the proximal area, with a U-shaped motion, to create the 2 mm reduction. An interproximal tooth shield can prevent unnecessary damage to adjacent tooth. Only after viewing 2 mm of the adjacent proximal tooth, should the margin separation procedure be performed, using a safe-side metal strip or a “mosquito” bur. Use an interproximal tooth shield to avoid touching the adjacent tooth. If the adjacent tooth is still in heavy contact, it is better to perform a more proximal reduction, as long as it does not go subgingival, to allow for easier margin separation. There will often be existing boxes present. Carefully clean them, and soften any sharp internal angles.
Step 6: Check that all margins flow, with no major sharp-angled transitions between proximal and facial–lingual margins. For endodontically treated teeth, it is better to create a deep 2 mm bevel in the enamel on the lingual margin to ensure better protection of tooth and a better direction for the enamel rod. A smaller bevel is desirable if this step might lead to getting too close to the gingiva or subgingival margin.
Step 7: Bevel the facial surface and color match. If the color of the tooth is ideal, a translucent material such as lithium disilicate can be used. Make a 2–3 mm bevel of the facial surface for improved blending of the restoration and a 2 mm lingual bevel to ensure good splinting of the tooth and better enamel rod exposure. In areas of high force, zirconia maybe a better choice. The trade-off with zirconia is a lack of translucency and poor blending. It is desirable to carry the facial bevel to 1 mm above the gingival margin, ending with a light 0.5 mm chamfer. A 1–1.5 mm lingual bevel should be added to the lingual butt margin, as long as this does not create a subgingival margin (Figure 6.23a,b).

Step 8: Take a final impression and provisionalize.
Step 9: The restoration should be fabricated with thicker lithium disilicate or zirconia.
Impression
The impression process can easily be argued as one of the most unpredictable and often the least successful part of the indirect restorative preparation visit (Figures 6.24, 6.25) [24]. The primary reason for this stress is because, when restorative margins are placed subgingivally, the possibilities of lacerating the gingiva with the drill, or difficult cord packing make tissue management very difficult, as any experienced clinician can attest. Conversely, when a supragingival minimally invasive protocol is in place, the restorative margins will most likely end up above the gums, and these problems become nonexistent. The wonderful news is that, since this is supragingival dentistry, taking an impression is easy. A triple tray combined with a hydrophilic impression material (such as Panasil, Kettenbach) will lead to great results with extremely rare retakes. Digital impressions will also benefit greatly from keeping the margins supragingival.


Materials and Techniques for Temporary Restorations
A significant reason why dentists have been opposed to onlays is the aspect of temporization. The assumption that onlay temporaries have more difficulty in maintaining adhesive integrity owing to a lack of mechanical retention is a reality, but with correct modification of the technique, the problem can be predictably overcome. The technique is very similar to a full crown provisionalization.
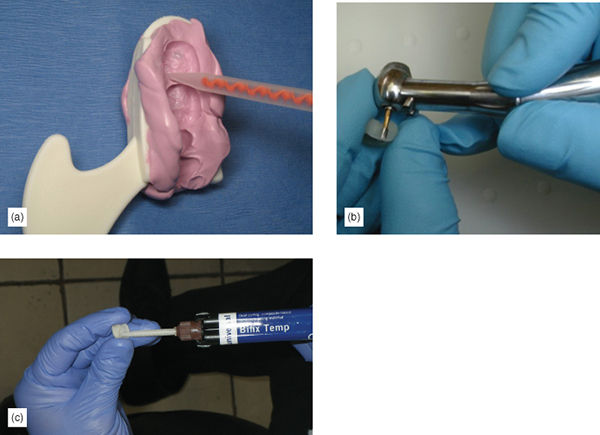
- A preimpression is taken with a hydrophilic alginate substitute silicone impression material, using a small segmental impression tray or triple tray using minimal material (Figure 6.26a). A good impression is always of paramount importance.
- After preparation, fill the tooth with a good bis-acryl provisional material, like Structure 3 (VOCO) or a non-bis-acryl, like Bisylis (Kettenbach). Make sure to avoid catching bubbles during the filling procedure (Figure 6.26b).
- Allow approximately 1 minute for full initial setting, the remove the impression and the temporary from the tooth; the material should be firm but slightly flexible.
- Re-seat the provisional in the mouth for an additional 3 minutes, to allow for final setting and to avoid polymerization shrinkage outside of the mouth, which may deform the temporary and end up affecting correct fit.
- Trim and polish (Figure 6.26c).
- A critical decision is the cementation material to be used:
- If the provisional is being made on a tooth with no buildup or dentin sealing, any resin-based temporary cement can be used, allowing some extra cement to go over the facial and lingual cavosurface margin, allowing that after setting the temporary will lock into place, and no excess should be left interproximally.
- If the provisional is being made on a tooth with buildup or dentin sealing, the tooth should be coated with a micro-brush with a traditional crown and bridge non-eugenol temporary cement, leaving a small island in the center of the tooth with no cement. A small amount of resin temporary cement should be injected in that island and the provisional seated, followed by correct removal of the excess.
References
- Edelhoff D. Tooth structure removal associated with various preparation designs for posterior teeth. Int J Periodont Restorative Dent, 2002; 22: 241–249.
- Stappert C. Fracture resistance of different partial-coverage ceramic molar restorations: An in vitro investigation. J Am Dent Assoc, 2006; 137(4): 514–522.
- Heymann H, Swift E, Ritter A. Indirect tooth color restorations, in Sturdevant’s Art and Science of Operative Dentistry, 6th ed. Elsevier Mosby, 2013, pp. 280–295.
- Dietschi D, Spreafico R. Adhesive Metal Free Restorations, Current Concepts for Esthetic Treatment of Posterior Teeth. Chicago: Quintessence Publishing, 1997, pp. 79–100.
- Kois DE, Chaiyabutr Y, Kois JC. Comparison of load-fatigue performance of posterior ceramic onlay restorations under different preparation designs. Compend Contin Educ Dent, 2012; 33(Spec No 2): 2–9.
- Magne P, Stanley K, Schlichting LH. Modeling of ultrathin occlusal veneers. Dent Mater, 2012; 28(7): 777–782.
- Schlichting LH, Maia HP, Baratieri LN, Magne P. Novel-design ultra-thin CAD/CAM composite resin and ceramic occlusal veneers for the treatment of severe dental erosion. J Prosthet Dent, 2011; 105(4): 217–226.
- Etemadi S, Smales RJ, Drummond PW, Goodhart JR. Assessment of tooth preparation designs for posterior resin-bonded porcelain restorations. J Oral Rehabil, 1999; 26(9): 691–697.
- Beier U, Kapferer I, Dumfahrt H. Clinical long-term evaluation and failure characteristics of 1,335 all-ceramic restorations. Int J Prosthodont, 2012; 25: 70–78.
- Ahlers MO, Mörig G, Blunck U, Hajt J, Pröbster L, Frankenberger R. Guidelines for the preparation of CAD/CAM ceramic inlays and partial crowns. Int J Comput Dent, 200; 12(4): 30–25.
- Stappert CFJ, Guess PC, Gerds T, Strub JR. All ceramic partial coverage restorations: Cavity preparation design reliability, and fracture resistance after fatigue. Am J Dent, 2005; 18: 275–280.
- Holberg C, Rudzki-Janson I, Wichelhaus A, Winterhalder P. Ceramic inlays: is the inlay thickness an important factor influencing the fracture risk? J Dent, 2013; 41(7): 628–635.
- Bakeman E, Rego N, Chaiyabutr Y, Kois J. Influence of ceramic thickness and ceramic materials on fracture resistance of posterior partial coverage restorations. Oper Dent, 2015; 40(2): 211–217.
- Ruiz JL, Finger WJ. Enamel margin preservation and repair technique. J Dent Res, 2016; 95(Spec Iss 5): abstract no. 2370749.
- Bakeman, E, Kois J. Posterior, all-porcelain, adhesively retained restorations. Inside Dentistry, 2009; 5(5): 20–30.
- Kois DE, Chaiyabutr Y, Kois JC. Comparison of load-fatigue performance of posterior ceramic onlay restorations under different preparation designs. Compend Contin Educ Dent, 2012; 33(Spec No 2): 2–9.
- Reeh ES, Douglas WH, Messer HH. Stiffness of endodontically treated teeth related to restoration technique. J Dent Res, 1989; 68: 1540–1544.
- Aquilino SA, Caplan DJ. Relationship between crown placement and the survival of endodontically treated teeth. J Prosthet Dent, 2002; 87: 256–263.
- Cheung W. A review of the management of endodontically treated teeth. Post, core and the final restoration. J Am Dent Assoc, 2005; 136(5): 611–619.
- Beier US, Kapferer I, Burtscher D, Giesinger JM, Dumfahrt H. Clinical performance of all-ceramic inlay and onlay restorations in posterior teeth. Int J Prosthodont, 2012; 25(4): 395–402.
- van Dijken JW, Hasselrot L. A prospective 15-year evaluation of extensive dentin-enamel-bonded pressed ceramic coverages. Dent Mater, 2010; 26(9): 929–939.
- Dietschi D, Duc O, Krejci I, Sadan A. Biomechanical considerations for the restoration of endodontically treated teeth: a systematic review of the literature, Part II (Evaluation of fatigue behavior, interfaces, and in vivo studies). Quintessence Int, 2008; 39(2): 117–129.
- Ma L. Load-bearing properties of minimal-invasive monolithic lithium disilicate and zirconia occlusal onlays: finite element and theoretical analyses. Dent Mater, 2013; 29(7): 742–751.
- Christensen GJ. The state of fixed prosthodontic impressions: room for improvement. J Am Dent Assoc 2005; 136(3): 343–346.
Supragingival Simple and Complex Onlay Preparation
Introduction
Correct preparation is crucial to the success of bonded onlays and partial crowns. In many cases, less than ideal results occur because clinicians have followed habits created by traditional school training and years of working in the same way. Crown preparation and gold onlay preparation require tooth preparation with exacting geometric features, retention and resistance form (Figure 6.1) Thus, when presented with a preparation for partial or full coverage porcelain onlay, instinctively it is assumed that this preparation will have similar mechanical features and only minor variations will be made to the preparation, as experience and the literature attest [1,2,3]. Additionally, lack of trust in the long-term success of adhesion continues to encourage clinicians to use mechanical retention during bonded onlay preparation. There is great variation in what is suggested to be the “ideal” onlay preparation. Some suggest modifications to geometric preparations, with time-consuming routine buildups to soften boxes, and other geometric features [4]. Others recommend flat preparations with limited features, and unbroken contacts, which some call flat-top design. This type of preparation has the disadvantage of the lack of indexing during fabrication and the inability to find a positive seating at cementation. Some consider that badly worn or damaged teeth are contraindicated for bonded onlays, and thus encourage full coverage (Figure 6.2a–d) [3,5]. While others suggest super-thin composite or ceramic occlusal veneers for severely worn teeth, which could easily lead to a short clinical life, as occlusion will wear through the restoration (Figure 6.3) [6,7]. Etemadi and colleagues determined that, in prosthodontic practice, the variation in tooth preparation design for all ceramic posterior restorations is quite large, and suggested that more needs to be known about the consequences of such variation [8]. Adhesively retained, partial-coverage bonded porcelain onlays do not require exacting tapers on axial walls, internal angles, offsets, grooves, and other retention and resistance features used in mechanically retained restorations. Adhesion is sufficient to retain the final restoration.
Procedures which employ adhesive retention and have no need for mechanical retentive features have many advantages. Many years of experience and thousands of restorations have shown that bonded onlays can be used successfully in cases when the tooth is only missing a limited amount of structure (for example, one or two cusps, and for badly damaged endodontically treated teeth (Figure 6.4a–d). Clearly, the preparation required for a simple tooth should be different from the preparation for a complex, badly damaged tooth. Correct use and a proper understanding of adhesion and new restorative materials should allow the restorative dentist to select a material that best fits the condition of the tooth.
Purpose of Tooth Preparation and Universal Principles
The purpose of tooth preparation is first to remove the damaged and carious tooth structure, and then to create space for the restorative material. Tooth preparation should also include retention and resistance forms (for traditional mechanically retained restorations), creating a design that facilitates laboratory fabrication of the restoration, simplifies cementation or adhesive bonding of the restoration. An additional preparation requirement, unique to the supragingival approach, is the use of a protocol which avoids or greatly limits the risk of placing the restorative material subgingivally. Clearly, retention and resistance forms are unnecessary when we use adhesion. Supragingival minimally invasive bonded restoration requires a preparation that preserves more of the tooth. It is tissue protective and is, in fact, simpler to perform than traditional crown and bridge work. To achieve the above requirements, there are some universal rules that should be applied to all bonded onlay preparations. While some principles are widely agreed upon, some are open to the interpretation of the available literature [9,10] mixed with clinical experience.
Basic Universal Principles for Onlay Preparations
A minimum thickness of 2 mm is desirable for the restorative material [11]. Some studies suggest that very thin restorative material becomes weaker and more likely to fracture [3], although other studies show that strong materials such as lithium disilicate and zirconia can perform well when thinner, or when bonded with resin cement [12,13]. Thus a 2 mm space or reduction should be the goal, on the understanding that sometimes, during occlusal adjustment, porcelain will be removed and the final thickness will be less.
It is reassuring to realize that the pulp is farther away from the occlusal surface of the tooth. Thus, occlusal reduction will cause the least trauma to the pulp, compared with other surface reductions, especially axial reduction (Figure 6.5). Sufficient reduction is important so it is desirable to confirm the space using an occlusal reduction ring of the clinician’s choice or a flexible clearance tab, to ensure an accurate 2 mm reduction (Figure 6.6). A thermoplastic tab may be used, on which the patient bites down after it has been softened by hot water. The space is then measured with calipers (Figure 6.7).
A flatter preparation is desirable, as it preserves more tooth structure. Geometrical preparations can prevent full seating of a restoration, owing to the film thickness of the adhesive cement (Figure 6.8). The occlusal reduction should follow the same morphology of the natural tooth, and not be a full flat-top reduction. If the condition of the tooth is such that, after occlusal reduction and caries removal, the preparation is flat, it is unnecessary to reduce it further to create grooves of isthmus – a flat preparation will be well retained by the adhesive. Proximal ridge areas are prepared to be more concave, but not as a box (Figure 6.9). Reduction follows the inclination of the cusp and grooves. The result is a wavy preparation which resembles the initial natural occlusal surface. A nicely sloped and anatomical occlusal reduction preserves more tooth structure and also serves for indexing when seating the restoration: the onlay should only fit one way (Figure 6.10).
In partial occlusal coverage inlay/onlay combination, the preparation must always ensure a minimum of 2 mm in the transitional areas (Figure 6.11). The prepared tooth should have internal rounded angles.
Great effort should be taken to maintain supragingival, or at least equigingival margins. This can be achieved by the implementation of the five rules of supragingival dentistry previously discussed in Chapter 3. Ideally, enamel margins should be retained if at all possible. However, if this is not possible, it is not a contraindication. Procedures to ensure preservation of enamel margins should be used [14].
Use compressive force on porcelain, whenever possible, and avoid shear force. This generally means avoiding axial reduction, as in traditional mechanically retained crowns. Axial reduction increases shear forces on the final restoration (Figure 6.12).
After occlusal reduction of the lingual cusps, when indicated, create a shallow 1 mm bevel, fully within the enamel, to ensure better enamel rod direction. Avoid this step if you are in danger of getting too close to the gingiva or the subgingival margin. It is acceptable to leave a lingual butt margin.
Facial bevel for esthetic blending of the onlay restoration is ideal. The bevel should be entirely within the enamel, at approximately 45 degrees (Figures 6.13a–c, 6.14a,b). The thin, knife-edge porcelain at the end of the bevel will provide for maximum blending capacity. Knife-edge margins can be easily fabricated with pressable lithium disilicate. Fabricating this type of thin margin with a computer-aided designed and manufactured (CAD-CAM) restoration may be more challenging, overbulking the margins at CAD design and after adhesive cementation. Finishing the restoration to the thin design is a way of circumventing the limitations of CAD-CAM design. While some consider thin porcelain margins to be contraindicated [15], other studies may suggest equal success with bevelled and unbevelled onlays [16]. My own extensive clinical experience of thousands of restorations, with not one fracture at the margin, shows that clinical reality sometimes does not follow “supposed truths” or even in-vitro testing.
Slight interproximal separation, while not absolutely necessary [15], is desirable, to allow the laboratory or the scanner to easily view the restoration margins and to provide clean margins. Unclear margins lead to defective margins (Figure 6.15).
This research/article was written with the help of our AI research paper writer.
Stay updated, free dental videos. Join our Telegram channel
VIDEdental - Online dental courses


