Learning Objectives
After reading this chapter, the student should be able to:
- 1.
Relate the history of single tooth implants.
- 2.
Enumerate the steps in the diagnosis and treatment planning for a single tooth implant.
- 3.
Describe how to remove a tooth with minimal trauma and prepare the site for implant placement.
- 4.
Describe the esthetic zone for single implants.
- 5.
Explain the conditions that lend themselves to a single tooth implant without a flap.
- 6.
Describe the steps in the surgical placement of a single tooth implant without a flap.
- 7.
Identify the nonesthetic zones for single implants.
- 8.
Describe hard and soft tissue considerations for placement of a single implant in nonesthetic zones.
- 9.
Describe flap design and wound closure for a single implant in nonesthetic zones.
- 10.
Describe the principles of maintaining single implants.
History of Single Implants
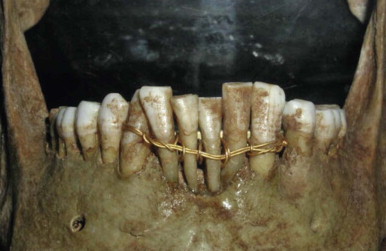
From the very beginning, humans have strived to retain their teeth ( Fig. 23.1 ) and also to replace teeth when necessary. A pleasing smile has had enormous psychosocial importance since earliest times. Stone, metal, ivory, and sea shell implants are all cited in the archaeological records of China, Egypt, and the Americas. Success, however, was rare. In 1685, in the first modern textbook on dentistry (The Operator for the Teeth), Charles Allen suggested that the teeth of dogs, baboons, and sheep be used for implantation. However, the possibility of disease transmission was recognized.
Transplantation was also described by Pare, Fauchard, and Hunter, who used boiling for disinfection. Autotransplantation still has a place in clinical dentistry today. In 1807 Maggiolo developed a single-stage gold implant that was to be placed in fresh extraction sockets and allowed to heal passively without loading; however, pain and inflammation resulted. At the beginning of the twentieth century, Greenfield introduced latticelike, precious metal basket implants that were used to support complete dentures and single teeth. This hollow basket design continued to inspire implant designs used through the 1990s.
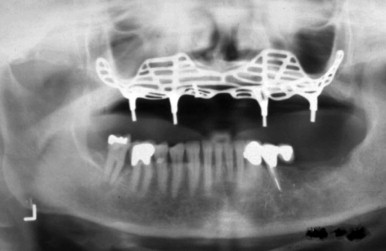
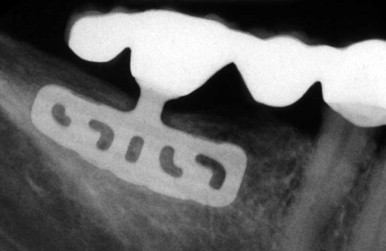
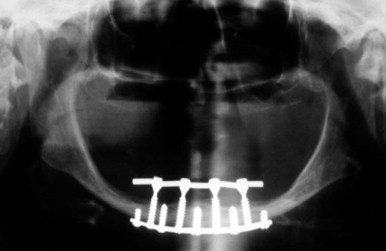
From the 1930s through the 1960s, new metallic alloys were used to form a variety of subperiosteal implants ( Fig. 23.2 ) that are classified as eposteal (placed on or in bone) implants. Other types of implants include endosteal blade implants ( Fig. 23.3 ) and transmandibular, or staple, implants ( Fig. 23.4 ). These approaches were generally directed toward supporting multiple prosthetic teeth. Most of these implants were one piece and were not fully submerged. Various one-stage endosteal root form pins, screws, and cylinder designs were also developed. In the 1930s, Strock used immediate placement and a porcelain crown for single tooth replacement with a Vitallium implant. He reported a 15-year case study, noting the role of occlusion, and described the histology. Adams considered a two-stage surgical procedure for placing a cylindrical screw implant with a healing cap.
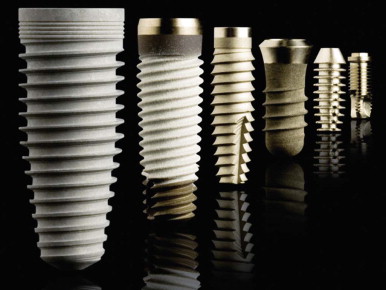
In the late 1940s Formiggini introduced a helicoidal screw tantalum implant. This design was modified by Chercheve in the 1960s to increase the distance between the screw threads and implant head ( Fig. 23.5 ). Some of these endosteal designs began to resemble contemporary solid, cylindrical, moderately tapered, and threaded osseointegrated implants ( Fig. 23.6 ). Although the Dental Implants: Benefit and Risk Consensus Development and Technology Conference, held in 1978 at the Harvard School of Dental Medicine, set new standards for reporting implant data, an enthusiastic Brånemark began to publish a series of experimental studies on the use of intraosseous anchorage of dental prostheses in the late 1960s, leading to a landmark 10-year study in 1977. His two-stage threaded titanium screw-type root form implant (Nobelpharma, now Nobel Biocare) was first presented in North America in 1982 ( Fig. 23.6 ) at the Toronto Implant Conference organized by Dr. George Zarb.
Osseointegrated endosseous implants had been first used in the treatment of fully edentulous jaws more than four decades earlier. Brånemark’s original protocol for dental implant placement in the anterior parts of edentulous jaws included a mucobuccal flap; a two-stage surgical approach, followed by 3 to 6 months of stress-free healing to allow for osseointegration; and restoration with complete implant-supported prostheses. By 1985 Zarb, Jansson, and Jemt were already investigating the longitudinal application of osseointegrated implants in the areas of overdenture application, treatment of partially edentulous patients, and single tooth implants. Many innovations facilitated achievement of the current, predictable, widespread use of single tooth implants; however, future challenges may arise from the rapid launching of untested novelties or procedures. The 1988 Consensus Development Conference on Dental Implants, held at the National Institutes of Health, added several more suggestions.
Diagnosis and Treatment Planning for Single Implants
Even though there have been numerous advances in the field of dentistry, many teeth still develop decay and/ or periodontal disease or are removed due to traumatic injuries. Traditional treatment options called for the restoration of diseased teeth with root canal or periodontal treatments and/or fixed or removable prostheses. When there is doubt that the teeth can be restored or treated, both practitioners and patients frequently ask whether the tooth should be saved by performing a root canal and periodontal treatment or whether extraction with replacement with an implant is the better choice.
Appropriate diagnosis of the patient’s condition allows the dentist to create a suitable treatment plan that can be properly executed. All treatment planning must have a proven scientific basis to provide a successful result. Without anticipating potential failure, any immediate success is limited. A complete and accurate diagnosis must be performed systematically. This evaluation should include obtaining the patient’s chief complaint, comprehensive pretreatment evaluation of the patient, a thorough radiographic examination, necessary tests, and a thorough review of the patient’s dental and health history to identify any conditions that may interfere with implant therapy. The review should include cardiovascular health; any history of diabetes, osteopenia, or osteoporosis; anticoagulation therapy; and any history of smoking. A thorough examination of the patient’s oral cavity also should be performed to identify areas of disease or tooth malposition that may affect the overall success of the final implant prosthesis. The evaluation should include decayed and missing teeth and the relationship of the opposing dentition and related interdental spacing. A thorough radiographic examination also is necessary for proper implant placement.
Diagnosis is important and has to be based on careful systematic examination and analysis of the data. Once the diagnosis has been made, proper treatment procedures usually can be carried out ( Fig. 23.7 ). The patient’s expectations and desires can often complicate the treatment planning. An ideal treatment plan tackles the patient’s chief complaint, effectively meets the patient’s expectations, addresses the biologic environment and scientific evidence, and restores or maintains the function and esthetic.
Tooth Extraction and Site Preparation
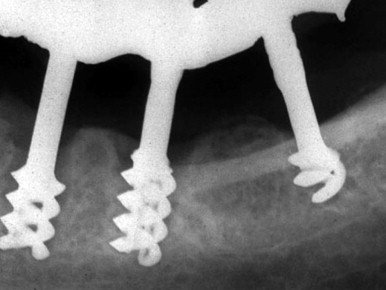
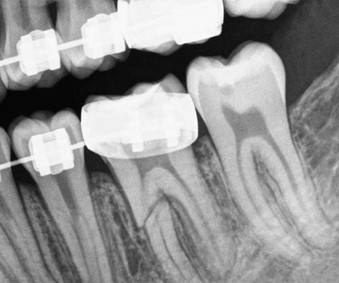
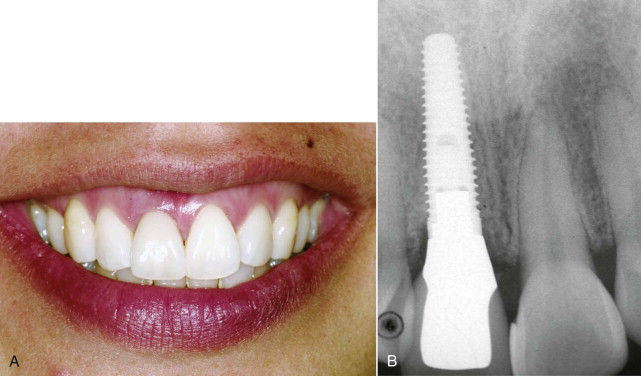
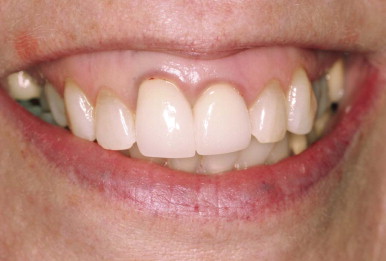
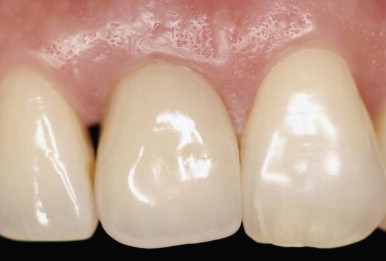
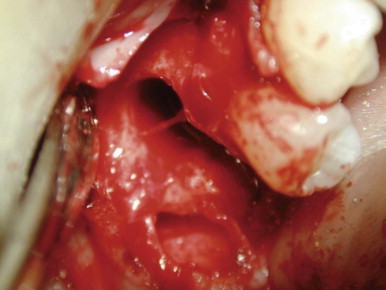
Dental implants are the preferred treatment for the replacement of missing teeth. Implant placement is a very predictable treatment for replacing lost or missing teeth, and long-term survival rates of 85% to 100% have been reported. Today, osseointegration is not the only important goal of the treatment. Establishing a balance between the implant restoration and the surrounding soft tissues is also of great importance ( Fig. 23.8 ). This is especially true in the esthetic zone. Tooth removal is often accompanied by varying degrees of loss of alveolar bone and soft tissue alterations that create a challenging situation for restoring soft tissue esthetics, ideal implant placement, and tissue management ( Fig. 23.9 ). The loss of a tooth results in an immediate loss or fracture of alveolar bone, interproximal bone, and the papilla and may result in the recession of the marginal gingiva, formation of interproximal “black triangles” ( Fig. 23.10 ), or a bulky restoration. Morphologic changes in the alveolar bone and soft tissue have been reported after extraction. An average loss of 2 mm of bone width may occur after loss of a tooth. Incomplete bone fill of a socket and reduction of alveolar bone height also have been reported. If the situation is not corrected, this loss tends to impede ideal positioning of a dental implant replacement. Fortunately, this deficiency can be successfully overcome through the use of barrier membranes.
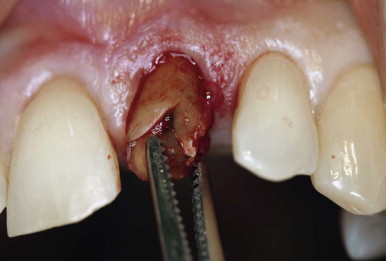
Minimally Traumatic Extraction
The tooth should be removed with a periotome instead of the conventional elevator that is associated with hard and soft tissue trauma. A periotome is typically used for extraction of a tooth in the esthetic area to prevent excess trauma to the interproximal papilla and marginal gingiva. A periotome has a thin, flat blade that conveniently facilitates tooth removal by severing the gingival attachment and luxating the tooth in the gingival sulcus. A periotome should be inserted into the periodontal ligament space along the root surfaces with the continued exertion of apical pressure. This pressure should be continued with or without using a surgical mallet until the periotome penetrates to a sufficient depth in the gingival sulcus to initiate tooth mobility ( Fig. 23.11 ). A periotome is frequently used in the interproximal and palatal aspect of a tooth to prevent damage to the buccal plate in order to maintain integrity of the buccal wall and gingival margin.
Single Tooth Implant
During the clinical examination for implant placement, the dental practitioner may encounter horizontal, vertical, and intraalveolar bone defects ( Fig. 23.12 ). These are common and therapeutically important. Proper diagnosis of the patient’s condition allows the dental practitioner to devise a suitable treatment plan that can be predictably executed. The practitioner can choose either to perform guided bone regeneration (GBR) simultaneously with implant placement or to use a staged approach.
Single implants can replace any tooth in the dental arch. For purposes of single implant placement, the various areas of the oral cavity are broadly classified as comprising the esthetic zone (i.e., the central, lateral, canine, and first premolar areas in the maxilla) and the nonesthetic zone (i.e., the posterior maxilla, posterior mandible, and anterior mandible). This allows the characteristics of each area to be explained separately.
Single Implants in the Esthetic Zone
As mentioned, the esthetic zone in the oral cavity consists of the central, lateral, canine, and first premolar areas in the maxilla. These areas are very important because of their role in the esthetic appearance of the patient. A large number of articles have been published on the subject from surgical and prosthetic viewpoints. The principles of implant surgery and osseous and soft tissue considerations in these areas are different from those in other areas of the oral cavity.
After necessary analysis of the region to undergo implant surgery, taking into account osseous and soft tissue considerations, the patient is ready for implant surgery. As described previously, the esthetic zone consists of the central, lateral, canine, and first premolar areas of the maxilla. The remaining mandibular and maxillary areas are not included in the esthetic zone. Before performing implant surgery, the dental surgeon must consider three important questions:
- 1.
Will the implant surgery be immediate?
- 2.
If the tooth has already been extracted, how long has it been since the extraction?
- 3.
Are any bony defects present in the area? If so, is the defect vertical, horizontal, or both?
Immediate Implant Surgery without Any Flaps
If the tooth in question should be extracted because of endodontic problems or root fractures, immediate implant surgery can be carried out without any flaps if the following clinical characteristics are noted:
- ▪
Single-rooted tooth
Stay updated, free dental videos. Join our Telegram channel
VIDEdental - Online dental courses


