Introduction
This article reports the use of an orthodontic mini-implant for a temporary crown restoration in a small edentulous space after limited orthodontic treatment.
Methods
Two clinical cases are presented: a 23-year-old woman and a 14-year-old boy. In the adult patient, a 2-piece orthodontic C-implant (Cimplant, Seoul, Korea) was placed in a 3-mm wide edentulous space to build up a temporary crown restoration after a short orthodontic treatment to regain space for a missing mandibular right permanent lateral incisor. In the boy, a C-implant was placed in the space resulting from an avulsed maxillary right permanent lateral incisor to prevent aggressive alveolar bone resorption after dental trauma. Both patients were followed for more than 4 years of retention to evaluate the stability of the temporary crown restoration built up on the orthodontic mini-implants.
Results
Both patients had successful long-term results, confirmed by clinical and radiographic examinations. Both were pleased with the results and plan to retain the orthodontic mini-implant temporary crown restoration until they are ready for a permanent restoration later.
Conclusions
A 2-piece orthodontic C-implant system can be used to maintain edentulous space after active orthodontic treatment.
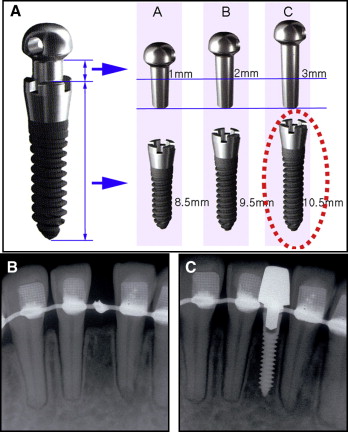
The C-implant (Cimplant, Seoul, Korea) is a 2-piece orthodontic mini-implant system developed by Dr Kyu-Rhim Chung in Korea in 2000; its clinical application as a temporary skeletal anchorage device has been reported ( Fig 1 ). The unique biomechanics of this system overcome many limitations encountered in conventional orthodontic therapy. The characteristics of the C-implant as an orthodontic skeletal anchorage device resemble Bränemark’s standard restorative dental implant system developed in 1951. Dental implant systems are currently accepted as the treatment of choice for permanent restoration of an edentulous area of a single tooth in contemporary restorative dentistry. Various dental implant systems have been introduced through years of design modifications regarding shape, diameter, length, surface treatment methods, connection types, and so forth for different clinical conditions.
The Bolton ratio discrepancy and congenitally missing permanent teeth are common clinical findings during the initial diagnoses of orthodontic patients. If the goal of active orthodontic treatment is to regain and restore the lost space, the conventional space maintenance option is either a Maryland bridge or a removable retainer with a pontic. Most patients prefer the cemented Maryland bridge appliance. However, the drawback of this treatment option includes inevitable permanent damage of the adjacent natural tooth structures. In addition, it does not accommodate transverse dimensional changes of the dentition during the posttreatment retention period.
Therefore, as an alternative to the Maryland bridge, a single-tooth mini-implant has been reported to serve as an abutment for a crown restoration with a long-term retention period. Also, a self-drilling 1-piece orthodontic miniscrew can be used for temporary abutment. However, this miniscrew can, at most, be used as a space maintainer with no capability of esthetic restoration for the edentulous area during the posttreatment retention period because of its limited head design. It cannot provide enough stability to endure occlusal forces on an esthetically restored temporary crown. This might be because most 1-piece orthodontic miniscrews do not have a surface treatment that encourages osseointegration between the mini-implant and the bone. In addition, esthetic temporary crown buildups can be difficult to do with a 1-piece orthodontic miniscrew design. Driven by necessity for these orthodontic patients, minitype restorative dental implants have recently been developed in periodontics and prosthodontics as a novel treatment option for a fixed-type temporary crown restoration for the residual space after orthodontic treatment. The interdisciplinary treatment approach for temporary crown restoration at the end of the orthodontic treatment can sometimes be cumbersome to the patient with extra costs and visits to various clinics; this might delay completion of orthodontic treatment.
In such instances, an orthodontic 2-piece mini-implant can be an easy in-office solution that would eliminate the need for interdisciplinary referrals. The dimension and design of a C-implant make it an ideal size abutment for any small orthodontic edentulous area. The C-implant also facilitates the esthetic fabrication of a temporary crown by using the indirect buildup method ( Fig 1 , B and C ). In addition, the sand-blasted with large grit and acid-etched (SLA) treated surface of the C-implant body promotes osseointegration and makes the C-implant–based temporary crown an ideal treatment when the alveolar bone of the edentulous area is at risk of further resorption. In cases of dental trauma such as complete tooth avulsion or lost teeth, it is recommended to place a C-implant within the first 3 months after the dental accident and subsequent wound healing.
The standard dimensions of a C-implant used for temporary crown restoration are 10.5 mm in length and 1.8 mm in diameter. The length of the mini-implant body used for temporary restorations is much longer than that used for orthodontic anchorage. The surface of the C-implant body is SLA treated to increase the degree of osseointegration between the bone and the mini-implant. The C-implant body connects with its head part by a friction-grip joint. Although 3 lengths of the head part are available (1, 2, and 3 mm), the 3-mm head is usually recommended when the C-implant is used for temporary crown restorations.
The closed method ( Figs 2 and 3 ) does not require an incision for a periodontal flap operation. This technique is indicated when the full width of the alveolar crest is intact with palpation. After local anesthesia, a tissue punch marks the implant placement point, and the 1500-rpm straight low-speed handpiece drills a pilot hole under isotonic saline-solution irrigation. The 1.5-mm diameter guide drill (Stryker Leibinger, Freiburg, Germany) is designed to penetrate the single cortical wall and therefore has minimum risk of dental root damage. A 1.8-mm diameter C-implant body is then screwed into the drilled hole with a manual driver.
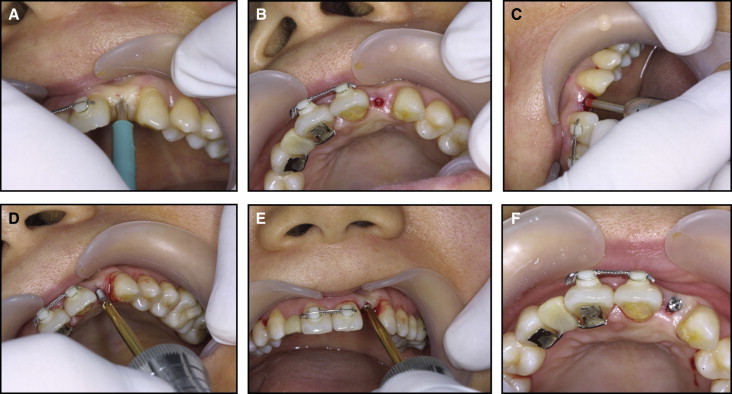
If the alveolar bone crest is buccolingually resorbed after active orthodontic treatment regaining space, it is recommended to place the C-implant body with the open method ( Fig 4 ) with a periodontal flap. The actual anatomy of the lateral alveolar crest walls might differ from the overlying gingival tissues. A gingival flap incision is made by using a number 15 blade, followed by determination of the position and direction of the C-implant body placement ( Fig 4 , A and B ). The mucosal depth of the alveolar crest determines the size of the C-implant head attachment. The temporary crown is created 6 to 8 weeks after placement of the C-implant body to avoid unnecessary loading and gingival irritation. A 3-mm head is effective in helping the sutured area heal without a second surgery to build the temporary crown restoration above the mini-implant body.
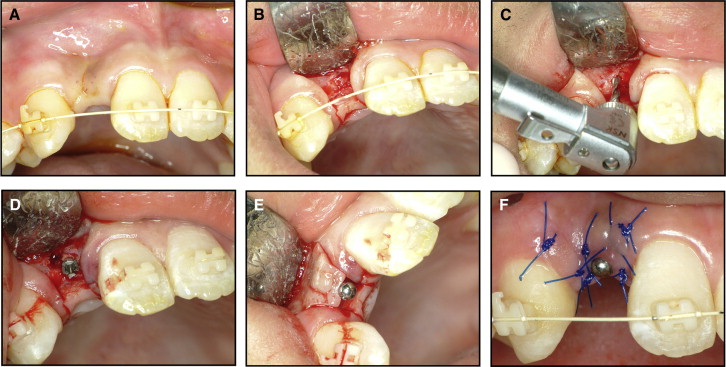
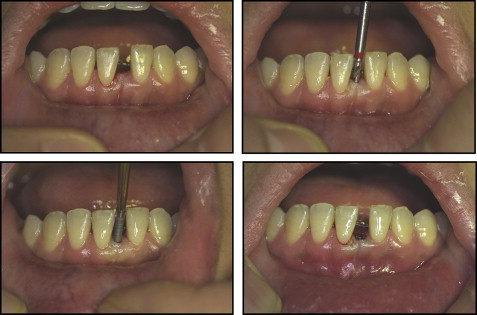
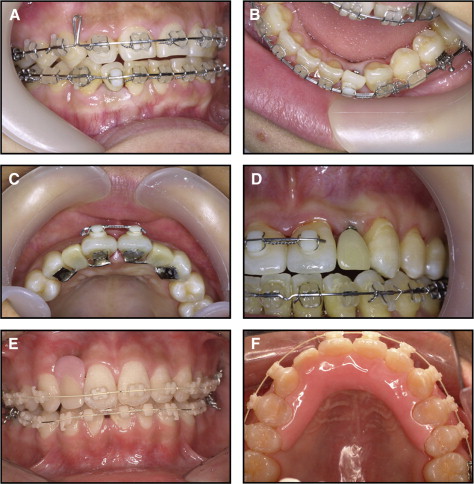
For 6 to 8 weeks after placement of the C-implant body, the edentulous space is maintained by a pontic that is engaged in the finishing orthodontic archwire ( Fig 5 , A and B ) or in the lingual fixed retainer ( Fig 5 , C and D ). A removable type of retainer with a pontic can also be used ( Fig 5 , E and F ).
There are 3 methods for making a single temporary crown on top of the C-implant body ( Fig 6 ). The first method uses a small extension wire through the hole of the head component and allows direct composite buildup ( Fig 6 , A-C ). The C-implant head component is a titanium alloy that is difficult to cast. In addition, the head part is an ideal round shape with minimal retention. Therefore, an 0.8-mm wire is often placed in the hole of the head part to create a retentive arm in the resin buildup in the direct method. This approach is straightforward and has benefits of easy resin add-on or shave-off options as the edentulous space size changes in a growing patient.
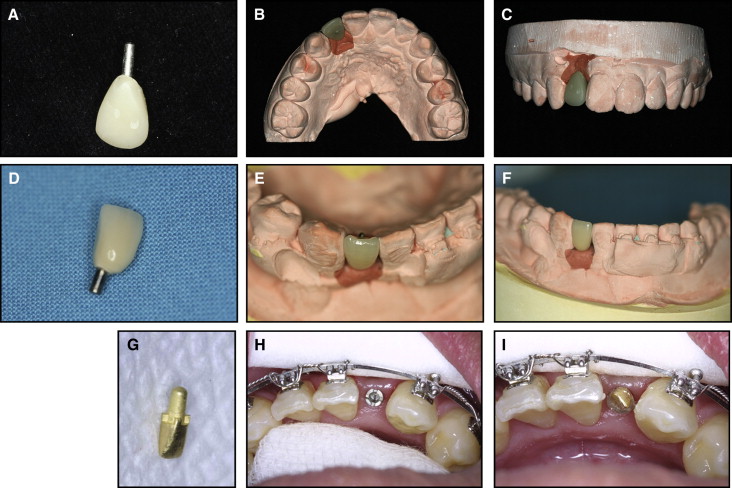
The second method is to prepare the head part of the C-implant intraorally with burs into an ideal abutment shape and to treat this prepared head part with gold plating ( Fig 6 , D-F ). Again, the size of the head part is determined based on the gingival depth at the alveolar crest and on the depth of the mini-implant body placement into the bone. Although the titanium-alloy material of the mini-implant head part is difficult to cast and does not permit porcelain buildup, the gold plating does allow porcelain buildup for a temporary crown. This technique uses an indirect method of telescopic abutment casting and porcelain buildup that adds a few more steps of procedure, but the resultant dental restoration is more durable with better esthetics. In addition, its high resistance to staining and fracture even enables this temporary crown to function as a final dental restoration if necessary.
The third method is similar to that of the standard restorative dental implant crown fabrication with an impression coping and a full-cast abutment ( Fig 6 , G-I ). In general, the 1-mm long head part of the mini-implant is used as an impression coping for orthodontic temporary crown fabrication. A pickup impression is taken after attaching a small piece of 0.8-mm diameter wire to the hole of the 1-mm long head part for better retention. After the wax up and casting of the full gold abutment, a precisely fitting clinical crown restoration is built on top of it. The cast gold abutment is placed into the mini-implant body (friction retention), and then the crown is cemented to the cast abutment.
Clinical applications
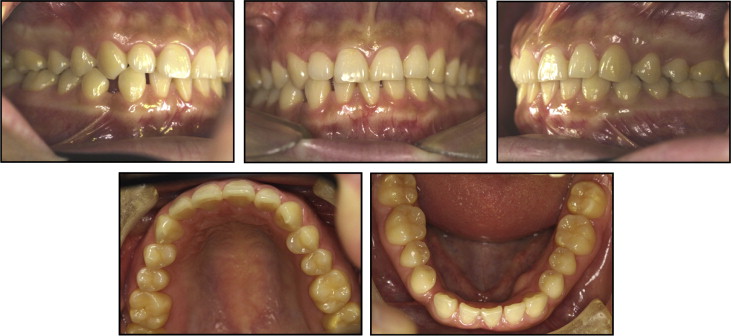
A 23-year-old woman came to our office with primary concerns of excessive spacing distal to the mandibular right canine and tilted mandibular central incisors ( Fig 7 ). Her general dental and skeletal patterns were in a solid Class I occlusion. However, her overjet and overbite were compromised because of the missing mandibular lateral incisor. Therefore, the treatment goal was to restore the missing tooth rather than closing the space and risk further compensation of the overjet and overbite. Treatment objectives included reestablishing the original space of the mandibular right lateral incisor by distalizing the adjacent canine and uprighting the mandibular central and lateral incisors while minimizing the involvement of the posterior dentition.