Porcelain laminate veneers (PLVs) provide the dentist and the patient with an opportunity to enhance the patient’s smile in a minimally to virtually noninvasive manner. Today’s PLV demonstrates excellent clinical performance and as materials and techniques have evolved, the PLV has become one of the most predictable, most esthetic, and least invasive modalities of treatment. This article explores the latest porcelain materials and their use in minimum thickness restoration.
The treatment of healthy but unesthetic teeth has always presented a challenge for the dental practitioner. The introduction of the acid-etch technique by Buonocore and the development of composite resin by Bowen expanded the options for treatment of healthy teeth that were of improper shape, deficient in size, or unesthetic in color. These initial discoveries followed by the work of many others brought to light the possibility of enhancing teeth with porcelain laminate veneers (PLVs).
Since the early 1980s, the development and application of porcelain bonded to tooth restoration using a PLV has enjoyed widespread enthusiasm and success and has now become a widely accepted and popular procedure.
PLVs provide the dentist and the patient with an opportunity to enhance the patient’s smile in a minimally to virtually noninvasive manner. Today’s PLV demonstrates excellent clinical performance and as materials and techniques have evolved, the PLV has become one of the most predictable, most esthetic, and least invasive modalities of treatment. This article explores the latest porcelain materials and their use in minimum thickness restoration.
History
The evolution and development of adhesive technology over the past 50 years has provided the foundation for today’s veneering techniques. The combination of Buonocore’s acid etch research and Bowen’s composite resin findings had made possible the technology that allows for the bonding of composite resin to tooth structure in a predictable manner.
In 1928, C.L. Pincus introduced the “Hollywood Veneer.” This veneer was not dissimilar from today’s porcelain veneers, except that they were not etched, but rather held to place with denture adhesive. Obviously, retention was a significant issue and these restorations were basically for a temporary cosmetic change for actors to be used in filming and still photography. They needed to be removed before eating and were not functionally sound.
This was then followed by an acrylic resin veneering technique using a chemical bond between the composite resin, now used as cement, and a thin acrylic veneer. These veneers were fabricated using indirect acrylic and were bonded to the etched enamel using an ultraviolet light–cured composite resin as the cementing medium.
Introduced in 1979, the Mastique laminate veneer system (caulk) was the first commercially available, mass-produced attempt to bring a veneering system to the market. Preformed acrylic veneers were selected and bonded to the teeth.
In time, the use of an acrylic system for veneering proved to be unsuccessful in the long term. The chemical bond was a weak link leading to debonding and/or fractures. Additionally, esthetically the acrylic lacked the ability to truly simulate tooth structure in either appearance or in function to abrasive forces.
Porcelain, however, had a long history as a restorative material in dentistry. Its ability to simulate the optical properties of tooth structure, color stability, stain, and wear resistance along with its history of biocompatibility warranted a search to find a mechanism of attachment to the enamel that would be durable.
Simonsen and Calamia provided the initial studies to demonstrate that porcelain etched with hydrofluoric acid could be bonded to composite, which in turn was bonded to etched enamel. Additionally, they demonstrated that this bond would be further enhanced using a silane coupling agent. These studies created the foundation that is still used today in the laboratory fabrication of PLVs and how they are adhesively attached to etched tooth structure. Further studies confirmed these findings.
Initially, PLVs were used in a “no-prep” manner. The PLVs were fabricated from stacked feldspathic porcelain. These porcelain veneers were typically 0.5 to 0.7 mm in thickness. The concept was that these restorations were elective/cosmetic in nature and that a noninvasive approach would be ideal. Although the ethical approach of not wanting to remove healthy tooth structure was admirable, it often provided less than desirable results. The veneers often appeared bulky and the soft tissue would show signs of irritation.
As PLVs continued to evolve, a minimally invasive approach was used to provide a more esthetic and biologically compatible restoration. A minimal preparation of 0.5 mm was used to allow for room to place a 0.5- to 0.7-mm-thick piece of porcelain over the tooth. The 0.5 to 0.7 mm of preparation is needed to be able to adequately mask unesthetic areas and/or change the color as well as provide the minimal strength needed for the fabrication and delivery of the PLV.
The method of stacking feldspathic porcelain using either a platinum foil technique or refractory die is time intensive and labor intensive and requires a skilled and experienced ceramist. Additionally, stacked porcelain is a fragile material. In an effort to provide a stronger porcelain veneer that was easier for more ceramists to produce, the industry introduced pressed ceramics in 1991 using a leucite-reinforced glass. Using a “lost-wax” technique in combination with staining and/or a cut back and add technique, ceramists now had a system that had more strength, was easier to fabricate, and had excellent esthetic potential. Now more ceramists could meet the esthetic requirements of the practitioner and the patient.
Pressed ceramics (examples: Empress by Ivoclar [Amherst, NY, USA], OPC by Pentron Ceramics [Somerset, NJ, USA]) gained great popularity in the mid 1990s and into the early 2000s, as dentists found great success in providing their patients with highly esthetic results.
This success did not come without some sacrifice. Early leucite-reinforced restorations had to be fabricated in a greater thickness than stacked porcelain. Typical reduction requirements of the time recommended 1.0 mm of reduction. This more aggressive reduction now created a tooth preparation that was mostly in dentin. So the problem created was twofold. First, the ability to bond to dentin is not as predictable or as strong as the bond to enamel. Therefore, debondings became more common. Second, the more aggressive removal of tooth structure was found to be very concerning to dentists and patients alike. Concerns were expressed within the dental community questioning the ethics of sacrificing healthy tooth structure for purely esthetic gains.
In reaction to this concern by dentists and patients, there was an evolution to return to the initial minimal prep design and there was even a movement to revisit the original no-prep concepts.
Past clinical experience and almost 30 years of data show that PLVs are very predictable and successful when the PLV is bonded to enamel. Current best practices in use of PLV for creating an esthetic change is to use a very minimal, if not noninvasive, tooth preparation that is restored with a very thin piece of porcelain. Selecting the proper materials, good case selection, proper techniques, and partnering with a talented ceramist are cornerstones to successful outcomes with PLV therapy.
Indications for PLV
PLV should be used as a conservative solution to an esthetic problem. They are primarily indicated for teeth that are discolored, have displeasing shapes or contours, lack of size and/or volume, or to eliminate diastemata. Additionally, porcelain veneers can have a place in the restoration of loss of tooth structure owing to disease or trauma.
In 2002, Magne and Belser presented the following classification for indications for PLV:
-
Type I: Teeth resistant to bleaching
-
Type IA: Tetracycline discoloration
-
Type IB: Teeth that are unresponsive to bleaching
-
-
Type II: Major morphologic modifications
-
Type IIA: Conoid teeth (peg laterals)
-
Type IIB: Diastemata or interdental triangles to be closed
-
Type IIC: Augmentation of incisal length or facial prominence (contour)
-
-
Type III: Extensive restorations
-
Type IIIA: Extensive coronal fracture
-
Type IIIB: Extensive loss of enamel by erosion and wear
-
Type IIIC: Generalized congenital malformations.
-
Within Magne and Belser’s classification system the use of minimal-preparation and no-preparation porcelain veneers can achieve the desired esthetic outcome in a conservative manner for Types I and II.
Type III cases are more extensive in nature and the treatment goals have as much to do with returning to proper function as they do with esthetics. The use of more aggressive preparation may be necessary to achieve predictable functional results. In many of these cases, the use of stacked ceramics would often not be the first choice. These more extensive restorations would benefit from the stronger leucite-reinforced or lithium disilicate materials now available.
Contraindications
-
The following are contraindications to use of PLVs:
- 1.
Teeth exposed to heavy occlusal forces, eg, moderate to severe wear owing to bruxism
- 2.
Severely malpositioned teeth
- 3.
Presence of soft tissue disease
- 4.
Highly fluoridated teeth: such teeth may resist acid demineralization and give rise to retention issues
- 5.
Teeth in which color modification can be successfully achieved with various bleaching techniques
- 6.
Teeth with extensive existing restorations.
In cases of minor incisal wear owing to bruxism, it is often possible to restore the incisal length using PLVs. However, it is imperative that the dentist evaluates the occlusal scheme and manages the occlusal forces before any treatment with PLVs is attempted. Many times in these types of cases an occlusal guard is indicated to assist in the prevention of porcelain fracture postoperatively. Excellent patient communication is required before starting such as case.
In cases of misalignment, it is an ethical obligation to discuss the use of orthodontics to create proper alignment. The noninvasive nature of orthodontics will constantly be a better treatment option than any option that includes removal of healthy tooth structure. In the late 1990s, the term “instant orthodontics” was often used to describe PLV therapy as a treatment option for misaligned teeth. This is an aggressive treatment that has been hotly debated in recent years. Although possible to create the illusion of properly aligned teeth with PLVs, it can be a very invasive treatment option that the dentist and the patient need to be very clear on the risks/benefits involved before any treatment is started.
It is important during the treatment-planning and the case-presentation phase of treatment that the dentist provides all the treatment options available and the risks and benefits of these options. PLVs are a versatile restoration that can be a solution to many problems, but they may not always be the best solution. Good judgment and great communication are part of the keys to success with PLV therapy.
Case Selection and Treatment Planning
The key to success with PLVs is in the case selection. The dentist needs to be able to discern those patients who present with conditions that will accept PLVs and have excellent longevity and esthetics; but even more important is learning to identify those cases that are beyond the limits of PLV therapy.
Situations that lend to having good long-term results are patients who have:
- 1.
A well-developed occlusal arch form
- 2.
A balanced and aligned occlusion
- 3.
Postorthodontic treatment
- 4.
Spacing between teeth (diastema)
- 5.
Discolored dentition
- 6.
Symmetric gingival architecture
- 7.
Minimal to no existing anterior restorations.
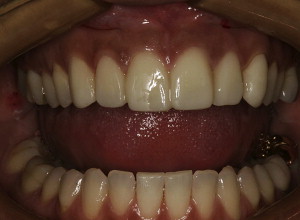
The absence of any of the listed factors will add to the risk of having a less than desirable esthetic and/or functional result. There are many patients who meet the listed criteria and can benefit from PLV therapy ( Fig. 1 ).
Situations that complicate or contraindicate PLVs are:
- 1.
Crowded and/or rotated teeth
- 2.
Narrow occlusal arch form
- 3.
Large existing restorations and/or existing veneers that are bonded to dentin
- 4.
Presence of moderate to extreme wear
- 5.
End-to-end anterior occlusion
- 6.
Anterior crossbite
- 7.
Active soft tissue disease
- 8.
Gingival asymmetry
- 9.
History of occlusal or joint dysfunction
- 10.
Psychological issues associated with self-image.
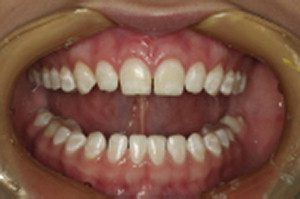
The dentist must carefully evaluate each patient when discussing PLV therapy. There are many patients who would like to have their smiles enhanced using PLV, but not all patients are good candidates for this procedure ( Fig. 2 ). For many patients, orthodontics and/or composite bonding, and/or bleaching can be a better treatment option(s).
Proper case selection and excellent communication skills are foundational skills for a dentist to become proficient and successful at providing PLV.
Diagnostics and Records
Once it has been determined that a patient is a good candidate for PLV treatment, it is imperative that a complete oral examination is completed to determine the appropriateness of veneer therapy.
A records appointment is required to provide a complete evaluation of the patient’s oral health and to confirm that the patient is indeed a good candidate for this elective treatment. All aspects of the patient’s dentition, periodontium, osseous support, joint and muscle health, and extraoral soft tissue need to be evaluated.
A records appointment is required to establish the patient’s baseline oral health, to determine the appropriateness of providing the requested restoration(s), and to determine the need for other dental specialty consultations and/or therapies before treatment is started.
The records appointment consists of:
- 1.
Full-mouth radiographs with or without a panoramic radiograph
- 2.
Full-mouth periodontal probing
- 3.
Charting of existing restorations
- 4.
Complete hard and soft tissue evaluation
- 5.
Occlusal/joint evaluation
- 6.
Upper and lower impressions for study model fabrication
- 7.
Bite registration; a facebow transfer may or may not be used for mounting on an articulator
- 8.
Intra- and extraoral photography using American Academy of Cosmetic Dentistry protocol
- 9.
Interview patient regarding goals and expectations.
This information is critical for the dentist to evaluate the appropriateness of the proposed treatment, but it also provides the critical information to develop the treatment plan and the treatment sequence.
Using the information gathered from the examination, it may be necessary to provide the patient with therapies to deal with any disease process present before PLV treatment is started. Additionally, it may be required to seek consultation and possibly treatment by a specialist before the patient’s oral condition is ready for the beginning of PLV therapy.
The impressions, bite registration, facebow, and photography are used for the next step in the sequence of PLV treatment. The cast is mounted on an articulator and evaluated for the proposed treatment. This evaluation will determine if the proposed treatment is to go forward.
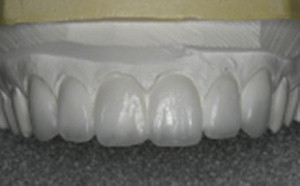
With the mounted casts on the articulator, the teeth to be veneered are waxed up to ideal contour and occlusion ( Fig. 3 ). This wax-up serves as an evaluation of the potential esthetic and functional outcome. This wax-up also allows the dentist to show the patient a preview of the expected final outcome. The wax-up can be an excellent communication tool to ensure that the dentist and ceramist have a good understanding of the patient’s esthetic goals, and that the patient’s goals can be achieved. Additionally, this wax-up can be used as a preparation guide and for the fabrication of the patient’s temporary veneers.
Preparation
Conventional and current popular practice for conservative PLV preparation is to remove 0.5 mm of tooth structure to create room for the placement of 0.5 mm of porcelain on the facial surface. The gingival margin is prepared using a chamfer diamond where the amount of reduction is slightly less, owing to the thinness of the enamel in this area. The gingival margin can be placed supragingival, at the height of tissue, or subgingival. This margin determination is dictated primarily by the esthetic goals. Ideally, subgingival margins should be avoided unless necessary because of the existing tooth color that needs to be blocked out and/or a dramatic change in the higher value of the porcelain shade requested. Last, the incisal edge is prepared by removing 1.0 mm of tooth structure.
Variations and considerations in preparation design
Incisal edge preparation design
For many years, experienced clinicians had recommended removing 1.0 mm of tooth structure at the incisal edge, then creating a 1- to 2-mm lingual bevel. The idea was that this design would provide stability within the veneer and prevent displacement or cracking of the veneer by functional forces and provide increased overall strength. However, Magne and Belser published convincing evidence that the best incisal preparation design was to remove 1.0 mm of tooth structure at the incisal edge and create a butt-joint margin at the lingual-incisal line angle. Their study concluded that this design best supported the PVL.
Interproximal preparation design
No conclusive evidence can be found for what is the best way to prepare the interproximal area of a tooth for a porcelain veneer. Opinions range from virtually no preparation, to a preparation that stops just short of the interproximal contact, to a slight opening of the interproximal contact.
The clinical reality is that each case and each tooth is different. It is up to clinicians to use their best judgment in this area. However, the evidence is clear that margins in enamel are preferred. The margin design here should be such that the margins are not visibly detectable and that a minimum amount of tooth structure should be removed to accomplish this goal.
Preparation guides
Over the years, many different ideas have been presented to help the dentist properly and conservatively prepare teeth for PLV. Recently, Magne and Belser published a technique to allow for a more conservative approach to PLV preparation.
Frequently the teeth are not in an ideal arch form, and oftentimes to the original facial and/or incisal structure of the tooth has been lost over time. Magne and Belser recommend using a study model to create a wax-up of the ideal final facial, incisal, and lingual contours desired in the final restoration. Then a highly accurate impression of the wax-up is taken using conventional impression material or a silicone putty. This impression now becomes a matrix that will allow the dentist to transfer the wax-up into the patient’s mouth using a temporary material (example: LuxaTemp by DMG-America [Englewood, NJ, USA]). This is accomplished by drying the teeth that are to receive PLVs, then loading the matrix with the auto mix temporary material and seating it in the patient’s mouth. The temporary material is allowed to set up for 4 to 5 minutes, and then the matrix is removed. The temporary material will adhere to the teeth. With the wax-up (ie, the final desired tooth form/position) now in the patient’s mouth, the dentist removes 0.5 mm using a depth-cutting bur to create room for the 0.5-mm-thick PLV. The end result is a more conservative final preparation.
Although it is not always possible to do this procedure in cases of teeth in labial-version or rotated teeth where the rotation carries the tooth facially outside of the ideal arch form, it can provide an excellent general guide for minimizing trauma to the tooth to be prepared.
Ultra-thin preparations
In recent years, experienced, skilled ceramists have been able to consistently create PLVs that are 0.3 mm thick. This ability has now allowed many dentists to become even more conservative in their preparation of teeth for PLV. The same previously mentioned preparation guidelines can be used, but now 0.3-mm depth cutters are used to control the preparation depth to an absolute minimum.
Tetracycline and other severe color challenges
One of the primary uses of PLVs is to alter the shade of dark-colored teeth. Tetracycline staining and endodontically treated teeth are often esthetic problems for patients.
When treating these patients it is important to have good communication with the patient. Nixon and others have demonstrated that it is possible to improve the esthetics on these severely discolored teeth, but the patient needs to be aware of potential compromises. First, it will be very difficult to not have a bit of a graying of the final restoration at the gingival margin. As the porcelain gets thinner at the gingival margin, it becomes increasingly difficult to block out the deeper color of the natural tooth. Second, a slightly more aggressive preparation may be needed to make room for the addition of the opaque porcelains needed to block out this deep color.
Stacked porcelain veneers offer the best solution to get maximum opaquing of the prepared tooth while keeping a minimal preparation. Using stacked porcelain, a thin layer of opacious dentin porcelain can be first laid down to opaque the dark tooth color; then the ceramist can layer the porcelain in such a way as to be able to create the desired results. Pressed ceramics do not offer the same flexibility in technique and would require a slightly more aggressive preparation to achieve similar results.
Impressions and Bite Registration
Once the preparations have been completed, the final impression can be obtained. Currently polyethers and vinylpolysiloxanes (VPS) are the most popular materials for final impressions. Either type of material can accurately record the intraoral condition.
Retraction cord may or may not be required. Experienced clinicians will often use a very small diameter retraction cord to create a small amount of apical displacement to record the unprepared tooth structure below the prepared margin. The gingival tissues around anterior teeth are often thin and fragile. It is critical to minimize the trauma to this tissue during cord placement.
Recently there has been the introduction of “pastelike” materials (Expisyl by Kerr [Orange, CA, USA]) that can be used to provide slight retraction of the gingival tissue. The atraumatic nature of these materials makes them appealing for this application.
An accurate bite registration is required to be able to accurately mount the working models. There are many different materials on the market today that can accomplish this task.
The horizontal orientation of the maxillary arch is critical information for the ceramist. In cases where the veneers are minimal in their design and the functional occlusion will not be altered as “stick-bite” can be adequate. A “stick-bite” is obtained by having the patient stand up; placing a small amount of VPS bite registration (example: BluMouse by Parkell [Edgewood, NY, USA]) on the incisal surfaces of the anterior teeth, have the patient close, then place a “stick” (often a long cotton tip applicator) into the bite registration. Then the stick is manipulated to being parallel to the horizon.
A more accurate and desirable method is to use a facebow transfer to accurately record the horizontal maxillary position.
It is timely to mention the existence of digital impression technology in many of today’s dental offices. Digital impressions can be used for PLV, but if they are used it needs to be in conjunction with a minimum of a “stick-bite” and/or a facebow transfer.
Shade Selection
In cases where PLVs are being placed electively for cosmetic purposes, it is important to get the patient’s input. Using shade guides and photographs of previous cases, the dentist can begin to gain an understanding of what the patient is looking to achieve in the final results. It is imperative for the success of these cases that the dentist takes into consideration the patient’s goals.
In cases where the PLVs are being used to on 1 to 4 (or even 6) teeth, the dentist now needs to strive to reproduce a restoration(s) that matches the shade of the remaining natural teeth. With a case that will include 8 to 10 teeth in the arch, the shade selection should be an agreement between the dentist and the patient as to what shade will met the patient’s goals.
Digital photography can be a helpful tool when communicating with the ceramist. Photographs taken of the prepared teeth at various angles with and without a shade guide in the picture will help the ceramist have a better opportunity to achieve the desired final result.
Another tool commercially available are digital shade taking devices (example: EasyShade by Vident [Brea, CA, USA]). These devices can be used to record the shade of the existing dentition. Caution must be used when using these devices. Although a helpful tool in selecting a shade, they should only be used as an adjunctive method of making the final selection.
Laboratory Communication
For the ceramist to provide the desired final results, it is critical to send him or her as much information as possible to help in the fabrication of the PLV.
The following information should be sent to the laboratory:
- 1.
Final impression (full arch)
- 2.
Impression of the opposing arch (full arch)
- 3.
Bite registration with a stick-bite or facebow transfer
- 4.
Photographs of the preoperative condition and the prepared teeth, as well as shade tabs next to the prepared and unprepared teeth. The photos can be stored on a disc or flash drive or sent via e-mail.
- 5.
Return of the wax-up with a notation if anything has been altered on the wax-up
- 6.
Written laboratory prescription with details on the desired final results and the desired type of porcelain to be used.
Additional information that may sometimes be helpful includes:
- 1.
A study model of the temporary restorations
- 2.
Photographs from magazines or the dentist’s own patient library showing smile designs that the dentist and/or the patient may want to try to simulate
- 3.
Diagrams written on a photo or from a “smile design” book.
Material Options
For use as a material for thin, conservative PLVs there are currently 2 options available.
Traditional feldspathic stacked veneers
Feldspathic ceramic is a ceramic that is designed to mimic natural dentition. These porcelains are mainly composed of feldspar, quartz, and kaolin. The blending amounts have been adjusted over years to produce the translucent levels and opaque levels in glass. There are many different types and recipes including use of synthetics. Overall, their properties are similar. Most importantly, when using feldspathic type of porcelain for thin veneers the common denominator is the supporting matrix during fabrication as well as cementation. The refractory die investment and the platinum foil support the porcelain during ceramic firing and grinding because of the overall brittleness and reduced strength, 50 to 90 MPa, in feldspathic porcelain. Once bonded to enamel the material is strengthened by the underlying tooth just as when manufactured on its matrix.
The fabrication of feldspathic veneers requires 1 of 2 different techniques; either the refractory system or the foil system.
The refractory system is a technique where a master model is fabricated by pinning the prepared teeth into removable dies. It is then duplicated using a polyvinylsiloxane-duplicating material in a refectory high-heat investment including ceramic die pins. This allows the dies to be fired repeatedly in a porcelain furnace. These dies are first degassed to remove any ammonia in the refectory investment and the feldspathic porcelain is applied to the dies. They are then placed into a ceramic furnace and fired according to the manufacturer’s specifications. After the veneers are built and fired, they are contoured and form and function are refined. The veneers are then glazed and polished. The refectory investment material is removed from the veneers by air abrading with 50 μm of aluminous oxide. The veneers are then transferred to the master dies for reexamination of fit and function.
The foil technique is the fabrication of veneers using a 0.001 dead soft platinum foil that is adapted to the master dies. The platinum foil is burnished by hand with a tool and swedged in a clay-filled cylinder to achieve premium adaptation. The feldspathic porcelain is applied directly to the foil substrate and placed in the ceramic furnace for firing. The veneers are then contoured and refined on the master model to optimum form and function. The veneers are then glazed and polished. The platinum foil is then teased out of the inside of the veneers and transferred to the master model for final refinements.
Pressed lithium disilicate
Lithium disilicate is composed of quartz, lithium dioxide, phosphor oxide, alumina, potassium oxide, and other components. These materials are combined in a glass melt. Once proper viscosity is achieved, it is placed in steel molds and cooled. Overall, this composition yields a highly thermal shock-resistant glass ceramic owing to low thermal expansion when it is manufactured. This allows for self-supporting strength during fabrication. Lithium disilicate is rated at approximately 400 MPa.
Pressed thin veneers using lithium disilicate are fabricated using a lost-wax technique. The master model is fabricated with the preparations cut into dies. The tissue is trimmed from the model, the dies are sealed, and a layer of spacer is added. The veneers are waxed to full contour. They are then sprued and invested in a ring of pressing high-heat investment. The rings are placed in a burnout oven where the wax melts out leaving a mold of the restorations. The mold then has an ingot placed inside and a plunger is placed into a porcelain press where the molten glass is pressed into the mold under vacuum pressure. The molds are divested using glass beads in an air abrasion unit. The lithium disilicate veneers are cut off of the sprue leads and placed in a 1% hydrofluoric acid solution for 10 to 15 minutes to remove the reaction layer. The pressings are then fit to the master dies, and sprues are ground off and contoured. The veneers are either custom stained or micro-layered with a fluorapatite-based layering ceramic. The veneers are evaluated for form and function on the master cast. Last, they are refined and glazed and polished.
Temporization
Throughout the years, one of the biggest challenges presented with a porcelain veneer case was the question of how to successfully provide a provisional restoration. Many different techniques and materials have been used with various levels of success.
Currently one of the most popular and predictable techniques is to start with a wax-up of the desired final results. This wax-up will be used for the Magne/Belser preparation guide. The silicone putty or VPS putty matrix created from the wax-up is also used as the matrix for the temporary restorations.
Once the final impression(s) and bite registration have been taken, the patient is now ready for temporization. The prepared teeth are isolated and dried. The preparations are then spot-etched using phosphoric acid in the middle of each prepared tooth. The etchant is allowed to stay on the teeth for 30 seconds, then teeth are rinsed and dried. A small amount of a lightly filled resin (example: the second bottle of the Optibond FL bonding agent by Kerr) is placed on the area of the preparation(s) that was etched. The bonding agent is then light cured for 5 to 10 seconds.
Next the putty matrix is loaded with an auto mix temporary material (example: Luxatemp by DMG-America) using a shade that is in the approximate range of the final restorations. This matrix is then inserted into the mouth and allowed to sit for at least 5 minutes.
When the matrix is removed, a highly detailed, esthetic duplication of the wax-up is now in place as the patient’s provisional restoration. Not only does this provide patients with a socially acceptable, esthetic smile, it also gives them a preview of the final restorations.
It will be necessary to trim off the excess temporary material. At the gingival margins a 16-fluted carbide bur and a #12 scalpel blade can be used to carefully, atraumatically remove excess temporary material. The #12 blade is an excellent tool for removing material in the interproximal areas. A 16-fluted “football”-shaped carbide is used to remove any excess material on the lingual, and is also used to adjust and refine the occlusion.
Finishing of the temporary material can be accomplished with any number of composite finishing instruments.
A highly esthetic final polish can be obtained using a prophy cup and composite polishing paste.
When doing multiple units, it is advisable and acceptable to leave the restoration in one unit that will splint all the prepared teeth. By using this splinting process, the provisional veneers have improved retention. However, it is critical when this technique is used that great care is taken to finishing the papilla area and allow from room to use a floss threader for home care ( Fig. 4 ).