Although no “ideal” laser exists for every situation, with the use of CO2,5,6 diode,7 and argon8 lasers in orthodontic procedures reported in various studies, this chapter focuses on the use of diode lasers. The selection of the proper laser is based on individual preference. The practitioner is strongly urged to take multiple courses from instructors experienced with multiple wavelengths (see Chapter 16).
Types of Orthodontic Procedures
Many procedures can be done with a soft tissue laser, but the vast majority that orthodontists might perform fall into two categories: access gingivectomies1 and esthetic procedures. Access gingivectomies involve exposing more tooth tissue for earlier or more ideal bracket or band placement. Esthetic procedures involve removing redundant gingival tissues to optimize gingival esthetics and improve appearance of completed orthodontic treatment. To perform these procedures most safely and efficiently, with the least discomfort for the patient, it is important to know what not to do. Three primary considerations should be kept in mind in performing soft tissue laser procedures: biologic width or zone, pocket depth, and keratinized tissue. For gingival esthetic procedures, several additional diagnostic considerations are of importance as well.
Diagnostic Considerations with Most Soft Tissue Procedures
Biologic Width/Biologic Zone
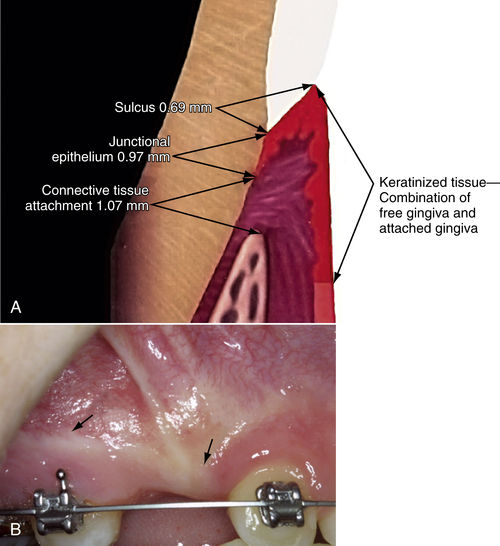
The concept of biologic width, or biologic zone, is important in restorative dentistry. When analyzing a series of gingivectomies, Garguilo et al.9 found that regardless of the amount of tissue removed, tissue regrowth resulted in an average connective tissue attachment (CTA) of 1.07 mm, a junctional epithelium (JE) thickness of 0.97 mm, and a sulcus depth of 0.69 mm. These workers suggested that the distance from the height of the crestal bone to the gingival margin should be approximately 2.5 mm. Cohen10 coined the phrase “biologic width” to refer to the combined JE and CTA: 0.97 + 1.07 = 2.04 mm.11 Kois12 extended this definition, adding all three—0.97 + 1.07 + 0.69 = 2.73 mm, with the result rounded to 3.0 mm—and termed this dimension the “biologic zone.” Restorative dentists found that placing margins within the biologic zone resulted in chronic inflammation, and Kois has suggested that a biologic zone of 3.0 mm or more is necessary for a healthy dentogingival complex.12 When a restoration is to be placed within the patient’s biologic zone, the preferred solution would be to “sound the bone,” probing through the pocket to the bone, and then exposing and removing enough bone to restore the 2.5- to 3.0-mm biologic zone.
Pocket Depth
In general, orthodontists are neither equipped for nor interested in performing hard tissue procedures such as removal of bone. In nearly all cases, removing redundant gingival tissue and leaving a pocket depth of 1 mm will be all that is needed in a typical orthodontic procedure. Although an understanding of the importance of biologic zone is essential to aid in discussions with colleagues, a much more practical approach is to simply measure pocket depth and plan to leave a 1.0-mm pocket, with the recognition that in most cases, violating the biologic zone will result in relapse to a 1.0-mm pocket. If a proposed gingival procedure will leave a pocket of less than 1.0 mm, laser gingivectomy may not be recommended, and referral for osseous crown lengthening is the preferred method of management (Figure 12-1).
Keratinized Tissue
Keratinized tissue is the immovable, fibrous, coral pink tissue surrounding the neck of each tooth. It extends from the free gingival margin to the mucogingival junction. Keratinized tissue is resistant to recession from toothbrushing or eating. Unattached gingiva is the movable, darker pink tissue also known as alveolar mucosa and is not strong enough to resist recession from normal trauma. In planning a gingival procedure, care must be taken to maintain at least 2 mm of attached gingiva. If the planned gingivectomy violates this minimum, a laser procedure may be inappropriate, and referral for surgical creation of an apically positioned flap may be more appropriate. Although special dyes can be used to demarcate the mucogingival junction, it can easily be observed by having the patient move their lips and observing for corresponding movement of mucosa. In summary, the limiting factors to consider in planning most soft tissue procedures in an orthodontic office are to leave at least 1.0 mm of pocket depth and to preserve at least 2.0 mm of keratinized tissue.
Access Gingivectomies
Access to Partially Erupted Teeth
When a tooth is slow to emerge or a bracket is difficult to position, removing excess tissue not only enhances esthetics but also speeds treatment and reduces required appointments. Figure 12-2 shows a partially erupted maxillary cuspid. In such a case, the following options can be considered:
1. Wait for the tooth to erupt completely before bonding (6 to 12 months).
2. Bond to the exposed crown, erupt slightly, rebond and repeat, until enough crown is available to place a bracket in an ideal position.
3. Expose the tooth and bond immediately. A diode laser can be used to obtain access for near-ideal positioning of a bracket, allowing the operator to bring the cuspid into the arch and rotate it, saving months of treatment (see Figure 12-2B–D).
Access to Unerupted Teeth
When the tooth is visible just below the gingival surface but could take many months to emerge into the mouth (Figure 12-3A), the patient is often reluctant to visit the periodontist or primary care dentist for an exposure procedure, so orthodontic treatment is “on hold.” If sufficient keratinized tissue is present, laser exposure with immediate bracket placement is possible, thereby saving the patient’s months of waiting. In addition, the laser provides a clean, bloodless field, allowing a bracket to be bonded immediately after exposure (see Figure 12-3B, C). In the patient whose case is shown in Figure12-3, the tooth was rebonded 6 weeks later to improve bracket position and subsequently erupted to an ideal position. The initial window procedure was the only laser exposure performed. All additional tooth visibility was the result of eruption (see Figure 12-3D). The patient was thus spared months of treatment time and went on to attend school with an attractive smile and improved self-esteem.
Access for Ideal Bracket Placement
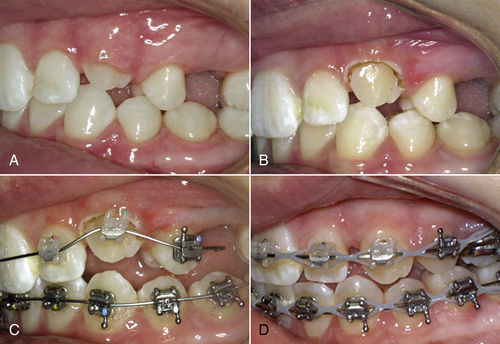
A common approach to position brackets properly involves placing brackets in the center of the clinical crown. To do so accurately, the practitioner must be able to visualize the clinical crown, which can be difficult when gingiva obscures tooth anatomy. A simple gingivectomy exposes the entire clinical crown, allows more accurate bracket placement, and speeds completion of treatment. With this procedure, not only was the patient in Figure 12-4 spared months of treatment but the exposure also afforded better access for cleaning, thereby reducing the risk of gingival hypertrophy during continued orthodontic treatment.
• Figure 12-2 Gingivectomy to allow more ideal bracket placement and speed treatment. A, Immediately before procedure. B, Immediately after exposure. C, Bracket bonded in near-ideal position, ready for nickel-titanium wire. D, Six weeks later.

• Figure 12-3 A, Upper central incisors and lateral incisors not fully erupted. B, Simple gingivectomy exposes clinical crowns to aid ideal bracket placement. C, Brackets easily bonded, ideally at the same appointment in a clean field. D, Three weeks later, healing is complete and teeth have already aligned.
Access Resulting from Poor Oral Hygiene
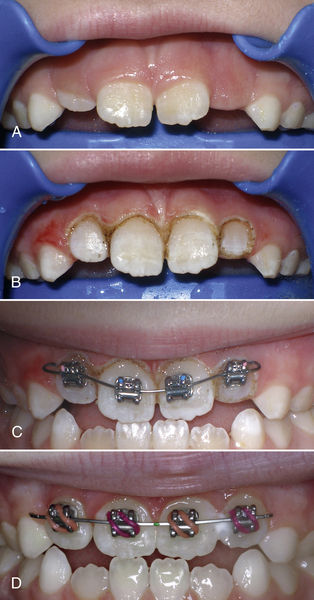
Occasionally, a patient may have difficulty with oral hygiene, with consequent development of inflammatory gingival hyperplasia. With improved oral hygiene, the inflammation subsides, but the hypertrophy may not completely resolve. Figure 12-5 shows readiness for placement of full braces, but the gingival hypertrophy, partially erupted upper left cuspid, and unerupted upper right cuspid prevented ideal placement of brackets. A full-mouth gingivectomy was performed to remove excess tissue and expose the cuspids, allowing brackets to be placed properly and permitting the patient to maintain an improved level of hygiene during treatment.
Access Resulting from Overlying Operculum
In many patients, treatment cannot progress without banding or bonding second molars, but placement is hindered by an overlying operculum (Figure 12-6). Removing the excess tissue with immediate bonding allows treatment to progress. Operculectomy is one of the few procedures for which topical anesthesia may be insufficient, necessitating injection of local anesthetic.
• Figure 12-4 A, Preoperative view of upper incisors B, Laser gingivectomy and exposure of upper incisors to allow bonding of brackets. C, Brackets bonded at the same appointment on a dry field. D, Four weeks later, alignment has already begun.
Additional Diagnostic Considerations with Esthetic Procedures
Gingival Shape and Contour
Two important concepts of gingival architecture are gingival shape and gingival contour.2 Gingival shape describes the gingival margin as seen in viewing a tooth “face on” (Figure 12-7). Several factors contribute to ideal gingival shape.13–15 First, the gingival margins of the two central incisors should be at the same level and should form a smooth, sweeping curve; the apex of the curve should follow the contours of the cementoenamel junction (CEJ), with the height of contour inclined slightly to the distal. Second, the gingival margins of the canines should be at the same level as that of the central incisors. Third, the gingival margins of the lateral incisors should be 1.0 mm shorter than those of both the canines and the central incisors. Thus, when viewed from central incisor to cuspid, the gingival margin heights can be described as “high-low-high.”
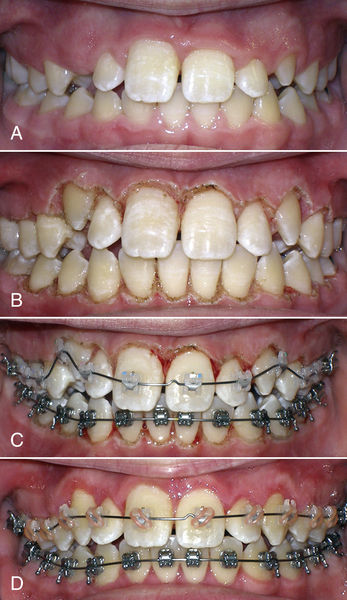
• Figure 12-5 A, Patient ready for treatment of gingival hypertrophy and unexposed cuspids. B, Immediately after gingivectomy and exposure. C, Teeth bonded same day. D, Six weeks later.
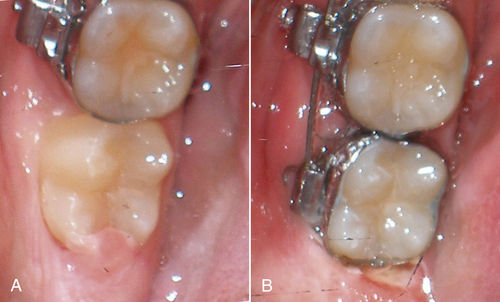
• Figure 12-6 A, Operculum partially covering distal of lower second molar. B, Operculum removed and band placed on lower second molar at same appointment, allowing immediate movement.
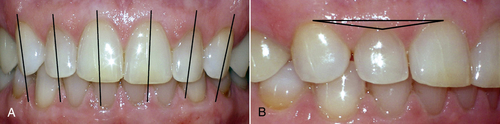
• Figure 12-7 A, Gingival margins define smooth curves, with the height of the gingival contour mildly distal. B, Gingival margins of central incisors and canines are at the same level, with the gingival margin of the lateral incisor 1.0 to 1.5 mm incisal (high-low-high from central to cuspid).
Gingival contour relates to the architecture of the gingiva parallel to the tooth surface. Healthy gingiva is relatively flat with a small, even curve just as the gingiva meets the tooth (Figure 12-8A). Hyperplastic gingivae are bulky and distended with a ledge at the gingival margin (see Figure 12-8B). If gingival shape is corrected without addressing contour, the excess bulk at the gingival margin can lead to relapse.13
Tooth Proportions
Widths of central incisors average from 8.4 to 9.3 mm, and lengths from 10.4 to 13.0 mm.11–15 The ideal ratio of width to length is in the range of 75% to 80%,12,16–20 with greater than 80% resulting in too “square” a tooth and less than 75% resulting in too long an appearance.21 Using these ratios in concert with known dimensions of the tooth in question can help determine a more ideal treatment plan. These concepts are demonstrated in the clinical cases described in the following section.
Treatment Planning for Anterior Esthetics
Straightforward Situations
Sometimes after completion of orthodontic treatment, the teeth are aligned, but gingival contours do not conform to acceptable norms. In patients with such esthetic issues, gingival recontouring can greatly enhance the smile.
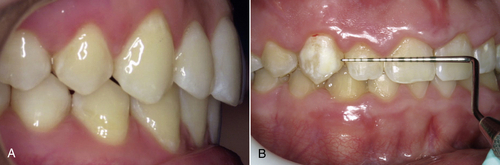
Figure 12-9 shows that the gingival architecture of the maxillary right central incisor is esthetic and harmonious relative to all other anterior teeth, except the upper left central incisor (pocket depth 2.0 mm). Removing 1.0 mm of the left central gingiva leaves a pocket depth of 1.0 mm, with adequate keratinized tissue, and allows for harmonized gingival contours and a better result.
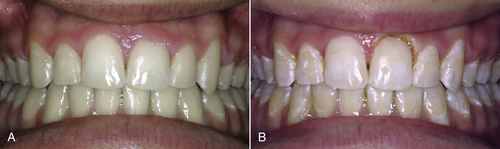
Figure 12-10 shows a similar discrepancy between the maxillary central incisor gingival margins in a patient ready to begin orthodontic treatment, but with no discrepancy in pocket depths and with the CEJs at different levels. Upon inspection, significant wear on the maxillary left central is evident (see Figure 12-10B), indicating that this tooth is hypererupted and worn. In this case, a soft tissue procedure is contraindicated. Instead, the left central incisor should be intruded to match gingival contours and then can be restored to a proper length. Diagnosing this situation at the beginning of treatment allows brackets to be placed appropriately.
Comprehensive Anterior Esthetics
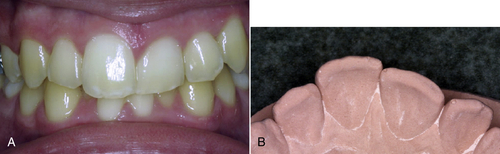
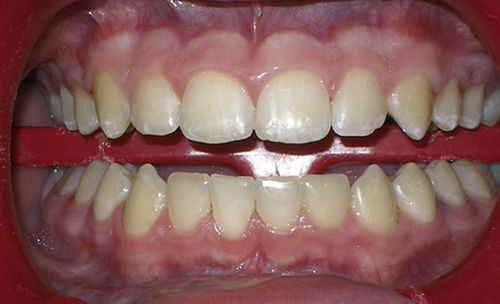
In some situations, none of the anterior teeth exhibit ideal contours. Treatment planning involves evaluating the proportions of each tooth to determine ideal goals and designing the plan to ensure not only achievable goals but also sufficient time scheduled to complete the necessary procedures. First, measure the width of the central incisors. In Figure 12-11, for a patient who recently underwent debanding, the width of the central incisors is just over 9 mm (slightly wider than average). The estimated ideal width of a central usually is 80% of the length; so divide 9 by 0.8 for an estimated ideal length for the central of 11.25 mm. This becomes the initial goal for an ideal central incisor length.
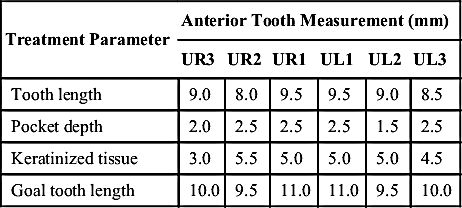
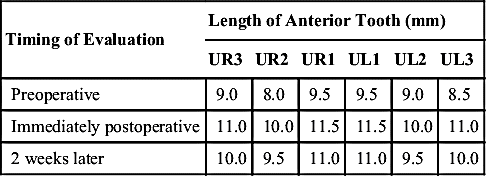
Next, for each of the anterior teeth, measure the length, amount of keratinized tissue available, and depth of sulcus at the proposed gingival crest (Table 12-2). These data allow calculation of the limits that can be achieved with a laser in a particular case. For example, most patients will finish with approximately 1 mm of pocket depth, so by reducing the initial pocket depth by 1, the available length can be calculated for each tooth and then combined with its current length to determine the actual goal length achievable for an individual patient.
• Figure 12-8 A, Healthy gingiva and gingival margins, flat with a small, free-gingival groove just apical to the gingival margin. B, Hyperplastic gingiva, bulky at gingival margin.
• Figure 12-9 A, Left central incisor with excess gingival tissue. B, Excess tissue is removed to match other side.
• Figure 12-10 A, Central incisor gingival heights do not match. B, Excessive wear on left central incisor suggests hypereruption.
• Figure 12-11 Improper gingival heights and contours. See Table 12-2.
In Figure 12-11
Stay updated, free dental videos. Join our Telegram channel
VIDEdental - Online dental courses


