• Figure 6-1 The tooth is attached to the surrounding gingival tissue and alveolar bone by fibrous attachments. The gingival fibers run from the cementum into the gingiva immediately apical to the junctional epithelium attachment, and the periodontal ligament fibers run from the cementum into the adjacent cortex of the alveolar bone. (Modified from Rose LF, Mealey BL: Periodontics: medicine, surgery, and implants, St Louis, 2004, Mosby.)
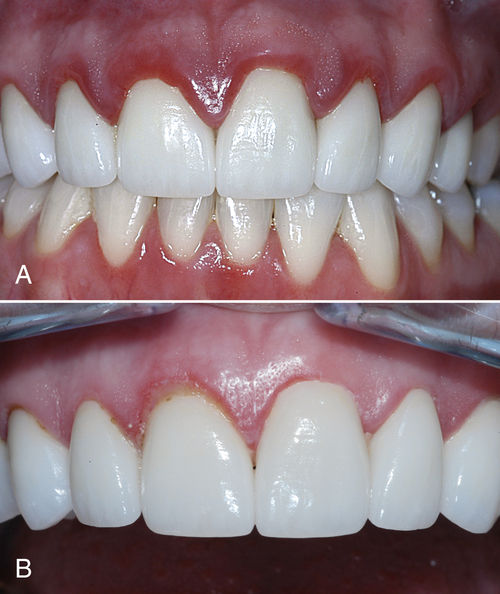
• Figure 6-2 Laser correction of biologic width. A, Biologic width impingement in the anterior segment. Note localized gingival hyperplasia, redness, and inflammation surrounding the porcelain veneers. B, Photograph of site 2 weeks after correction of biologic width using an erbium laser in a closed-flap procedure to establish new bone level.
Soft Tissue Troughing with and without Gingivoplasty
The gingival trough is defined as the narrow space between the free margin of the gingival epithelium and the adjacent enamel of a tooth.11 At times, permanent alteration of the gingival contours around a tooth or teeth is necessary to ensure a superior, long-lasting cosmetic restoration. The successful outcome of a direct or indirect restoration is related to the dentist’s ability to control the surgical site. In controlling the site for delivery of a superior restoration, lasers provide the following functions:
1. Enable the dentist to access and visualize the operative site and all of the margins clearly, especially when the margins are subgingival
2. Create a blood-free environment and achieve hemostasis if necessary
3. Control moisture content of the field
4. Ensure bacterial decontamination of the field, leading to superior gingival health around the margins
5. Control the soft tissue contours for a harmonious esthetic and functional relationship between the soft tissues of the periodontium and the restored hard tissues of the teeth and underlying bone
These steps are essential for the fabrication of precise impressions, for digital scanning, or for direct placement of restorative materials. Whenever the restorative interface is subgingival, the displacement of gingival tissue is critical for finalizing tooth preparation and impression taking or restorative material placement.12 With older restorative materials, a common challenge to the dentist was placement of the preparation “finish line” at or below the crest of the gingiva so that the margin did not show. Retraction of the gingival tissues usually was performed mechanically, with retraction cord impregnated with medicaments for hemostasis. Packing of retraction cord around the circumference of the tooth to reflect the gingiva away from the tooth and to absorb crevicular fluids was the conventional technique used for recording the finished preparation margin or to complete placement of the direct restorative material.
Conventional Techniques
A technique widely used for gingival retraction is a double-cord technique for subgingival reflection of tissue. Removing the second (top) retraction cord before injecting the impression material or creating an optical impression allows for complete capture of the finish line. This time-consuming technique has its disadvantages, including potential injury to the periodontal ligament if excessive force is used; difficulty in removing the retraction cord without creating shredding of the cord or bleeding, and postoperative discomfort.13
Another conventional gingival troughing technique, use of electrosurgery or radiosurgery, allows for contouring of gingival tissues and hemorrhage control. The electrosurgery procedure may be associated with delayed wound healing, with asymmetric gingival heights, crestal bony recession, and moderate postoperative discomfort.14 In a study of electrosurgical gingival troughing with a fully rectified current on rhesus monkeys, Wilhelmsen et al.15 showed statistically significant recession of the gingival margin along with apical migration of the junctional epithelium. Deep soft tissue resections close to bone typically produced gingival recession, bone sequestration and necrosis, loss of bone height, furcation involvement, and tooth mobility. Electrosurgery (or radiosurgery) is contraindicated around dental implants16 and must not be used in patients with any of the following:
• Pacemakers
• A history of radiation to the jaws
• Poorly controlled (or uncontrolled) diabetes
• Blood dyscrasias
• Immunodeficiencies
• Other diseases that cause delayed or poor healing17
Scalpel techniques are used primarily to resect tissue to provide access and visualization of the target site. Scalpel incision surgery may result in gingival attachment loss with apical repositioning, exposure of sensitive root surface to the oral environment, asymmetric gingival margins, and the postoperative pain and discomfort typically associated with periodontal surgery.18
Laser Troughing
In contrast with conventional techniques, laser troughing allows for clear, clean visualization of gingival margins. Most lasers are excellent coagulation devices, with minimal to no bleeding. Unlike blade or electrosurgical techniques, laser gingival troughing with a laser gingivectomy can be performed at the same appointment as impression taking. The patient saves a trip to the office, greatly reducing valuable chair time. The ease with which necrotic tissue debris is removed from around the preparation finish line simplifies impression taking. Retraction cord is not necessary for reflection around the tooth or teeth; no placement or removal of cord from multiple pockets is required for taking impressions of multiple teeth or a full arch. Laser treatment causes no recession or repositioning of the gingival margin.19 Laser troughing promotes an ideal environment for use of current impression scanning devices.
Dentists who practice laser surgery and laser gingival troughing have reported high patient acceptance and comfort. Neill’s survey20 on self-reported patient comfort after laser gingival troughing revealed that 3 h after treatment, patients were comfortable, with half “extremely” comfortable. The overall pain rating was 1.9 (on a scale of 0.0 to 10.0), indicating that patients experienced minimal to no pain.
Laser vaporization of fibrotic tissue around crown margins is extremely fast, with no bleeding, swelling, or postoperative pain. Predictable stability of the gingival tissue on healing is the rule, with the additional benefit of elimination of pathogens from the periodontal pocket.21,22
Slightly different techniques are used for each wavelength. The laser dentist must learn the specific procedure and follow the specific protocols for the particular device employed. Once again, it must be emphasized that training is critical in using this technology.
Erbium lasers use thin tips made of sapphire, quartz, or hollow metal for troughing. For use of erbium lasers on soft tissue, the water spray usually is turned off. This precaution aids in hemostasis. CO2 lasers have thin hollow metal or ceramic tips for troughing. The Nd:YAG and diode lasers use optical fibers of various diameters to perform gingival troughing.
Procedure
The laser troughing procedure is simple to perform. With CO2, erbium, and Nd:YAG lasers, the laser tip is placed parallel to the long axis of the tooth, barely into the periodontal sulcus. The tip should glide circumferentially around the margin of the tooth, with slight to no resistance. Watch for any yellowing of the gingival tissue, which will indicate thermal collateral damage. With diode lasers, the fiber may be directed from the gingival crest toward the tooth just apical to the margin, removing a thin layer of tissue and opening more of a wedge-shaped trough for easier flow of the impression material.
To maximize its efficiency, the tip must be kept free of debris. With CO2 lasers, a stream of air blown through the hollow tip keeps it patent. Debris may accumulate on the outside of the tip, however, in which case the tip should be wiped down with gauze or replaced. Nd:YAG and diode lasers use glass or quartz fibers, which become dulled and scratched after multiple uses. A dull tip may cut tissue poorly, much like a broken piece of glass, leaving tissue tags.7 The tip must therefore be cleaved periodically to ensure optimal results. Some diode lasers are supplied with disposable tips, but the cost of tips is much greater than that incurred with simple recleaving of a standard 3-m optical fiber. The tip also must be “initiated” so that the depth of penetration of the wavelength is minimized, with no deep thermal damage.
During troughing to establish gingival proportions with the diode and Nd:YAG lasers, the clinician may note carbonization on the tissues.8,23 This layer can be quickly removed using a 3% hydrogen peroxide solution in a minibrush tip syringe (Figures 6-3 and 6-4).
Crown-Lengthening Procedures
The performance of crown-lengthening procedures has become progressively more driven both by esthetics, reflecting the increasing popularity of “smile enhancement” procedures, and by practitioners’ better understanding of the principles of biologic width preservation in the restoration of the broken-down dentition. Crown lengthening is a surgical procedure performed to expose a greater gingivoincisal length of tooth structure, before restoring the tooth prosthetically. Such exposure involves predictably excising a small amount of only gingival tissue around the tooth (soft tissue crown lengthening), or of both gingival tissue and alveolar bone (osseous crown lengthening). Although many general dentists perform this procedure, many others refer patients requiring crown lengthening to a periodontist or oral surgeon. Conventional techniques of osseous crown lengthening generally involve a full-thickness flap procedure to establish the new gingival level.17
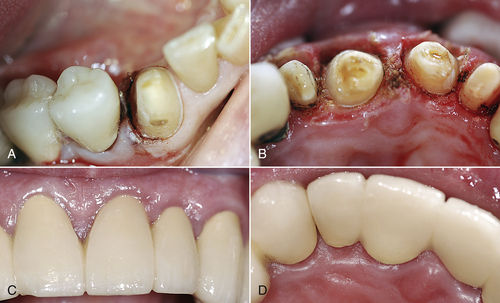
• Figure 6-3 Gingival troughing of soft tissue with a CO2 laser. A, Treatment of deep distal decay in tooth #28 involves use of CO2 laser to create gingival trough around entire tooth and minor gingivoplasty of tissue on distal surface of tooth. Note dry field and excellent visualization of gingival margin. B, Soft tissue troughing and soft tissue crown lengthening to expose tooth structure without violating biologic width dimensions in an 83-year-old man with traumatic mouth injury. C, Anterior facial view of final splinted prosthesis 1 month after delivery. D, Lingual-incisal view of final restoration 1 month after delivery. Gingival tissues responded well to treatment.
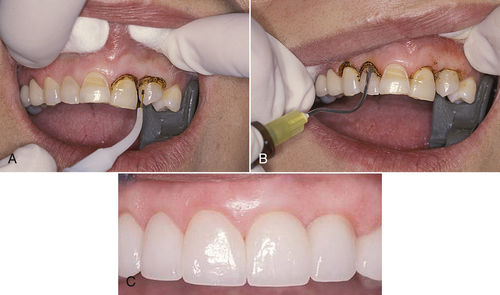
• Figure 6-4 Gingival troughing of soft tissue with a diode laser. A, In this procedure, the diode laser fiber tip glides along the axial surface of the tooth for precision. Technique uses slow, continuous strokes, with care taken not to blunt interproximal papillae. B, During gingival troughing to establish gingival proportions with diode laser, carbonization may be seen on the tissues. This layer can be quickly removed using 3% hydrogen peroxide solution in a diffusing-brush syringe. Keep the laser tip parallel to the tooth surface or slightly angled away from the surface, to avoid absorption of the wavelength by hard tissue. C, Final postoperative facial view of healthy tissue after gingival troughing and placement of restorations.
Soft Tissue
The crown-lengthening procedure is basically an excision of gingival soft tissue. Conventional methods of executing this technique involve the use of surgical scalpels or periodontal knives or electrosurgery. Recommended placement of the excision is at least 2 mm coronal to the bottom of the gingival attachment, to reduce the risk of root exposure and violation of biologic width principles.24
Hard Tissue
Surgical crown-lengthening procedures may involve the hard tissue as well. To provide adequate biologic width from the margin of the restoration, a minimum of 3 mm of attached gingiva must remain over the underlying bone to create a healthy periodontal environment.
Use of flap surgery with osseous resection is the traditional method of choice when crown margins will impinge on the biologic width. Rotary instruments have long been used to recontour the alveolar structure. Bone recontouring can be achieved conventionally with fissure or diamond burs, using copious amounts of water, or with bone chisels. Thinning of the bone around the tooth or teeth reduces craters or ridges that create sharp, uneven soft tissue topography. Sufficient bone is removed to create a 3-mm space between the crest of the bone and the new restoration’s finishing-line margin. However, poor esthetics may result from enlarged gingival embrasures, root sensitivity, transient mobility, or root resorption.24
In some cases, the need for osseous recontouring may be localized to one specific area because of the presence of a subgingival restoration, carious lesion, or fractured cusp. Erbium lasers may be useful in localized osseous tissue removal for establishing a new biologic width without raising a gingival flap. In allowing for careful removal of osseous tissue in a closed-flap technique, along with soft tissue removal, the clinician can create the biologic width for the final restoration and complete the impressions for the indirect restoration in the same appointment.25 The closed-flap, hard tissue crown-lengthening procedure is very technique-sensitive and is not recommended for the novice laser dentist; advanced training in open-flap periodontal surgery is highly recommended.
Erbium lasers have end-cutting tips with a water spray that prevents the surgical site from overheating, in contrast with the rotary friction heat released by conventional burs. Collateral thermal tissue damage when using erbium lasers is less than with conventional techniques.4 The use of rotary diamond or carbide burs for osseous tissue removal risks possible damage to adjacent tooth structure. Healing after conventional osseous surgery is associated with swelling and postoperative pain.26 Bleeding from a conventional (blade) incision typically will compromise visualization of the surgical site, in contrast with a laser incision, and visualization is critical in working on osseous structure. The risk of bony damage caused by dissipated heat from rotary burs outweighs the risk of trauma from a water-cooled erbium laser when correct parameters are used.
The procedure starts by measuring the amount of needed reduction of the bony crest. End-cutting then commences. While maintained in parallel orientation with the root surface, the laser tip is advanced to penetrate the crestal bone to the desired depth. Miniature osteotomies are produced with the laser tip. Once at the desired depth, the laser tip is withdrawn and moved 1 to 2 mm laterally, and the next osteotomy is performed to the desired depth. This sequence continues across the facial or buccal, mesial, distal, and lingual walls until the entire circumference is treated, if necessary.25
Once the cut is completed, the laser tip is inserted into the osteotomy site. A swiping motion in the mesial or distal direction is performed to remove any osseous tags between osteotomy sites. Soft smoothing of the underlying bone removes troughs or craters and creates a scalloped topography from the facial surface to interproximal surface.25 The gingival tissue is essentially a marker of underlying bone, and preservation of the interproximal bone height will prevent loss of the interproximal papillae. A literature review revealed that the contact area between teeth should be positioned 5 mm incisal to the height of the interproximal bone to maintain the papillae.27 Provisionalize the area, and allow 3 to 4 weeks for healing before taking the final impression. Once again, it must be pointed out that a closed-flap osseous procedure is a “blind” procedure and is not recommended for laser dentists to perform until they have extensive experience and training with their units.
If conventional (rotary or bone chisel) open-flap osseous recontouring is performed, any laser wavelength (or a scalpel) may be used to open and reflect the flap. With a laser incision for full-thickness flap reflection rather than conventional techniques, visualization of the bony crest is enhanced because bleeding is minimal. The surgical site is cleaner, free of blood, and more “sterile,” because the laser destroys bacteria as it incises the soft tissue.
The bone should be contoured so that the bone structure has no craters or ledges. If any of these defects are present, the overlying soft tissue will become thick, hindering good impression taking, in addition to resulting in deep probing depth after the restoration is cemented. Before suturing, it is essential to ensure that the flaps are without tension and preferably covering where the eventual crown margin will be placed. Flaps will not lie correctly if the bone is not contoured properly.11
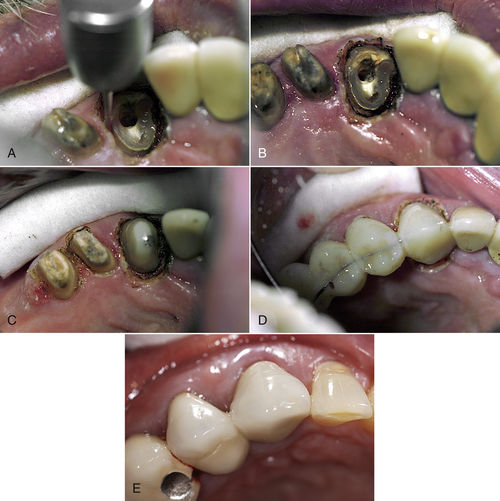
• Figure 6-5 Hard tissue crown-lengthening procedure. A, Miniature osteotomies are produced with the laser tip. Once at desired depth, laser tip is withdrawn and moved 1 to 2 mm laterally, and the next osteotomy is performed. Osseous tissue is dropped to desired depth to create a biologic width zone. Osseous troughing is done circumferentially with Er,Cr:YSGG laser, followed by soft tissue contouring with diode laser to expose tooth structure. B, Incisal view after hard tissue and soft tissue crown lengthening on tooth #11. C, Dry field has been established for post-and-core buildup, and the site is ready for taking impressions. D, Provisional restoration with opened interproximal papilla development. E, Final restoration 5 years postoperatively.
Sutures should be removed within 7 to 10 days. If crown lengthening is performed correctly, the impression can be made 3 to 6 weeks after the open-flap surgery for posterior teeth and a few weeks later for anterior teeth, for which soft tissue esthetics is critical (Figure 6-5) (see also Chapter 4).
Emergence Profile
Emergence profile is defined as the axial contour of a tooth or crown as it relates to the adjacent soft tissue.28 In developing an optimal emergence profile during procedures that close spaces between teeth (e.g., diastema closure, ovate pontic site formation, implant placement), presence of interproximal tissue that has no papilla point is typical. This characteristically fibrotic tissue can present an esthetic challenge in treatment plans incorporating crowns and veneers. The clinician needs to measure the periodontal pocket to establish a biologic width requirement. The general rule for creating the ideal emergence profile of the restoration is that for every millimeter of additional width added to each tooth to close a diastema, the margin of the restoration must be prepared an additional 1 mm subgingivally.29
Stay updated, free dental videos. Join our Telegram channel
VIDEdental - Online dental courses


