Learning Objectives
After reading this chapter and studying the Appendix, the student should be able to:
- 1.
Describe the reasons for rubber dam isolation during endodontic procedures.
- 2.
List a rubber dam clamp selection for anterior, premolar, and molar teeth.
- 3.
Identify clamps that have several applications and state which two are “universal.”
- 4.
Describe techniques for application of the clamp and rubber dam in single-tooth isolation.
- 5.
Describe techniques to stop salivary or hemorrhagic seepage into the operative field.
- 6.
Recognize situations in which special isolation approaches are necessary.
- 7.
Describe techniques used in special isolation situations.
- 8.
Identify patients with difficult isolation situations who should be considered for referral.
- 9.
Identify major objectives of access preparation in both anterior and posterior teeth.
- 10.
Explain why straight-line access is critical.
- 11.
Explain the importance of pulp horn removal in anterior teeth.
- 12.
Relate reasons and indications for removing caries or restorations during access preparation.
- 13.
Explain the reason and technique for removing the dentin shelf in anterior and posterior teeth.
- 14.
Describe the procedure, burs used, and sequence of operations to start and complete access preparations on various teeth.
- 15.
Identify common errors for specific teeth that may occur during access preparation.
- 16.
Recognize when these errors occur and know how to correct them (if correctable).
- 17.
Describe techniques for locating difficult to find chambers or canals.
- 18.
Demonstrate the step-by-step technique for obtaining estimated and final working lengths.
- 19.
Account for conditions under which the working length (distance from radiographic apex) varies.
- 20.
Describe how to designate and maintain (and create, when necessary) a stable reference point.
- 21.
Describe electronic apex locators: how they function and when they are useful.
- 22.
Diagram the portions of the tooth that must be removed to attain straight-line access to the canals. Illustrate this on sagittal sections of both anterior and posterior teeth.
- 23.
Diagram the outline form of the access preparation for all teeth.
- 24.
Show the location of each canal orifice relative to the occlusal or lingual surface.
[CR] , Chapter 16 , Chapter 18 deal with the technical aspects of nonsurgical root canal treatment. Areas presented include isolation, access, length determination, cleaning and shaping, and obturation. A number of instruments and techniques are advocated for treatment procedures. These chapters introduce concepts and principles that are important for successful treatment. These building blocks are based on the best available evidence and provide a basis for incorporating more complex and alternative techniques.
Isolation
Rubber Dam Application
Application of the rubber dam for isolation during endodontic treatment has many distinct advantages and is mandatory for legal considerations. Failure to use a rubber dam indicates that the clinician does not understand the microbial nature of the disease process, the need to protect the patient from aspiration or swallowing instruments, the protection afforded the dental staff from contaminated aerosols, and the decreased success rate for treatment when strict asepsis is not used. The use of the rubber dam in the United States is considered the standard of care; thus expert testimony is not required in cases involving patients who swallowed or aspirated instruments or materials because juries are considered competent to determine negligence. Evidence exists that many general dentists unnecessarily place themselves at risk by not using the rubber dam when performing endodontic procedures.
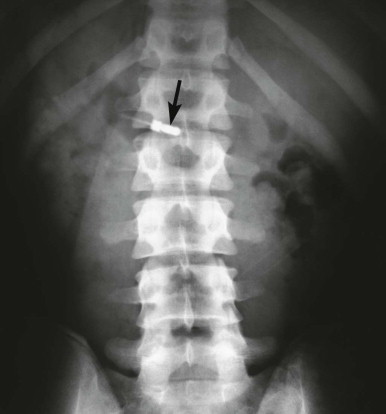
The rubber dam provides protection for the patient and creates an aseptic environment; it enhances vision, retracts tissues, and makes treatment more efficient. Soft tissues are protected from laceration by rotary instruments, chemical agents, and medicaments. Irrigating solutions are confined to the operating field. Most important, rubber dam isolation protects the patient from swallowing or aspirating instruments and materials ( Fig. 15.1 ). An additional advantage is that the dentist and auxiliary employees are also protected. The risk from aerosols is minimized, and the dam provides a barrier against the patient’s saliva and oral bacteria. Application of the rubber dam may also reduce the potential for transmission of systemic diseases such as acquired immunodeficiency syndrome (AIDS), hepatitis, and tuberculosis.
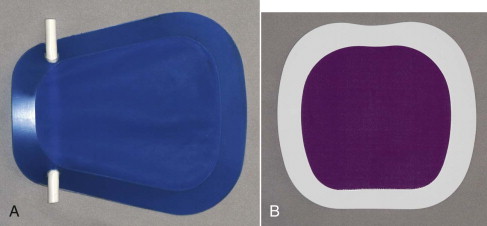
The rubber dam is manufactured from latex; however, nonlatex rubber dam material is available for patients with latex allergy ( Fig. 15.2 ). The rubber dam can be obtained in a variety of colors that provide contrast to the tooth. The thickness also varies (light, medium, heavy, and extra heavy). A medium-weight dam is recommended because a lightweight dam is easily torn during the application process. Also, the medium material fits better at the gingival margin and provides good retraction.
The design of the rubber dam frames is also variable. For endodontics, plastic frames are recommended; they are radiolucent and do not require complete removal during exposure of interim films such as the working length and master cone radiographs and digital images.
Rubber Dam Retainers
Rubber dam clamps fit the various tooth groups. During routine treatment, metal clamps are adequate; however, they may damage tooth structure or existing restorations. Some have serrated edges to enhance retention when minimal coronal tooth structure remains. Plastic clamps are manufactured and have the advantage of being radiolucent. This is an advantage in difficult cases in which the pulp chamber and canal cannot be located. Metal clamps often must be removed when exposing a radiograph or digital image for orientation purposes. When using a plastic clamp, the rubber dam can remain in place. The plastic clamps are less likely to damage tooth structure or existing restorations.
Types
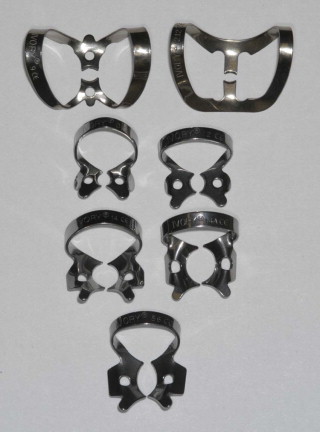
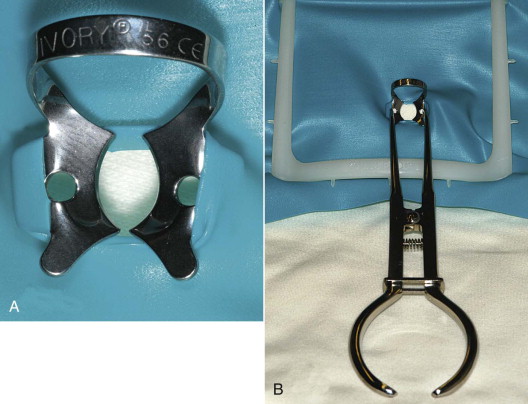
Different styles and shapes of rubber dam clamps are available for specific situations. The following selection is recommended: anterior teeth : Ivory No. 9 or 212; premolars: No. 0 and 2; and molars: No. 14, 14A, and 56. Clamps that will manage most isolation situations during root canal treatment are shown in Fig. 15.3 . Winged clamps permit the application of the rubber dam as a single unit during single-tooth isolation ( Fig. 15.4 ).
Universal Clamp Designs
Two designs (see Fig. 15.3 ), the “butterfly” Ivory No. 9 and the Ivory No. 56, are suitable for most isolations. The butterfly design (No. 9) has small beaks, is deep reaching, and can be applied to most anterior and premolar teeth. The No. 56 clamp can isolate most molars.
With teeth that are smaller, reduced in crown preparation, or abnormally shaped, a clamp with smaller radius beaks (No. 0, 9, or 14) is necessary. Small-radius beaks can be positioned farther apically on the root, which stretches the dam cervically in the interproximal space.
Additional Designs
Clamps that may be most useful when little coronal tooth structure remains have beaks that are inclined apically. These are termed deep-reaching clamps. Clamps with serrated edges are also available for cases involving minimal coronal structure. These clamps should not be placed on porcelain surfaces because damage may occur.
For stability, the clamp selected must have four-point contact between the tooth and beaks. Failure to have a stable clamp may result in damage to the gingival attachment and coronal structure, or the clamp may be dislodged. Clamps may also be modified by grinding to adapt to unusual situations.
Placement of the rubber dam as a single unit is fast and efficient. Once in place the dam is flossed through the contacts, and the facial and lingual portions of the dam are flipped under the wings.
Identification of the tooth requiring treatment is usually routine. However, if no caries or restorations are present, the operator may clamp the wrong tooth. This can be avoided by marking the tooth before rubber dam application or by beginning the access after placement of a throat pack without the rubber dam in place.
Preparation for Rubber Dam Placement
Before treatment is initiated, the degree of difficulty in obtaining adequate isolation must be assessed. Often, teeth requiring root canal treatment have large restorations, caries, or minimal remaining tooth structure that may present complications during isolation and access. Adequate isolation requires that caries, defective restorations, and restorations with leaking margins be removed before treatment. This preparation ensures an aseptic field of operation, allows assessment of tooth restorability, and permits temporization between visits.
Once the treatment plan has been finalized, it may be necessary to perform ancillary procedures to allow for placement of the rubber dam.
Isolation of Teeth with Inadequate Coronal Structure
Ligation, the use of deep-reaching clamps, bonding, and clamping of the gingiva are the major methods of isolating teeth without adequate coronal tooth structure. Surgical management may also be required ( Fig. 15.5 ).
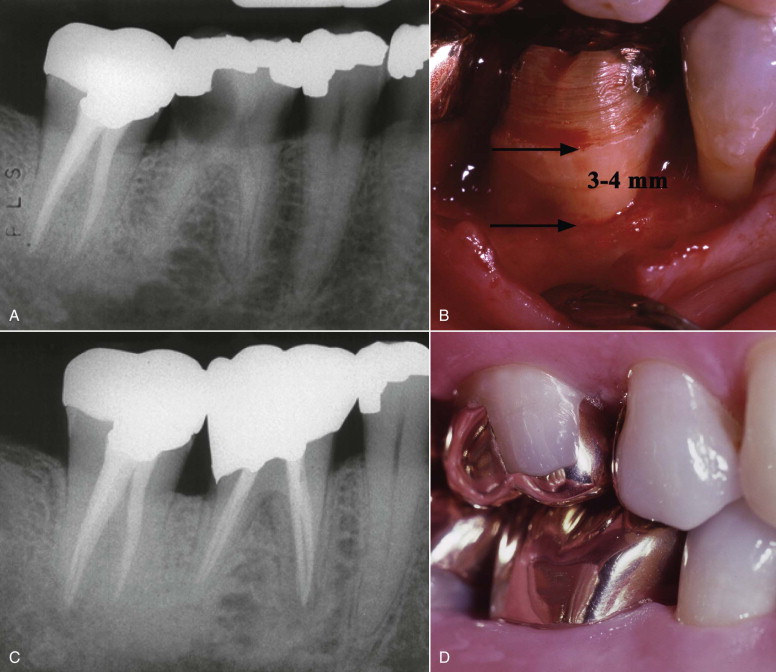
Ligation
Inadequate coronal structure is not always the cause of lack of retention. In young patients the tooth may not have erupted sufficiently to make the cervical area available for clamp retention. In these cases, ligation with floss or the use of interproximal rubber Wedjets is indicated (see Fig. 15.15, D ). Another approach is multiple tooth isolation.
Deep-Reaching Clamps
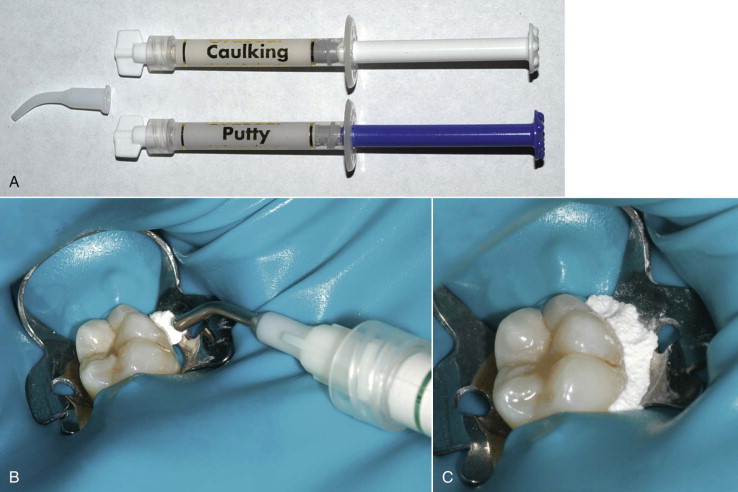
When the loss of tooth structure extends below the gingival tissues but there is adequate structure above the crestal bone, a deep-reaching clamp is indicated. It may be necessary to use a caulking material around the clamp to provide an adequate seal ( Fig. 15.6 ). Another option is the use of an anterior retainer regardless of the tooth type.
Bonding
When there is missing tooth structure, including the natural height of contour, retention can be increased by bonding resin on the facial and lingual surfaces of the remaining tooth structure. The clamp is placed apical to the resin undercut. After treatment the resin is easily removed. This technique is preferred over the more invasive technique of cutting horizontal grooves in the facial and lingual surfaces for the prongs of the clamp.
Clamping of the Gingiva
When the loss of tooth structure extends below the gingival tissues or below the crestal bone, clamping the gingival tissues is an option. This produces minimal damage, and the tissues heal. Postoperative discomfort is minimal (see Fig. 15.16, D ).
Replacement of Coronal Structure
Temporary Restorations
When there is missing tooth structure but adequate retention, missing structure can be restored with reinforced intermediate restorative material (IRM) containing zinc oxide–eugenol, glass ionomers, or resins. These materials provide an adequate coronal seal and are stable until the definitive restoration is placed. Bonded materials provide a better seal with improved strength and esthetics, but placement is more time-consuming.
Coronal Buildups
Coronal buildups replace missing structure when the tooth exhibits inadequate retention for a temporary. They are rarely required and are time-consuming. Materials include amalgam and resins. Special retention is required, and anatomic landmarks are often lost.
Band Placement
Placement of orthodontic bands is a better option if a buildup is being considered. The bands are available in various sizes and are appropriately contoured. A band can be cemented and the missing tooth structure replaced with IRM (see Fig. 15.39 ). During the placement procedure, it is important to protect the canals and pulp chamber.
Provisional Crowns
Placement of temporary crowns is an option; however, they reduce visibility, result in the loss of anatomic landmarks, and may change the orientation for access and canal location. Often temporary crowns are displaced during treatment by the rubber dam clamp. In general, when provisional crowns are placed, they should be removed prior to endodontic treatment to provide the correct orientation and maintain the remaining tooth structure.
Corrective Surgery
Gingivectomy
Gingivectomy before root canal treatment is an option when the loss of tooth structure extends below the gingival tissues but there is adequate structure above the crestal bone. It can also be used when the gingival tissues have grown into a carious defect. In general, the biologic width requires a minimum of 3 mm of sound tooth structure above the crestal bone: 1 mm for the epithelial attachment, 1 mm for the connective tissue attachment, and 1 mm for the margin of the final restoration. If there is less than the required 3 mm of tooth structure, crown lengthening should be considered. Gingivectomy removes excessive gingival tissue and exposes the coronal root structure; however, osseous reduction is not possible. Electrosurgery is an option to the traditional scalpel because it provides a bloodless operating site. The small surgical electrodes make it easy to reach difficult areas, and the coagulating property provides hemostasis and enhances vision. Care must be taken not to contact the alveolar bone because irreversible damage and necrosis will occur.
Crown Lengthening
Crown lengthening is a procedure requiring an intrasulcular incision and flap reflection before osseous recontouring. Enough osseous tissue is removed to provide at least 3 to 4 mm of sound tooth structure coronal to the crestal bone (see Fig. 15.5 ). An additional factor is the ability to complete the root canal treatment adequately. Performing the surgical procedure and then discovering that the endodontic treatment cannot be accomplished is not in the best interest of the patient. For this reason, the procedures are often performed concurrently.
Orthodontic Extrusion
Orthodontic extrusion (forced eruption) is indicated when there is inadequate tooth structure for isolation and subsequent restoration and crown lengthening is contraindicated. Criteria to consider during the treatment planning process include the resulting crown-root ratio after extrusion and esthetics (narrowing of the root form). The tooth must be extruded so that the biologic width is restored (3 mm of root coronal to the crestal bone). The minimum crown-root ratio after the extrusion is a 1 : 1 ratio.
Rubber Dam Placement
Placement as a Unit
Placement of the rubber dam, clamp, and frame as a unit is preferred (see Fig. 15.4 ). This is most efficient and is applicable in most cases. A traditional dam and frame can be used, or proprietary disposable systems are available (see Fig. 15.2 ). The steps in this process are as follows:
- 1.
The dam is placed on the frame so that it is stretched tightly across the top and bottom but has slack horizontally in the middle.
- 2.
A hole is punched in the dam, and then the clamp wings are attached to the dam.
- 3.
The dam, frame, and clamp are placed as a unit to engage the tooth near the gingival margin.
- 4.
The dam is released apically off the clamp wings to allow it to constrict around the tooth neck. The dam is then flossed through the contacts.
Placement of a Clamp, Followed by the Dam and Then the Frame
Placement of a clamp followed by the dam and frame is seldom used but may be necessary when an unobstructed view is required while the clamp is positioned. The clamp is first placed on the tooth and secured. The rubber dam is then stretched over the clamp and the frame affixed.
Placement of the Rubber Dam and Frame and Then the Clamp
The preferred method for applying a butterfly clamp that does not have wings (No. 212) is to place the dam and frame and then the clamp. Better visualization is possible when the hole is stretched over the tooth and gingiva first by the operator or dental assistant, and the clamp is then placed. The No. 212 clamp has narrow beaks and is often used in situations in which wing clamps are unstable or cannot be retained.
Rubber Dam Leakage
Several proprietary products are available for placement around the rubber dam at the tooth-dam interface should leakage occur (see Fig. 15.6 ). These caulklike materials are easily applied and removed after treatment and are especially useful for isolation of an abutment for a fixed partial denture or for a tooth that is undergoing active orthodontic treatment.
The caulk can be placed on the gingival tissues before dam placement or at the dam-tooth interface after isolation. Both the caulking and putty materials adhere to wet surfaces, although the putty has a stiffer consistency.
Disinfection of the Operating Field
Various methods and techniques are used to disinfect the tooth, clamp, and surrounding rubber dam after placement. These include alcohol, quaternary ammonium compounds, sodium hypochlorite, organic iodine, mercuric salts, chlorhexidine, and hydrogen peroxide. An effective technique is as follows: (1) plaque is removed by rubber cup and pumice; (2) the rubber dam is placed; (3) the tooth surface, clamp, and surrounding rubber dam are scrubbed with 30% hydrogen peroxide; and (4) the surfaces are swabbed with 5% tincture of iodine or with sodium hypochlorite.
Access Openings
Endodontic access openings are based on the anatomy and morphology of each individual tooth group. In general, the pulp chamber morphology dictates the design of the access preparation. The internal anatomy is projected onto the external surface. Internal pulp chamber morphology varies with the patient’s age and secondary or tertiary dentin deposition. In anterior teeth and premolars with a single root, calcification occurs in a coronal to apical direction with the chamber receding. In posterior teeth with bifurcations and trifurcations, secondary dentin is deposited preferentially on the floor of the chamber, decreasing the cervical to apical dimension of the chamber. The mesiodistal and buccolingual dimensions remain relatively the same, as does the cusp to roof distance. Dystrophic calcifications related to caries, restorations, attrition abrasion, and erosion also can occur. In general, the pulp chamber is located at the cementoenamel junction (CEJ). In young teeth, the pulp horns are at approximately the level of the height of contour.
The major objectives of the access openings include (1) removal of the chamber roof and all coronal pulp tissue, (2) locating all canals, 3) unimpeded straight-line access of the instruments in the canals to the apical one third or the first curve (if present), and (4) conservation of tooth structure. Prior to initiating treatment, the clinician should assess the existing coronal structure, restorations present, tooth angulation in the arch, and the position, size, depth, and shape of the pulp chamber. A parallel preoperative radiograph or digital image is essential. Additional angled radiographs or digital images may aid the identification of additional canals and roots. Bitewing radiographs and digital images offer the most accurate and distortion-free information on chamber anatomy in posterior teeth. Recent advances in cone beam computed tomography (CBCT) imaging allow three-dimensional viewing of the pulp chamber and radicular space. Conservation of tooth structure is important for subsequent restorative treatment and the long-term prognosis. Maintaining adequate structure in the cervical region is assured by not extending the access preparation beyond the natural external chamber walls. The distance from the surface of the clinical crown to the peripheral vertical wall of the pulp chamber is the same throughout the circumference of the tooth at the level of the CEJ and the orifices of the root canals are located at the angles in the floor-wall junction
General Principles
The general principles for endodontic access are outline form, convenience form, caries removal, and toilet of the cavity.
Outline form is the recommended shape for access of a normal tooth with radiographic evidence of a pulp chamber and canal space. The outline form assures the correct shape and location and provides straight-line access to the apical portion of the canal or to the first curvature. The access preparation must remove tooth structure that would impede the cleaning and shaping of the canal or canals. The outline form is a projection of the internal tooth anatomy onto the external root structure. The form can change with time. As an example, in anterior teeth with mesial and distal pulp horns the access is triangular. In older individuals with chamber calcification, the pulp horns are absent, so the access is ovoid.
Convenience form allows modification of the ideal outline form to facilitate unstrained instrument placement and manipulation. As an example, the use of nickel-titanium rotary instruments requires straight-line access. An access might be modified to permit placement and manipulation of the nickel-titanium instruments. Another example is a premolar exhibiting three roots. The outline form might be made more triangular to facilitate canal location.
Caries removal is essential for several reasons. First, removing caries permits the development of an aseptic environment before entering the pulp chamber and radicular space. Second, it allows assessment of restorability before treatment. Third, caries removal provides sound tooth structure so that an adequate provisional restoration can be placed. Unsupported tooth structure is removed to ensure a coronal seal during and after treatment so that the reference point for length determination is not lost should fracture occur.
Toilet of the cavity involves preventing materials and objects from entering the chamber and canal space. A common error is entering the pulp chamber before the coronal structure or restorative materials have been adequately prepared. As a result, these materials enter the canal space and may block the apical portion of the canal.
Canal Morphologies
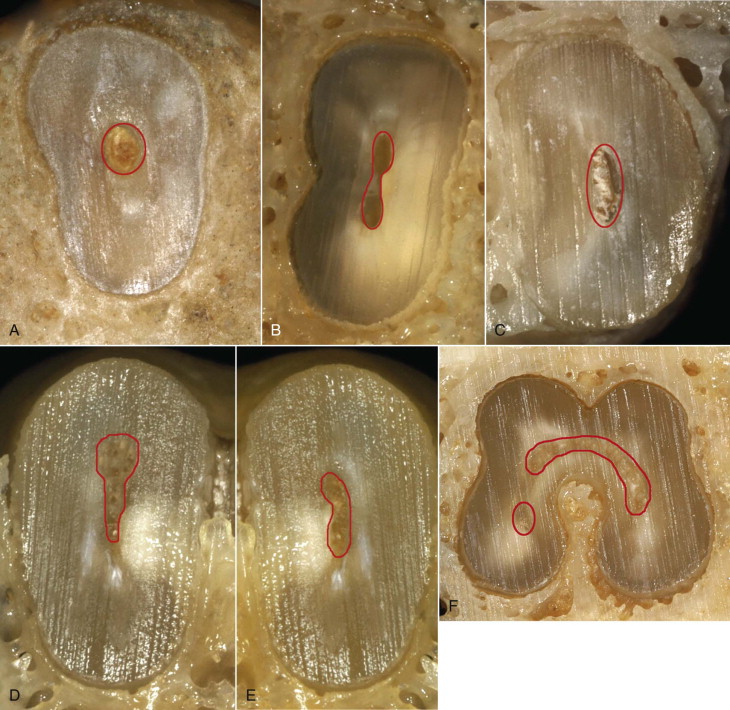
Five major canal morphologies have been identified ( Fig. 15.7 ). They include round, ribbon or figure eight, ovoid, bowling pin, kidney bean, and C -shape. With the exception of the round morphologic shape, each presents unique problems for adequate cleaning and shaping.
General Considerations
In difficult cases the access can be prepared without the rubber dam in place. This allows visualization of the tooth shape, orientation, and position in the dental arch. When the canal or chamber is located, the rubber dam is applied. Caution: Until the rubber dam is in place, broaches and files cannot be used (see Fig. 15.1 ).
Care must be taken to prevent tooth structure or restorative materials from entering the radicular portion of the root if additional expansion of the access is necessary after the chamber is exposed. When an access is to be enlarged or restorative materials removed after chamber exposure, the radicular space must be protected. The canal orifice and chamber floor can be blocked by placing gutta-percha temporary stopping. The material is heated and then compacted with a plugger. The temporary stopping is removed with heat (preferred) or solvents after completion of the access preparation.
Before beginning the access, the clinician should assess the preoperative radiographs to determine the degree of case difficulty. At this stage the estimated depth of access is calculated. This is a measurement from the midlingual surface of anterior teeth and the occlusal surface of posterior teeth to the coronal portion of the pulp chamber. Calculated in millimeters, this information is then transferred to the access bur and provides information on the depth necessary to expose the pulp. If the estimated depth of access is reached and the pulp has not been encountered, the access depth and orientation must be reevaluated. A parallel radiograph exposed with the rubber dam removed helps determine the depth and orientation so that perforations and unnecessary removal of tooth structure can be avoided (see Fig. 15.33 ).
The estimated depth of access for anterior teeth is similar in different tooth groups. The maxillary central and lateral incisors average 5.5 mm for the central incisor and 5 mm for the lateral incisor. The mandibular central and lateral incisors average 4.5 mm for the central incisor and 5 mm for the lateral incisor. The maxillary canine averages 5.5 mm and the mandibular canine, with its longer clinical crown, averages 6 mm. In maxillary furcated premolars, the average distance from the cusp buccal cusp tip to the roof of the chamber is 7 mm. For maxillary molars the distance is 6 mm, and for the mandibular molars it is 6.5 mm. With an average pulp chamber height of 2 mm, the access depth for most molars should not extend beyond 8 mm (the floor of the chamber).
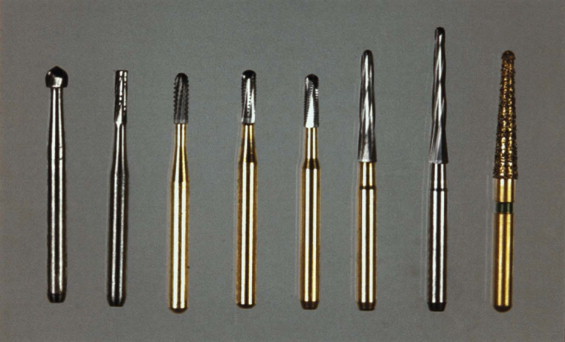
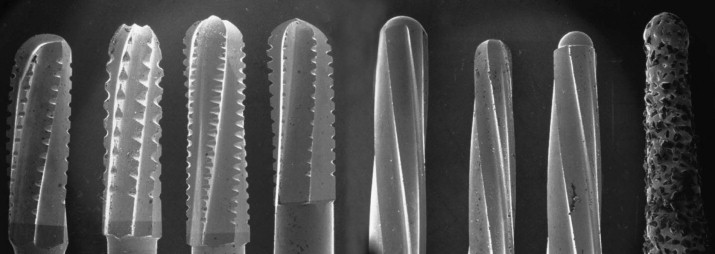
Access openings are best accomplished using fissure burs in the high-speed handpiece. A number of special burs are also available for access. No single bur type is superior. For the clinician with a knowledge of anatomy and morphology and the appropriate clinical skills and judgment, bur selection is a personal choice ( Figs. 15.8 and 15.9 ). Regardless of the high-speed bur chosen, the bur is placed in the chamber and removed while rotating. High-speed burs are not used in the canals. Failure to follow these principles can result in breakage ( Fig. 15.10 ).
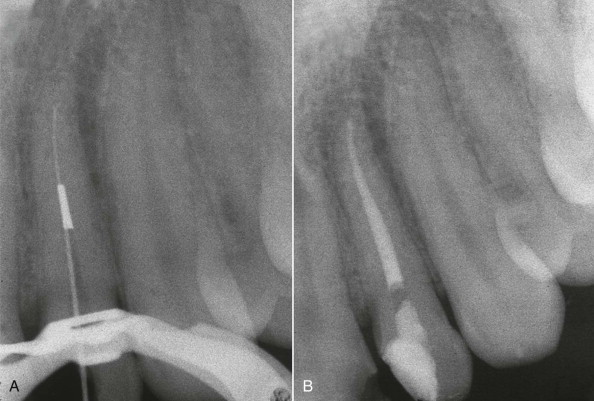
Visualization of the internal anatomy is enhanced during access by using a fiberoptic handpiece and microscopy. Illumination is the key. A sharp endodontic explorer is used to detect the canal orifice or to aggressively dislodge calcifications. When a canal is located, a small file or path-finding instrument (.06, .08, or .10 stainless steel file) is used to explore the canal and determine canal patency close to the apical foramen. Care should be exercised during this process to avoid forcing tissue apically, which might result in canal blockage ( Fig. 15.11 ). This procedure is performed in the presence of irrigant or lubricant.
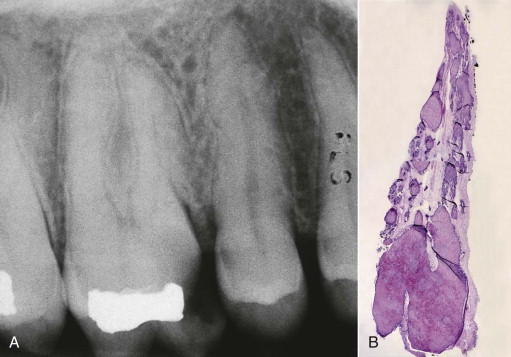
Often, in an attempt to preserve tooth structure, the access openings are constricted and underprepared. This creates problems with locating canals and gaining straight-line access. Removal of restorative materials during access is often indicated knowing that following treatment a new restroration will be placed. Removal enhances visibility and may reveal undetected canals, caries, or coronal fractures. When difficulties occur with calcifications or extensive restorations, the operator may become disoriented. The discovery of one canal can serve as a reference in locating the remaining canals. A file can be inserted and an angled radiograph exposed to reveal which canal has been located (see Chapter 13 ).
It is important not to violate marginal ridges during access preparation in any of the tooth groups.
Stay updated, free dental videos. Join our Telegram channel

VIDEdental - Online dental courses


