Type
AU %
Hardness
Indication
I
98
Soft
Class V, gold foils
II
77
Soft enough to make great margins
Inlays or small onlays with finishable margins on tooth surfaces
III
72
Hard
Crowns, nonfinishable margins
IV
69
Harder
Removable partial dentures
Noble metals are the most popular when fabricating a fixed prosthodontic restoration. These include gold (Au), platinum (Pt), and palladium (Pd). Below is an illustration of the composition of noble metal alloys:
- A.
High gold: 80–85 % Au, 7–10 % Pt
- B.
High noble: 53 % Au, 38 % Pd, 0–12 % Ag
- C.
Pd-Ag alloy: 60 % Pd, 30 % Ag (shading problems, must use a low-sodium ceramic)
Base metal alloys are sometimes utilized due to the reduced cost. An example of this composition is nickel-chrome-beryllium: 65 % Ni, 20 % Cr, and 2 % Be. The problem with base metal alloys is the oxide. Oxide affects the porcelain bond, making that bond unreliable. Margin integrity is an issue as base metal alloys shrink significantly more than noble alloys. The margin distortion is a function of the geometry of the margin and the composition of the alloy. Due to the lower melting temperature, the casting has a greater probability of distorting.
7.2.2 All-Ceramics Restorations
- A.
Feldspathic porcelain: Is derived from the natural feldspar; it is predominantly a glass material with amorphous (noncrystalline) structure. It is a glass ceramic that is mainly composed of silicon dioxide (silica quartz) and some amount of alumina. It provides excellent esthetics, and its major concern is strength. Feldspathic porcelain has traditionally been used to veneer porcelain-fused-to-metal (PFM) restorations.
-
Indications: porcelain veneers
-
- B.
Leucite-reinforced pressed glass ceramic: There is significant literature to support its use. This is a glass ceramic which has incorporated fillers to increase its strength. Pressed leucite-reinforced ceramic has been found to have better marginal adaptation than more traditional porcelain-fused-to-metal restorations (Goldin et al. 2005).
-
Indications: Esthetic inlays, onlays, porcelain veneers, and anterior crowns
-
Brand names: IPS Empress, Ivoclar Vivadent; 3G All-Ceramic System, Pentron; Finesse All-Ceramic, Dentsply; Authentic, Jensen Industries
-
- C.
Lithium disilicate glass ceramic: These are traditionally milled with computer-aided design/computer-aided milling (CAD/CAM) in the laboratory and pressed with layers of porcelain for improved esthetics. The milled full contour form (monolithic) has been found to have very good survival rate in a 3-year study (Fasbinder et al. 2010). In three unit bridges, Kern et al. in 2012 have found that following manufacturer’s directions, the survival of IPS e.max over 5–10 years is similar to the more traditional porcelain-fused-to-metal bridges. In addition, the cement type used for final cementation did not affect the longevity of the survival of the bridge. The restoration has to be characterized to obtain acceptable esthetics. It is the strongest glass ceramic in the market. Dental laboratories in the United States fabricate IPS e.max through a digital pathway and ultimately utilizing milling machines (see Fig. 7.1). In any milled ceramic, careful tooth preparation considerations should be observed to have successful outcomes (See Chap. 10 Indirect Restorations Utilizing CAD/CAM).
 Fig. 7.1Commercial milling units and a lithium disilicate puck which can accommodate 25–30 restorations and are milled in a few hours (Photo Courtesy of Mr. Kevin Hudi, DSG Americus Laboratories, Saint Petersberg, Florida)The long-term success of lithium disilicate crown is dependent on the bonding of the cement to the restoration and the tooth. Careful preparation of the restoration after the try in process removes contaminants like saliva and blood. Current recommendation is to “clean” the restoration using 5 % hydrofluoric etch for 20 s, rinse and dry, followed by silane application (Kern 2014). It is thus not necessary to have the laboratory etch the restoration prior to try in. Air abrasion of lithium disilicate is contraindicated as it may alter the marginal integrity. Following manufacturer’s directions on the use of your chosen cement is also essential for success.
7.2.3 Other Metal
Zirconia: Is a shiny gray-white metal, which may look blue-black when in powder form. It is an oxide which has high tensile strength, high hardness, and high corrosion resistance. It is a strong core that can be fabricated as a monolithic restoration or can be layered with porcelain over the core. The esthetic result is not comparable with the glass ceramics. Zirconia is milled and sintered in high-heat ovens to attain the correct fit on the tooth. An interesting video of this process can be found on https://www.youtube.com/watch?v=HDedHm5SWR4 (Accessed on March 22, 2016). A chairside zirconia CAD/CAM workflow was introduced by Dentsply Sirona and Glidewell laboratories in 2016.
There has not been a consensus on the best way to achieve adhesion of zirconia to the tooth. It is especially an issue when mechanical retention is not present. A recent review of the literature by Ozcan and Bernasconi revealed that adhesion of zirconia to the tooth is increased when two things are done (Ozcan and Barnasconi 2015):
- 1.
Conditioning of the zirconia prior to bonding (use of silane or primers).
- 2.
The use of an MDP monomer-based resin cement had slightly higher results.
In a literature review by Agustin-Panadero et al., their findings report high fracture rates of porcelain-veneered zirconia, 6–15 % over a 3–5-year period. This is compared to PFM which is 6–10 % over 10 years. Minimizing the thickness of the veneered surface decreases the risk of fracture (Grob and Sisera 2014). The monolithic zirconia on the other hand is heralded for its resistance to fracture even in limited occlusal clearance areas and feather edge (or shoulder-free preparations) (Nakamura et al. 2015).
Preparation of a zirconia crown prior to cementation should include air abrasion with alumina particles after try in to remove saliva or blood contaminants (Kern 2014):
-
Indications: (Monolithic) core for anterior and posterior crowns, nonesthetic zones, bridges, abutments for implants
-
Some brand names: BruxZir® Solid Zirconia and PrismatikTM Clinical Zirconia restorations
7.3 Design Guidelines for the Restoration
7.3.1 Laboratory Techniques (Our Special Acknowledgment to Mr. Lee Culp for Assisting Us in Writing This Section)
Beginning with the end in mind is a great way to understand what we as dentists need to provide our laboratory technicians in order for them to have the ability to fabricate functional and esthetic restorations. The techniques below are examples of how dental laboratories can improve the esthetics of all ceramic crowns. The basic foundation is keeping the majority of the tooth as a monolithic piece (milled as a solid structure Vazquez 2012) to preserve the strength of the zirconia or lithium disilicate restoration. If the restoration is to be fabricated from zirconia, the restoration will be designed in dental CAD/CAM software and then milled out to achieve the final tooth form. If the restoration is to be fabricated from lithium disilicate, the restoration can be “waxed up” by hand, similar to the creation of a gold crown, or it can be designed and milled in a dental CAD/CAM system.
For final esthetic enhancement, the porcelain is then layered in different shades and translucencies to achieve the correct esthetics for the different parts of the tooth. Strength and esthetics become possible when these techniques are adapted. For best results on esthetic cases, communication with the laboratory is an essential element even at the planning stage (See Chap. 20 Communicating with Dental Laboratories):
- A.
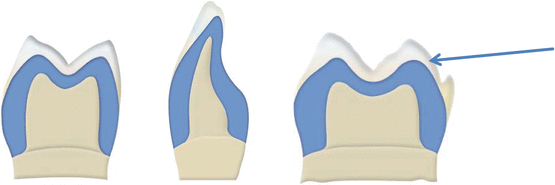
Cutback technique: Design is done as a full contour crown (blue and white layers together) utilizing design software, CAD. The design is then modified and a coping (blue layer) is milled through CAM. Porcelain layers (white) are pressed onto the coping to achieve the desired esthetics. The cutback technique was developed by Mr. Lee Culp in 2002. Ivoclar’s Empress Esthetic system was based on this technique (Fig. 7.2 Images reprinted with permission from Ivoclar Vivadent).
 Fig. 7.2Cutback. The full contour is utilized in essence to determine where the cutbacks are needed to maximize esthetics
 - B.
Full layering technique: After the coping frame is milled, the entire anatomical shape of the tooth is layered by hand using the brush technique and fired over the CAD/CAM coping design in order to achieve better esthetics.
- C.
Staining technique: The entire crown is milled through a CAD/CAM pathway. The porcelain is then stained to characterize the crown.
7.3.2 Tooth Preparation Guidelines
7.3.2.1 Veneer Preparations (Table 7.2)
Table 7.2
Prior to large esthetic cases in the anterior, a wax up of the desired final result should be done. This would also be useful in fabricating provisional restorations and ultimately for the laboratory to fabricate the final restorations
|
Porcelain veneers
|
Cervical reduction
|
Mid-facial reduction
|
Incisal reduction
|
Comments
|
|---|---|---|---|---|
|
Porcelain veneers feldspathic
|
0.3 mm
|
0.5–0.7 mm
|
1–1.5 mm
|
Communicate with your lab technician regarding best ways to shade match. Photographs are often helpful
Minimal preparation on tooth, bonded to enamel for better results
85 % of porcelain veneers are additive
|
|
Porcelain veneers pressed (e.max)
|
0.6 mm
|
0.6 mm
|
1–1.5 mm
|
Cervical reduction might end in dentin
|
|
Porcelain veneers to mask discolored dentin (mildly)
|
0.6–0.8 mm
|
0.8–1 mm
|
1–1.5 mm
|
Veneer preparation is on dentin. Increase in mm per shade change
|
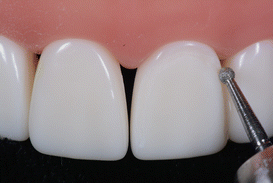
These illustrations are step-by-step guidelines in preparing a veneer. The same basic principles apply when preparing full coverage posterior or anterior teeth:
-
Step 1 Depth guides are established and marked.


