Learning Objectives
After reading this chapter, the student should be able to:
- 1.
Define a basic set of instruments appropriate for diagnosis, emergency treatment, canal preparation, obturation, and bleaching.
- 2.
Describe the general physical properties of endodontic instruments and show how these characteristics are related to their use.
- 3.
Describe the basic design (longitudinal, cross-sectional, and tip configuration) of the more common canal preparation instruments and their mode of use.
- 4.
Explain the basis for sizing and taper (standardization) of hand-operated instruments.
- 5.
Describe and differentiate between conventional files and files of alternative designs.
- 6.
Define the differences between stainless steel and nickel-titanium intracanal instruments, including physical properties and usage characteristics.
- 7.
Describe the action and use of rotary instruments for both cleaning and shaping canals.
- 8.
Describe the proper use of instruments to prevent breakage within the canal.
- 9.
Recognize visible changes that predispose instruments to breakage.
- 10.
Describe techniques for sterilization and disinfection of instruments.
- 11.
Select appropriate sterilization methods for each instrument type.
- 12.
Identify procedures and chemicals that might cause deterioration of files and explain how to recognize such deterioration.
This text is directed toward the basics of clinical endodontics; therefore, the instruments described in this chapter are not all inclusive. A clinician’s knowledge of the purpose, composition, design, function, proper technique, safety guidelines, and maintenance for each instrument is critical to treatment success. Using the correct instrument for each step is a basic rule for success and prevention of procedural errors.
Some hand instruments are common to many dental procedures (mirror, explorer, spoon excavator), but others have been designed to adapt to the requirements of root canal treatment. Originally, these instruments were few in number and crude in design. Early hand-operated files had long handles that were best suited for preparation of anterior teeth. As root canal treatment diversified, smaller “finger” instruments were developed for posterior teeth. In addition to being more adaptable, these provided improved tactile sense for the operator. As hand-operated instruments underwent changes, mechanized instruments, such as rotary, reciprocating, and ultrasonic devices, were finding their way into the specialty. New instrument designs continue to evolve (and to be marketed), always with the hope of improving efficiency and treatment outcomes.
This chapter reviews a basic armamentarium for various procedures and systems for effective sterilization. The different designs of endodontic intracanal instruments are introduced, including types of metals and important aspects of their physical properties and usage characteristics. Detailed information about all aspects of manufacturing and testing of intracanal instruments is beyond the scope and intent of this chapter; however, certain essential facts, as identified in the learning objectives, are presented to enable effective instrument use (and prevent abuse).
Instruments for Different Procedures
Examination and Diagnosis Kit
A basic kit for examination and diagnosis includes items found in routine restorative kits, such as a cassette to hold instruments during sterilization and storage, mouth mirror, general purpose explorer, and periodontal probe. Cotton forceps are used for various functions during the exam procedure, including holding cotton pellets for cold testing or cotton rolls when controlling moisture for electric pulp tests.
Although not necessarily considered instruments, other materials usually required are isolation materials: gauze, cotton rolls, Dri-Angles, a rubber dam, cotton pellets, occlusion paper, bite stick, wooden stick or Tooth Slooth, evacuation devices (high speed and saliva ejector), and devices for radiographs.
Routine Endodontic Procedure Kit
Instruments for local anesthesia, radiographs, isolation, endodontic access, and length determination are described in other chapters. For the majority of visits in which routine endodontic therapy (cleaning, shaping, and obturation) is delivered, a kit includes any special instruments, in addition to those in the examination and diagnosis kit mentioned previously.
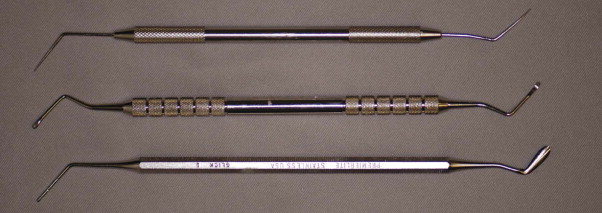
A number of instruments have been specially adapted for endodontics ( Fig. 13.1 ). For example, the DL16 explorer is double ended and has long, tapered tines at varying angles to the handle. Explorers should never be heated. Debris is removed from the pulp chamber and canals with a specialized spoon excavator, which has an extra-long shank compared to the more standard spoon used in restorative dentistry. The Glick #1 instrument has a “paddle” end (for placement of materials such as temporary restorations) and a “plugger” end (for removal or condensation of gutta-percha). The plugger end may be heated. The rod-shaped plugger may have markings to indicate 5-mm increments. Other root canal long-shanked pluggers (flat end) and spreaders (pointed end) are used during placement of various materials into root canal systems.
Specific techniques for these instruments are discussed in other chapters of this text. For other aspects of many procedures, a spatula, millimeter ruler, device for holding files, scissors, hemostats, bur block with burs, and syringes (anesthetic and irrigation) are usually included.
A common method of irrigating canals, called “needle irrigation,” usually uses a 5- or 10-cc Luer-Lok syringe with a 27- to 30-gauge needle. The safest needle delivery method uses a non-open-ended device that is side vented and/or closed ended, causing the irrigant to be expressed laterally, thus reducing the risk of apical extrusion.
Sonic or ultrasonic agitation devices, negative apical pressure systems (EndoVac), and laser photon-initiated photoacoustic streaming (PIPS) have been shown to provide improved effectiveness in some situations. The scope of this chapter does not allow full descriptions of all these devices and methods.
Emergency Kit
Required instruments are dictated by diagnosis. Procedures may vary and may include pulpotomy, pulpectomy, occlusal adjustment, or incision for drainage of an acute apical abscess.
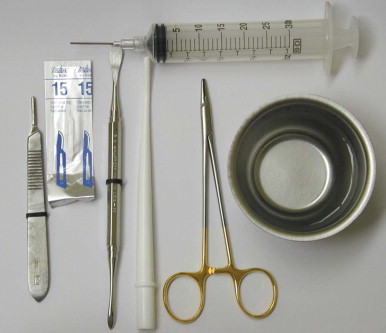
Most emergency situations can be managed with a typical examination or routine procedure kit. If an incision for drainage is required, other devices should be available: scalpel handle and blade; periosteal elevator; small, curved hemostat; latex drain, needle holder, suture material, 25-cc irrigation syringe, 18-gauge irrigation needle, sterile saline, and surgical suction tip ( Fig. 13.2 ).
Instruments for Bleaching
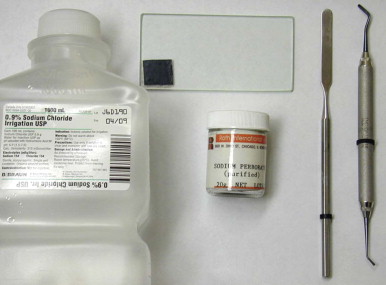
Instruments for bleaching are included with the cleaning and shaping tray, with the addition of the paste ingredients and a plastic instrument ( Fig. 13.3 ). The plastic instrument is used to place the bleaching mixture (usually sodium perborate and sterile water) in the pulp chamber, followed by a temporary restoration.
Intracanal Preparation Instruments
The purpose of canal preparation (cleaning and shaping) is to mechanically debride and allow chemical disinfection, followed by sealing of the spaces. Shaping of the canals is partially dictated by the method of obturation to be used. Various instruments have been designed to reduce risks while increasing efficiency and effectiveness. The clinician must become knowledgeable about the materials, design principles, and manufacturer’s recommendations for the instruments.
To mechanically debride a region of the canal space completely, an instrument must contact and plane all walls. Despite continual improvements in design and physical properties, there are still no instruments or techniques that totally mechanically prepare and shape all root canal spaces. Irregular spaces do not correspond to, and cannot always be well prepared by, an instrument with a regular (round) shape. These incongruences between reality and ideal shape require judicious and skillful use of canal preparation instruments to maximize debridement while avoiding procedural errors.
Other instrument systems are activated using ultrasonic or sonic energy and are diverse in design. Some resemble barbed broaches or files, and others are diamond-coated wires. All insert into a dedicated vibratory handpiece that energizes the instrument. Again, none of these special designs or techniques has been shown to be superior in achieving treatment outcomes.
Physical Properties
Currently two basic categories of metal are used to construct root canal–shaping instruments: stainless steel and nickel-titanium. Individual compositions of the metals and handling during fabrication vary among manufacturers, resulting in instruments with different properties. Many of these changes are proprietary knowledge. The clinician should select the instrument type based on the physical properties needed for the procedure (e.g., stiffness, flexibility, cutting efficiency, memory, durability) and cost.
Stainless steel instruments are primarily composed of carbon, iron, and nickel (traces of manganese [Mn], chromium [Cr], and molybdenum [Mo] may be added to achieve specific properties). Stainless steel instruments are relatively inflexible, which renders them less adaptable to canal curvatures.
New metal alloys have been incorporated to attempt to improve the quality of files. Nickel-titanium instruments are composed of approximately 55% nickel and 45% titanium, which can vary by manufacturer. Besides specific elemental content, during the manufacturing process variables are manipulated, such as temperature or heating and cooling phases, resulting in instruments with significantly different properties. Nickel-titanium instruments are more flexible and adapt more readily to fine, curved canals but have no advantage over stainless steel files in straight and irregular canal spaces.
Nickel-titanium does not conform to the normal rules of metallurgy. Because it is a superelastic metal, external stresses transform the austenitic crystalline form of nickel-titanium into the martensitic crystalline structure, which can accommodate greater stress without increasing the strain.
Due to the unique crystalline structure and phase-change capability of nickel-titanium, most of these files have shape memory; that is, they are able return to their original shape after being deformed. This is an important ability; shape memory gives nickel-titanium alloys the flexibility and toughness necessary for routine use as effective rotary endodontic files in curved canals. Nevertheless, when torsional strength was tested, stainless steel proved more resistant than nickel-titanium to fracture by twisting.
Besides traditional Ni-Ti instruments, alterations of composition, processing, and design have led to other new “models,” including M-Wire (Dentsply, Tulsa, Oklahoma), CM wire (DS Dental, Johnson City, Tennessee), and the Twisted File (Sybron, Culver City, California). It has been shown that by controlling the memory of nickel-titanium, the number of cycles to fracture increased three to five times. Nickel-titanium has been adapted for both hand instruments and rotary applications, and many designs have been developed.
Instrument Fabrication
Recent developments with metal composition and processing allow files to be fabricated from a blank wire by grinding, twisting, or a combination of these processes. This process can be highly variable between brands and results in different instrument designs, physical characteristics, and working properties. A “ground” instrument is produced by placing a blank wire in a lathe and grinding it to a specific design (e.g., stainless steel Hedstrom files [ Fig. 13.4 ] and stainless steel K-type files [ Fig. 13.5 ]). K-type files are made by twisting or grinding a square or triangular tapered wire to form cutting edges along the length of the shaft ( Fig. 13.6 ).
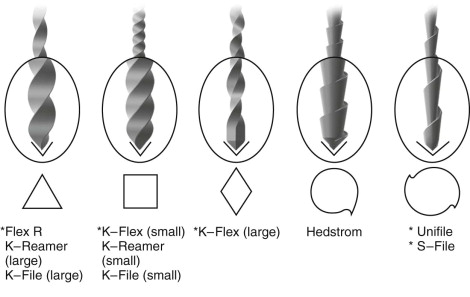
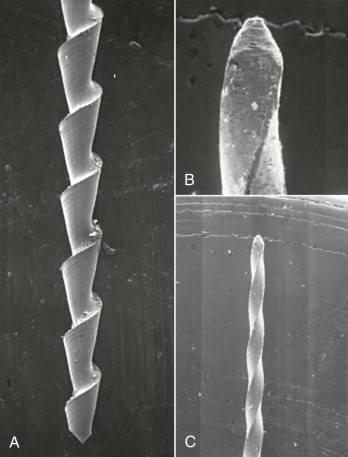
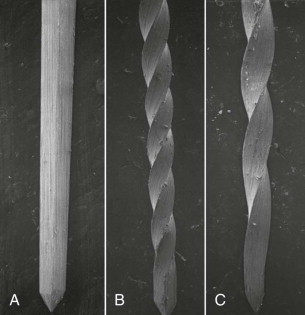
To produce a twisted file, one end of the blank is fixed in a lathe, and the other end is allowed to rotate until the desired design shape is achieved. A ground-twisted wire is fabricated by first grinding a wire into tapered geometric blanks of various shapes (square, triangular, rhomboid) and then twisting it to produce helical cutting edges.
Physical Characteristics
Several factors inherent to stainless steel and nickel-titanium wire instruments must be considered. How is adequate flexibility maintained without instrument fatigue? How much abuse can the files endure before fatigue and failure ensue? When has a file been fatigued to a critical point? How can an efficient cutting edge be maintained while avoiding the creation of new, nonanatomic canal spaces? Although these metals may have different physical properties and different use characteristics, both can fatigue and separate when used incorrectly.
Nickel-titanium alloy has a modulus of elasticity that is one-fourth to one-fifth that of stainless steel, allowing a wide range of elastic deformation. An advantage of this increased flexibility is that a file can better follow a canal curvature with less deformation (transportation) during enlargement.
Materials researchers and manufacturers hold various theories about file properties, such as “flexibility may be increased by increasing length or decreasing cross-sectional diameter” and “a more acute cutting angle can mean more efficient substance removal by a blade.” Bench-top research has identified certain important limits to specific physical properties and incorporated these findings into a series of standards for the manufacture of instruments. However, clinical behavior may not directly relate to such in vitro testing.
Instrument nomenclature follows International Organization for Standardization (ISO). Hand-operated instruments include K-type reamers and files, broaches, and Hedstrom-type files. Other instruments can be engine-driven, thus have a latch that inserts into a slow-speed handpiece. These include rotary (Gates-Glidden and Peeso) engine-driven reamers and files, and reciprocating files or reamers.
American National Standards/American Dental Association (ANSI/ADA) specification No.101 has established torsional standards for all nickel-titanium and stainless steel rotary instruments. The term torsional limits refers to the amount of rotational torque that can be applied to a “locked” instrument to the point of breakage (separation). Obviously, an instrument should have sufficient strength to be rotated and reasonably worked without separating. Fatigue also occurs as a file is rotating in a curved canal. For this reason, rotary files should never rotate in a canal for more than a few seconds, especially if no movement to withdraw occurs. Under cyclic fatigue test conditions, nickel-titanium files have increased resistance to fracture compared with stainless steel files.
Efforts to enhance the properties of nickel-titanium alloy are ongoing; it has been demonstrated that altering surface characteristics and the process of manufacturing may increase the durability and flexibility of these instruments. Electropolishing, surface coatings, and surface implantation have been used for this purpose.
Sharpness and corrosion resistance are properties related to metal and design. Traditional metals have included stainless or carbon steel. Although these are similar in some respects, many carbon steel instruments have been shown to cut somewhat more efficiently than stainless steel instruments. However, carbon steel is no longer used because it is more susceptible to corrosion caused by autoclaving and irrigating solutions.
Instrument Design and Standardization
Many variables in the design of instruments can affect their function, efficacy, and efficiency. By changing the cross-sectional design from square to triangular or rhomboid and decreasing the number of flutes per millimeter, greater flexibility is gained. To improve the consistency of treatment, the ADA has established several specifications (No. 28, 58, 95, and 101) that cover various types of instruments and characteristics such as dimensions, stiffness, corrosion resistance, acceptable tolerances in manufacturing, color code, taper, tip geometry, size, fatigue resistance, and torsional resistance.
Despite reported sizes and shapes, it should be noted that hand-operated instruments do not demonstrate reliable and consistent dimensional standardization. This should always be a consideration when preparing canal spaces.
Stay updated, free dental videos. Join our Telegram channel
VIDEdental - Online dental courses


