Introduction
Cone-beam computed tomography images have been previously used for evaluation of alveolar bone levels around teeth before, during, and after orthodontic treatment. Protocols described in the literature have been vague, have used unstable landmarks, or have required several software programs, file conversions, or hand tracings, among other factors that could compromise the precision of the measurements. The purposes of this article are to describe a totally digital tooth-based superimposition method for the quantitative assessment of alveolar bone levels and to evaluate its reliability.
Methods
Ultra cone-beam computed tomography images (0.1-mm reconstruction) from 10 subjects were obtained from the data pool of the University of Oklahoma; 80 premolars were measured twice by the same examiner and a third time by a second examiner to determine alveolar bone heights and thicknesses before and more than 6 months after orthodontic treatment using OsiriX (version 3.5.1; Pixeo, Geneva, Switzerland). Intraexaminer and interexaminer reliabilities were evaluated, and Dahlberg’s formula was used to calculate the error of the measurements.
Results
Cross-sectional and longitudinal evaluations of alveolar bone levels were possible using a digital tooth-based superimposition method. The mean differences for buccal alveolar crest heights and thicknesses were below 0.10 mm for the same examiner and below 0.17 mm for all examiners. The ranges of errors for any measurement were between 0.02 and 0.23 mm for intraexaminer errors, and between 0.06 and 0.29 mm for interexaminer errors.
Conclusions
This protocol can be used for cross-sectional or longitudinal assessment of alveolar bone levels with low interexaminer and intraexaminer errors, and it eliminates the use of less reliable or less stable landmarks and the need for multiple software programs and image printouts. Standardization of the methods for bone assessment in orthodontics is necessary; this method could be the answer to this need.
There has recently been increased interest in the orthodontic community for evaluating alveolar bone heights and thicknesses before, during, and after orthodontic treatment. Both medical computed tomography (CT) and cone-beam CT (CBCT) have made such evaluations possible under circumstances where direct observation is not practical or feasible. Compared with medical CT, CBCT images are captured on a single rotation using a relatively focused beam, with considerably less scattered radiation and more x-ray use.
The 3-dimensional (3D) images from a CBCT scan are composed of a series of isotropic voxels equal in width, thickness, and height, with sizes commonly ranging between 0.1 and 0.4 mm. These images allow accurate 1:1 linear measurements to be made along any plane. Therefore, morphologic changes can be evaluated and quantified over time with a relatively low dose of radiation.
When one looks at the methods currently available for longitudinal assessment of alveolar bone levels, these are not well defined, use unreliable or unstable landmarks, or require many software programs, conversion of file formats, recalibration of images, printouts, hand tracings, hand superimpositions, or hand measurements. All these factors can contribute to a loss in the precision of the measurements. Unless proper methods are established, adequate conclusions cannot be drawn from studies that evaluate alveolar bone levels with CBCT.
The purposes of this study were to describe a digital method for longitudinal assessment of alveolar bone levels using a step-by-step approach and to assess its reliability.
Material and methods
After proper institutional review board approval, 10 subjects were randomly selected from the data pool of patients at the University of Oklahoma. Pretreatment (T0) and more than 6 months posttreatment (T1) CBCT images were obtained from the charts of these subjects. Their mean age at T0 was 14.5 years (range, 12-18 years), and the mean retention time from the end of treatment to T1 was 10 months (range, 6-18 months). All scans were taken on the same Iluma Ultra Cone Beam CT scanner with a 16 × 22-cm field of view (3M IMTEC, Ardmore, Okla) for 20 seconds at 3.8 mA and 120 kV(p). The images were reconstructed at ultraresolution (0.1-mm voxel size). Spatial resolution was measured at 0.1920 mm.
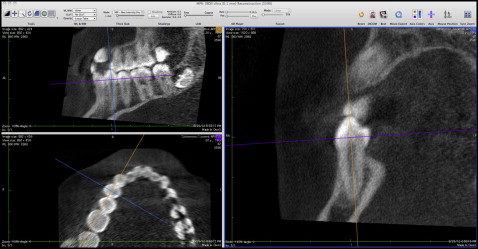
The DICOM data were imported into OsiriX (version 3.5.1; Pixmeo, Geneva, Switzerland; 64 bit). The 3D multiplanar resolution was selected, and all maxillary and mandibular premolars were oriented using 3D triangulation and following the long axes of the teeth, perpendicular to the arch circumference ( Fig 1 ). The images were viewed on 0.19-mm slices (thickness), using linear table opacity. The numeric range between the white and black levels (window width) and the theoretical midpoint of this range (window level) were selected for the best visualization of alveolar bone and tooth structure. Window width was kept between 2863 and 2937 Hounsfield units (HU), with the level between 815 and 874 HU.
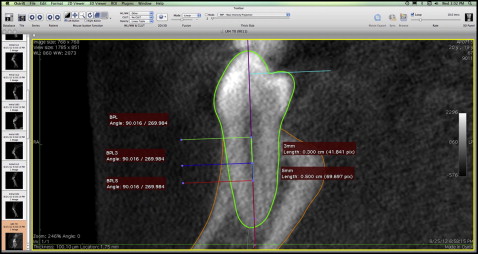
The coronal (frontal) views from the 3D triangulation were saved using the DICOM Export tool. Regions of interest (ROIs) were identified on the new files for each tooth. The first ROI was defined using the closed polygon tool to trace the contour of the tooth. The contours of the buccal and lingual alveolar bone were traced using the open polygon tool. A reference line was created with the length tool following the long axis of the tooth ( Fig 2 ). For the mandibular first premolars and for anatomic reasons, the deepest portion of the occlusal table was perpendicularly projected to the reference line using the dynamic angle tool.
By double clicking an ROI or its information box, the option boxes were accessed. Here the ROIs were labeled, and a different color was selected for each ROI to facilitate identification.
Buccal perpendicular line (BPL): Once the contour of the tooth and the reference line were traced, a line was constructed perpendicular to the reference line marking the buccal alveolar bone crest height. To do this, the reference line and the tooth contour were grouped, and the ROIs were made unselectable to make sure that they would not be altered. Using the dynamic angle tool, a 90° angle was drawn following the reference line, tangent to the alveolar crest. This ROI was labeled the BPL ( Fig 2 ).
BPL3 and BPL5: The length tool was used to mark both 3 mm and 5 mm apical to the BPL on the reference line; with the same procedure used for the BPL, 2 more lines were drawn. These lines were labeled BPL3 and BPL5 ( Fig 2 ).
At this point, all ROIs were made unselectable, and the buccal alveolar crest height and thicknesses were measured using the length tool.
Buccal alveolar crest height (BACH) was determined as the distance from the deepest portion of the occlusal table on the reference line (or its perpendicular projection in the case of mandibular premolars) to the BPL ( Fig 3 ).
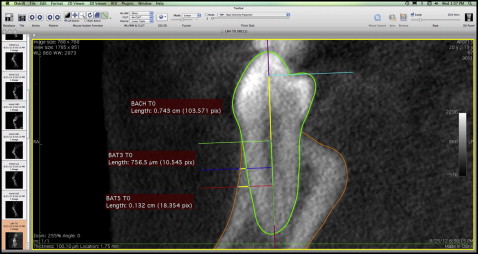
Buccal alveolar thickness (BAT) was measured from the outermost contour of the bone to the tooth silhouette on each perpendicular accessory line apical from the crest (BPL3 and BPL5) ( Fig 3 ). BAT3 at T0 represented the initial thickness (before treatment) of the alveolar bone on BPL3. Similarly, BAT5 at T1 was the alveolar bone thickness on BPL5 at T1 (retention, >6 months after treatment).
Superimposition: T1 images were oriented for each tooth with the same guidelines as for T0. The template for each tooth was pasted onto the 3D multiplanar reconstruction for the corresponding T1 image ( Fig 4 ). This allowed one to make the right cut for the subsequent time point. Once the T1 cut was saved as a DICOM file, the T0 template was inserted and moved as needed for the best fit on the tooth silhouette ( Fig 5 , A and B ).
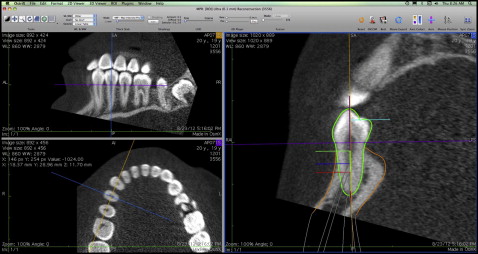
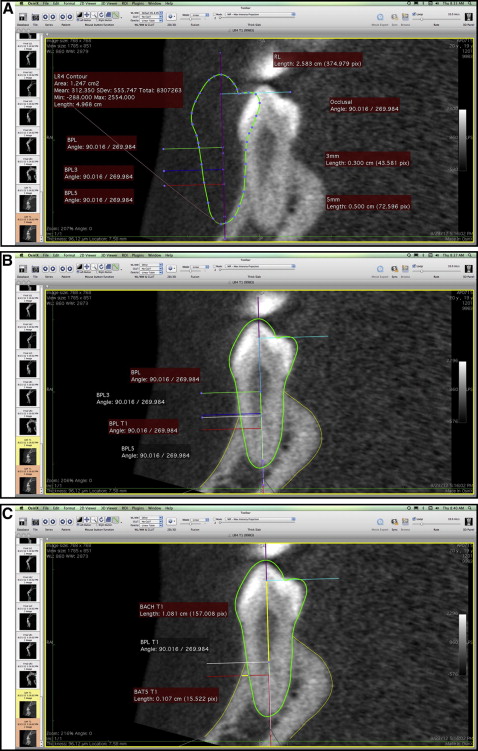
Once the superimposition was completed, the BPL was moved as needed along the reference line to mark the new location of the alveolar crest; the new ROI was labeled as BPL at T1 ( Fig 5 , B ). Buccal alveolar crest height and thicknesses (when applicable) were then measured at T1 ( Fig 5 , C ).
All measurements were performed twice by the same examiner (A.R.-D.) at least 2 weeks apart, and a third time by a second examiner (T.C.). Once the measurements were obtained, the data were extracted to calculate interexaminer and intraexaminer reliabilities.
Statistical analysis
Buccal alveolar bone height and thickness measurements were used to statistically analyze the interexaminer and intraexaminer reliabilities of the method. An interexaminer reliability analysis was conducted after randomly selecting 1 measurement from the first examiner to ensure a balanced design. Means of the differences between the 2 repeated measurements from the same examiner and between the 2 examiners were calculated. Dahlberg’s formula, S2=∑d2/2n
S 2 = ∑ d 2 / 2 n
, was also used to calculate the error of measurements.
Results
BACH, BAT3, and BAT5 were measured on a total of 80 premolars twice by the same examiner and once by the second examiner. For the same examiner, the mean differences for BACH were below 0.07 mm for most teeth, except for the mandibular right second premolars, which showed a mean difference of 0.10 mm. The mean differences for the remaining measurements (BAT3, BAT5) were below 0.08 mm for all teeth. Across examiners, the mean differences were below 0.10 mm for BACH; the mean differences were below 0.11 mm for BAT3 and below 0.17 mm for BAT5.
The range of Dahlberg’s measurement errors for intraexaminer reliability was calculated to be between 0.02 mm and 0.23 mm for any given measurement. The highest errors were seen on the mandibular right second premolars for BACH (0.23 mm), the maxillary right second premolars for BAT3 (0.20 mm), and the maxillary right second premolars for BAT5 (0.19 mm) ( Table I ).
| Measurement (mm) | Tooth | n | Mean of difference | SD | 95% CLs of mean | Dahlberg’s measurement error |
|---|---|---|---|---|---|---|
| BACH at T1 | LL4 | 10 | 0.068 | 0.12 | −0.0147, 0.151 | 0.185 |
| LL5 | 10 | 0.064 | 0.18 | −0.0624, 0.191 | 0.179 | |
| LR4 | 10 | 0.059 | 0.15 | −0.0474, 0.166 | 0.172 | |
| LR5 ∗ | 10 | 0.102 | 0.18 | −0.0295, 0.233 | 0.226 | |
| UL4 | 10 | 0.001 | 0.00 | −0.0010, 0.003 | 0.020 | |
| UL5 | 10 | 0.004 | 0.01 | −0.0056, 0.014 | 0.047 | |
| UR4 | 10 | 0.040 | 0.12 | −0.0439, 0.123 | 0.141 | |
| UR5 | 10 | 0.016 | 0.05 | −0.0161, 0.049 | 0.091 | |
| BAT3 at T1 | LL4 | 10 | 0.027 | 0.04 | −0.0000, 0.054 | 0.116 |
| LL5 | 10 | 0.004 | 0.01 | −0.0050, 0.013 | 0.045 | |
| LR4 | 10 | 0.039 | 0.06 | −0.0064, 0.085 | 0.140 | |
| LR5 | 10 | 0.003 | 0.01 | −0.0015, 0.008 | 0.039 | |
| UL4 | 10 | 0.017 | 0.04 | −0.0140, 0.047 | 0.091 | |
| UL5 | 10 | 0.019 | 0.06 | −0.0221, 0.061 | 0.099 | |
| UR4 | 10 | 0.041 | 0.05 | 0.0091, 0.074 | 0.144 | |
| UR5 ∗ | 10 | 0.082 | 0.21 | −0.0668, 0.231 | 0.203 | |
| BAT5 at T1 | LL4 | 10 | 0.056 | 0.16 | −0.0604, 0.173 | 0.168 |
| LL5 | 10 | 0.025 | 0.04 | −0.0054, 0.055 | 0.111 | |
| LR4 | 10 | 0.037 | 0.10 | −0.0329, 0.107 | 0.136 | |
| LR5 | 10 | 0.049 | 0.14 | −0.0544, 0.152 | 0.156 | |
| UL4 | 10 | 0.029 | 0.06 | −0.0145, 0.072 | 0.120 | |
| UL5 | 10 | 0.006 | 0.02 | −0.0079, 0.020 | 0.056 | |
| UR4 | 10 | 0.001 | 0.00 | −0.0014, 0.004 | 0.024 | |
| UR5 ∗ | 10 | 0.070 | 0.12 | −0.0141, 0.154 | 0.187 |
Stay updated, free dental videos. Join our Telegram channel

VIDEdental - Online dental courses


