Fig. 20.1
Completed diagnostic wax-up, for maxillary and mandibular anterior restorations
20.2.2 Step 2: Preparation and Impressions
Finally, make sure you understand correct preparation design as it relates to the type of restoration you want. With the choice of materials for restorations multiplying every day, it is critical to prepare the tooth (teeth) correctly in order to allow the technician to fabricate the best possible restoration (Fig. 20.2).
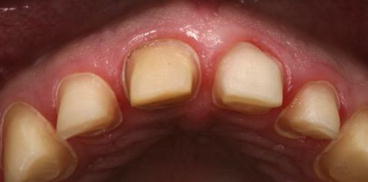

Fig. 20.2
Proper preparations for maxillary anterior all-ceramic restorations
Of equal importance is the accuracy of the impression. After the impression is removed, check the marginal integrity (Fig. 20.3). If you cannot see the margin 360° around the tooth, retake the impression. Never ask the laboratory to guess at a margin. Doing so leads to hard feelings and a lot of wasted time and money. The opposing model or any other models you decide to send should be of the same excellent quality as the working impression and casts. The alginate impression should be taken with the same care as the master, with the impression capturing all teeth and tissues with no pulls, tears, or voids. Opposing models should be poured in the dental office to avoid shrinkage of the alginate impression. The person responsible for pouring the alginate impression must be trained to mix high-quality die stone in a vacuum mixer to ensure a dense, bubble-free cast. “Buff” stone should not be used as it is a low-quality stone designed for denture processing. It is not designed for complex restorative dentistry.
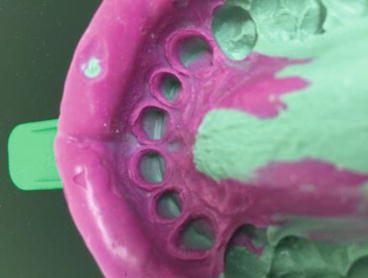

Fig. 20.3
Impression of maxillary anterior preparations, showing definite margins 360° around margin
20.2.3 Step 3: Occlusal Records
With the models completed, they must be articulated correctly. This calls for accurate occlusal records, commonly known as the bite. Choose an accurate material that won’t distort. Most waxes are inappropriate because they are influenced by temperature and bend and break easily. The bite is the only reference the technician has to attain the proper maxillary-mandibular relationship, so it’s important to take the time and care to ensure accuracy (Fig. 20.4).
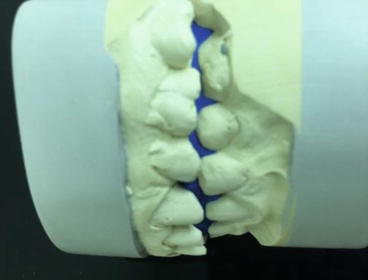

Fig. 20.4
Properly referenced maxillary and mandibular models, with trimmed interocclusal record
A “facebow” is not required in all cases. However, it is advisable to use the articulator system’s facebow in cases involving changes to the function and aesthetics of the anterior segment or complex posterior reconstruction.
20.2.4 Step 4: Creating the Blueprint
What constitutes a blueprint in restorative dentistry? Several items, which can be classified as either two- or three-dimensional communications:
- 1.
Two-dimensional communication tools include a properly filled out laboratory prescription, photos, color mapping form, or drawing for tooth shade.To properly communicate aesthetics, especially in the case of matching existing dentition, photos are an invaluable tool in relating shape, color, internal effects, translucency, texture, and luster (Fig. 20.5). A digital camera and some training on how to use it are a great investment. Images are not only a good communication tool; they document pre- and postoperative treatment results for patient education and marketing. If done correctly, photos become a three-dimensional communication tool. Along with visual communication should be a properly filled out laboratory prescription form. Take the time to thoroughly document the results you want so there is no question on the technician’s part as to what you and your patient expect. Include all information relating to aesthetics, function, color, and patient expectations.
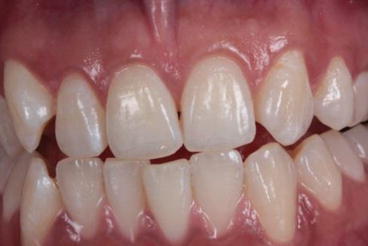 Fig. 20.5Intraoral digital image, showing shade, color nuance, translucency, and surface texture
 - 2.
Get VIDEdental app for watching clinical videosThere are two ways to utilize a three-dimensional communication tool:
- A.
When restoring anterior teeth, use the approved provisional model (Donovan and Cho 1999) (Table 20.1). To create predictable anterior restorations, two models are needed: the “approved provisional” model and the preoperative model. The approved provisional model is the blueprint from which the anterior case will be created. It dictates proper tooth length, incisal edge position, lip support, and anterior function. This model of the provisional restorations (temporaries) is vitally important for the proper creation of anterior restorations. This can be accomplished by:Table 20.1Approved provisional model for anterior restorationsStepsPurpose1. Diagnostic wax-up of what your final restorations should look likeAbility to visualize where your final restorations can be and the limitations2. Make a silicone putty matrix or clear vacuform stent of the wax-upThis is your carrier and mold for provisional material once the tooth preparations are completed3. Fabricate your provisional restoration using the matrix aboveProtects the prepared teeth and holds the occlusion until the final restorations are placed4. Correct occlusion and all excursive movements with the provisionals cemented in placeAllows the patient proper function5. Check for aesthetics and speech and polish. Recontour as needed and acquire patient approval for function and aestheticsCritical step to prevent adjustments when the final restoration is returned from the laboratory6. Take an alginate impression of the “Approved Provisionals” to send to the laboratoryThis gives the laboratory a “blueprint” which can be used to make the final restorations
- 1.
Completing a diagnostic wax-up and fabricating silicon putty mold of the teeth to be restored. When the final preparations are completed and the final impression is taken, the putty mold is placed in the mouth, checked for fit and trimmed if necessary. The mold is then removed and filled with your temporary material of choice. After the material has set, remove the mold and the temporaries. Trim, polish, and reinsert the temporaries. Check your margins, contacts, and occlusion and adjust accordingly.
- 2.
Now comes the important part; after cementation of the temporaries, take the time to adjust them to perfection. First, check to make sure occlusion and function are correct. Insure that there is cuspid guidance and tracking of the maxillary and mandibular teeth in protrusive and lateral excursive movements. Next, check the length of the centrals, overbite and overjet, to insure that the new smile does not affect speech or the lip closure path, as it often does. Now is the time to be an artist and create a beautiful smile. Function, occlusion, and phonetics should be evaluated. The visual presentation must be examined and corrected. General tooth contours, length, size, harmony, and the balance of the smile in relation to the lips must all be verified. If all intraoral recontouring is done now, it will not be necessary in the completed final ceramic restorations.
- 3.
When the dentist and patient are satisfied with function and aesthetics of the provisional restoration, take an impression of the “approved provisionals” and send it along with the rest of the case to the laboratory (Table 20.1).
This model, or blueprint, will be used to create these laboratory fabricated verification tools:-
Incisal edge matrix to recreate incisal edge position (overbite, overjet) of anterior teeth (Fig. 20.6)
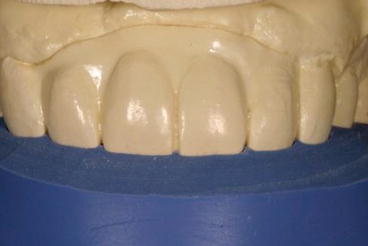 Fig. 20.6“Approved provisional model,” with incisal edge matrix for the correct incisal edge positioning (overbite, overjet) of final all-ceramic restorations
 -
Soft tissue matrix to recreate soft tissue contours, to insure correct emergence profile and anatomical harmony between teeth and tissue (Fig. 20.7)
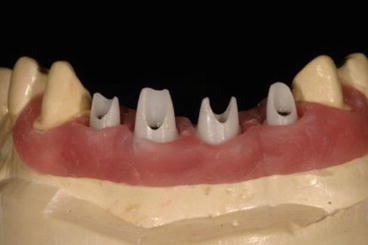 Fig. 20.7Soft tissue matrix to recreate soft tissue contours, to insure correct emergence profile and anatomical harmony between teeth/implants and tissue
The final ceramic restorations are now created to your exact specifications using your instructions and models as the communication blueprint. Take the time to accept your responsibility as oral architect and any high-quality laboratory that understands these philosophies and techniques will gratefully accept their role as builder (Fig. 20.8).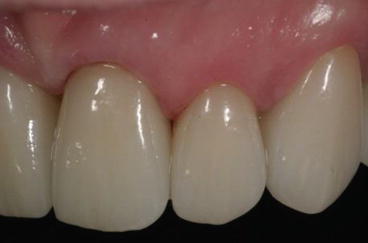 Fig. 20.8The final ceramic restorations are now created to your exact specifications using your instructions and models as the communication blueprint (all-ceramic restorations on teeth 8–11)
 - 1.
- B.
Digital PhotographyPhotographs or computer images are invaluable in creating a visual reference for the restorative dental team (Ahmad 2009). Photography as a communication tool was once considered a luxury item, but should now be considered standard practice in prosthetic dentistry. The introduction of simple point and shoot digital cameras offers the dentist/technician team an accurate, reproducible way to communicate all visual information that cannot be conveyed by a stone cast. Training in the use of the dentist’s chosen digital camera is essential to achieve the proper settings for the most accurate images. Camera settings, the flash, and the angulation of the shot should be done correctly for the proper image to be achieved.

Stay updated, free dental videos. Join our Telegram channel

VIDEdental - Online dental courses


- A.