and Armin Segarra1
(1)
University of the Philippines Manila College of Dentistry, Paranaque, Philippines
4.1 Introduction
Cementation with resin cements is an adhesive procedure. The two bonding substrates, namely, the tooth surface (dentin and enamel) and the internal surface of the restoration, are usually pretreated before cementation. Cementation procedures will vary depending on the restoration material and type of resin cement. As discussed in the previous chapters, pretreatment of ceramics will differ from that of composites and metal alloys.
Being mainly adhesive, cementation with resin cements is a technique-sensitive procedure and should be done with utmost care. Each step recommended by the manufacturer has been culled from numerous researches and should be strictly followed to ensure satisfactory results. Whenever a new product is used, it is imperative that the instructions are read thoroughly before using the cement. One should remember that the composition of resin cements varies and are proprietary from brand to brand even within the same type or class of cement. One cannot assume that the instructions of one resin cement apply with another resin cement even if they are of the same type.
4.2 Procedural Flow Chart
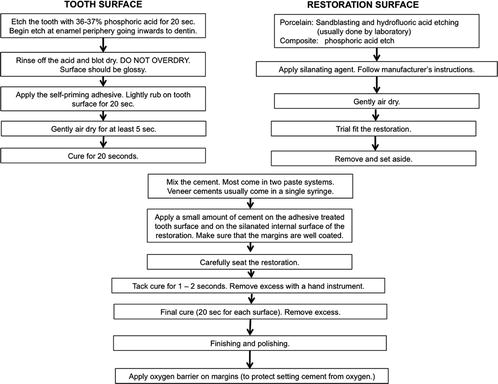
Fig. 4.1
Total-etch conventional resin cements

Fig. 4.2
Self-etch conventional resin cements

Fig. 4.3
Self-adhesive resin cements
4.3 The Resin Impregnation Technique/Immediate Dentin Seal
The use of a dentin adhesive and a low-viscosity resin to seal the dentinal tubules immediately after tooth preparation was first introduced by Nikaido et al. in 1992. This procedure was called the “resin coating or resin impregnation technique.” The dentin surface of the preparation was sealed with a dentin adhesive immediately after tooth preparation followed by placement of a low-viscosity resin such as a flowable composite. This technique has been shown to reduce postoperative sensitivity during the temporization phase and increase cement bond strengths to the underlying dentin (Nikaido et al. 2003).
Magne in 2005 and Dietschi in 2002 also observed the same results with immediate sealing of the cut dentin with dentin adhesives. This procedure later became known as the “immediate dentin seal” (IDS) technique.
Several advantages have been cited for immediate dentin sealing.
Firstly, freshly cut dentin after tooth preparation is an ideal substrate for dentin bonding since contamination with provisional cements is avoided (Pashley et al. 1992).
Secondly, prepolymerization of the dentin-bonding agent results in improved bond strength. Polymerized dentin-bonding adhesive (DBA) thickness can vary significantly according to surface geometry—on average, 60–80 μm on a smooth convex surface and up to 200–300 μm on concave surfaces such as marginal chamfers. As a result, applying and polymerizing the DBA immediately before the insertion of an indirect composite resin or porcelain restoration could interfere with the complete seating of the restoration. It is therefore recommended that the adhesive resin be kept unpolymerized before the restoration is fully seated, but the pressure of the luting composite restoration can create a collapse of the demineralized dentin and affect the adhesive interface cohesiveness. It has been proposed that thinning of the adhesive layer to less than 40 μm would theoretically allow for prepolymerization before insertion of the restoration; however, because methacrylate resins show an inhibition layer of up to 40 μm thick when they are light cured (Pashley et al. 1992), excessive thinning can prevent the polymerization of light-activated dentin-bonding agents. All the aforementioned issues can be resolved if exposed dentin surfaces are sealed immediately (Magne 2005).
Thirdly, IDS allows stress-free dentin bond development. Since there is delayed placement of the restoration and postponed occlusal loading, the dentin bond can increase over time, and residual stress can dissipate resulting in improved restoration adaptation (Dietschi et al. 2002).
Finally, IDS protects dentin against bacterial leakage and sensitivity during the provisional phase of treatment which is based on research that provisional restorations may permit microleakage of bacteria and subsequently dentin sensitivity. An in vivo study confirmed the ability of different primers to prevent sensitivity and bacterial penetration when preparing for porcelain veneers (Cagidiaco et al. 1996).
4.3.1 Clinical Technique
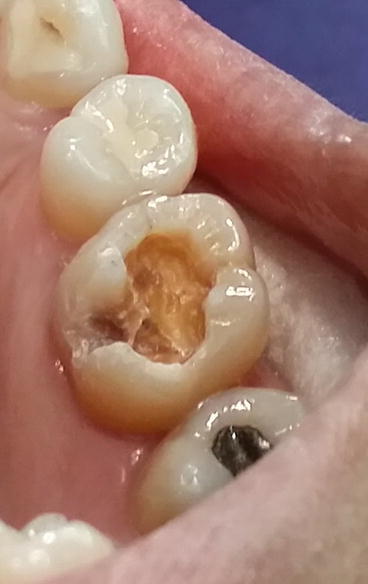
Fig. 4.4
Inlay preparation for tooth #26
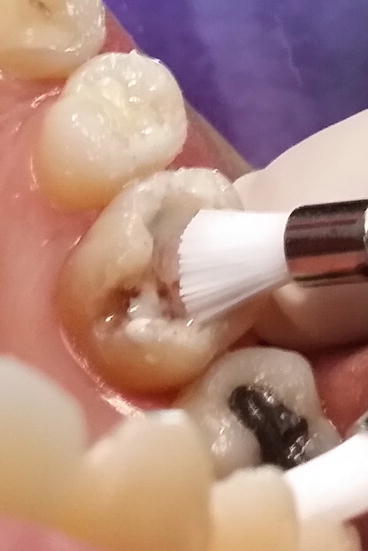
Fig. 4.5
The tooth is cleaned with a slurry of pumice to remove surface contaminants
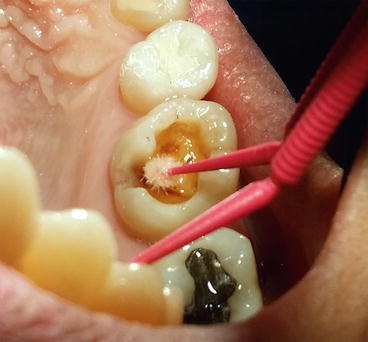
Fig. 4.6
A self-etch adhesive is used for immediate dentin sealing. The self-etch primer is applied using light rubbing motion for 20 s and then air-dried for 5–10 s
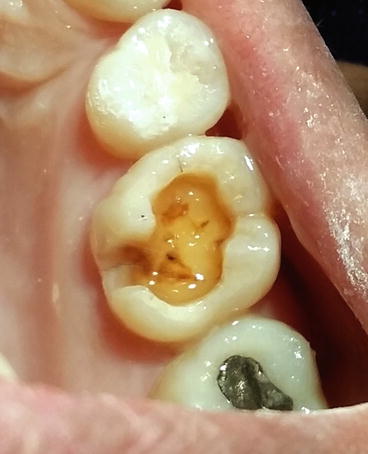
Fig. 4.7
A glossy surface after application of the self-etch primer indicating that the primer has penetrated into the dentinal tubules
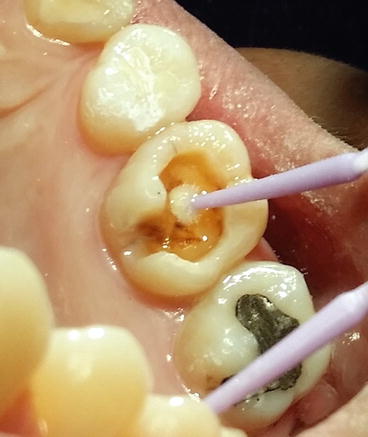
Fig. 4.8
The bonding agent is applied and air thinned

Fig. 4.9
Light curing for 10 s
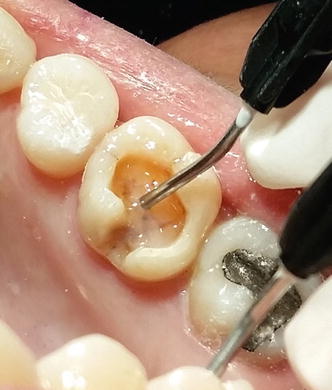
Fig. 4.10
Application of a thin layer of flowable composite or low-viscosity composite
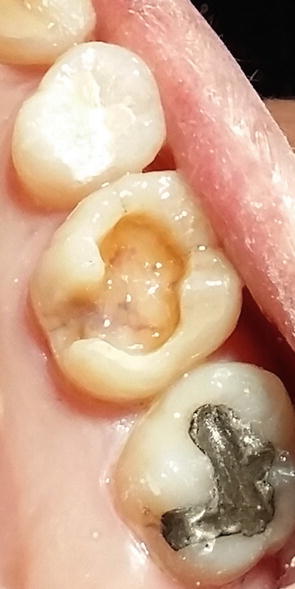
Fig. 4.11
The flowable composite is light cured. A final impression is taken
4.4 Cementation Techniques for the Different Types of Restorations
4.4.1 Tooth-Colored Inlays and Onlays
4.4.1.1 Choosing the Right Resin Cement
Preparations for inlays and onlays usually involve a lot of dentin. The inlays and onlays are usually thick (more than 2 mm). Considering these factors, the recommended cement is either a self-etch conventional resin cement or a self-adhesive resin cement. Both cements are dual cured, and thus, they will cure underneath a thick restoration. The choice between the self-etch conventional or self-adhesive resin cement will depend on the degree of retention needed. For preparations with few remaining walls (Fig. 4.12), the self-etch resin cement, when available, can be chosen over the self-adhesive resin cement.
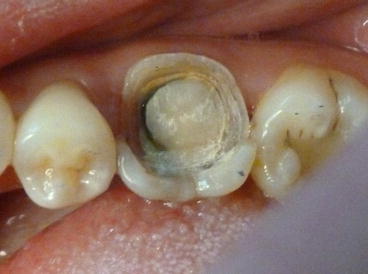
Fig. 4.12
Onlay preparation with very few remaining walls. Retention is compromised. Although both a conventional self-etch resin cement and a self-adhesive resin cement can be used, a conventional self-etch resin cement is a better choice
A flowable composite should never be used to cement thick tooth-colored inlays and onlays as light will not penetrate through the thick material resulting to inadequate polymerization. This may cause pulpal death from the unreacted monomers.
4.4.1.2 Clinical Case
Laboratory fabricated composite inlays (Adoro) on teeth # 26 and 27 to be cemented with a self-adhesive resin cement (Clearfil SA Luting, Kuraray, Japan). The inlays were sandblasted by the laboratory.
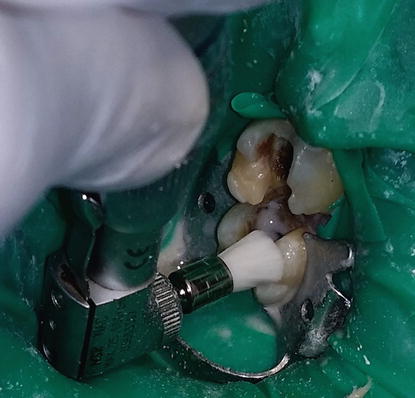
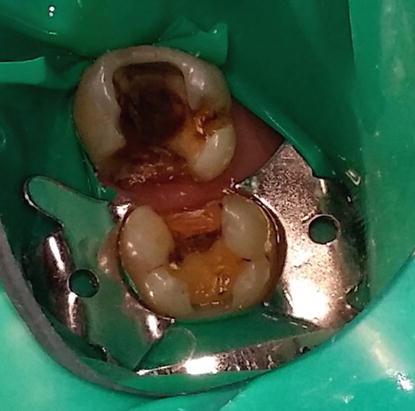
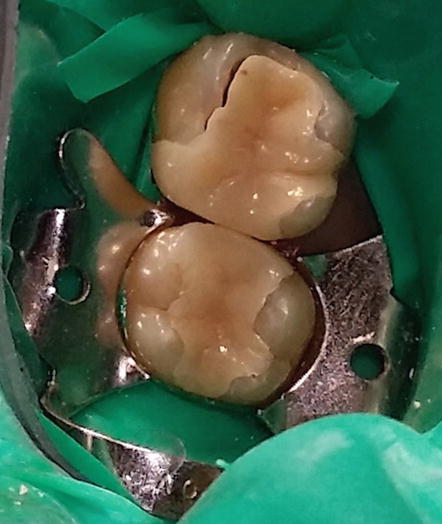
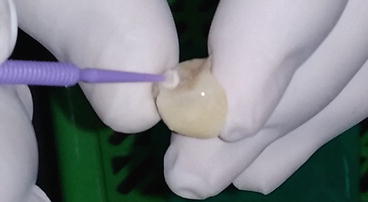
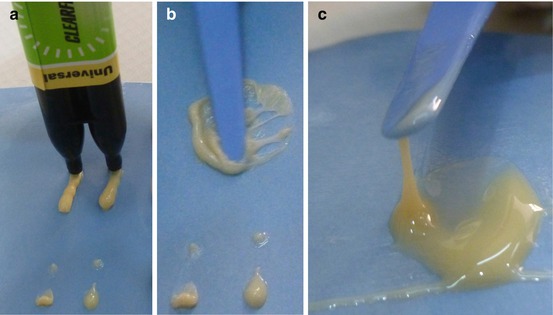
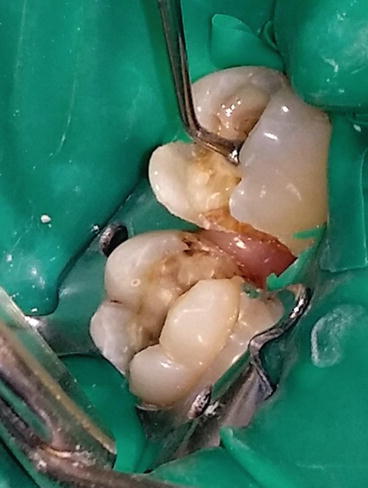
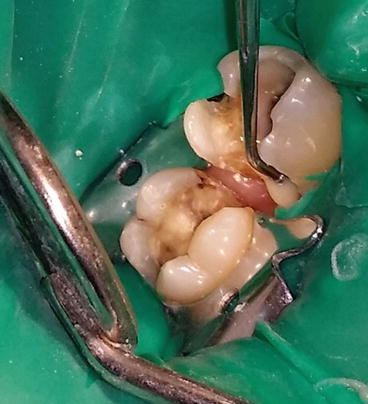
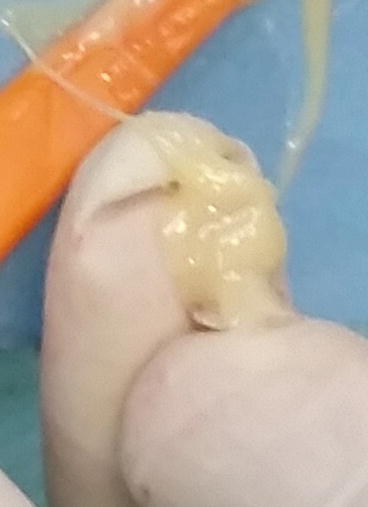
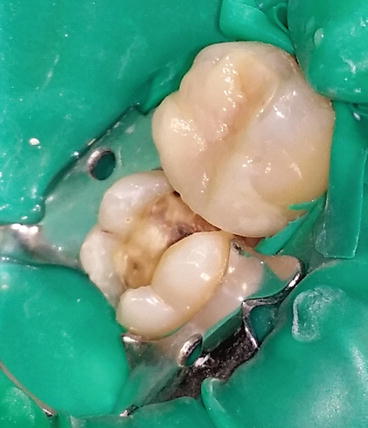
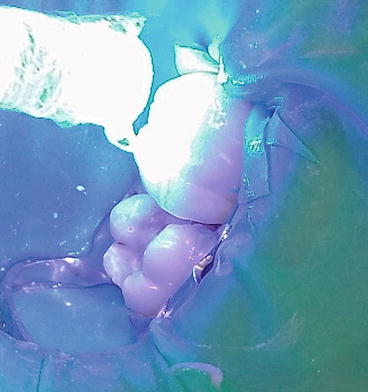
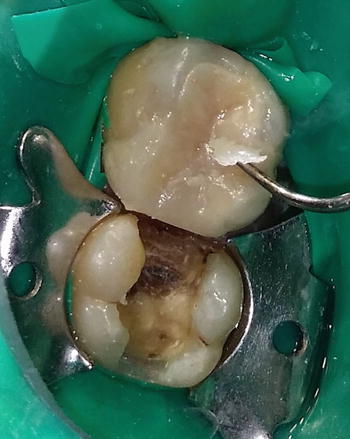
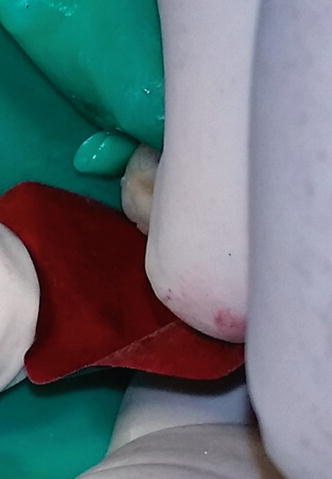
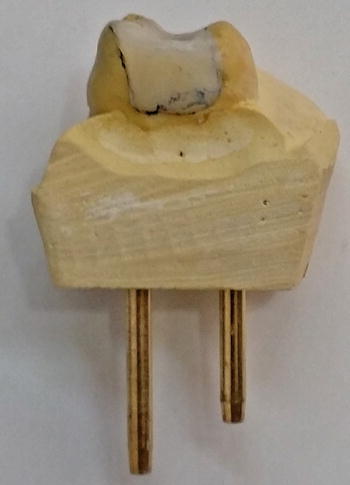


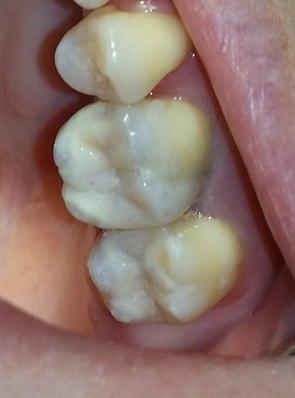
Fig. 4.13
The tooth was cleaned with a slurry of pumice to remove surface debris that may interfere with bonding
Fig. 4.14
The prepared teeth. To ensure good bonding, obtain proper isolation
Fig. 4.15
Trial fitting of the inlays. Notice a slight gap on the mesiobuccal area of 26 indicating the inlay has not seated properly. This might have been caused by a prematurity, irregularity, or bubbles on the internal surface of the restoration or a prematurity on the proximal contacts of 26 and 27. The prematurities were identified with a fit checker and articulating paper and subsequently trimmed
Fig. 4.16
The external surface of the inlay was coated with a thin layer of petroleum jelly to facilitate subsequent clean up. Care was taken not to inadvertently place petroleum jelly on the adhesive surfaces
Fig. 4.17
(a) A self-adhesive resin cement (Clearfil SA Luting, Kuraray, Japan) is dispensed on a mixing pad. (b) The two pastes are mixed thoroughly using folding strokes to prevent incorporation of air. (c) Properly mixed cement. The cement should string 2 cm from the mixing pad
Fig. 4.18
A small amount of resin cement was wiped into the cavity preparation to ensure that the internal walls are well coated with cement and to minimize voids
Fig. 4.19
To ensure that the critical gingival margin is sealed, a small amount of resin cement is also wiped onto the gingival floor and proximal margins
Fig. 4.20
The internal surface of the restoration was also coated with resin cement
Fig. 4.21
The 26 onlay was then seated on the prepared tooth using slow, gentle pressure. Do not seat the restoration using strong abrupt force as this may create pressure to build up between the walls of the tooth and the restoration which might push the restoration occlusally. A slow steady pressure will give enough time for the excess cement to flow out aiding in the proper seating of the restoration
Fig. 4.22
The cement was cured for 1–2 s (tack curing or tack and wave technique). The cement is not cured completely until all excess cement is removed. Tack curing renders the cement partially set and gives the excess cement a consistency that is easy to peel off from the tooth and restoration for a very easy clean up
Fig. 4.23
Excess cement was carefully removed from the surface of the restoration. Note the consistency of the tack-cured cement. Care should be taken not to remove any cement between the restoration and the cavosurface margin. When there is a slight gap between restoration and the tooth, a clean brush is used to remove excess cement prior to curing, to protect the fragile “cement seal” between the tooth and restoration. Tack curing when there is a slight gap may just pull out the cement from the interface
Fig. 4.24
The second inlay is fitted. An articulating paper inserted between the two inlays is used to check for any prematurities in the proximal area
Fig. 4.25
Note the mark made by the articulating paper. The marked area is a prematurity that prevents complete seating of the inlay. The inlay is then trimmed (on the die) removing the prematurity. Never trim the inlay without the die to avoid fracture
Fig. 4.26
The second inlay (27) was seated and cemented using the same cementation technique
Fig. 4.27
Occlusal adjustment. Occlusal adjustment is done only after the onlay is cemented. (a) The patient was asked to bite on an articulating paper to identify occlusal prematurities (high spots). (b) The prematurities were removed with a composite trimmer
Fig. 4.28
The cemented inlays
4.4.1.3 Trial Fitting an Inlay/Onlay
One of the difficulties during the cementation procedure is placing the inlay on the preparation. Inlays/onlays are very small and fragile, and there is also the danger of the patient swallowing these restorations. Rubber dam isolation is always a good practice during trial fitting and cementation of inlays.
Several techniques have been suggested in the dental literature:
Stay updated, free dental videos. Join our Telegram channel
VIDEdental - Online dental courses


