-
Chapter Outline
Learning Objectives
After reading this chapter, the student should be able to:
- 1.
State reasons and describe strategies for enlarging the cervical portion of the canal to promote straight-line access.
- 2.
Define how to determine the appropriate size of the master apical file.
- 3.
Describe objectives for both cleaning and shaping and explain how to determine when these have been achieved.
- 4.
Illustrate shapes of differently created preparations and draw these both in longitudinal and cross-sectional diagrams.
- 5.
Illustrate probable actual shapes of preparations with iatrogenic errors created in curved canals.
- 6.
Describe techniques for shaping canals that have irregular shapes, such as round, oval, hourglass, bowling pin, kidney bean, or ribbon.
- 7.
Describe techniques for manual and engine-driven preparation of root canals.
- 8.
Distinguish between apical stop, apical seat, and open apex and discuss how to manage obturation in each.
- 9.
Describe appropriate techniques for removing the pulp.
- 10.
Characterize the difficulties of preparation in the presence of anatomic aberrations that make complete debridement difficult.
- 11.
List properties of suitable irrigants and identify which irrigant meets most of the criteria.
- 12.
Describe the techniques that provide the maximal irrigant effect.
- 13.
Discuss the properties and role of chelating and decalcifying agents.
- 14.
Explain how to minimize preparation errors in small, curved canals.
- 15.
Describe techniques for negotiating severely curved, “blocked,” “ledged,” or constricted canals.
- 16.
Describe in general the principles of application of ultrasonic devices for enhanced root canal disinfection.
- 17.
Evaluate in general alternative means of cleaning and shaping and list advantages and disadvantages of each.
- 18.
Discuss nickel-titanium (NiTi) hand and rotary instruments and how the physical properties of this metal affect cleaning and shaping.
- 19.
Discuss the properties and role of intracanal, interappointment medicaments.
- 20.
List the principal temporary filling materials and describe techniques for their placement and removal.
- 21.
Describe temporization of extensively damaged teeth.
- 22.
Outline techniques and materials used for long-term temporization.
Successful root canal treatment is based on establishing an accurate diagnosis and developing an appropriate treatment plan; applying knowledge of tooth anatomy and morphology (shape); and performing the debridement, disinfection, and obturation of the entire root canal system. Historically, emphasis was on obturation and sealing the radicular space. However, no technique or material provides a seal that is completely impervious to moisture from either the apical or coronal aspect. Early studies on prognosis indicated that failures were attributable to incomplete obturation. This proved fallacious, because obturation reflects only the adequacy of the cleaning and shaping. Canals that are poorly obturated may be incompletely cleaned and shaped. Adequate cleaning and shaping and establishing a coronal seal are the essential elements of successful treatment, and obturation is less important for short-term success. Elimination (or significant reduction) of the inflamed or necrotic pulp tissue and microorganisms is the most critical factor. The role of obturation in long-term success has not been established; however, obturation may be significant in preventing recontamination either from the coronal or apical direction. Sealing the canal space after cleaning and shaping helps entomb any remaining organisms and, with the coronal seal, prevents or at least delays recontamination of the canal and periradicular tissues. However, some bacterial species have been shown to survive entombment.
Principles of Cleaning
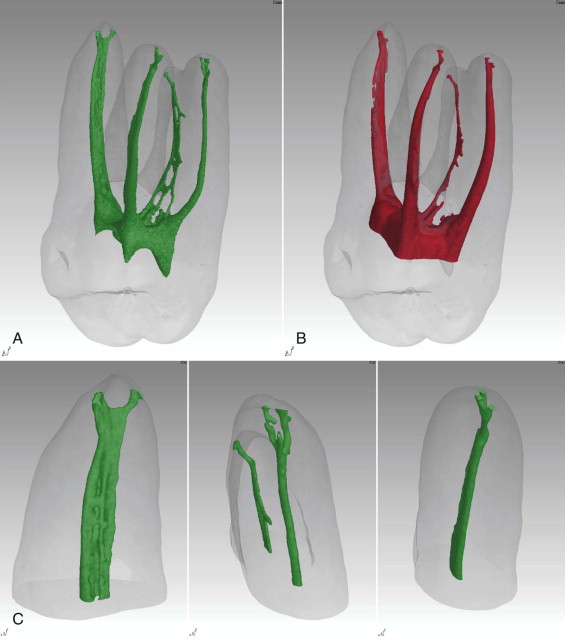
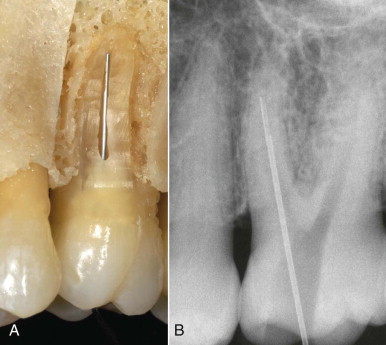
Nonsurgical root canal treatment is a predictable method of retaining a tooth that otherwise would require extraction. Root canal treatment in a tooth with a vital pulp is more often successful than is root canal treatment of a tooth diagnosed with a necrotic pulp and periradicular pathosis. The reason for this difference in outcome is the persistent presence of microorganisms and their metabolic byproducts. The most significant factors in the clinician’s inability to completely remove intracanal microorganisms are tooth anatomy and morphology. Instruments are believed to contact and plane the canal walls to debride the canal ( Figs. 16.1 to 16.4 ), aided by irrigating solutions. Morphologic factors include lateral canals ( Fig. 16.2 ) and accessory canals, canal curvatures, canal wall irregularities, fins, cul-de-sacs ( Fig. 16.1 ), and isthmuses. These aberrations make total debridement virtually impossible. Therefore, a practical objective of cleaning is to significantly reduce the irritants, not totally eliminate them.
Currently, there are no reliable clinical methods to assess cleaning efficacy. The presence of clean dentinal shavings, the color of the irrigant, and canal enlargement three file sizes beyond the first instrument to bind have been used to assess the adequacy of cleaning; however, these do not correlate well with debridement. Obtaining glassy smooth walls is a suggested indicator, but this property cannot be assessed beyond the coronal aspect of the root canal system.
Principles of Shaping
The purpose of shaping is to facilitate cleaning and provide space for placing obturating materials. The main objective of shaping is to maintain or develop a continuously tapering funnel from the canal orifice to the apex. This reduces procedural errors during apical enlargement. The degree of enlargement is partly dictated by the method of obturation. For lateral compaction of gutta-percha, the canal should be enlarged sufficiently to permit placement of the spreader to within 1 to 2 mm of the working length. There is a correlation between the depth of spreader penetration and the quality of the apical seal. For warm vertical compaction techniques, the coronal enlargement must permit the placement of pluggers to within 3 to 5 mm of the working length.
As dentin is removed from the canal walls, the root becomes less resistant to fracture. The degree of shaping is determined by preoperative root dimensions, the obturation technique, and the restorative treatment plan. Narrow, thin roots (e.g., those of the mandibular incisors) may not be enlarged to the same degree as more bulky roots (e.g., those of the maxillary central incisors).
Apical Canal Preparation
Termination of Cleaning and Shaping
Although the concept of cleaning and shaping the root canal space is simple, consensus has not been reached on some points. One example is the extent of the apical preparation. Early studies identified the dentinocemental junction as the area where the pulp ends and the periodontal ligament begins. Unfortunately, this is a histologic landmark, and its position (which is irregular within the canal) cannot be determined clinically.
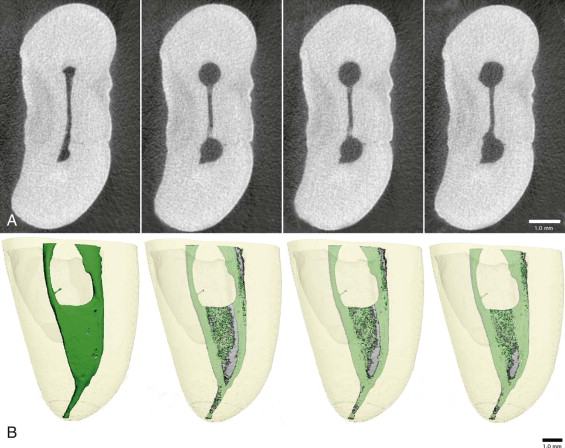
Traditionally, the apical point of termination, also known as the working length (WL), has been 1 mm from the radiographic apex. A classic study described the apical portion of the canal with the major diameter of the foramen and the minor diameter of the constriction (see Fig. 16.4 ). The apical constriction is defined as the narrowest portion of the canal; the average distance from the foramen to the constriction was found to be 0.5 mm. Another study found the classic apical constriction to be present in only 46% of the teeth studied. Also, when present, it varied in shape and in relationship to the apical foramen. Variations from the classic appearance consist of the tapering constriction, multiple constrictions, and a parallel apical canal part. To complicate the issue, the foramen is rarely located at the anatomic apex. Recently, micro-computed tomography data have provided a more realistic portrait of the apical canal morphology ( Fig. 16.5 ).
Apical anatomy has also been shown to be quite variable (see Fig. 16.4, B , and Fig. 16.5 ). A study found no typical pattern for foraminal openings; it also found that no foramen coincided with the apex of the root. The same group reported the foramen-to-apex distance to range from 0.2 to 3.8 mm.
It has also been noted that the foramen-to-constriction distance increases with age, and root resorption may destroy the classic anatomic constriction. Resorptive processes are common with pulp necrosis and apical bone resorption. Therefore root resorption is an additional factor to consider in length determination.
In a prospective study, significant adverse factors influencing success and failure were the presence of a perforation, preoperative periradicular disease, and incorrect length of the root canal filling. The authors speculated that canals filled more than 2 mm short harbored necrotic tissue, bacteria, and irritants and that when retreated, these canals could be cleaned and sealed. A meta-analysis evaluation of success and failure indicated a better success rate when the obturation was confined to the canal space. A review of several studies on endodontic outcomes confirms that extrusion of materials decreases success. In one study examining cases with pulp necrosis, better success was achieved when the procedures terminated at or within 2 mm of the radiographic apex. Obturation shorter than 2 mm from the apex or past the apex resulted in a decreased success rate. In teeth with vital inflamed pulp tissue, termination between 1 and 3 mm was acceptable. Two larger studies confirmed that overfill was associated with inferior outcomes.
The exact clinical point of apical termination of the preparation and obturation remains a matter of debate. Compacting the gutta-percha and sealer against the apical dentin matrix (constriction of the canal) is important in creating a seal. The decision on where to terminate the preparation is based on a knowledge of apical anatomy, tactile sensation, radiographic interpretation, apex locators, apical bleeding, and the patient’s response. To prevent extrusion, the cleaning and shaping procedures should be confined to the radicular space. Canals filled to the radiographic apex are actually slightly overextended.
Degree of Apical Enlargement
Generalizations can be made regarding tooth anatomy and morphology, although each tooth is unique. The length of canal preparation is often emphasized, with little consideration given to important factors such as canal diameter and shape. Because morphology is variable, there is no standardized apical canal size. Traditionally, preparation techniques were determined by the desire to limit procedural errors and by the method of obturation. A small apical preparation reduces the incidence of preparation errors (discussed later) but may decrease the antimicrobial efficacy of cleaning procedures. It appears that with traditional hand instruments, apical transportation occurs in many curved canals enlarged beyond a No. 20 stainless steel file.
The criteria for cleaning and shaping should be based on the ability to adequately deliver sufficient amounts of irrigant and not on a specific obturation technique. The ability of irrigants to reach the apical portion of the root canal depends on the canal’s size and taper and the irrigation device used.
Larger preparation sizes have been shown to provide adequate irrigation and debris removal and significantly decrease the number of microorganisms. However, any removal of dentin has the potential to weaken radicular structure; therefore, the use of an irrigation adjunct designed to promote irrigation efficacy in smaller canals may be advantageous.
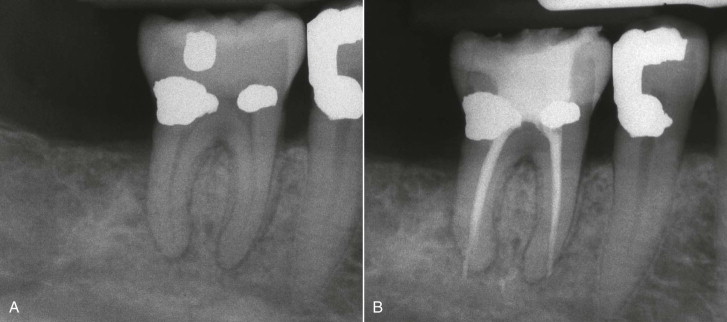
In principle, there may to be a relationship between increasing the size of the apical preparation and canal cleanliness and bacterial reduction. Instrumentation techniques that advocate minimal apical preparation may be ineffective at achieving the goal of cleaning and disinfecting the root canal space. However, this concept reaches its limits when too large a preparation leads to procedural errors and when modifications created in the hard tissue block the very anatomy that was to be cleaned ( Fig. 16.6 ).
A variety of microbial species can penetrate deep into dentinal tubules. These intratubular organisms are sheltered from endodontic instruments, the action of irrigants, and intracanal medicaments. Dentin removal appears to be the primary method for decreasing their numbers. However, it may not be possible to remove bacteria that are deep in the tubules, regardless of the technique. There is a correlation between the number of organisms present and the depth of tubular penetration ; in teeth with apical periodontitis, bacteria may penetrate the tubules to the periphery of the root.
Elimination of Etiology
The development of nickel-titanium instruments has dramatically changed the techniques of cleaning and shaping; these instruments have been rapidly adopted by clinicians in many countries. The primary advantage of these flexible instruments is seen in shaping, specifically a significant reduction in the incidence of preparation errors.
Neither hand instruments nor rotary files have been shown to completely debride the canal. Mechanical enlargement of the canal space dramatically reduces the number of microorganisms present in the canal, but it cannot render the canal sterile. Therefore, the use of antimicrobial irrigants has been recommended, in addition to mechanical preparation techniques. There is currently no consensus on the most appropriate irrigant or concentration of solution, although sodium hypochlorite (NaOCl) is the most widely used irrigant.
Unfortunately, solutions such as NaOCl that are designed to kill bacteria are often toxic to the host cells ; therefore, extrusion beyond the canal space is to be avoided. A major factor in the effectiveness of irrigants is the volume of irrigant used during the procedure. Increasing the volume produces cleaner preparations.
Apical Patency
In the apical patency technique, small hand files are repeatedly placed to or slightly beyond the apical foramen during canal preparation ( Fig. 16.7 ). A benefit of this technique during cleaning and shaping procedures is that it ensures that the working length is not lost and that the apical portion of the root is not packed with tissue, dentin debris, and bacteria (see Fig. 16.6, A ). This technique has raised some concerns about extrusion of dentinal debris, bacteria, and irrigants. However, in a recent large, retrospective study, the apical patency technique was identified as a factor possibly associated with higher success rates. Moreover, at least in vitro, microorganisms do not appear to be transported beyond the confines of the canal by patency filing. Small files are not directly effective in debridement (see Fig. 16.3 ), but achieving patency may be helpful in enhancing irrigation efficacy and in electronic length determination.
Studies evaluating treatment failure have noted the presence of bacteria outside the radicular space, in addition to several other factors, and in some cases bacteria have been shown to exist as plaques or biofilms on the external root structure.
Pretreatment Evaluation
Before treatment, each case should be evaluated for its degree of difficulty. Normal anatomy and anatomic variations are determined, as are variations in canal morphology.
One or more preoperative radiographs of diagnostic quality are assessed. The longer a root, the more difficult it is to treat. Apically, a narrow, curved root is susceptible to perforation; in multirooted teeth, a narrow area midroot could result in a stripping perforation toward the root concavity. The degree and location of curvature are determined. Canals are seldom straight, and curvatures in a faciolingual direction are normally not visible on the radiograph. Sharp curvatures or dilacerations are more difficult to manage than is a continuous, gentle curve. Roots with an S -shape or bayonet configuration are very difficult to treat. Intracanal mineralization also complicates treatment. Such mineralization generally occurs in a coronal to apical direction (see Fig. 14-14 ); therefore, a large, tapering canal may become more cylindrical with irritation or age.
The presence of resorption also complicates treatment. With internal resorption, it is difficult to pass instruments through the coronal portion of the canal and the resorptive defect and into the apical portion. Also, files do not remove tissue, necrotic debris, and bacteria from the resorptive defect. External resorption may perforate the canal space and present problems with hemostasis and isolation. Restorations may obstruct access and visibility and change the orientation of the crown in relation to the root.
Principles of Cleaning and Shaping Techniques
Cleaning and shaping are separate and distinct concepts but are performed concurrently. The criteria of canal preparation include developing a continuously tapered funnel, maintaining the original shape of the canal, maintaining the apical foramen in its original position, keeping the apical opening as small as possible, and developing glassy-smooth walls. The cleaning and shaping procedures are designed to maintain an apical matrix for compacting the obturating material, regardless of the obturation technique.
The clinician must be knowledgeable about a variety of techniques and instruments involved in the treatment of the myriad variations in canal anatomy. There is no consensus or clinical evidence on which technique or instrument design or type is clinically superior.
Nickel-titanium files have been incorporated into endodontics because of their flexibility and resistance to cyclic fatigue. The resistance to cyclic fatigue permits these instruments to be used in a rotary handpiece, which gives them an advantage over stainless steel files. Nickel-titanium (NiTi) files are manufactured in both hand and rotary versions and have been demonstrated to produce superior shaping compared to stainless steel hand instruments.
NiTi instruments are available in a variety of designs, many with increased taper compared to the .02 mm standardized stainless steel files. Common tapers are .04 and .06, and the tip diameters may or may not conform to the traditional manufacturing specifications. The file systems can vary the taper while maintaining the same tip diameter, or they can use varied tapers with International Organization for Standardization (ISO) standardized tip diameters; some NiTi instruments have multiple tapers along their cutting portions.
A useful procedure for root canal preparation using current instruments unfolds in stages. Stage 1 is a defined preflaring, performed before bringing any hand file to the apical third of the canal. Depending on the expected canal difficulty, instruments may reach working length during stage 2 (e.g., if there is only one curvature). If preoperative assessments have indicated that an S -shape or multiple curvatures are present, it may be useful to introduce a stage 3, in which the estimated WL is finally reached; in such cases, stage 2 is used to create additional enlargement into the secondary curvature.
In general, the use of nickel-titanium rotary instruments should be preceded by a manual exploration of the canal to the desired preparation length, also known as glide path verification. This step is performed with one or more small K-files that are not precurved. If it is possible to predictably reach working length without precurving, rotary instruments may be used to the desired length. However, caution should be used in S -shaped canals, canals that join within a single root (type II configuration), and canals with severe dilacerations. Canals in which ledge formation is present and very large canals in which instruments fail to contact the canal walls do not lend themselves to rotary preparation. In general, for rotary root canal preparation, straight-line access to the canal is essential.
Instrument fracture can occur as a result of torsional forces or cyclic fatigue. Torsional forces develop because of frictional resistance; therefore, as the surface area increases along the flutes, the greater the friction and the more potential for fracture. Torsional stress can be reduced by limiting file contact and using a crown-down preparation technique, in addition to liquid irrigants (e.g., NaOCl), during the procedure.
Cyclic fatigue occurs as a file rotates in a curved canal. At the point of curvature, the outer surface of the file is under tension and the inner surface of the instrument is compressed. As the instrument rotates, the areas of tension and compression alternate, and crack initiation begins, ultimately leading to fracture. There is often no visible evidence that fracture is imminent; therefore, the frequency with which a nickel-titanium instrument is used should be monitored. In difficult, calcified, or severely curved canals, the instruments should be used only once.
Smear Layer Management
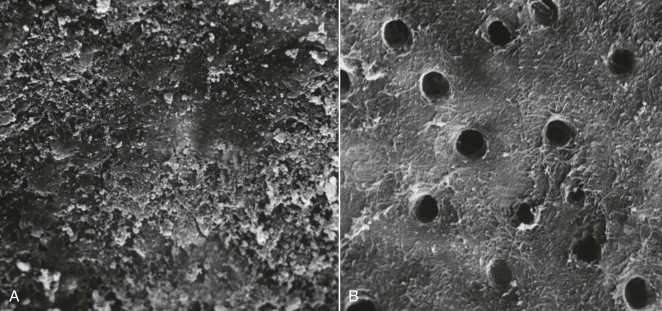
During cleaning and shaping, organic pulpal materials and inorganic dentinal debris accumulate. Not only are these pressed into accessory canals, fins, and isthmuses (see Fig. 16.6 ), they also are deposited on the radicular canal wall, producing an amorphous, irregular smear layer ( Fig. 16.8 ). With pulp necrosis, the smear layer may be contaminated with bacteria and their metabolic byproducts. The smear layer is superficial, having a thickness of 1 to 5 µm, and debris can be packed into the dentinal tubules to varying distances.
There is no consensus on removal of the smear layer before obturation. The advantages and disadvantages of smear layer removal remain controversial; however, evidence generally supports removal of the smear layer prior to obturation. The organic debris present in the smear layer might constitute a substrate for bacterial growth, and it has been suggested that the smear layer prevents sealer contact with the canal wall, permitting leakage. In addition, viable microorganisms in the dentinal tubules may use the smear layer as a substrate for sustained growth. If the smear layer is not removed, it may slowly disintegrate with leaking obturation materials, or it may be removed by acids and enzymes that are produced by viable bacteria left in the tubules or that enter via coronal leakage. The presence of a smear layer may also interfere with the action and effectiveness of root canal irrigants and interappointment disinfectants.
With smear layer removal, filling materials adapt better to the canal wall. Also, removal of the smear layer enhances the adhesion of sealers to dentin and tubular penetration and permits the penetration of all sealers to varying depths. Removal of the smear layer reduces both coronal and apical leakage.
Irrigants
The ideal properties for an endodontic irrigant are listed in Box 16.1 . Currently, no solution meets all the requirements outlined. In fact, no techniques appear able to completely clean the root canal space. Frequent irrigation is necessary to flush and remove the debris generated by the mechanical action of the instruments. At the same time, preparation of the radicular wall creates hard tissue debris that is typically pushed into the accessory anatomy, blocking access for subsequent irrigation. Therefore, coordinated use of mechanical shaping and irrigation is imperative to maximize the antibacterial efficacy of endodontic procedures.
-
Organic tissue solvent
-
Inorganic tissue solvent
-
Antimicrobial action
-
Nontoxic
-
Low surface tension
-
Lubricant
Sodium Hypochlorite
As mentioned, the most common irrigant is NaOCl, also known as household bleach. The advantages of an NaOCl solution include mechanical flushing of debris from the canal, the ability to dissolve vital and necrotic tissue, antimicrobial action, and lubricating action. In addition, NaOCl is inexpensive and readily available.
Free chlorine in NaOCl dissolves necrotic tissue by breaking down proteins into amino acids. There is no proven appropriate concentration of NaOCl, but concentrations ranging from 0.5% to 5.25% have been recommended. A common concentration is 2.5%, a concentration at which the potential for toxicity is reduced, yet some tissue dissolving and antimicrobial activity is maintained. Because the action of the irrigant is related to the amount of free chlorine, an increase in volume can compensate for a decrease in concentration. Warming the solution can also increase its effectiveness. However, NaOCl is limited in its ability to dissolve canal content because of limited contact with tissues in all areas of the root canal system.
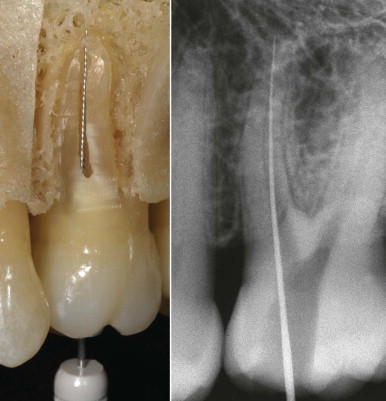
Because of toxicity, extrusion is to be avoided. The irrigating needle must be placed loosely in the canal ( Fig. 16.9 ). Insertion to binding and slight withdrawal minimizes the potential for extrusion and a sodium hypochlorite accident ( Fig. 16.10 ). Special care should be taken when irrigating a canal with an open apex. To control the depth of insertion, the needle is bent slightly at the appropriate length or a rubber stopper is placed on the needle.
The irrigant does not move apically more than 1 mm beyond the irrigation tip, so deep placement with small-gauge needles enhances irrigation (see Fig. 16.9 ). During rinsing, the needle is moved up and down constantly to produce agitation and prevent binding or wedging of the needle.
EDTA
Ethylenediaminetetraacetic acid (EDTA) is another frequently used irrigant; its activity is directed toward removal of the smear layer. Irrigation with 17% EDTA for 1 minute, followed by a final rinse with NaOCl, is a recommended method. Chelators such as EDTA remove the inorganic components and leave the organic tissue elements intact. NaOCl is then necessary for removal of the remaining organic components; however, the use of NaOCl after chelating agents may lead to excessive demineralization of radicular wall dentin. Demineralization results in removal of the smear layer and plugs and enlargement of the tubules. The action is most effective in the coronal and middle thirds of the canal and is diminished in the apical third.
Reduced efficacy may be a reflection of canal size or anatomic variations such as irregular or sclerotic tubules. The variable structure of the apical dentin presents a challenge during endodontic obturation with adhesive materials.
The recommended time for removal of the smear layer with EDTA is 1 minute The small particles of the smear layer are primarily inorganic and have a high surface-to-mass ratio, which facilitates removal by acids and chelators. EDTA exposure over 10 minutes causes excessive removal of both peritubular and intratubular dentin. Citric acid has also been shown to be an effective means of removing the smear layer.
Chlorhexidine
Chlorhexidine has a broad spectrum of antimicrobial activity, provides a sustained action, and has little toxicity. Two percent chlorhexidine has an antimicrobial action similar to that of 5.25% NaOCl, and it is more effective against Enterococcus faecalis . NaOCl and chlorhexidine are synergistic in their ability to eliminate microorganisms. A disadvantage of chlorhexidine is its inability to dissolve necrotic tissue and remove the smear layer. Moreover, clinical studies do not confirm that the use of chlorhexidine is associated with better outcomes.
MTAD
An alternative method for disinfecting while at the same time removing the smear layer uses a mixture composed of a tetracycline isomer, an acid, and a detergent (MTAD) as a final rinse to remove the smear layer. The effectiveness of MTAD in completely removing the smear layer is enhanced when low concentrations of NaOCl are used as an intracanal irrigant before the use of MTAD. A 1.3% NaOCl concentration was recommended; MTAD may be superior to NaOCl in antimicrobial action. MTAD has been shown to be effective in killing E. faecalis, an organism commonly found in failing treatments, and it may prove beneficial during retreatment. It is biocompatible, does not alter the physical properties of the dentin, and enhances bond strength. Although there is encouraging in vitro data, MTAD has not been shown to be clinically beneficial at this point.
QMix
Use of a recently introduced irrigant, marketed as QMix, follows an underlying strategy similar to that for MTAD; in addition, QMix has the potential not only to remove the smear layer, but also to provide antibiofilm activity. QMix consists of a proprietary mix of chlorhexidine, EDTA, and a surface-active agent. Although this is a new material and nothing is known about its contribution to clinical outcomes, it appears that smear layer removal is similar to that seen with 17% EDTA, and antimicrobial effects are adequate. However, tissue dissolution with prior canal shaping and use of NaOCl are still required.
Ultrasonics
Ultrasonic activation is used to enhance irrigation and to remove materials from the canal, including posts and silver cones. Ultrasonically powered instruments may also be used for thermoplastic obturation and root-end preparation during surgery; however, shaping curved root canals with ultrasonic instruments has been shown to create preparation errors and is no longer recommended.
The main mechanism of adjunctive cleaning with ultrasonics is acoustic microstreaming, which is described as complex, steady-state streaming patterns in vortex-like motions or eddy flows that are formed close to the instrument. Agitation of the irrigant with an ultrasonically activated instrument after completion of cleaning and shaping has the benefit of increasing the effectiveness of the solution.
Lubricants
Lubricants facilitate manipulation of hand files during cleaning and shaping. They are an aid in initial canal negotiation, especially in small and constricted canals without taper.
Glycerin is a mild alcohol that is inexpensive, nontoxic, aseptic, and somewhat soluble. A small amount can be placed along the shaft of the file or deposited in the canal orifice. Counterclockwise rotation of the file carries the material apically. The file can then be worked to length using a watch-winding motion.
Paste lubricants can incorporate chelators. One advantage to paste lubricants is that they can suspend dentinal debris and prevent apical compaction. One proprietary product consists of glycol, urea peroxide, and EDTA in a special water-soluble base. It has been demonstrated to exert antimicrobial action. Another type is composed of 19% EDTA in a water-soluble, viscous solution. A disadvantage of these EDTA compounds appears to be the deactivation of NaOCl by reducing the available chlorine and potential toxicity. The addition of EDTA to the lubricants has not proved effective. In general, files remove dentin faster than the chelators can soften the canal walls. When nickel-titanium rotary techniques are used, aqueous solutions (e.g., NaOCl), rather than paste lubricants, should always be present in the root canal to reduce torque.
Preparation Errors
Regardless of the technique used in root canal preparation, procedural errors can occur. These include loss of working length, apical transportation, apical perforation, instrument fracture, and stripping perforations.
Loss of working length has several causes, including failure to have an adequate reference point from which the working length is determined, packing of tissue and debris in the apical portion of the canal, ledge formation, and inaccurate measurement of files.
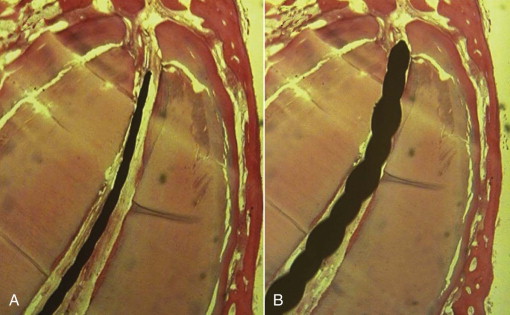
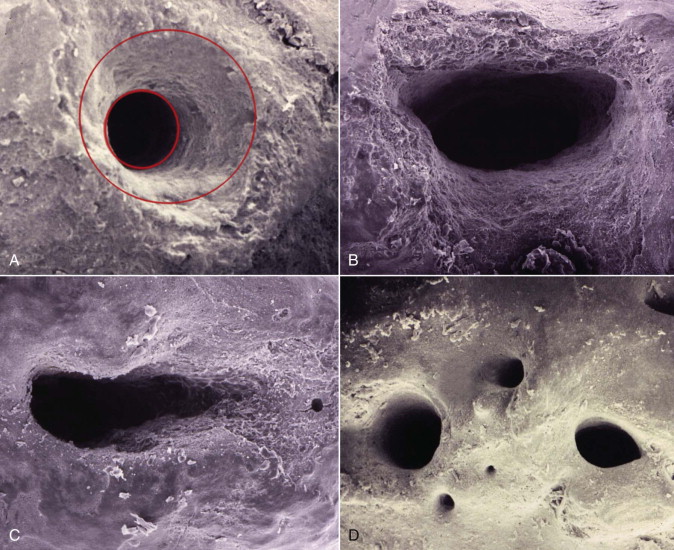
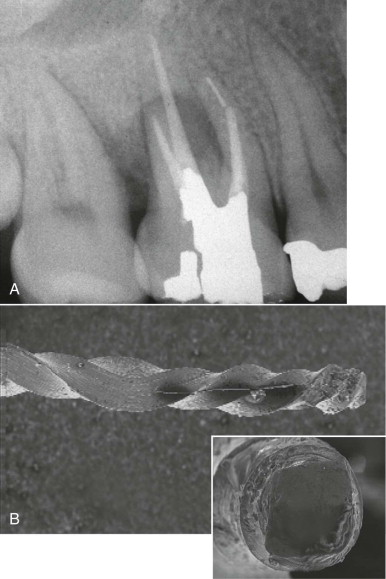
Apical transportation and zipping occur when relatively inflexible files are used to prepare curved canals. The restoring force of the file (the tendency to return to the original straight shape of the file) exceeds the threshold for cutting dentin in a curved canal ( Figs. 16.11 and 16.12 ). When this apical transportation continues with larger and larger files, a teardrop shape develops, and apical perforation can occur on the lateral root surface ( Fig. 16.11 ). Transportation in curved canals already begins with a No. 25 file. Enlargement of curved canals at the working length beyond a No. 25 file can be done only when an adequate coronal flare is developed.

As stated before , instrument fracture occurs with torsional and cyclic fatigue. Locking the flutes of a file in the canal wall while continuing to rotate the coronal portion of the instrument is an example of torsional fatigue ( Fig. 16.13 ). Cyclic fatigue results when strain develops in the metal. File fracture occurs more frequently with rotaries but may also involve hand instruments such as K-type and Hedstrom files.
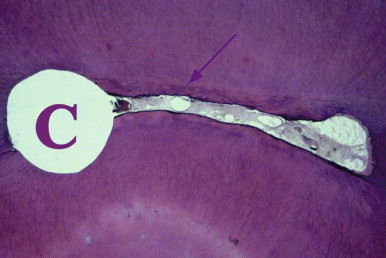
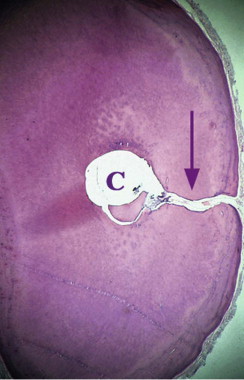
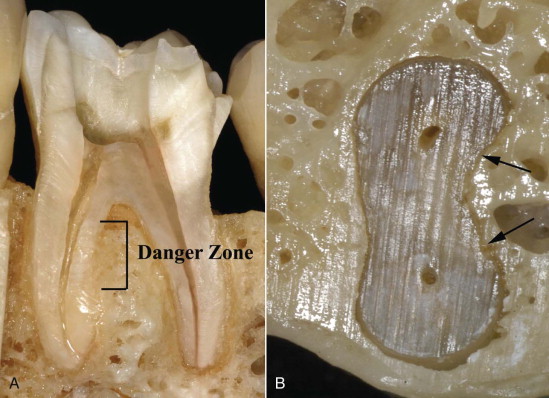
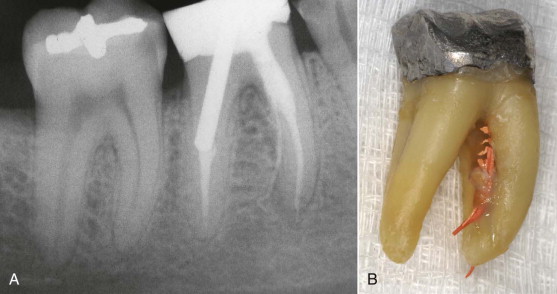
Stripping perforations occur in the furcal region of curved roots and frequently in the mesial roots of maxillary and mandibular molars ( Figs. 16.14 and 16.15 ). The canal in this area of the root is not always centered in cross sections; before preparation, the average distance to the furcal wall (danger zone) is less than the distance to the bulky outer wall (safety zone). An additional complicating factor is the furcal concavity of the root.
Stay updated, free dental videos. Join our Telegram channel
VIDEdental - Online dental courses


