13
Basic Injection Technique
In this chapter, we review the basic technique for injecting local anesthetic intraorally. We present the various phases in order and with all the relevant steps (even though these often overlap in clinical practice), placing emphasis on those aspects that make dental injections safer and more comfortable, given that injections are the main reason people fear dental treatment (Kleinknecht et al. 1973; Messer 1977; Berggren and Meynert 1984; Milgrom et al. 1997). Furthermore, following the approach we present here helps to reduce the stress experienced by almost 20% of dentists themselves with respect to administration of local anesthetic (Simon et al. 1994).
In the second part of the chapter, we address the components of the injection technique that lead to pain by separating them into those that directly produce pain and those that are much less significant but are popularly considered to be closely associated with pain. The final part of the chapter will address the terminology of the different anesthetic techniques. We have divided the basic technique into 10 phases (sections “Initial Preparation” to “Post‐treatment Phase”).
Comment on Retraction
With the aim of preventing accidental needle‐stick injury and the resulting risk of transmission of HIV, hepatitis B, or hepatitis C infection to the health professional (Cleveland et al. 2007; David et al. 2007), dentists now tend to avoid placing their fingers into the patient’s mouth during administration of local anesthetic to retract the soft tissues and palpate dental structures (Cleveland et al. 2007; David et al. 2007; Fa et al. 2016). Alternatives include a dental mirror (David et al. 2007; Fa et al. 2016), a Minnesota retractor, a tongue depressor (David et al. 2007), or even devices such as the vibrating device DentalVibe® (Fa et al. 2016) (Chapter 11).
Nevertheless, a study based on information collected from 1995 to 2004 in the United States that provides a wide‐ranging review of previous studies found that, since 1987, the frequency of accidental needle‐stick injury in dentistry had decreased, and that of the 59 recorded cases of transmission of HIV infection to healthcare personnel, none involved dental professionals (Cleveland et al. 2007). Furthermore, of the 360 accidental needle‐stick cases recorded in dental health personnel, 88 were caused by dental needles (25%), with 70% affecting dentists and oral surgeons and 25% affecting dental assistants and hygienists (Cleveland et al. 2007).
In this book, dental local anesthetic techniques are addressed by inserting the fingers of the supporting hand into the patient’s mouth (left hand in right‐handed dentists) to separate the soft tissues and thus stabilize the area to facilitate injection. This is the approach recommended in all of the texts in this specialty, although emphasis is placed on methods to prevent accidental needle‐stick injuries.
Phases of the Injection
Initial Preparation
Before the patient enters the dental office, we should evaluate and anticipate a series of concerns.
- Assess how well the patient will cooperate.
The previous visit (generally the first visit), especially in children, gives an idea of how the patient will behave. It is important to remember that children are brought to the dentist by their parents. Thus, aside from age, demeanor, and physical appearance, two specific situations enable us to predict disruptive behavior in future visits to the dentist:
- Examination of the mouth.
- Intraoral radiographs.
Any difficulty observed while these maneuvers are being performed points to a high risk of disruptive behavior during administration of oral anesthesia at the following visits.
In contrast, if the examination reveals the patient to have undergone considerable restorative work and complicated dental procedures and the parents report that no specific measures were taken (sedation, medication), then the patient’s behavior should be acceptable for the administration of local anesthesia.
- Review the health questionnaire and dental history.
We can review the following questions:
- What level of anxiety and fear does dental treatment cause you?
- None □ A little □ Moderate □ Quite a lot □ A lot □
- Have you ever experienced abnormal reactions, fainting, dizziness when receiving local anesthetic or vaccinations or when giving blood?
- Yes □ No □
These two questions enable us to better evaluate disruptive behavior. Other questions on health status, medical problems, and medications taken will enable us to determine whether there are absolute or relative contraindications for administration of dental local anesthetic or whether there are limitations for the use of anesthetics or vasoconstrictors (see Chapters 8, 9, and 10 on contraindications for the techniques, anesthetics, and vasoconstrictors).
- What level of anxiety and fear does dental treatment cause you?
- Review body weight in small patients and children.
The basic purpose of reviewing body weight is to avoid overdose, which can have serious consequences (Goodson and Moore 1983; Hersh et al. 1991; Moore 1992; Virts 1999; Council on Clinical Affairs 2015). Surveys among dentists show that around half believe (erroneously) that the maximum dose should not be based on the patient’s weight but that the same dose should be administered to all patients, therefore in patients weighing less than 40 kg there may be a risk of overdose (Linscott et al. 1978; Cheatham et al. 1992; Daubländer et al. 1997). Annex 10 shows the maximum absolute doses by body weight in dentistry.
- Organize all local anesthetic equipment.
Before the patient comes into the dental office, the dental equipment should be prepared and covered so as not to increase the anxiety generally felt by the patient (Mink and Spedding 1966). Some authors recommend having tweezers or mosquito clamp to prepare for the unfortunate case where a needle breaks in the patient’s mouth, so that the end protruding from the soft tissue can be removed before it disappears completely into the tissue (Armbrecht and Schwetz 1962; Orr 1983; McDonogh 1996).
Preparation Phase
Once the patient is in the office, we can proceed as follows:
- Position of the dentist and patient.
- The dentist should be seated at between 8 and 10 o’clock (maximum 7–11 o’clock) with respect to the patient’s mouth, depending on the technique and approach used, and on the patient’s right (for right‐handed dentists). Being seated ensures better accuracy and control.
- The patient should be in a semi‐recumbent position so that the dentist can work from a seated position, thus improving accuracy and reducing risk for the patient: having the patient in a semi‐recumbent position reduces the risk of a vasovagal reaction caused by the lack of blood flow to the brain resulting from anxiety. Consequently, the risk of serious complications is reduced (Bourne 1957, 1970).
- Assistant beside the dentist.
Having the assistant seated at 2–4 o’clock can make it easier to pass the syringe and hold the patient to prevent sudden movements (especially in children) and help where necessary, such as in cases of needle breakage, when he/she can pass the dentist tweezers or a mosquito clamp to remove the protruding end of the needle (Orr 1983).
- Where possible, remove prosthesis and braces from the patient’s mouth. Where possible orthodontic braces in children and dentures in adults should be removed, since these hamper administration of anesthetic and increase the risk of lesions in uncooperative patients.
- Preparation of the syringe by the assistant.
- Insert the cartridge into the syringe. Some dentists prefer to disinfect the mouth of the cartridge by wiping it with gauze soaked in alcohol immediately before loading the syringe. This maneuver is not necessary with modern packaging (blister packs). Cartridges should never be placed in disinfectant since this can reach the interior of the cartridge and contaminate the solution (Shannon and Feller 1972; Shannon and Wescott 1974).
- Place the needle over the mouth of the syringe loaded with the cartridge by removing the posterior cap of the needle and screwing the posterior part of the needle into the mouth of the syringe. Note that the anterior cap covering the front part of the needle, the active part, is not removed. The needle should not be bent for intraoral injections (Dentists’ Desk 1983). In cases where it is necessary to bend the needle to reach a difficult area, then it should be bent half‐way down the shaft of the needle and not at the hub‐adapter, since this is the weakest area and thus increases the risk of breakage (Burgess 1988).
- Finally, place a protective disk on the front cap of the needle to prevent needle‐stick injury when the syringe containing the cartridge and needle is passed to the dentist (needle‐stick protector) (Figure 11.10, Chapter 11).
- Do not use words with a high emotional content.
Try to avoid these terms and use more pleasant euphemisms:
- Do not use the terms “syringe,” “injection,” or “prick”; instead use “anesthesia,” which is more general and less aggressive.
- Do not use the words “pain” or “harm”; instead use “notice” or “discomfort.”
- Do not use the term “soft tissue anesthesia,” as it is too technical; instead use “numbness,” “dullness,” “tingling,” “tickling,” or “swelling” (Table 13.1).
Using words with a high emotional content in explanations increases anxiety and makes more predisposed patients consider low levels of stimulus as pain (Jackson 1974; Firestein 1976; Wepman 1978).
- With children, use the tell‐show‐do technique (Addelston 1959), which is actually the tell‐do technique (McClure 1968), since in this case neither the needle nor the syringe should be shown: seeing these objects increases anxiety in children (Spedding and Mink 1964; Majstorovic and Veerkamp 2004) (Figure 13.1). The approach should be as follows (Spedding and Mink 1964: Mink and Spedding 1966):
- Provide brief explanations with positive sentences and continuous specific references in a level of language that is suited to the patient’s age. Prolonged explanations lead the child to stop listening and begin to feel anxious.
- The dentist can tell the child that only his/her “teeth are going to sleep” and that these are small (show using the fingers), unlike him/her, who is big (show using the arms). This strategy is aimed at reassuring the child by showing him/her that he/she is big in comparison with the teeth, which are small and that, therefore, the maneuver will be “a little one.”
- The dentist explains that he/she is going to use “anesthetic” on the gum near the teeth and touches the area to be injected with a finger (this should be clearly visible). Thus, the patient becomes familiar with the touch and pressure on this area of the mouth. The dentist can tell the child that when the anesthetic goes in, “it will feel just as it does now.”
- The dentist then explains how the anesthetized lips and mouth will feel “fat” or that they will feel “ticklish” or that the “lip will feel swollen.” These terms are nicer than those used with adults, such as “tickling sensation,” “tingling,” “numbness,” or “dullness” (Table 13.1).
- The dentist should ensure that the patient does not confuse the sensation of “pressure” at the injection site with “discomfort,” therefore the dentist carefully takes the child’s wrist (without hurting) and presses it so that the patient notices the sensation of pressure without pain and moves the patient’s arm.
- It is important to use a calm, soft, gentle, and monotone voice to ensure an atmosphere of normality where everything is known, understood, and accepted (Addelston 1959).
- Finally, tell the patient that he/she will feel like they have a “fat lip” or “swollen lip” and that this will last for some time and then go away. You can even give the patient a mirror so that he/she can see that the lip is not swollen even if it feels like it is.
Questions commonly asked by children:
- Will it be painful? Will it hurt? Simply tell the patient that he/she will feel the same “discomfort” as when you put your finger in his/her mouth.
- Are you going to stick a needle in me? Are you going to give me an injection? Tell the patient that “you give injections in the backside, in the mouth you use anesthesia.” This way, we separate the two parts of the body and the two concepts.
- The patient may ask to see the syringe and needle. In this case, you say “No, because it’s clean and doesn’t have germs, so I can’t show it to you.” This explanation is generally sufficient. Some dentists tell children that they’ll show it to them at the end (only if the child remembers; if not, do nothing) and if they do, they do so with only the syringe (not the needle), or if they do show the needle it has the cap on.
- Similarly, with adults, it is a good idea to explain what you are about to do, how you are going to anesthetize them, and how comfortable they will feel. Something like this: “Just let me anesthetize you and you’ll see that it’s much less than you expect.” Or inject a dose of humor: “After I inject the anesthetic you’ll get addicted and be back every day for more.” Or “It’s not worth worrying about the anesthetic. You’ll see that it’s much easier than you think. Just let me show you.”
Remember, studies show that patients are anxious and have expectations of pain caused by the anesthetic and dental treatment that are more negative than necessary (Rousseau et al. 2002; Nanitsos et al. 2009). Giving the patient positive information allays and reduces the fear and anxiety (Van Wijk and Hoogstraten 2006).
Table 13.1 The most common terms used with patients in dentistry to explain the feeling of soft tissue anesthetized (lips, tongue, and mouth).
| Children | Adults |
|---|---|
|
|
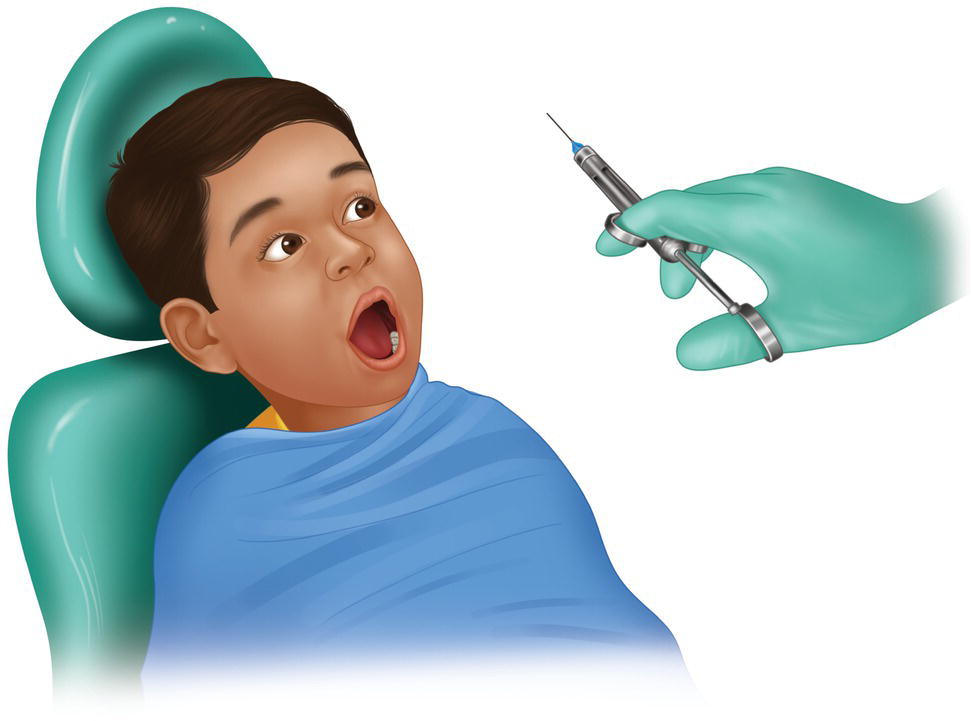
Figure 13.1 Do not show children the syringe with the needle in place.
Source: Drawn with modifications according to Snawder (1987).
Application of Topical Anesthetic
Approximately 95% of dentists in the United States (Kohli et al. 2001) and UK (Meechan 2008) administer topical anesthetic before intraoral injections to reduce pain and fear.
The time between applying the topical agent and the injection is very important. Many dentists wait less than 30 seconds (Gill and Orr 1979), and a survey in the United States showed that 70% wait less than a minute (Kohli et al. 2001). Holst and Evers estimated that the maximum time tolerated in clinical practice for topical anesthetic to take effect should not exceed 5 minutes (Holst and Evers 1985). In addition, moisture in the mouth tends to inhibit adhesion of gels, ointments, pastes, creams, and solutions to the mucosal surface, thus hampering absorption of the anesthetic, therefore maximum absorption is achieved during the first 30 seconds (Carr and Horton 2001b). For all the above reasons, we need topical anesthetics that have a short onset of action, generally under 1–2 minutes, therefore the most commonly used agents in clinical practice are benzocaine 20% and lidocaine 5% in gels, ointments, and creams (Kohli et al. 2001; Meechan 2008).
As seen in the chapter on topical anesthetic (Chapter 12), aerosols and liquid solutions yield the worst results, therefore the preferred form is gel, ointment, cream, or paste (Annex 19). In addition, topical anesthetic has little efficacy on the palate, which has a thicker and more keratinized mucous membrane, thus making it the least permeable part of the oral mucosa (Lesch et al. 1989). Similarly, its efficacy is poor for reducing the discomfort/pain produced by mandibular block, since the needle is inserted approximately 20–25 mm into the pterygomandibular space. As reported in clinical trials (Annex 19), topical anesthetic cannot reach this level (Meechan et al. 1998). Remember that in truncal injections the most painful part is the advance of the needle into the soft tissue (Annex 23). In any case, the placebo effect of the topical anesthetic is observed.
Method of Application
- Tell the patient that topical anesthetic is going to be used to reduce the “discomfort” associated with administration of local anesthetic. This measure has been shown to reduce anxiety and increase tolerance to pain (Martin et al. 1994).
- Clean and dry the puncture site with gauze or air pressure to remove saliva and soft debris (Figure 13.2). If this is not sufficient, the amount of saliva in the mouth can be reduced by placing cotton roll in the vestibule, at the orifice of the Stenon duct, or under the tongue at the orifice of the Wharton duct.
- Aspirate saliva to ensure that it does not dilute the topical anesthetic which is about to be applied.
- Apply the ointment or gel by rubbing a cotton swab directly over the injection site (Figure 13.3). Apply a small amount; it is important to remember that the cotton bud will absorb part of the gel or ointment (Holst and Evers 1985).
- Cover the area with gauze or a cotton roll so that the anesthetic remains in place and is not dispersed throughout the mouth or diluted in saliva (or at least as little as possible) (Roghani et al. 1999; Munshi et al. 2001). Here, again, some of the gel or ointment will be absorbed by the gauze or cotton roll (Lim and Julliard 2004).
- Wait sufficient time for the anesthetic to take effect, generally 30 seconds to 1 minute for benzocaine and 1–2 minutes for lidocaine. Remember that one of the reasons for failure of topical anesthetic is that not enough time is left for it to take effect (Gill and Orr 1979).
- Clean the area before injection to remove the topical anesthetic and leave the area clean. Owing to continuous stimulation with saliva, the injection site is always being contaminated, therefore it is more important to keep it clean than disinfected (Mink and Spedding 1966).
- Prevent contact between the anesthetic and skin, since many anesthetics are ester agents (benzocaine, tetracaine, cocaine) and can lead to allergic sensitization (Roberts and Sowray 1987).
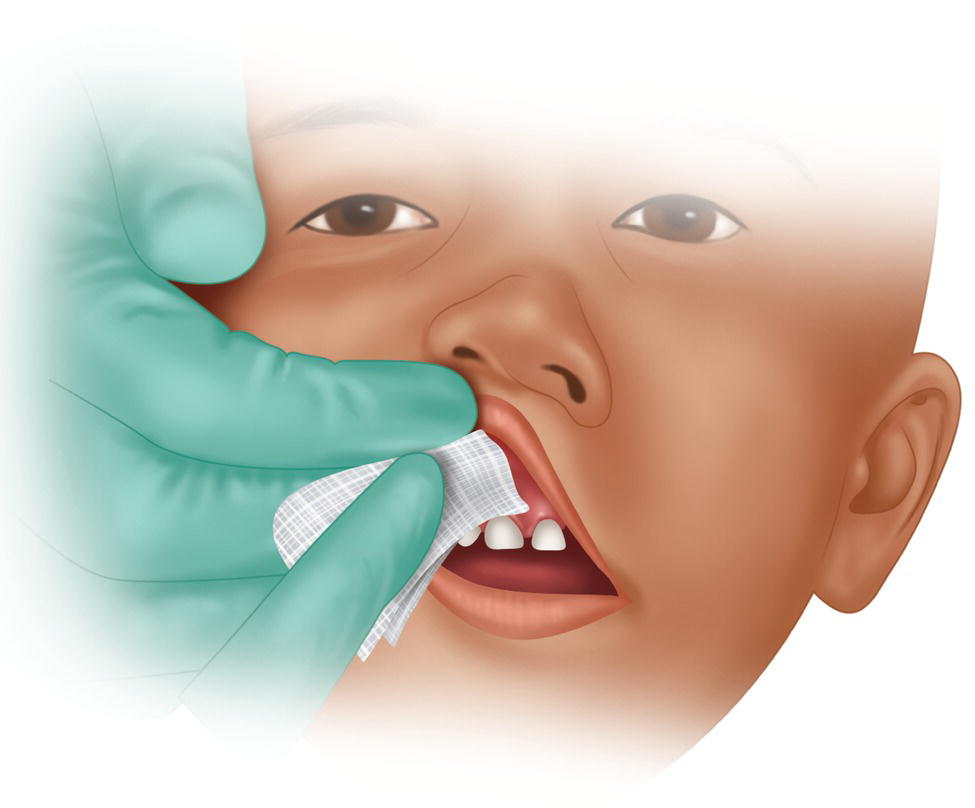
Figure 13.2 Using gauze to clean the area where the topical anesthetic is to be applied.
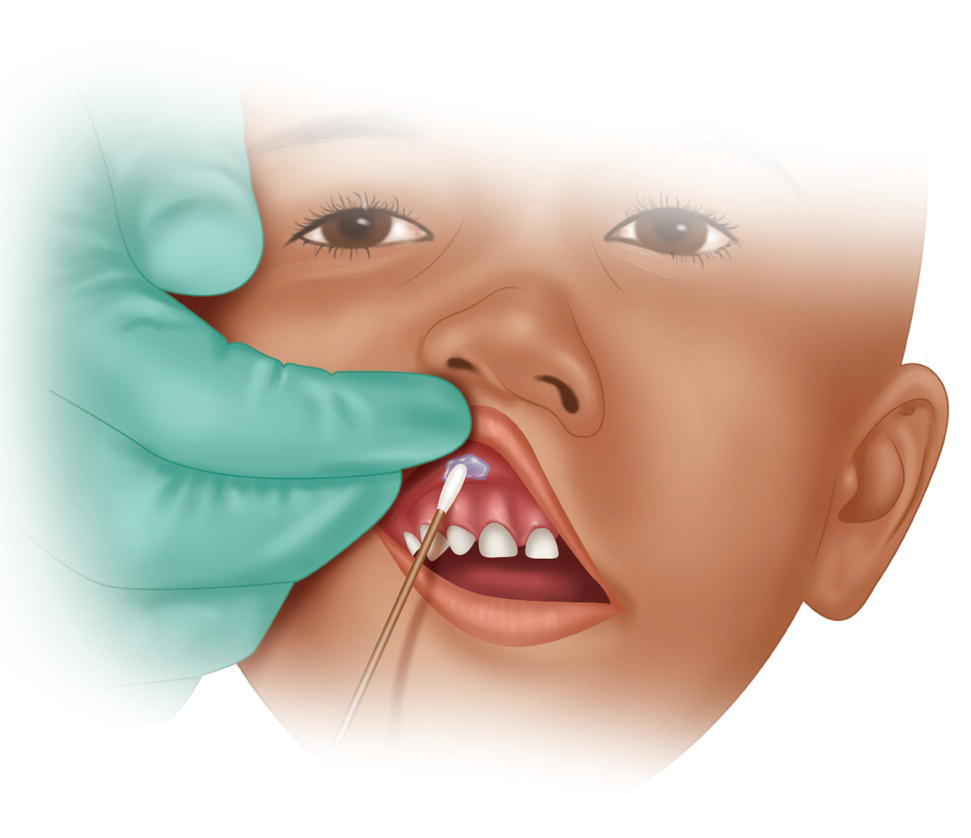
Figure 13.3 Application of topical anesthesia with a cotton swab.
Note: Owing to diffusion of the topical anesthetic, the mucosa of the tongue or pharynx often becomes anesthetized at some distance from where the topical anesthetic was applied. This is a common complaint (Nakamura et al. 2013).
Observations on Aerosols
As we have seen, topical anesthetic in the form of aerosols is not recommended owing to the low efficacy resulting from dispersion in the mouth and dilution in saliva (Annex 19), although when they are used, it is important to take into account the following:
- A cannula should be used to prevent – as much as possible – the aerosol solution from extending and dispersing.
- Advise the patient to hold his/her breath when the agent is applied so that the drug is not inhaled. This would lead to anesthesia of the pharynx and an uncomfortable sensation of anxiety (Roberts and Sowray 1987).
- Press the aerosol for 1 second, no more than 2 seconds, especially if it contains tetracaine, since it is easy to administer a toxic dose (Bennett 1984; Roberts and Sowray 1987).
Finally, aerosols are not recommended in children because they may lead to sudden uncooperative behavior owing to the noise they make and bad taste as the anesthetic spreads through the mouth (Frasier 1967; Evers and Haegerstam 1981).
Transfer of the Syringe
- The assistant finishes preparing the syringe (continuation of section “Preparation Phase”, point 4).
Once the syringe is prepared with the cartridge, needle, and protective disk, the assistant separates the anterior cap to break the seal and replaces it using the protective disk. The risk of a needle‐stick injury is minimized because of the protective disk (Figure 11.10, Chapter 11).
- The dentist’s supporting hand, i.e. the hand not holding the syringe (the left hand for right‐handed dentists) must carry out the following operations simultaneously (Figure 13.4):
- Stabilize the patient’s head by holding it with the hand and fingers. The objective is to prevent sudden movements by the patient during insertion of the needle (Marks et al. 1984).
- Separate the soft tissue to ensure that the injection site is clearly visible.
- Block the view of the syringe (especially in children) with the fingers extended over the face or the wrist. There may also be cases where the upper lip can be raised.
- Children. The dentist must look the child directly in the eye throughout the transfer maneuver to ensure the following:
- The child is prevented from seeing the syringe, given that he/she tends to follow all the dentist’s actions and movements. Look directly at the child throughout, especially if he/she is nervous.
- By looking directly at the child’s face, the dentist can observe whether he/she is feeling pain or notices the prick of the needle by gestures such as frowning, raising the eyebrows, blinking, or moving the nose. On the other hand, the patient may not modify his/her expression, thus indicating that the insertion has been asymptomatic or well‐tolerated.
- The child should not close his/her eyes (almost no children do it, on the contrary, they look at everything the dentist is doing) (Mink and Spedding 1966), since the disappearance of one sense increases the sensitivity of the others, with the result that sensations such as touch and pressure are more easily perceived as pain. Furthermore, with the eyes closed, the patient can imagine horrible threats that are not seen when the eyes are open (Mink and Spedding 1966).
- The dentist can also ask the patient to place his/her hands under his bottom, that is, away from the mouth and supported by his/her own body (Figure 13.4). In addition, since children see the word “bottom” as a nice word, even a little naughty, they accept it very well.
- The dentist extends and opens his/her right hand (right‐handed dentist) to receive the syringe from the assistant without looking (he/she is looking at the child) and outside the child’s field of vision (behind the head rest or under the chin and near the left ear).
- The assistant places the syringe in the dentist’s hand:
- The syringe is presented with the needle cap and protective disk pointing toward the assistant (Figure 13.5).
- The assistant takes the syringe with his/her right hand by the body of the syringe, or barrel (Figure 13.5).
- The syringe is passed across out of the view of the patient, that is, behind the headrest or under the patient’s chin.
- The syringe is placed correctly in the dentist’s hand with a slight tap on the dentist’s open hand (so that the dentist is aware of receiving the syringe).
- The assistant removes the anterior sheath or cap of the needle so that it is exposed. Remember that the seal of the cap has already been broken (section “Transfer of the Syringe”, point 1), therefore it is easy to remove the cap.
- With the syringe in his/her hand, the dentist pushes the plunger slightly to:
- Purge the syringe (one or two drops) to eliminate silicone and aluminum powder residue that have entered the lumen of the needle when it pierces the silicone diaphragm of the mouth of the cartridge with the posterior needle (Kelly and Cohen 1984; Piesold et al. 1998). This residue is found in around 10% of cases and can measure as much as 0.3–0.5 mm and carries a risk of entering a vessel or muscle and causing pain or trismus (Kelly and Cohen 1984).
- Eliminate the initial sudden pushing and shaking movement (Tzafalia and Sixou 2011) caused by the fact that the plunger is usually blocked or sticks to the glass of the cartridge. This will ensure that it moves smoothly down the barrel (Figure 13.6). The plunger used to be lubricated with paraffin or glycerine wax that became hard over time and at low ambient temperatures. Lubricants are currently made of silicone and are much better than the previous ones. However, even though the problem has been somewhat resolved, it has not disappeared (Jastak et al. 1995; Malamed 2004). The problem is worse with plastic cartridges than with glass cartridges (Malamed 2004).
The way the hand moves and the use of cartridge‐type metal syringes make these initial brusque movements difficult to control. This is one of the advantages of computerized injection techniques, which solve this problem almost perfectly (Tzafalia and Sixou 2011).
- With the syringe now purged in his/her right hand, the dentist can direct it toward the patient’s mouth.
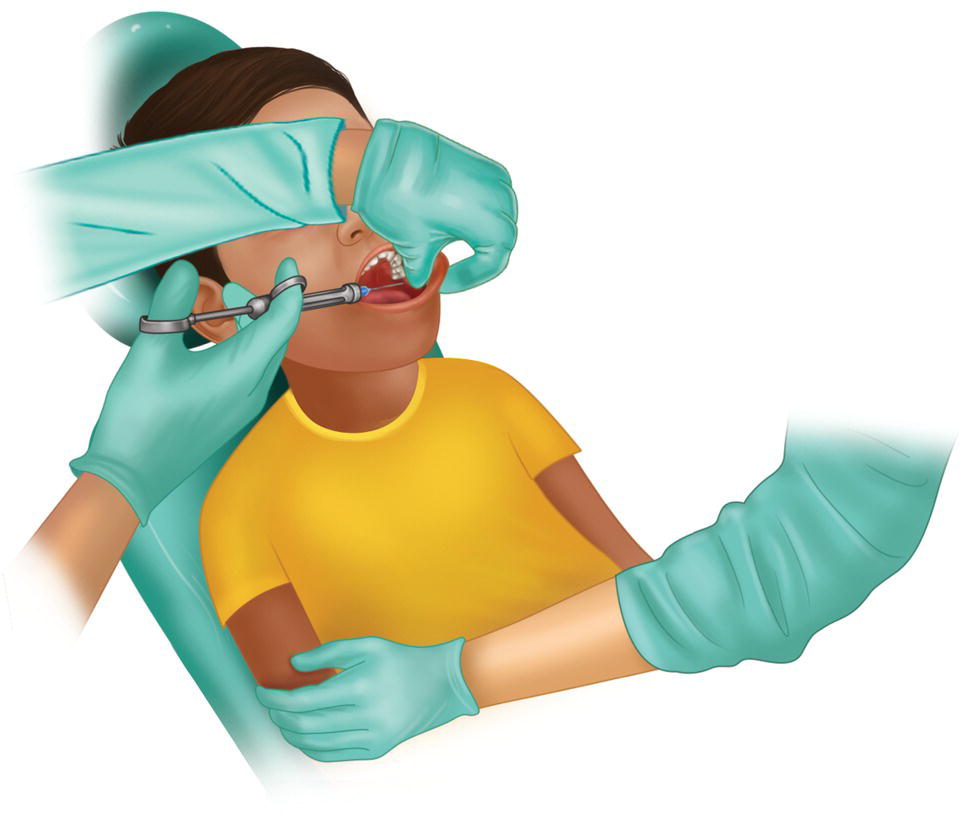
Figure 13.4 Note the following: (1) the position and function of the dentist’s supporting hand, and (2) the assistant’s arm extended across the child’s body.
Source: Redrawn with modifications from Snawder (1987).
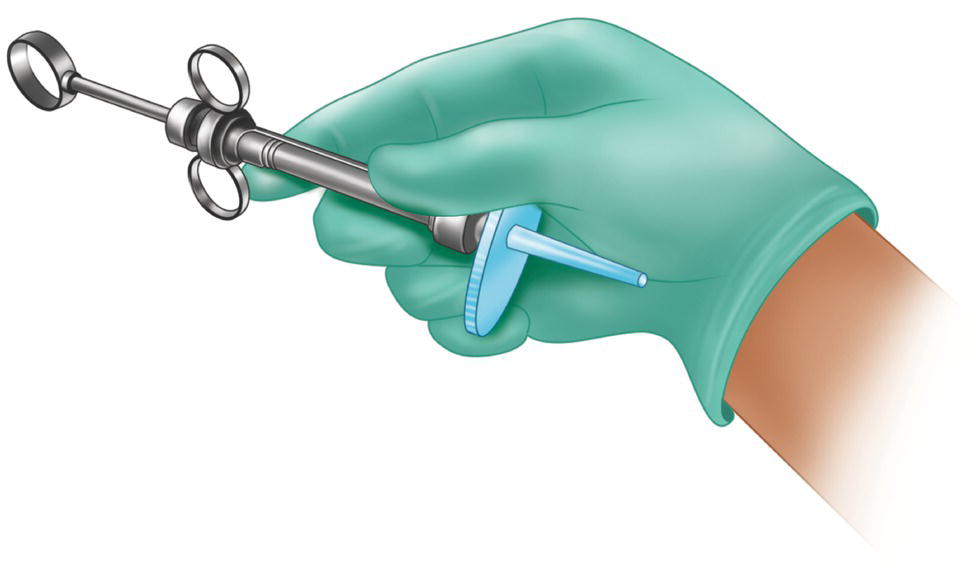
Figure 13.5 The assistant holds the syringe before passing it to the dentist with the right hand on the body or barrel of the syringe. Note the protective disk over the cap of the needle.
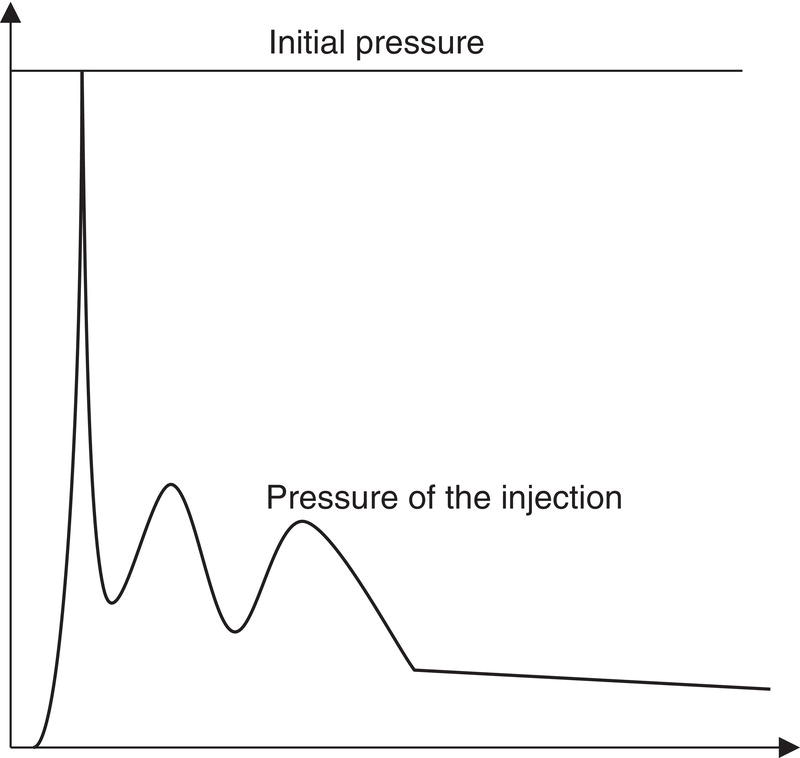
Figure 13.6 Control the sudden shaky initial movement to ensure that the solution is injected smoothly.
Insertion of the Needle
- Children. The assistant extends his/her left arm over the child’s body to hold the arms in place gently but firmly and remains alert to possible disruptive movements (Mink and Spedding 1966; Ram and Peretz 2002) (Figure 13.4).
- The dentist warns the patient when pain is unavoidable. Our body does not react well to surprises and reactions are often uncontrollable.
For example, injections into the palate or using the intrapulpal technique can be painful, therefore we must tell the patient that the pain will last only a second and show interest and concern for the fact.
For the same reason, when we say “this won’t hurt,” we should be sure that this is in fact the case. If the injection actually does hurt, then the patient may become counter‐conditioned, with the result that every time we say something similar, the patient will expect to feel pain (Jackson 1974) and not relax. This defective approach to providing information is disliked by 75% of patients (Rankin and Harris 1985).
- The dentist always holds the syringe stable to maintain control and prevent unexpected movements of the needle (Ram and Peretz 2002). This is done by supporting the body of the syringe on the patient’s teeth or lips or with the dentist’s fingers placing the syringe on the patient’s mouth or face.
Do not rest on the patient’s arms or shoulders, since he/she can move them unexpectedly while keeping the mouth still.
- The dentist should perform counter‐irritant/counter‐stimulant measures immediately before inserting the needle.
Traction and stretching of the soft tissue can be applied with the fingers in the area near the injection site to leave the area tense. This enables the needle to penetrate the mucous membrane with minimum resistance and discomfort. If the soft tissue remains lax and soft, the needle will push against it before being inserted, therefore insertion will be more difficult and painful.
Pressure or vibratory stimulus can also be applied by making rapid movements with the fingers or a cotton‐tip applicator. These maneuvers enable the following:
- The patient’s attention is diverted from the “prick,” thus ensuring that the pain threshold does not decrease (anxiety reduces the pain threshold) and the stimulus of the penetration of the needle (which is at its limit) falls below the pain threshold (Woolgrove 1983; Sokol et al. 1985).
- Activation of the gate control system at the level of the trigeminal caudate nucleus, which partially inhibits the passage of painful stimuli upwards, thus helping to maintain the stimulus below the pain threshold (Melzack and Wall 1965; Dubner 1978) (see Chapter 11).
- During the insertion of the needle, the dentist can distract the patient further with a continuous monolog, for example, “I hope everything is OK…now open your mouth, a little more,… that’s it, a little more,… that’s it, perfect, just like that,…”
- Depending on whether the injection is an infiltration or mandibular block, we can make a few suggestions:
- Buccal infiltration. We recommend the minimum intervention (minimum volume/minimum injection time), which consists of injecting a single drop at the injection site in 1–2 seconds and waiting a minute; we then inject again at the same site (the appearance of a blood spot is common), one or two drops in 1–2 seconds and waiting half a minute. We inject at the same site again, although this time ±0.25 ml (an eighth of a 1.8‐ml cartridge) in 7–10 seconds after aspirating; we now wait another half minute. Finally, we inject, slowly at the same site, the quantity we intended to administer (again, after aspirating). This method enables anesthesia of the soft tissues and prevents the discomfort resulting from distension of the tissues by injecting most of the solution.
- Mandibular block. We recommend a light but firm tap followed by quick insertion. This approach involves giving a light but firm tap with the supporting hand (generally the left in right‐handed persons) at the same time as the hand holding the syringe (generally the right) inserts the needle quickly to reach the bone immediately. This is a very important maneuver, since the traumatic stimulus limits the pain threshold (in this case, the passage of the needle across the soft tissue), which lasts some time, so that the initial threshold can be overcome and pain appears (Fuller et al. 1979). A slower advance reduces the threshold considerably, and, if some drops of anesthetic are injected as the needle advances, then the situation worsens (Appendix), in addition, the anesthetic does not act immediately (Nusstein et al. 2006; McCarney et al. 2007). It is important to remember that passage of the needle is the factor that produces most pain in truncal blocks (Annex 23).
- Avoid injuring the periosteum. The periosteum is rich in nerve endings and any injury to it causes pain at the time of the lesion and in the post‐operative period. In order to avoid this injury, we recommend the following:
- Place the bevel of the needle facing toward the bone (Figure 13.7) since if it comes into contact with the periosteum, it will tend to slide across without damaging it. This classic concept is currently under discussion since evidence from clinical trials indicates that the direction of the bevel does not affect the onset of pain (Carr and Horton 2001b) or the efficacy of the anesthetic in achieving pulpal anesthesia (Steinkruger et al. 2006).
- If the tip of the needle touches the bone, we withdraw it 1–2 mm before injecting (we do not exert pressure by pressing it against the bone) for the following reasons: (i) so as not to leave anesthetic solution below the periosteum and (ii) so as not to blunt the needle, especially if the tip barbed outwards, since this can damage muscles, nerves, and vessels on withdrawal (Stacy et al. 1994) (Figure 22.2, Chapter 22).
- Never insert the needle up to the hub. This is the weakest and most vulnerable part and the level at which needles always break (Orr 1983; Marks et al. 1984; Burgess 1988; McDonogh 1996; Zelster et al. 2002). Therefore, in the case of a breakage, the end part of the needle will remain outside the soft tissue and can be withdrawn before it disappears fully into the tissue.
Long needles should be used in techniques where it is necessary to insert the needle deep into the soft tissue, for example mandibular block (Dentists’ Desk 1983).
- In children, voice control should be used if the patient complains, cries, or tries to move when the needle is inserted.
In principle, the syringe should not be withdrawn, since this would reinforce the child’s disruptive behavior and hamper subsequent administration of local anesthesia (Mink and Spedding 1966).
Voice control accompanied by strict facial expression (nonverbal communication) gives us an authoritarian air. We can then move close to the child’s ear and tell him/her in a soft voice that it is time to stop behaving badly. If the child’s behavior continues to be disruptive, we raise our voice suddenly and considerably, and use expressions such as “Open your mouth!”, “Don’t move!” Once we have the child’s attention, we change our tone of voice, thanking him/her for stopping behaving badly and gently explaining that “You’ll hardly feel a thing.”
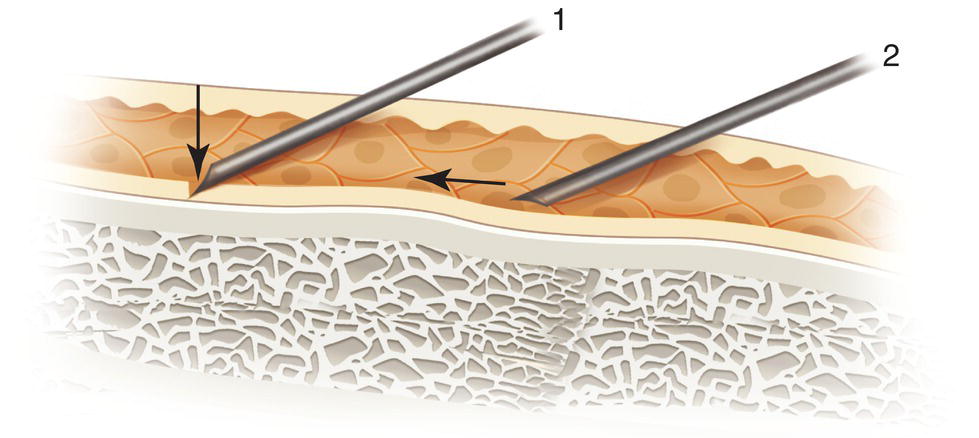
Figure 13.7 Prevent the tip of the needle from damaging the periosteum (1) by placing the bevel parallel to it (2).
Aspiration
In 1957, the Council on Dental Therapeutics of the American Dental Association highlighted the need for systematic aspiration before injecting dental local anesthetic (Council on Dental Therapeutics 1957). Today, there are still many dentists who do not routinely use aspiration in the belief that intravascular injection is very uncommon or that if it does occur, it has few adverse effects (Bartlett 1972; Meechan and Rood 1992). Some surveys show that more than 20% of dentists do not routinely aspirate (Malamed 2004).
The aim of aspiration before injection is to prevent intravascular injection and therefore systemic toxic effects resulting from the sudden passage of the solution into the bloodstream (Forrest 1959; Shira 1962; Bos et al. 1971), which can sometimes increase toxicity 200‐fold (Meechan and Rood 1992).
False Positives and Negatives
Matters may be further complicated by false positives and false negatives:
- False positives, when the cartridge fills with blood without a vessel having been injected (Alling and Christopher 1974; Watson and Colman 1976) as a result of the following (Figure 13.8):
- Aspiration of extravasated blood from tissue spaces caused by the trauma resulting from passage of the needle.
- Residual blood remaining in the lumen of the needle as it crosses a vessel.
- False negatives, when the cartridge does not fill with blood despite the fact that the tip of the needle is in a vessel as a result of:
- Excess negative pressure when the plunger is pulled backward to aspirate, thus leading to collapse of the vessels, especially vessels measuring less than 1.5 mm (Alling and Christopher 1974; Watson and Colman 1976).
- If the angle of insertion of the needle has the misfortune to lie parallel to the inner layer (adventitia) of the vessel, then the endothelium (adventitia) occludes the lumen of the needle on aspiration, especially in small vessels (Figure 13.9).
- Formation of a punch cylinder of epithelial mucosal cells in a little more than 1% of cases, leading to obstruction of the lumen (Piesold et al. 1998).
Stay updated, free dental videos. Join our Telegram channel
VIDEdental - Online dental courses


