Impression Materials
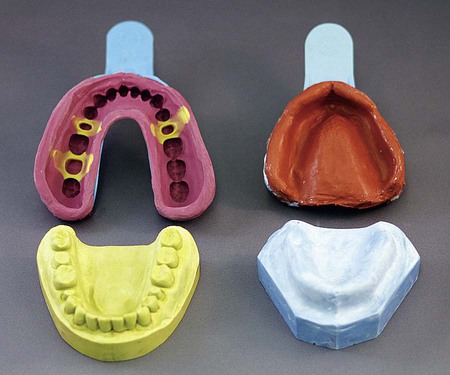
Construction of a model or cast is an important step in numerous dental procedures. Various types of casts and models can be made from gypsum products using an impression mold or negative likeness of a dental structure (Figure 8-1). The dentist designs and constructs both removable and fixed prostheses on a gypsum cast. Thus, the cast must be an accurate representation of oral structures, which requires an accurate impression.
 Critical Questions
 Critical Question
Classification of Impression Materials
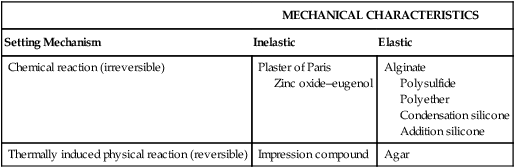
Impression materials that are used today can be classified according to their composition, mechanism of setting, mechanical properties, and applications. Table 8-1 shows the classification based on the setting mechanism and mechanical characteristics. The composition of the materials is discussed later.
TABLE 8-1
Classification of Dental Impression Materials
| MECHANICAL CHARACTERISTICS | ||
| Setting Mechanism | Inelastic | Elastic |
| Chemical reaction (irreversible) | Plaster of Paris Zinc oxide–eugenol |
Alginate Polysulfide Polyether Condensation silicone Addition silicone |
| Thermally induced physical reaction (reversible) | Impression compound | Agar |
Elastomeric Impression Materials
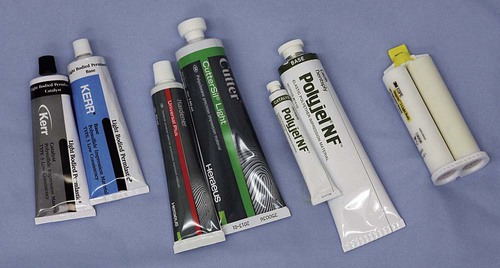
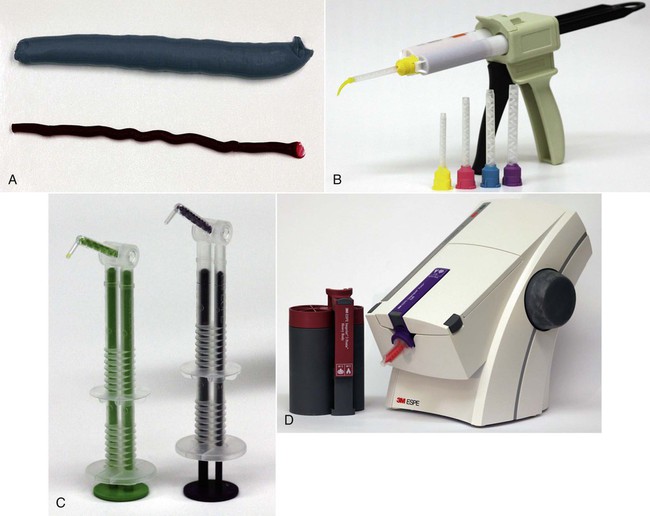
Elastomers comprise a group of synthetic polymer-based impression materials that are chemically cross-linked when set and that can be stretched and yet rapidly recover to their original dimensions, like vulcanized natural rubber when the applied stress is released. Chemically, there are three elastomers based on the backbone of polymer chains: polysulfide, silicone (condensation and addition), and polyether. Representative products are shown in Figure 8-2. In this chapter, they are called elastomeric impression materials.
Polysulfide
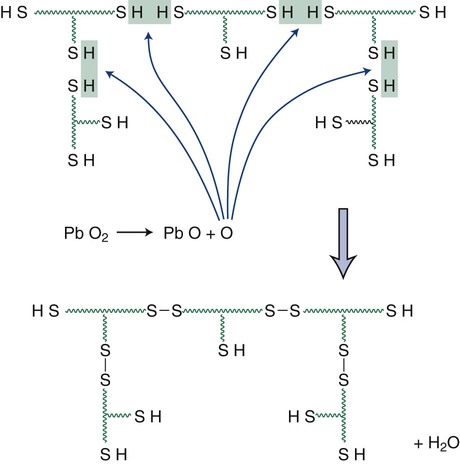
The reaction starts at the beginning of mixing and reaches its maximum rate soon after spatulation is complete (Figure 8-3). At this stage, a resilient network has started to form. During the final set, a material of adequate elasticity and strength is formed that can be removed past undercuts quite readily. Moisture and temperature have a significant effect on the course of the reaction. In particular, hot and humid conditions will accelerate the setting of polysulfide impression material. The reaction yields water as a by-product. Loss of this small molecule from the set material has a significant effect on the dimensional stability of the impression.
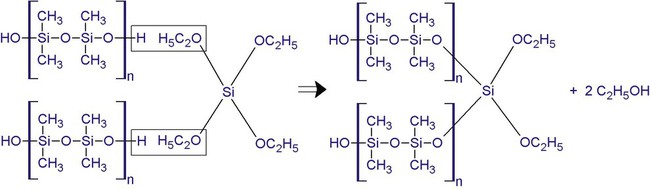
Condensation Silicone
The base paste consists of α-ω-hydroxyl-terminated polydimethyl siloxane (Figure 8-4). The curing of this material involves a reaction of tri- and tetra-functional alkyl silicates in the presence of stannous octoate as a catalyst. The material sets by cross-linking between terminal groups of the silicone polymers and the alkyl silicate to form a three-dimensional network (Figure 8-4). Ethyl alcohol is a by-product of the condensation setting reaction. Its subsequent evaporation accounts for much of the contraction that takes place in the setting impression.
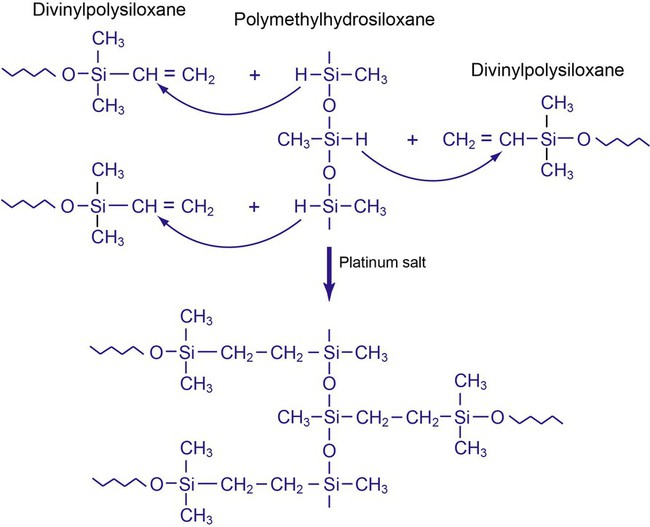
Addition Silicone
This material is often called a polyvinyl siloxane (PVS) or vinyl polysiloxane (VPS) impression material. In contrast to the condensation silicone, the addition silicone is based on addition polymerization between divinylpolysiloxane and polymethylhydrosiloxane with a platinum salt as the catalyst (Figure 8-5). The base paste contains polymethylhydrosiloxane, as well as divinylpolysiloxane. The catalyst (or accelerator) paste contains divinylpolysiloxane and a platinum salt. The platinum salt and polymethylhydrosiloxane are separated before mixing. Both pastes contain fillers.
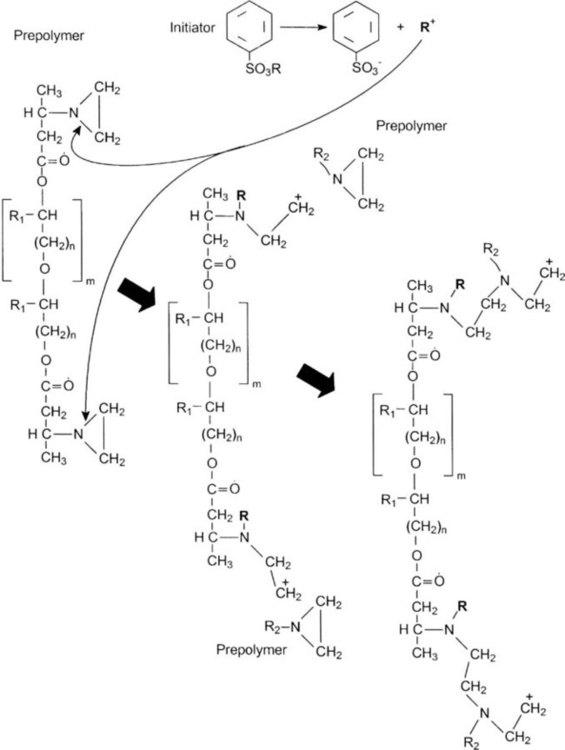
Polyether
There are two types of polyether impression materials. The first is based on the ring-opening polymerization of aziridine rings, which are at the end of branched polyether molecules (Figure 8-6, left). The main chain is probably a copolymer of ethylene oxide and tetrahydrofuran. Cross-linking and setting are promoted by an initiator and an aromatic sulfonate ester (Figure 8-6, top), where R is an alkyl group. This produces cross-linking by cationic polymerization via the imine end groups (Figure 8-6). The material is supplied as two pastes. The base paste contains the polyether polymer, colloidal silica as filler, and a plasticizer such as glycol ether or phthalate. The accelerator paste contains an alkyl-aromatic sulfonate in addition to the filler and plasticizer. The ether-dominated polymer backbones make this group of materials the most hydrophilic of all elastomeric impression materials.
 NR
NR CH2
CH2 C+H2), which can react with the nitrogen atoms of adjacent unreacted prepolymers, shown as the R2-aziridine ring. This chain-propagation polymerization reaction yields a larger molecule (right), which continues growing by binding with aziridine rings of additional unreacted prepolymers. The polymerization reaction terminates when the growing chain combines with a counterion.
 Critical Question
Making Impresssions with Elastomeric Materials
Impression Trays
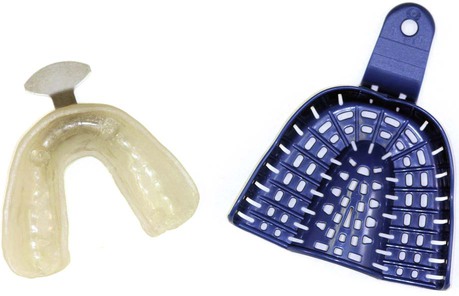
The use of a custom tray (Figure 8-7, A) is recommended to reduce the quantity of material required to make impressions; thus, any dimensional changes attributed to the materials are minimized. A custom tray allows a uniform distribution of impression material between the tray and the object, which also improves accuracy. This is especially true for polysulfide impression material. The use of custom trays for polyether and addition silicone impressions is not critical, since these materials are stiffer and have less polymerization shrinkage than the polysulfide material. In addition, disposable stock trays (Figure 8-7, B) work satisfactorily. Note that the use of less material in a custom tray reduces the compressibility of the impression, which can make removal of the impression tray more difficult. When severe undercuts are present, the use of a custom tray should be avoided. The stock tray should be rigid, thereby minimizing flexure of the tray during impression making. Disposable stock trays are also used to support the putty when the putty-wash technique is used for making impressions. Prior to making an impression, a uniform thickness of tray adhesive is applied on the tray surface, extending over its edge, and it is allowed to dry (through evaporation of solvent). A slightly roughened surface on the tray will increase adhesion. Tray adhesives are not interchangeable among different types of materials.
 Critical Question
Manipulation of Impression Materials
Currently, elastomeric impression materials are supplied for three modes of mixing: hand mixing, static mixing, and dynamic mechanical mixing (Figure 8-8).
Hand Mixing
The user should dispense the same lengths of materials onto a mixing pad or glass slab (Figure 8-8, A). The catalyst paste is first collected on a stainless steel spatula and then spread over the base paste. The mixture is then spread over the mixing pad. The mass is then scraped up with the spatula blade and spread uniformly back and forth on the mixing pad. This process is continued until the mixed paste is uniform in color, with no streaks of the base or catalyst appearing in the mixture. If one of the components is in liquid form, such as the catalyst for condensation silicones, a length of the base is dispensed from the tube onto a graduated mixing pad and drops of the liquid catalyst corresponding to the length of the base are added. These materials are somewhat difficult to mix because of the difference in the viscosity of the two components.
Static Mixing
This technique transforms two fluid (or paste-like) materials into a homogeneous mixture without mechanical mixing. The device used to accomplish this mixing is a gun for compressing materials in a two-cylinder cartridge, which contains the base and catalyst separately, as well as a mixing tip (Figure 8-8, B). The mixing tip is made of helical mixer elements in a cylindrical housing (Figure 8-9). The mixer elements are a series of alternating right- and left-turn 180° helixes positioned so that the leading edge of one element is perpendicular to the trailing edge of the next (Figure 8-9, B). The length of each element is about the same as the inner diameter of the cylindrical housing.
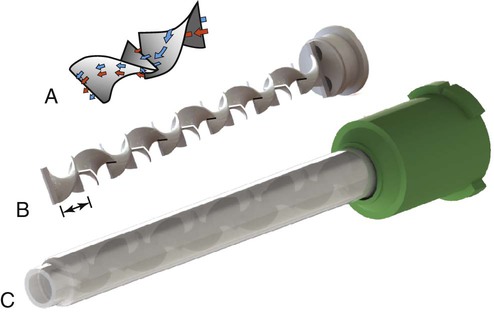
The base and catalyst are pressed from the cartridge into the mixing tip as one stream of a two-layer material. The leading edge of the first element splits the material entering the mixer into two streams. The streams that flow in either side of the helix will make a 180° turn (Figure 8-9, A) when they reach the second element. Both streams are split by the leading edge of the second element, and two substreams (one from each original stream) combine into two new streams entering the second element. This process is known as flow division. Assuming that there is no intermixing between the two substreams as they merge, the new stream will have a two-layer structure. After flowing through “n” elements, the number of layers in the stream of material increases to 2n. The most common mixing tips for impression material mixing have 11 or 12 elements. The stream of material that exits the mixing tip will have a 2048- or 4096-striation structure, which can be treated as a uniformly mixed stream of material. In addition, as the materials make turns along the helix, the rotational circulation causes a radial mixing of the materials. Thus, mixing between substreams occurs before the next flow division that further increases the uniformity of the mixture. Since there is no mechanical mixing, porosity caused by mixing with air is avoided. The mixing tips vary in their diameter, length (number of helical mixer elements), and the size of openings for a specific consistency.
The mixed impression material is injected directly into the adhesive-coated tray or, if the “syringe tip” is in place, onto the prepared teeth. Static mixing provides greater uniformity in proportioning and mixing, yields fewer voids in the mix, and reduces the mixing time. In addition, there are fewer possibilities for contamination of the material. One precaution that should be taken in using these automixing devices is to make sure that the openings of the tubes that dispense the pastes remain unclogged. Problems can be avoided if one expresses a small amount of material from the cartridge before attaching the mixing tip. This type of device has also been adapted to mix and dispense temporary crown and bridge acrylic materials and cements that are used for luting and for producing restorations (Chapter 14).
Dynamic Mechanical Mixing
The device shown in Figure 8-8, C, uses a motor to drive parallel plungers, forcing the materials into a mixing tip and out into an impression tray or syringe; meanwhile, the motor-driven impeller, which is inside the mixing tip, mixes the materials as they are extruded through the tip. The function of the impeller is only to mix the materials as they are passing through; it does not propel the material. The materials are supplied in collapsible plastic bags housed in a cartridge. The amount of material retained in the mixing tip is slightly greater than that used in static mixing. In using this device, thorough mixing of higher-viscosity materials can be achieved with little effort. Both polyether and addition silicone impression materials of various viscosities are available with this dispensing system.
 Critical Question
Making an Impression
Multiple-Mix Technique
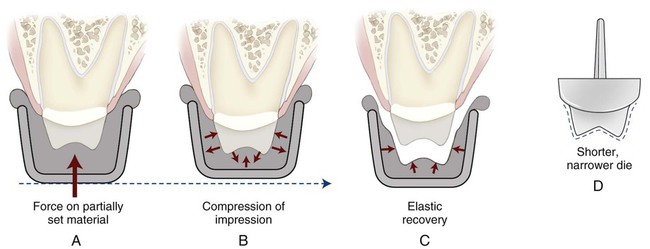
A syringe material (light body) and a tray material (heavy body) are used in this technique. Usually, the two groups of materials are mixed simultaneously, each by a different person. With the mechanical devices described earlier, the materials now can be mixed as needed by one individual. The lighter material is injected from the filled syringe or directly from a static mixing gun within and around the tooth preparation. The filled tray is then inserted in the mouth and seated over the syringe material, which has been extruded on hard and/or soft tissue. The tray material will force the syringe material to adapt to the prepared tissues. The two materials should bond together upon setting. If either material has progressed past its working time when the two materials are brought together, the bond between them will be compromised. If a partially set material is seated, it will be compressed elastically. Once removed from the mouth, the impression will “spring back” or relax, and the dies from this impression will be too narrow and too short, as illustrated in Figure 8-10.
Monophase Technique
Medium-body polyether and addition silicone are often used for the monophase or single-viscosity technique. The procedure is similar to that of the multiple-mix technique except that only one mixture is made, and part of the material is placed in the tray, and another portion is placed in the syringe for injection in the cavity preparation, prepared teeth, or soft tissue. The success of this technique depends on the pseudoplastic (shear thinning) properties of the materials. When a medium-viscosity material is forced through the syringe tip, the viscosity is reduced to allow the material to adapt well to the preparation. Meanwhile, the material in the tray retains its medium viscosity, and, when seated, it can force the syringe material to flow past critical areas of the tooth preparation. Table 8-2 shows the effect of shear rate and elapsed time on some monophase addition silicones.
TABLE 8-2
Viscosity (×104 cp) of Single-Phase Vinyl Polysiloxanes at 37 °C
| VISCOSITY AT 1 min | VISCOSITY AT 1.5 min | |||
| Material | 0.5 rpm | 2.5 rpm | 0.5 rpm | 2.5 rpm |
| Baysilex (Miles) | 122.1 (2.8)* | 68.9 (2.5) | 211.2 (14.7) | 148.8 (1.2) |
| Green-Mouse (Parkell) | 133.7 (8.9) | 56.7 (2.9) | 247.9 (14.9) | 78.0 (2.8) |
| Hydrosil (Caulk) | 194.2 (8.5) | 129.4 (4.1) | 398.1 (7.8) | 153.5† |
| Imprint (3M) | 106.5 (12.2) | 79.7 (2.2) | 245.1 (8.9) | 146.2 (5.9) |
| Omnisil (Coe) | 156.8 (11.5) | 102.5 (1.9) | 347.1 (5.2) | 153.5‡ |
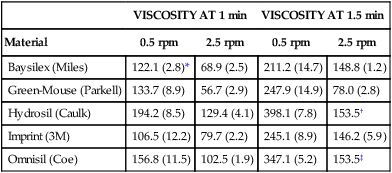
*Numbers within parentheses represent the standard deviation of the mean.
From Kim K-N, Craig RG, Koran A: Viscosity of monophase addition silicones as a function of shear rate. J Prosthet Dent 67:794, 1992.
 Critical Question
Putty-Wash Technique
When the latter technique is used, distortion or incomplete details can result because of excessive pressure applied to the setting putty. After being removed from the mouth, the pressure in the impression is released and the putty recovers its “elastic deformation.” The distortion produced by the stiff, compressible putty results in a short, narrow die (Figure 8-10). In addition to excessive pressure, some of the distortion in putty-wash impressions may be attributable to inadequate space for the wash material.
Properties of Elastomeric Impression Materials
 Critical Question
Working and Setting Times
Table 8-3 lists working and setting times for the various kinds of elastomeric materials as measured by an oscillating rheometer. The working time, which begins at the start of mixing and ends just before the elastic properties have developed, must be greater than the time required for mixing, filling the syringe and/or tray, injecting the material on tooth preparations, and seating the tray. The setting time is the time that has elapsed from the beginning of mixing until the curing process has advanced sufficiently that the impression can be removed from the mouth with no distortion. Remember, however, that polymerization may continue for a considerable time after setting. An increase in temperature accelerates the rate of polymerization of all elastomeric impression materials; therefore, the effect of temperature on working and setting time should be taken into consideration.
TABLE 8-3
Working and Setting Times of Elastomeric Impression Materials
| MEAN WORKING TIME (min) | MEAN SETTING TIME (min) | |||
| Impression Material | 23 °C | 37 °C | 23 °C | 37 °C |
| Polysulfide | 6.0 | 4.3 | 16.0 | 12.5 |
| Condensation silicone | 3.3 | 2.5 | 11.0 | 8.9 |
| Addition silicone | 3.1 | 1.8 | 8.9 | 5.9 |
| Polyether | 3.3 | 2.3 | 9.0 | 8.3 |
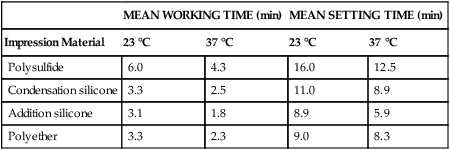
From Harcourt JK: A review of modern impression materials. Aust Dent J 23:178, 1978.
 Critical Question
Rheological Properties
Ideally, the impression material should flow freely and wet the tissue as it is being injected to achieve adaptation, and then resist flow away from the intended surface areas. The same procedure will facilitate spreading of heavy-body material on the impression tray and retain it in the tray. This phenomenon is called shear thinning (Chapter 3). Essentially, a stress-thinning material becomes less viscous when stressed as during injection and then recovers its viscosity when it rests on the tissue or or in the tray. All elastomeric impression materials exhibit shear-thinning characteristics before setting.
Stay updated, free dental videos. Join our Telegram channel
VIDEdental - Online dental courses


