Chapter 8
Extraction of Teeth and Roots
- Examination and assessment
- Extraction of teeth
- Luxators
- Elevators
- Extraction procedure
- Extractions in children under outpatient general anaesthesia
- Fracture of the tooth
- The transalveolar approach
- Removal of roots after the socket has healed
- Arrest of haemorrhage
- Post-extraction instructions
Indications for extraction:
- Caries
- Periodontal disease
- Trauma
- Orthodontics
- Involvement in pathology
- infection
- cysts
- tumours.
Tooth extraction is considered to be a straightforward procedure and in a large proportion of cases this is true; however, problems can be encountered that call for a high level of skill in order for the extraction to be carried out successfully and for healing to proceed uneventfully. Many of these potential problems can be anticipated through careful assessment.
Examination and Assessment
After the initial history in which the justification for extraction is established, a full medical history is necessary before proceeding. Problems such as prolonged bleeding and patients whose jaws have undergone irradiation will require careful management. Other medical conditions that need special preparation, such as patients taking bisphosphonates and those with cardiac pathologies and any disease process affecting long-term healing, such as diabetes, are discussed in Chapter 3. Any previous difficulty with extractions, including postoperative bleeding or infection, is noted and if serious in extent investigated further.
Clinical Examination
The patient’s sex, age, general build and bone structure are significant. Heavily built men, have teeth difficult to extract, while in old age roots are brittle and the bone sclerosed, the so-called ‘glass in concrete syndrome’. Access may be difficult in children who have small mouths and in patients with facial scars or trismus.
The tooth to be extracted is examined. Teeth malpositioned palatally or lingually, rotated, or inclined, or single standing teeth in occlusion, are all potentially difficult. Certain teeth frequently have abnormal root formation, particularly the upper and lower third molars. Heavily filled, root treated and dead teeth or those suffering from long-standing periodontal disease tend to become brittle. Periodontal disease predisposes to postoperative bleeding and infection. In acute ulcerative gingivitis or where the gingival condition suggests a blood dyscrasia, extractions may have to be delayed until these have been treated.
Radiographic Examination
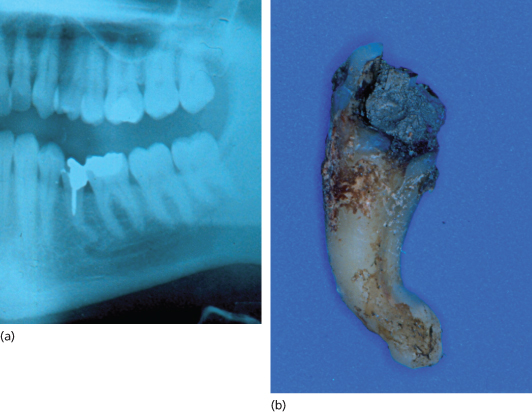
The nature of the root form and bone structure can only be determined from radiographs, and ideally these should always be taken before extraction. Radiographs are mandatory when the history or examination suggests the extractions will be difficult – this applies particularly to all lower third molars, partly erupted teeth and those that are malpositioned. Intraoral periapical views should show the whole of the crown, root and alveolus. Radiographs should demonstrate the relationship of the roots to such important structures as the maxillary sinus and the inferior dental canal (Figure 8.1). An orthopantomogram (OPG) can be a very useful scan view of the dentition but can lack some accuracy in certain areas of the mouth. Radiographs must be examined carefully as certain features, such as extra roots on molar teeth, are easily missed.
Figure 8.1 (a) Sectional orthopantomogram showing unusual curvature of lower left premolar (35); (b)the tooth was extracted by a junior student using a careful standard technique and shows that the radiographic appearance was accurate.
Assessment
All the findings on examination and radiography are considered, particularly the number, size, shape and position of roots and any signs of hypercementosis or resorption. The condition of the supporting bone, especially evidence of sclerosis, resorption or of secondary conditions such as apical granulomas and cysts, is noted. Where any of these complications occur the treatment plan should be modified to manage them.
Extraction of Teeth
- Knowledge of tooth morphology
- Application of force related to tooth morphology
- Use of forceps
- Use of elevators to assist and facilitate
- Position of patient vital to success.
Tooth Morphology
For the surgeon to extract teeth successfully it is important to understand the morphology of the roots of the tooth that is to be extracted. Only then can force be applied appropriately to remove the tooth (see Figure 8.4).
Upper Incisors and Canines
Upper incisors and canines have single, conical roots and are therefore rotated with a purposeful action, the forceps turning through as wide an arc as possible without damaging adjacent teeth. The upper canine, because its root is slightly flattened mesiodistally, can be extracted by an outward buccal movement if it is resistant to rotation.
Upper Premolars
Upper premolars have either one strong root markedly flattened mediodistally or two fine conical roots placed buccally and palatally. They are extracted by a limited buccopalatal movement coupled with some limited rotation to avoid breaking the apices.
Upper First and Second Molars
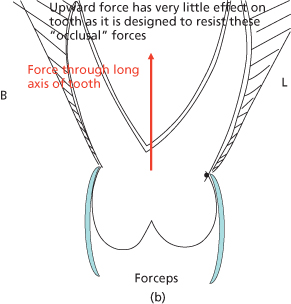
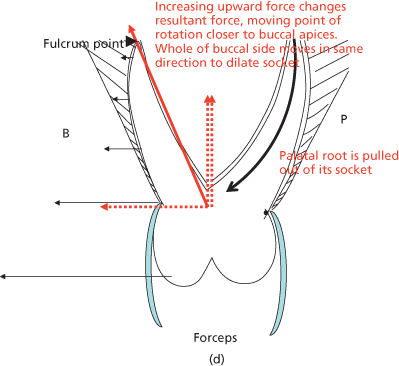
Upper first and second molars both have three roots which are usually somewhat flattened. The palatal diverges strongly from the two buccal roots. They are taken buccally with a long, steady movement while the upward pressure is maintained. Palatal movement is contraindicated as it may cause the palatal root to fracture.
Upper Third Molars
The morphology of upper third molar roots varies widely; some are fused, others have three or more fine roots. They may be extracted in the same way as the other upper molars, but access can make them more difficult and the use of elevators obligatory.
Lower Incisors and Canines
The roots of lower incisors and canines are flattened mesiodistally and as the buccal plate of bone is very weak they are extracted with an outward buccal movement.
Lower Premolars
Lower premolars and canines have conical roots and are therefore rotated.
Lower First and Second Molars
The roots of lower first and second molars are flattened mesiodistally. They should be extracted by a buccal movement while the downward pressure is maintained.
Lower Third Molars
A wide variation occurs in the root form of lower third molars and in their position in the mandible as they are often misplaced or inclined. Radiographs should always be taken before extraction, which may require an open or transalveolar approach.
Deciduous Teeth
The upper and lower incisors and canines are extracted with the same movements used for their permanent successors. The molar teeth, however, have divergent roots that enclose the follicle of the developing premolar teeth and it is possible to remove or damage the latter when extracting a deciduous molar. Great care must be taken in using the forceps, which should not be driven too far up the periodontal membrane. They are applied to the tooth root, avoiding the bifurcation under which the permanent tooth germ nestles.
Where, owing to caries or a fracture of the tooth during surgery, a deciduous molar root is retained which cannot be grasped with the forceps, it may be extracted by applying a right-angled Warwick James elevator to the mesial aspect of mesial roots or distal aspect of distal roots to elevate them gently along their natural curvature. Should there be a risk of damaging the underlying permanent tooth, then the retained root is best left and the patient’s parent told the reason.
Forceps
(See Figure 8.2)
Figure 8.2 Extraction forceps. (a) Left to right: Upper straights, upper premolars, upper molars, bayonets; (b) side view of the same forceps to show increasing curvature to allow access to teeth further back in the mouth; (c) lower roots, lower premolars, lower molars, cowhorns. Note that only the beak design changes.

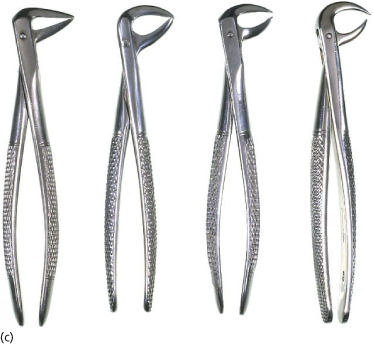
Forceps are designed to apply appropriate forces to the teeth. They have two blades with sharp edges to cut the periodontal fibres. The blades are wedge-shaped to dilate the socket and are hollowed on their inner surface to fit the roots. They are made to various designs, and a range should be available so that a pair that is designed to fit snugly round the roots and have even contact with the cementum over a wide area may be selected. One- or two-point contact is bad and prevents the tooth being gripped firmly. They should engage only the roots and never the crowns of the teeth.
The blades are hinged, which allows them to close and grasp the root. The handles act as a lever, which gives the operator a mechanical advantage. The farther from the blades the surgeon grasps the handles the less effort they will have to make to apply force to the tooth. In order to drive the forceps blade straight up the long axis of the tooth, the shape of the handle is varied. Lower forceps have handles at right angles to the blades, upper forceps are straight for anterior teeth and cranked for the posteriors. For the upper third molars the beaks as well as the handles are bent.
Grip of Forceps
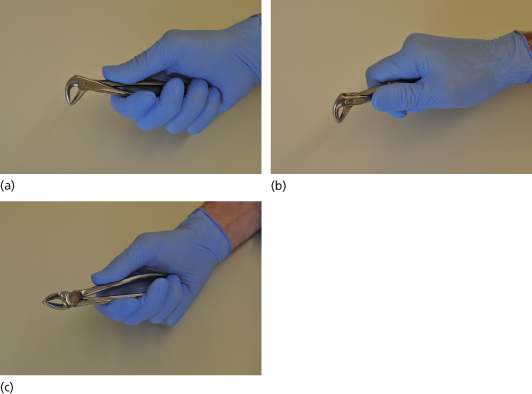
The ergonomic use of force in tooth extraction relies on a good grip of the forceps. The hand positions shown in Figure 8.3 are guides and the operator must find a grip that allows free movement of the joints of the hand, arm and shoulder while maintaining the maximum amount of feedback from the forceps themselves. The forceps are perhaps to be considered as ‘steel fingers’ and the sensory feedback from the finger and thumb gripping the forceps is crucial in developing a progressive and sensitive technique.
Figure 8.3 Holding the forceps. Note grip and position of finger and thumb opposed across handles to give maximum feedback during the extraction. (a) Method of holding lower forceps with thumb on top allows more directed pressure through long axis of tooth; (b) with thumb on side of handles it is easier to perform rotatory movements on operator’s contralateral side, i.e. on teeth in lower left quadrant for right-handed operators. (c) Method of holding upper forceps. Palm is turned upwards to give most ergonomic and safe method of applying force buccally.
Extraction of Teeth with Forceps
(See Figure 8.4)
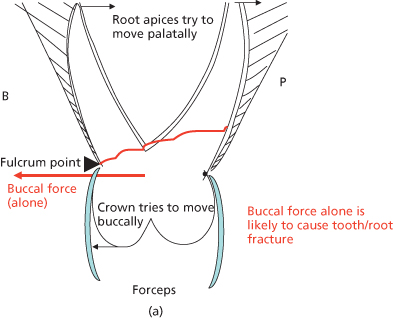
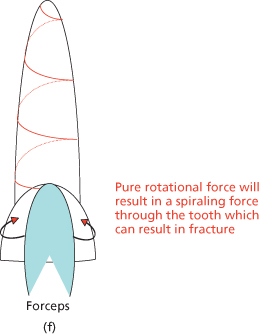
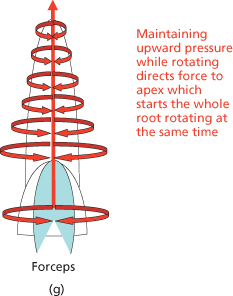
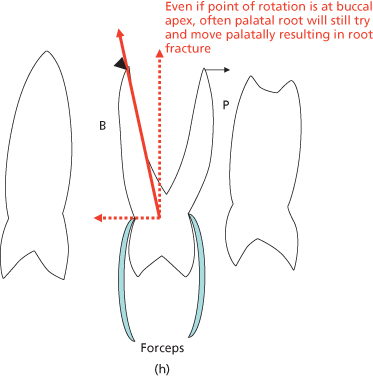
Figure 8.4 Movements in the extraction of teeth: (a) buccal movement; (b) force through long axis; (c) combined equal forces; (d) increased upward force; (e) lower molar; (f) teeth with round roots, rotational force by itself; (g) combined forces in round-rooted teeth; (h) upper premolars have unpredictable root pattern. Two-rooted variants can be extremely difficult to remove without fracture. A progressive steady technique must be applied using a constant upward force coupled with small rotatory or buccal forces.


The extraction of teeth is a surgical operation based primarily on an anatomical appreciation of their attachment in the jaws. First, the soft tissues of the gingival attachment and periodontal membrane are cut to separate the tooth from bone. Next, the socket is dilated either by applying a force to the bone with instruments, such as luxators (Figure 8.7) or Coupland elevators (Figure 8.7), with wedge-shaped blades that are driven along the periodontal membrane, or by applying force to the root, which then expands its bony socket. Finally when the tooth is loose it may be drawn out of the alveolus. When completed with forceps, extractions are performed in two movements.
First Movement
This is the same for all the teeth of both jaws. The forceps are applied on the buccal and the palatal or lingual aspect of the tooth, regardless of whether it is normally or abnormally positioned in the arch. For multirooted teeth the blades may engage on a root, or the bifurcation depending on the design. The blades are passed carefully under the gingival margin of the tooth avoiding damage to the soft tissues, and driven up or down the roots (according to the jaw concerned) in the same plane as the long axis of the tooth to penetrate as far as possible. This can only be done successfully if the forceps blades are held sufficiently apart that initially they do not grip the tooth root.
Considerable force is used, particularly in the upper jaw. In the lower jaw this must be limited to that which the operator can counteract by supporting the mandible with his free hand. While driving up the root in this way the blades should be in contact with the root surface but not gripping it. This movement cuts the gingival attachment and periodontal membrane and also uses the wedge-shaped blades to dilate the socket. Conical roots may sometimes be extracted by this movement alone.
Second Movement
The first movement completed, th/>
Stay updated, free dental videos. Join our Telegram channel
VIDEdental - Online dental courses


