CHAPTER 7
Harvesting Bone from the Tibia
The tibia offers the surgeon access to a large quantity of quality autogenous bone that can be harvested either in the office setting under local anesthesia and intravenous sedation or in the operating room under general anesthesia.1 Licensure varies by state and country regarding the degree and/or specialty required to perform this procedure. It is imperative for the clinician to research and confirm that he or she is permitted to perform the procedure in his or her locale prior to undertaking it without supervision.
A tibial bone harvest is generally an excellent graft choice when approximately 20 to 40 cm3 of cancellous particulate bone is needed.2 Bone obtained from a donor site such as the tibial plateau contains osteocompetent cells, an island of mineralized cancellous bone, fibrin from blood clotting, and platelets from within the clot. Within hours of graft placement, the clot’s platelets degranulate, releasing platelet-derived growth factor (PDGF), transforming growth factors-beta1 and -beta2 (TGF-β1 and TGF-β2), and other growth factors to initiate the process of bone regeneration.3 However, knowledge of the patient’s history is always essential for determining which donor site to use in each case .4, 5 Other important considerations regarding the donor site include understanding aging and metabolic disease states6 and using caution regarding tibial harvesting in children.7, 8
Advantages and Contraindications
The proximal lateral tibial graft harvest has a number of advantages over other donor sites and techniques:
- From 20 to 40 cm3 of noncompressed cancellous bone can be harvested from the marrow space.
- The procedure is straightforward and can be performed using in-office conscious sedation or general anesthesia.
- The total procedure time averages only 20 to 40 minutes.
- Blood loss is minimal, and drainage is not required.
- Patients report minimal postoperative pain and dysfunction.
- The procedure allows immediate postoperative weight bearing.
- Studies show relatively fewer complications and less morbidity is found than with other techniques, such as the iliac crest graft.9, 10 The incidence of complications for tibial grafts ranges from 1.3% to 3.8%, which compares favorably with the 8.6% to 9.2% incidence of complications for iliac crest harvesting.11
- Studies reveal that postoperative bruising is minimal, healing is generally uneventful, and postoperative scarring is unremarkable.
Contraindications for the procedure include:
- The need for block bone (This procedure provides only cancellous marrow [particulate] bone.)
- Patients 18 years of age or younger
- Patients with a history of knee injury or knee surgery
- Patients with advanced rheumatoid or degenerative arthritis
- Patients with metabolic bone disease
Anatomy
The tibia is the larger of the two lower leg bones in the tibia-fibula complex and the main structural support of this portion of the leg. Whether a medial or a lateral approach is used to obtain bone graft material, it is important for the clinician to note preoperatively the key anatomic landmarks associated with the tibia.12, 13
The tibial condyles should be palpated immediately below the knee and marked. On the anterior surface of the proximal end of the tibia between the condyles is an oval protuberance called the tibial tuberosity or Gerdy tubercle; this should be located, palpated, and marked. The Gerdy tubercle is a ridge on the lateral anterior aspect of the tibia, approximately 1.5 to 2.0 cm below the articulating surface. The iliotibial tract attaches to the top portion of the Gerdy tubercle, and the tendon of the tensor fascia lata muscle attaches to the bottom of the tubercle (Fig 7-1). The iliotibial tract is the tensor fascia lata and the tensor fascia lata muscle, which originates from the external tip of the anterior ilium, crosses the hip joint and the knee joint at the lateral band of the leg, and enters the Gerdy tubercle. Inferior to the ridge of the Gerdy tubercle is the anterior tibialis muscle. This ridge is located on the lateral side of the tibia, two-thirds of the way between the head of the fibula and the midline of the tibial shaft, both of which are readily palpable.
Properly locating the Gerdy tubercle prior to making the incision is essential to avoid violating the articular surface of the tibial plateau and damaging the articulation of the knee (Fig 7-2). Maintaining this anatomic position also prevents involvement of the head of the fibula, which is subcutaneous at this level and should be located, palpated, and marked, as should the patella, the iliotibial tract, and the anterior tibialis muscle.
The small blood vessels in the immediate vicinity of the lateral proximal tibia include:
- Branches of the medial superior and inferior genicular arteries, which pass under the cover of the patellar ligament
Fig 7-1 It is important for the clinician to note the key anatomic landmarks associated with the tibia prior to tibial harvesting.
(a) Anterior and lateral view of the tibia. The red circle indicates the access area for bone harvesting at the Gerdy tubercle.
(b) Tibiofemoral and tibiofibular joints in a cadaver specimen. The head of the fibula, the Gerdy tubercle (the protuberance just below the tibial condyle), and the tibial condyle vary in protuberance and should be clearly identified by palpation before the procedure begins.
(c) Anterior radiographic view of the area showing the exact location of the Gerdy tubercle and the volume of the medullary space within the head of the tibia.
(d) Muscles and attachments in the area of bone harvest.
(e) Vascular network in the area of bone harvest.
(f) Muscles and attachments, vascular network, harvest site, and angulation. Harvesting at this site and angulation can prevent damage to the vascular network and muscles.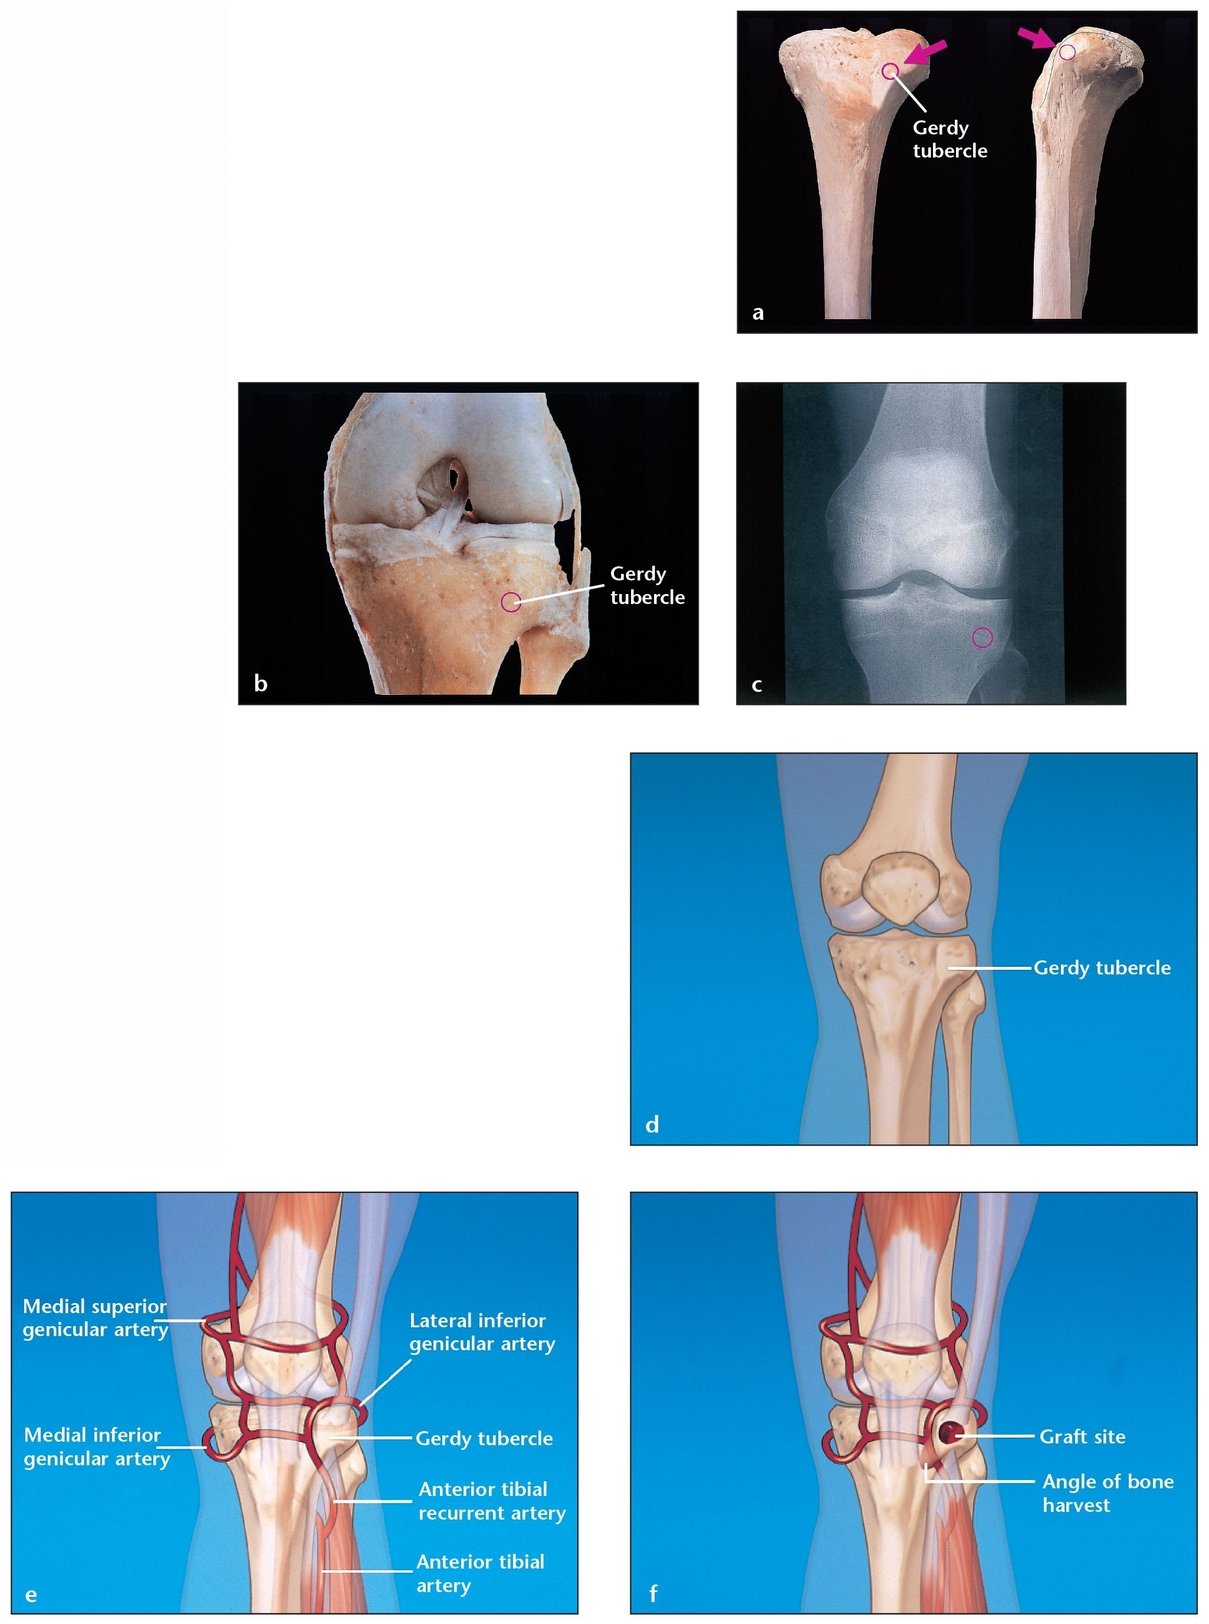
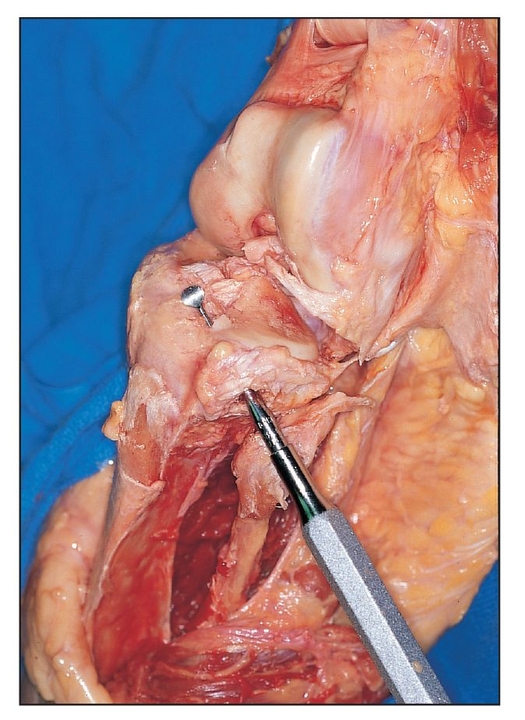
The Gerdy tubercle owes its protuberance to the “pull” of the muscles attached to it. The instrument used for harvesting bone from the site should always be directed medially and downward. In this figure, an opening is made over the Gerdy tubercle of a dissected cadaver tibia. The curette has been intentionally directed upward to illustrate how far off-angle the surgeon would have to be in order to enter the articulation of the knee. The surgeon should also keep in mind that extreme force must be exerted to perforate the flat articular surface of the tibia.
- Branches of the lateral inferior genicular, fibular, and anterior recurrent tibial arteries
- Branches of the anterior tibial arteries
Bleeding from these vessels is minimal and easily controlled with the use of electrocautery. The two vessels most at risk in the immediate surgical area are the anterior tibial recurrent and lateral inferior genicular arteries. Appropriate placement of the incision is essential to avoid injury to these vessels.
The primary muscle in this surgical area is the anterior tibialis, located on the lateral surface of the tibia. Its fibers course vertically, overlapping the anterior tibial vessels and the deep peroneal nerve in the proximal tibial region. This nerve rises from the bifurcation of the common peroneal nerve between the fibula and the peroneus longus muscle and continues deep to the extensor digitorum longus muscle and on to the anterior surface of the interosseous membrane. Injury to this nerve is easily avoided by the proper placement of the initial incision.
Stay updated, free dental videos. Join our Telegram channel
VIDEdental - Online dental courses


