7
Basic orthognathic surgical procedures
- Have an understanding of the indications and applications of the various orthognathic surgical procedures.
- Have an awareness of the basic orthognathic surgical techniques.
- Have an awareness of the potential surgical complications.
- Have an understanding of the general medical consideration during and following orthognathic surgery.
7.1 Introduction
This chapter illustrates basic surgical techniques for the correction of dento-facial deformities, it also highlights the main indications and potential complications of each procedure.
7.2 Le Fort I osteotomy
This procedure is used routinely for the correction of maxillary positions and discrepancies in jaw size.
7.2.1 Indications
7.2.2 Surgical technique
Preparation
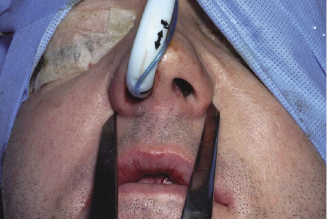
Under general anaesthesia an external midline reference point is usually established at the nasion point using either a Kirschner wire or a mono-cortical screw. This is used as a reference point for measuring the vertical height, before mobilising the maxilla, in relation to the upper incisal edge or the central point between the orthodontic brackets on both the right and left maxillary central incisors (Figure 7.1a). The distance between the medial canthus and the tip of the canine can also be used to record the vertical height before surgery. The distances between internal points marked on the maxilla above the level of the Le Fort I osteotomy cut can provide reference for vertical height changes and horizontal shifts. The right and left bases of the nose (alar bases) are marked through the skin using the sharp end of a needle to measure the width of the nose before surgery (Figure 7.1b).
Figure 7.1a Recording the anterior facial height before surgery.
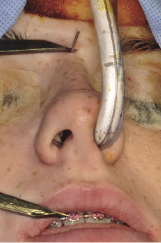
Figure 7.1b Recoding the alar base width before surgery.
Soft tissue reflection
A U-shape incision is made across the mucosa and deep to the periosteum of the buccal sulcus from the distal aspect of the first molar around to the opposite side (Figure 7.2a). A full mucoperiosteal flap is raised to expose the maxilla from the pyriform aperture anteriorly to the pterygo-maxillary suture posteriorly (Figure 7.2b). The infra orbital nerves are identified and protected. The nasal muco-periosteum is reflected from the floor of the nose starting at the lateral margin of the pyriform aperture and extended medially up the nasal septum with a Howarth periosteal elevator. Internal reference points above the molar region can be applied to measure the posterior facial height which guides the vertical changes of the posterior part of the maxilla (Figure 7.2c). Marking the level of bone cut on the maxilla maintains the vertical symmetry of the osteotomy and prevents canting of the occlusion (Figure 7.2d).
Figure 7.2a A U-shape muscosal incision on the labial sulcus across the mucosa and deep to the periosteum.
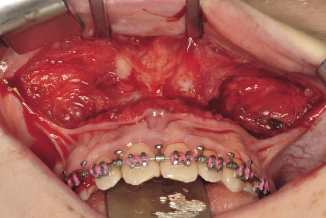
Figure 7.2b A full mucoperiosteal flap is from the pyriform aperture anteriorly to the pterygo-maxillary suture posteriorly.
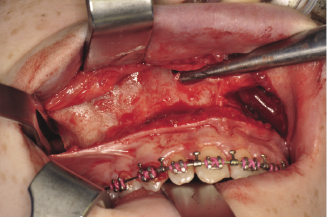
Figure 7.2c Reflection of the nasal mucosa using Hawath’s periosteal elevator and recording the posterior height of the maxilla.
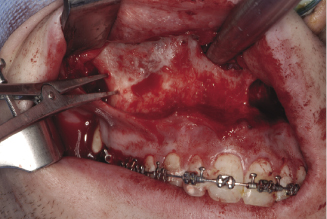
Figure 7.2d Marking the lateral surface of the maxilla to guide the level of bone cut and avoid occlusal canting.
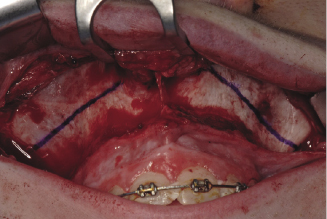
Bone cut
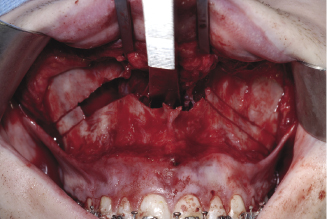
The outer surface of the maxilla is marked using a marking pen (Figure 7.2d) before it is cut using a surgical bur or a saw from the buttress part of the zygoma upward and forward to the lateral corner of the pyriform aperture about 8 mm above the apices of the roots (Figures 7.3a, 7.3b). A curved saw is used to complete the cut backwards and downwards to the pterygo maxillary suture. The lateral nasal wall is cut from the palate using a lateral nasal chisel (Figure 7.3c). The maxillary septum is separated from the palate using a nasal septal chisel (Figure 7.3d).
Figure 7.3a Bone cut using surgical saw about 8 mm above the apices of the teeth.
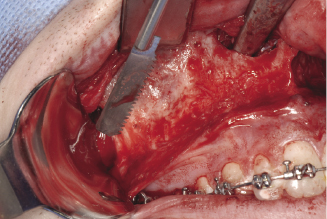
Figure 7.3b Saw from buttress part of the maxilla upward and forward to the lateral corner of the pyriform aperture.
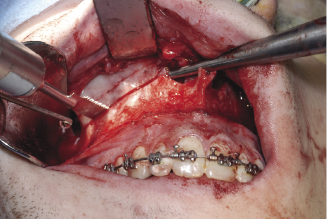
Figure 7.3c Cutting the lateral nasal wall using a lateral nasal chisel.
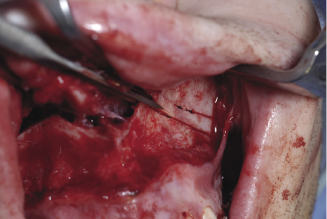
Figure 7.3d Separation of the septum from the palate using a nasal septal chisel.
Separation and mobilisation
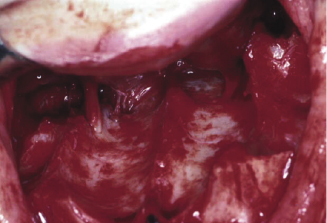
The maxillary bone is gradually separated from the base of the skull using a Smith spreader on each side (Figure 7.4a). Pterygo-maxillary disarticulation is achieved using Rowe’s disimpaction forceps (Figures 7.4b, 7.4c, 7.4d). Some surgeons advocate the use of a curved osteotome but the inappropriate application of this instrument for the separation of the maxillary tuberosity from the pterygoid plates can lead to excessive bleeding and fracture of the pterygoid plates. Once the maxilla is down-fractured a pair of Tessier mobilisers is inserted behind the tuberosities to mobilise and advance the maxilla (Figure 7.4e). This is a mandatory manoeuvre aimed at stretching the soft tissues attached to the maxilla, to minimise postoperative relapse. Damage to the greater palatine artery (Figure 7.4f) should be avoided during the manoeuvre.
Figure 7.4a Gradual separation of the maxilla from the base of skull using a Smith spreader.
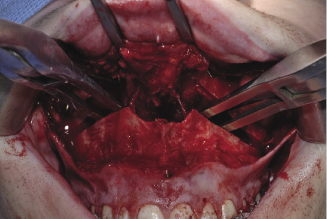
Figure 7.4b The application of Rowe’s dysimpaction forceps for pterygo-maxillary disarticulation.
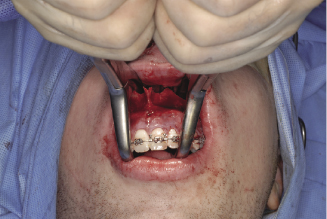
Figure 7.4c The position of the mobilisation forceps’ blades on the nasal surface of the maxilla.
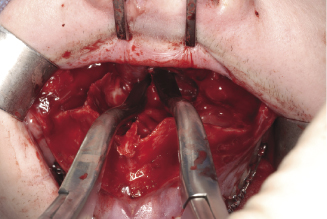
Figure 7.4d The position of the mobilisation forceps’ blades on the oral surface of the maxilla.
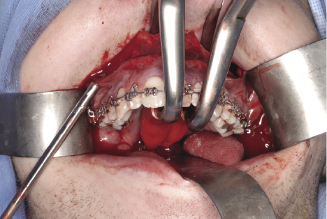
Figure 7.4e The application of Tessier mobilisers behind the tuberosities to mobilise and advance the maxilla.
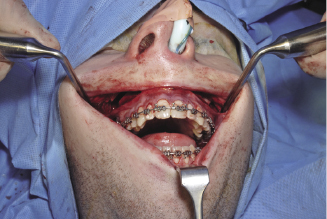
Figure 7.4f Shows the greater palatine artery at the posterior edge of the palate.
Final adjustments and fixation
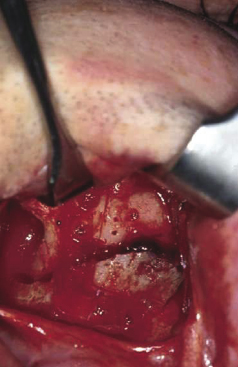
The prefabricated occlusal wafer is seated on the incisal edges and occlusal surfaces of mandibular teeth. The maxilla is then placed in the pre planned antero-posterior occlusal relationship and kept in place using temporary intermaxillary fixation. The vertical height is adjusted in relation to the external or internal reference points to achieve the pre planned vertical position of the maxilla. Bone removal is required for maxillary impaction. It is usually removed from the buttress area of the maxilla, and from the septum at the mid-palatal suture, the medial wall of the maxillary sinus (the lateral nasal wall) and the inferior border of the nasal septum itself which is readily accessible from the nasal surface of the palate (Figure 7.4f). Inferior turbinectomy may be required in cleft cases and where significant impaction is needed. In cases of maxillary down grafting, iliac bone graft may be inserted as interpositional material (Figure 7.5a). However, this will depend on the magnitude of the inferior maxillary shift, the associated advancement and quality of bone. The standard method of fixing the maxilla into its final position is by using four 1.7 mm bone plates. Two placed on each side, one at the pyriform aperture and the other in the buttress part of the maxilla (Figure 7.5b). Poly L-Lactide (PLLA) resorbable plates can also be used for fixation (Figures 7.5c, 7.5d). The stability of a large maxillary advancement can be improved with the insertion of cortico-cancellous bone blocks in the gap created between the maxilla and the base of the skull at the buttress area posteriorly, at the buccal surface of the maxilla and at the pyriform aperture. There is considerable debate in the literature regarding the indications of bone grafting, however, there is a general agreement that maxillary advancements more than 8 mm with or without vertical height augmentation would benefit from grafting.
Figure 7.5a Bone graft inserted as interpositional material.
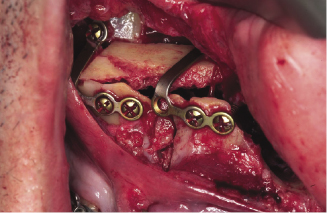
Figure 7.5b Two 1.7 mm plates placed on each side, one at the pyriform aperture and the other in the buttress part of the maxilla.
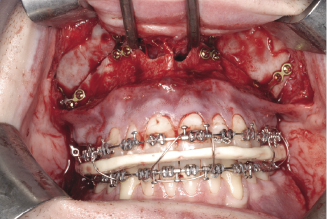
Figure 7.5c Poly L-Lactide (PLLA) resorbable plates.
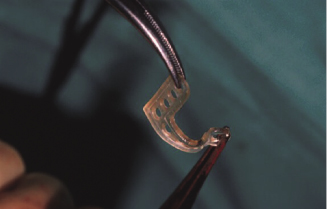
Figure 7.5d The application of PLLA plates for fixation of Le Fort I osteotomy.
Closure
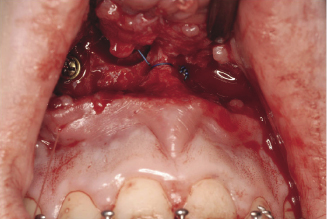
A V-Y closure may be considered where lip lengthening is required. This is achieved by suturing, in the midline, the mucosal surface of the upper lip first followed by suturing the mucoperiosteal flap bucally and labially (Figure 7.6a). A cinch stitch can then be applied to maintain or achieve the desired alar base width which tends to widen in Le Fort I osteotomy cases. This is usually carried out using a 3(0) non-resorbable suture that is passed from inside the mouth underneath the reflected mucoperiosteum to the skin of the right alar base (Figure 7.6b), then through the same penetration point of the skin to inside the mouth to anchor the alar cartilage. This is repeated with the same suture for the other alar cartilage of the opposite side and the two ends of the suture are then anchored through a hole drilled in the anterior nasal spine (Figure 7.6c). A cinch stitch can be also carried out by anchoring each alar cartilage separately to a drilled hole through the anterior nasal spine.
Figure 7.6a Suturing, in the midline, the mucosal surface of the upper lip first followed by suturing the mucoperiosteal flap bucally and labially to achieve a V-Y closure for lip lengthening.
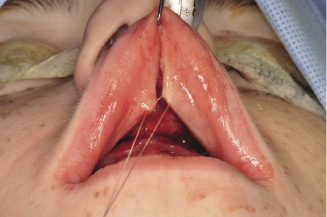
Figure 7.6b Cinch stitch passed from inside the mouth to the skin of the base of the nose to anchor the alar cartilage.
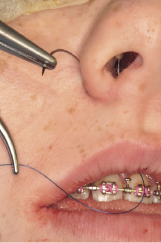
Figure 7.6c A cinch stitch carried out by anchoring alar cartilages to a drilled hole in the anterior nasal spine.
7.2.3 Le Fort I segmental osteotomies
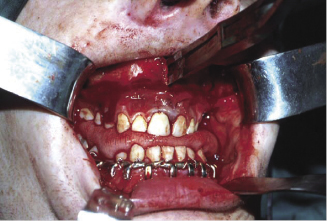
Mid-palatal split (Figures 7.7a, 7.7b)
Indications.
The main indication of this surgical procedure is the correction of a narrow maxilla and narrow dental arch. This technique deals with posterior cross bite where correction is indicated and is beyond the scope of orthodontic treatment. A maximum 8–10 mm increase in the posterior maxillary width can be achieved with mid-palatal osteotomy. It is an unstable procedure, therefore, adequate fixation and mid-palatal bone grafting are necessary to reduce postoperative relapse.
Figure 7.7a A fine fissure bur is used for the para sagittal palatal bone cut.
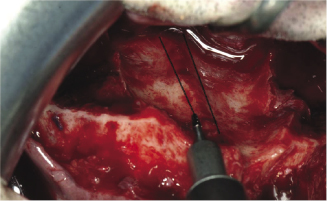
Figure 7.7b The application of Smith spreader to split the maxilla into two segments across the midline.
Technique.
Right and left para-sagittal bone cuts are made through the nasal surface of the palate with a fissure bur (Figure 7.7a). A fine fissure bur and a thin spatula osteotome are used for the remaining vertical labial bone cut between the roots of the central maxillary incisors and palate. This area is exposed by tunnelling from above the labial mucoperiosteum between the central incisors. The attached gingiva should be kept intact. Following this, the maxilla can be split into two segments using a Smith spreader (Figure 7.7b). The removed mid-palatal strip of bone can be cut into sections for grafting and wedging in the same surgical site at the mid-palatal suture following the mobilisation of the two halves of the maxilla. Mobilisation is essential, and this is usually achieved after reflection of the palatal mucoperiosteum at the para-sagittal cut from the nasal side. Maintaining the integrity of the mucoperiosteum is essential in segmental Le Fort I osteotomies and unavoidable perforations require careful suturing. Some surgeons advise additional fixation of the two maxillary segments by applying an extra plate on the labial surface of the maxilla below the pyriform aperture.
Two piece maxillary osteotomy (Figures 7.8a, 7.8b)
The main indication of this surgical procedure is the correction of an anterior open bite. This is usually achieved by impaction of the posterior part of the maxilla to allow the mandible to auto rotate and close the anterior open bite.
Figure 7.8a The horizontal cut across the palate to separate the anterior part of the maxilla from the posterior segment.
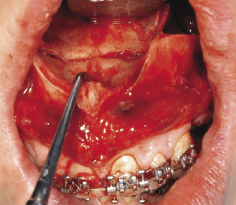
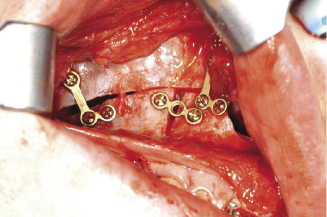
Figure 7.8b Fixation of the two-piece maxillary osteotomy using 1.7 mm titanium plates.
Surgical technique.
This can be most easily achieved once the maxilla is down fractured at the Le Fort I level. Access to the buccal surface of the maxilla in the area of the first or second premolars is achieved by incising the gingival sulcus around the premolars and tunnelling the mucoperiosteum using a periostel elevator. The bone cuts are made using a tapered fissure bur from the horizontal maxillary osteotomy line to the alveolar crest on each side of the maxilla. A thin spatula osteotome can facilitate this bone cut which should extend to involve the palatal bone whilst maintaining the integrity of palatal mucoperiosteum. The ends of the two vertical osteotomy lines are connected to the horizontal bone cut across the nasal surface of the palate (Figure 7.8a). The anterior maxillary segment can then be mobilised, repositioned in to its final position guided by the acrylic occlusal wafer and fixed in position using two plates on each side (Figure 7.8b).
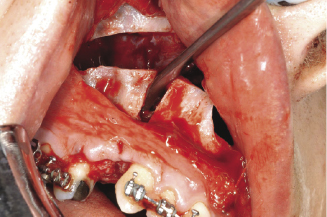
Three-piece maxillary osteotomy (Figure 7.8c)
Indication.
The main indication of this surgical procedure is the correction of a narrow posterior maxilla and allowing differential vertical movements of the anterior and posterior segments of the maxilla. The procedure should be considered for correction of anterior open bite which is associated with a narrow maxillary dental arch posteriorly.
Figure 7.8c Anterior maxillary osteotomy of the three-piece maxillary osteotomy.
Technique.
This surgical technique provides a combination of anterior maxillary osteotomy and posterior mid-palatal split. The sagittal palatal bone cut is achieved as explained above but would only extended to the horizontal palatal cut of the anterior part of the maxilla, that is, no vertical cut is made between the roots of the central incisors. The three bone segments (right posterior maxillary, left posterior maxillary and anterior maxillary segments) are adjusted into their pre-planned position, guided by the acrylic occlusal wafer, temporary inter maxillary wiring is applied and the segments are finally fixed in place with mini plates.
Four-piece maxilla (Figure 7.8d)
Indication.
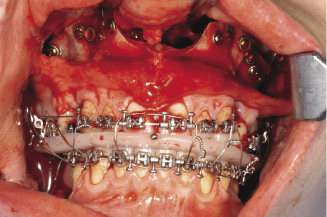
The main indication of this surgical procedure is the correction of a transverse maxillary deficiency which involves both the inter-canine and inter-molar width. It also allows differential vertical movements of the anterior and posterior segments of the maxilla. The procedure should be considered for correction of anterior open bite which is associated with a narrow maxillary dental arch at the canine and molar regions.
Figure 7.8d Four piece Le Fort I maxillary osteotomy.
Technique.
This provides a combination of the full antero-posterior mid-palatal split of the maxilla, including the vertical labial bone cut between the roots of central incisors, and the standard anterior maxillary osteotomy. The sagittal palatal bone cut is achieved as explained above. This is then connected with the horizontal palatal cut of the anterior maxillary osteotomy. This allows widening of the posterior part of maxilla medio-laterally as well as an increase in the inter-canine width. The maxilla is split into four segments (right posterior maxillary, left posterior, right anterior and left anterior) which are then adjusted into their pre-planned position, using the occlusal wafer, and fixed in place using mini plates.
7.2.4 Complications
The following are the most common complications associated with segments Le Fort I osteotomies:
7.3 Anterior maxillary osteotomies
7.3.1 Indications
The anterior segment of the maxilla can be osteotomised separately using the Wassmund or the Wunderer approach. The following are the main indications for this osteotomy:
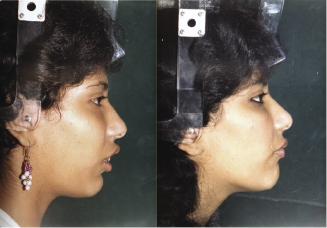
Figure 7.9 A preoperative and postoperative profile photograph shows the improvement of appearance following anterior maxillary osteotomy.
7.3.2 Surgical technique
Wassmund approach
This approach is used for the correction of discrepancies in the antero-posterior position and axial inclination of the anterior part of the maxilla whilst producing minimal change in vertical height.
A curved or inverted L incision is performed above the apex of the first premolar. A buccal mucoperiosteal flap is reflected to expose the buccal surface of the maxilla from the alveolar crest to the pyriform aperture on each side. The nasal floor is reflected using the rounded end of the Mitchell’s osteo-trimmer. Through a palatal gingival sulcus releasing incision from the canine to the second premolar the palatal mucoperiosteum is tunnelled from the alveolar crest to the mid-palatine suture bilaterally.
A bone cut is performed on each side using a surgical fissure bur after the extraction of the first premolar or at an edentulous area distal to the maxillary canine. The cut extends from the pyriform fossa distally above the apices of the teeth and vertical down at the edentulous area or through the alveolar bone before or after the extraction of the first premolar (Figure 7.10a). The buccal cortical bone cut extends to the palatal cortex. The use of a spatula osteotome facilitates the bone cut at the maximum height of the palate. The tunnelled palatal mucoperiosteum (Figure 7.10b) provides the necessary access for a surgical fissure bur and osteotome to complete the bone cut. Through a vertical incision of the labial mucoperiosteum overlying the anterior nasal spine (Figure 7.10c, a) nasal septal chisel is applied to separate the nasal septum for full mobilisation of the anterior maxillary segment. The palatal mucoperiosteum provides the main blood supply to the osteotomised segment and should be kept intact.
Figure 7.10a Bone cut extending from the pyriform fossa distally above the apices of the teeth and vertical down on the buccal surface of the maxilla.
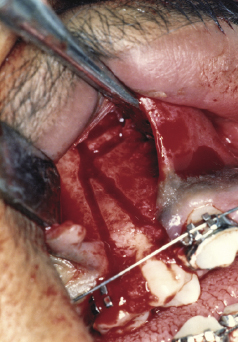
Figure 7.10b Tunnelling of the palatal mucoperiosteum to facilitate palatal bone cut.
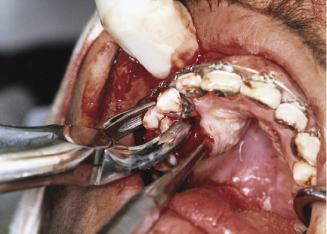
Figure 7.10c A vertical incision of the labial mucoperiosteum overlying the anterior nasal spine to facilitate cutting of the nasal septum.
Guided by the occlusal wafer and temporary inter-maxillary fixation the segment is fixed in the pre-planned position using mini plates. Bone removal is usually required between the two cut surfaces (anterior and posterior maxillary bone segments), both buccally and palatally, to allow accurate positioning of the anterior maxillary segment. Wounds are closed using 4 (0) resorbable sutures.
Wunderer approach
This approach is used mainly for correction of vertical discrepancies of the anterior part of the maxilla with minimal antero-posterior changes.
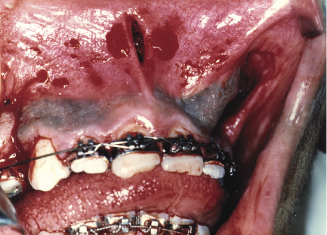
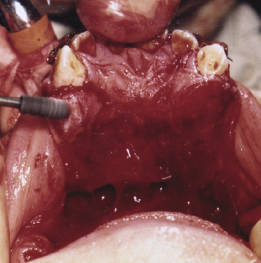
The approach to the buccal surface of the maxilla is similar to the Wassmund approach. The buccaly bone cut is usually at the first premolar region. Through a transverse palatal incision from the first premolar of one side to the other, the palatal mucoperioteum is reflected backward and the palatal bone is exposed (Figure 7.11a). The palatal bone cut is readily performed using a surgical fissure bur. The application of a spatula osteotome through the bone cuts on the buccal and palatal surfaces facilitates the mobilisation of the anterior segment of the maxilla. The osteotomy segment is rotated in an anti-clockwise direction (Figure 7.11b) so that its nasal surface becomes accessible through the palatal incision (Figure 7.11c). Bone is removed from the latter using a surgical cylindrical bur (Figure 7.11c) or bone nibblers for upward movement of the anterior maxillary segment without interference with the nasal mucoperiosteum.
Figure 7.11a Transverse palatal incision from the first premolar of one side to the other, the palatal mucoperiosteum is reflected backward and the palatal bone is exposed. Source: Medical Illustration Department, Glasgow Royal Infirmary, Greater Glasgow & Clyde NHS Trust.
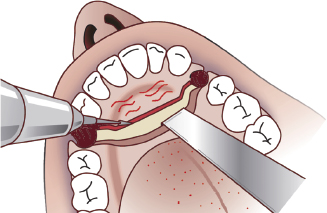
Figure 7.11b Rotating the osteotomy segment in an anti-clockwise direction so that its nasal surface becomes accessible through the palatal incision.
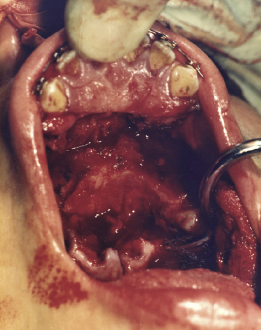
Figure 7.11c Bone removal from the posterior edge and superior surface of the anterior part of the maxilla.
Fixation of the anterior maxillary segment and closure of the surgical wounds are similar to the Wassmund approach in addition to careful suturing of the palatal flap.
7.3.3 Complications
General complications associated with maxillary osteotomies
Excessive bleeding during surgery is unusual. The average blood loss associated with Le Fort I osteotomy is about 500 ml. Excessive blood loss during surgery can be prevented with careful handling of the soft tissues and by avoiding damage to major blood vessels close to the surgical sites. Excessive bleeding may result from damage of the descending greater palatine vessels and the pterygoid venous plexus. This can be reduced by avoiding high posterior maxillary cut, ensuring gentle pteyrgo-maxillary disarticulation and by the use of hypotensive anaesthesia.
Damage to the roots of the teeth is a potential complication. This is more likely to occur in segmental osteotomies due to the close proximity of the osteotomy cuts to the roots of the adjacent teeth. This can usually be avoided through orthodontic divergence of the adjacent roots. Damage to the roots of teeth can also occur during plate fixation due to close proximity of the root apices to the tips of the fixation screws.
Tearing of the palatal mucoperiosteum is most likely to occur with segmental osteotomies used for extensive posterior widening of the maxilla. Careful suturing of any localised tear is essential together with the maintenance of an intact nasal floor mucosa.
Difficulty in achieving the required magnitude of movement is a serious problem which may occur due to unrealistic pre-planned maxillary advancement or due to inaccuracies in face bow recording, occlusal registration and model surgery planning. These can all introduce errors into the fabrication of the occlusal wafer which determines the antero-posterior surgical movements of the maxilla.
Pain is the most common complication reported by patients who have undergone a Le Fort I maxillary osteotomy. A standard protocol of pain management should be readily available for delivery by the designated nurse or the consultant anaesthetist during the immediate postoperative period. Morphine injection should be considered provided the respiratory rate and oxygen saturation are within the normal range.
Stay updated, free dental videos. Join our Telegram channel

VIDEdental - Online dental courses


