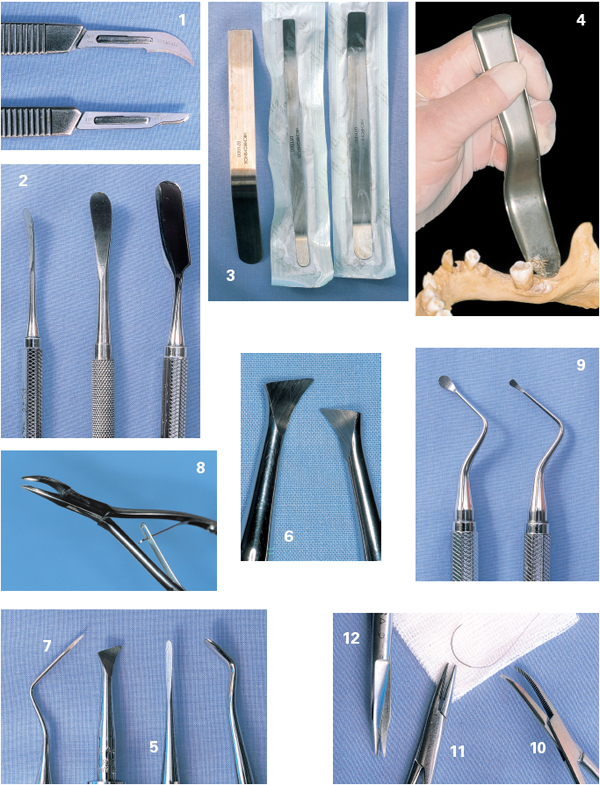
Following are the instruments to be used for specific surgical procedures (Fig 6-1):
| Incision lines | Two scalpels, no.3 handles with nos. 12 and 15 blades (1) |
| Full-thickness flap | Double Howard elevator (2) Prichard’s elevator-retractor and flexible retractor (3) Normed’s elevator 50.17.900 (4) (Nichrominox or MicroFrance) |
| Bone removal | Surgical burs |
| Sectioning of the retained tooth and extraction |
Warwick-James’ right elevator (5) Cryer’s right and left angular elevators (6) Davis’s right and left root elevators (7) Bone-cutting forceps (8) |
| Alveolar extraction site repair | Lucas’ double alveolar curettes (9) Hemostatic pliers (10) |
| Suturing | Halsey’s 13-cm needle holder (11) Goldman-Fox scissors (12) |
Incisions in the external tissues should be made to ensure that:
• There is a large enough opening to allow the bone to be drilled safely, whatever the position of the retained tooth.
• The retractors can be inserted without exerting any excessive traction, which may cause tearing of the tissues.
• Rotatary instruments can be used with no risk of damage.
• The tissue flap can be reattached after surgery so that the cavity can be sealed as tightly as possible and the marginal periodontal tissues of the proximal teeth completely restored.
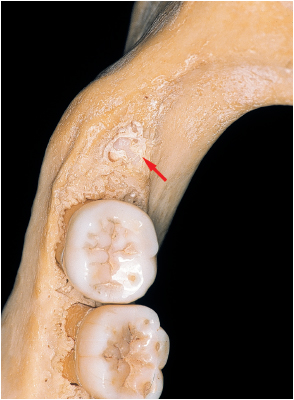
In order to achieve these objectives and promote efficient healing, the incision is generally made above the retromolar bone surface and the crown of the retained tooth when the latter is in a submucosal position (Fig 6-2). This incision comprises three stages:
• The retromolar incision
• The posterior extension
• The anterior extension
The retromolar incision
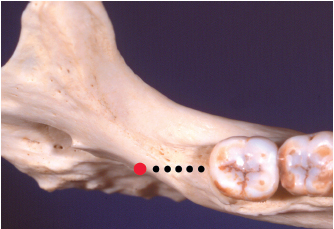
This incision crosses the retromolar pad–gingival space, through which the third molar normally erupts; it follows the axis of the arch and reaches the distal aspect of the middle of the second molar. If the tooth is in the process of erupting and part of the crown is exposed, the incision is made through the mucosal cap in order to free the occlusal aspect of the tooth (Figs 6-3 and 6-4).
This stage of the incision is a posterior mucoperiosteal oblique extension and has the twofold purpose of giving access to the distal area of the crown and facilitating the buccal release incision.
Its path should not be a direct linear extension of the previous incision for three reasons:
• The incision would rapidly pass beyond the border of the bone table and the inner lip of the retromolar pad–extension of the temporal ridge. It would therefore not be fully located on a bone plane and would cross the soft lingual tissue inside the ramus (Fig 6-5).
• The lingual nerve possibly may be sectioned at a position above the previous incision.
• Following a direct linear extension would limit flap opening and elevation. Following the palpation of the bone contour, the clinician should direct the posterior extension laterally, through the temporal groove toward the anterior border of the ramus (Figs 6-6 and 6-7).
In a Class I situation (see (Class II; see chapter 4)), it is easy to carry out the whole incision in a one-stage procedure using a no. 15 blade and sectioning from the rear to the front and from the outside to the inside as far as the distal aspect of the second molar. This incision line represents a portion of the circle that ends in the middle of the distal aspect of the second molars (see Figs 6-6 and 6-7).
In a Class III situation, the anterior part of the ramus and the lower muscle insertions are located close to the distal aspect of the second molar. In this situation it is preferable to carry out a two-stage procedure:
• The retromolar pad is penetrated first.
• The blade, which is directed toward the vestibule, is then inserted under the mucosa within the tissue in order to section the periosteum.
This type of submucosal debridement facilitates the release of the periosteum to make an access flap. In most Class III and in some Class II situations, it is unnecessary to incise the whole thickness of the tissue on the anterior aspect of the ramus in order to carry out the posterior extension and achieve good surgical access.
The anterior sulcular extension
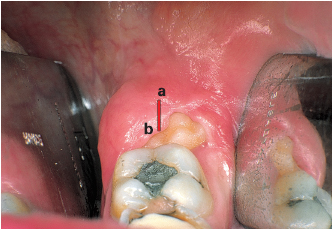
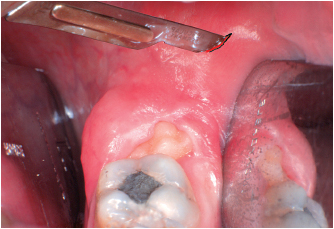
Access to the buccal cortical plate, toward the oblique line, is obtained via a full-thickness flap that originates from the gingival sulcus, facing the molars. In order to free the overlying tissues from the collar of the teeth, an intrasulcular incision, starting from the retromolar incision, is made using a no. 12 blade (Figs 6-8a and 6-8b); this incision follows the gingival sulcus of the molars and penetrates the interdental space in order to achieve elevation of the papilla (Figs 6-9 and 6-10).
The dimensions of the anterior extension are determined by the depth of the impaction. The anterior extension involves only the second molar when bone removal is limited, but it may be extended during surgery if more extensive bone removal is required than was originally planned.
Following extraction, the flap is repositioned and, since it lies on a bone plane, is easily sutured. The supracrestal fibers, which were sectioned by the sulcular incision, regenerate in a few days, and healing should be uneventful.
Surgical precautions
In order to facilitate the penetration of the no. 15 blade, it is recommended that the overlying tissues located inside the anterior border of the ramus should be pulled taut (Fig 6-11a). This slight pressure—often exerted with the thumb—leads to a temporary outward displacement of the tissues (Fig 6-11b). When the tension is released, the clinician will observe that the incision line has been modified: The portion of circle that has been followed by the blade has become a straight line directed along the extension of the arch axis (Fig 6-11c).
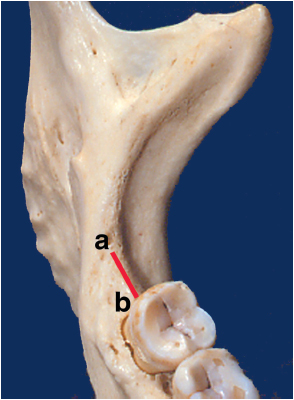
6-3 The 1-cm retromolar incision (ab) crosses the center of the retromolar triangle (see (Class II; see chapter 4)), following the arch axis.
6-4 The occlusal aspect of the left mandibular third molar may be completely exposed by a short retromolar incision (ab).
6-5 The posterior extension of the incision should not follow the arch axis. In most cases, it should be located beyond the bone, on the medial aspect of the ramus.
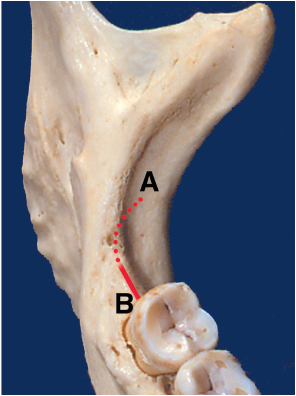
6-6 The retromolar incision and its extension become a protion of the curve (AB); both should lie along the plane of the bone. The starting point of this incision is located in the temporal groove.
6-7 The AB incision is made using a no. 15 blade in a one-stage procedure when the exposure of a large bone table is required.

6-8a Using a no. 12 blade, starting from the first incision line, contact is made with the distal aspect of the second molar in order to penetrate the gingival sulcus.

6-8b The no. 12 blade circumvents the interdental papilla and follows the buccal gingival sulcus of the molars up to the bone. This incision line ensures that the supracrestal fibers are sectioned.
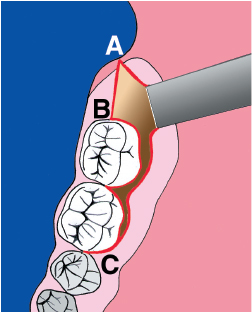
6-10 If the starting point of incision AB is moved laterally, a large opening will result, providing easy access to the buccal bone table without any excessive traction.


