CHAPTER 5
Harvesting Bone from the Ramus
Significant amounts of bone can be procured from the symphysis or ramus regions of the mandible. These mandibular bone grafts have been used with extremely favorable results for alveolar repair prior to implant placement. Mandibular cortical bone grafts provide very predictable increases in bone volume with a short healing time and yield a highly dense osseous architecture for implant placement.1 The close proximity of the donor and recipient sites reduces the duration of surgery and anesthesia and also decreases patient discomfort and morbidity from the graft harvest. 2, 3 Moreover, the surgical procedure can be performed on an outpatient basis utilizing intravenous sedation and local anesthesia. This chapter focuses on the harvesting of mandibular ramus bone for grafting.
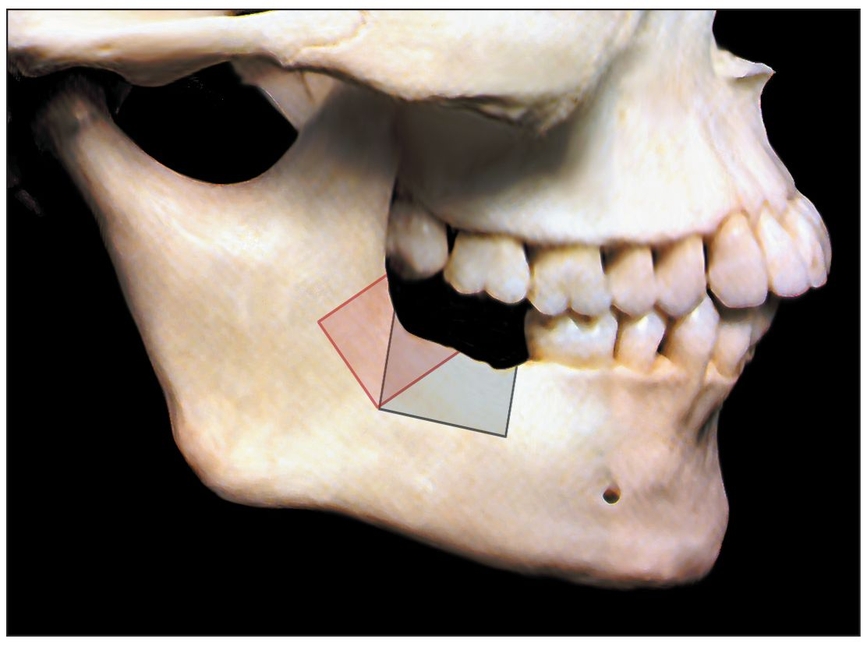
Bone harvested from the ramus is essentially cortical in nature and thus is appropriate for augmenting areas that require block grafts for structural support rather than particulated graft material from cancellous marrow harvests. In general, the ramus yields a rectangular piece of bone approximately 4 mm thick, 3 cm or more in length, and up to 1 cm in height (Fig 5-1). This graft morphology is especially well suited for use as a veneer graft to increase ridge width from one to four tooth sites.3 Twice this amount of bone can be obtained if it is harvested bilaterally. The ascending ramus has been used for bone augmentation before implant placement,3, 4, 5, 6, 7, 8 sinus grafting,9, 10 facial augmentation, 11, 12 orthognathic surgery,13 and immediate reconstruction following tumor resection.14

The ramus is one of the areas in the oral cavity that serves as a donor site for harvesting cortical bone. It can be used in place of or together with the anterior mandible when larger amounts of bone are needed. The area marked in red and gray represents the ideal sites for harvesting. Depending on the patient’s needs, bone can be harvested from one or both of the marked areas.
Surgical Technique
The recipient site for the graft should be carefully evaluated and prepared before donor bone is harvested. This allows the surgeon to determine the size and shape of the graft required to restore ridge contour, keeping in mind that, ideally, the size of the block graft should completely restore the bone defect. It also minimizes the amount of time between graft harvest and placement (Fig 5-2).
Two key factors to consider before undertaking this technique are that (1) in certain patients, gaining access to the ramus can be somewhat more challenging than gaining access to the symphysis, and thus it is important to extend the initial incision to a sufficient height to reach the ascending ramus and (2) care must be taken to avoid injuring the neurovascular bundle.
The incision access to the ramus area for bone harvest begins in the buccal vestibule medial to the external oblique ridge and extends anteriorly and lateral to the retromolar pad. Starting the incision on the ascending ramus no higher than the level of the occlusal plane minimizes the possibility of cutting the buccal artery or exposing the buccal fat pad. The incision continues anteriorly into the buccal sulcus of the molar teeth, if present, and to the midcrestal area if the patient is edentulous in the area. The mucoperiosteal flap is then reflected from the mandibular body on the lateral aspect of the ramus. With a notched ramus retractor, the flap is elevated superiorly along the external oblique ridge to the base of the coronoid process.
The ramus osteotomy is started at the level of the occlusal plane or at a point where the ramus is adequately thick (Fig 5-3). A reciprocating saw or a no. 1702 fissure bur (Brasseler, Savannah, GA) in a straight handpiece is used to make a cut through the cortex along the anterior border of the ramus about 3 to 4 mm medial to the external oblique ridge. The osteotomy can be extended anteriorly as far as the distal aspect of the first molar. A vertical cut is then made in the mandibular body extending inferiorly from the anterior aspect of the cut. The length of this cut depends on the size of the graft required and the position of the inferior alveolar canal. The cut should be made only through the cortical bone. The posterior vertical cut is made on the lateral aspect of the ramus, perpendicular to the external oblique osteotomy. The inferior osteotomy connecting the posterior and anterior vertical cuts may be performed with an oscillating saw or a no. 8 round carbide bur in a straight handpiece. Because access and visibility are limited when making the inferior osteotomy, a shallow cut can be made into the cortex, creating a line of fracture along which the bone will break once the block is tapped with a chisel.
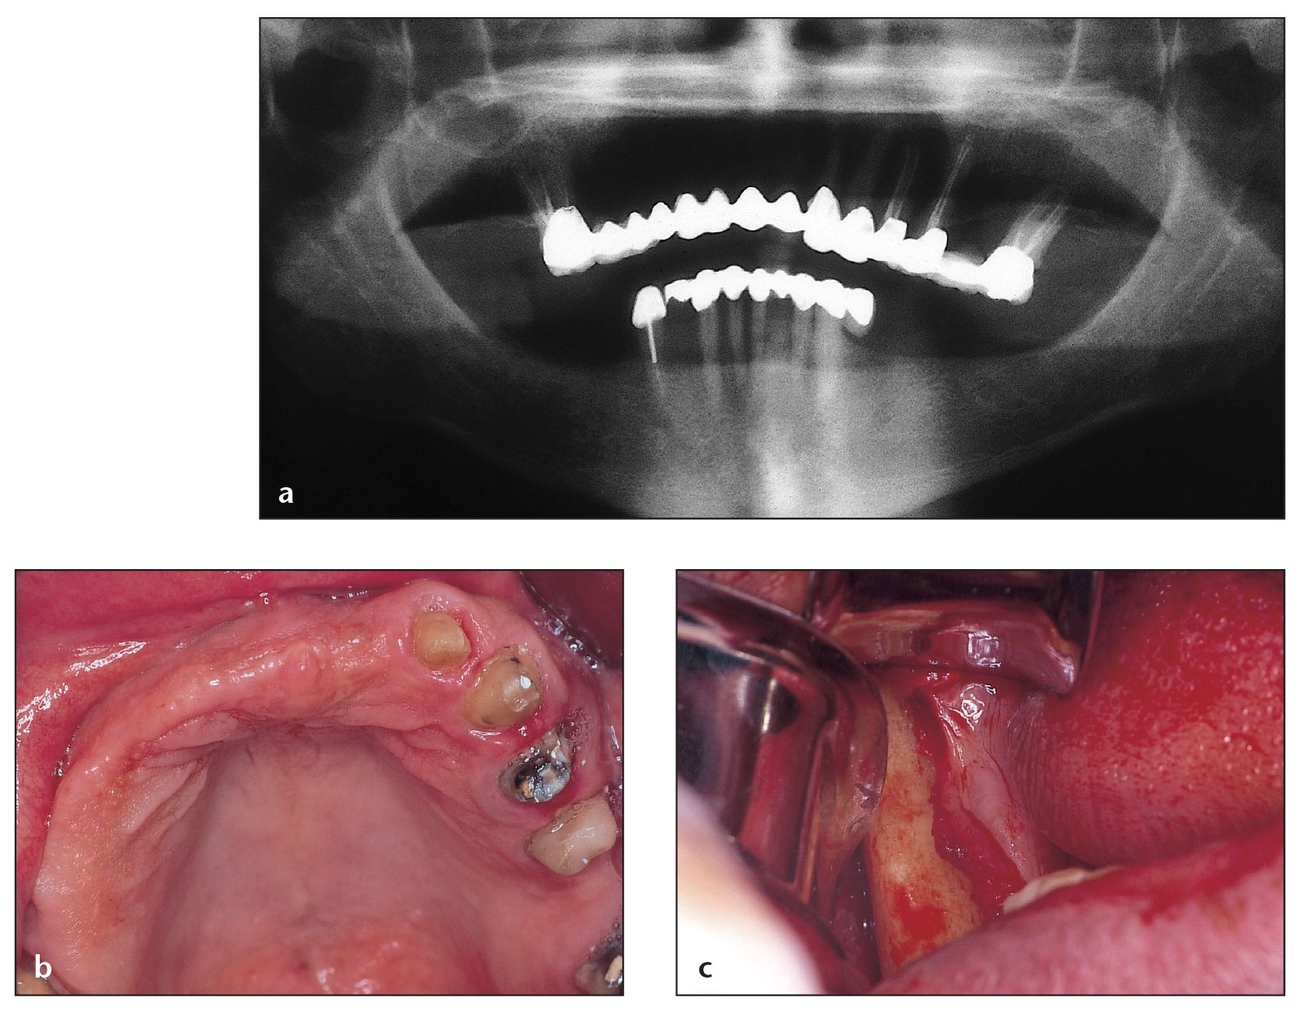
Fig 5-2 The recipient site for the graft should be carefully prepared and evaluated before donor bone is harvested.
(a) This patient is an ideal candidate for ramus bone harvesting for use in grafting of the maxilla. The fixed partial denture is failing because of the extensive unsupported pontic area. The position of the inferior alveolar nerve will permit removal of bone blocks; a chin block harvest is not indicated because of excessive tension of the orbicularis oris muscle at the lower lip and the mentalis muscle.
(b) Over time, the unilateral edentulous area that extends beyond the midline has created a buccopalatal contour deficiency that is greater than 5 mm.
(c) The incision starts over the anterior border of the ascending ramus at the level of the occlusal plane of the superior molar and continues anterior and lateral to the retromolar triangle. This incision will continue in a midcrestal fashion for an edentulous posterior mandible or intrasulcularly if molars are present. The anterior extension should provide a flap that ensures good visibility as well as working space according to the desired size of the block to be harvested.

A thin chisel is gently tapped along the entire length of the external oblique osteotomy; care should be taken to parallel the lateral surface of the ramus and to avoid inadvertent injury to the inferior alveolar nerve. A wider wedge chisel or Potts elevator may then be inserted and levered to pry the buccal segment free and to complete the splitting of the graft from the ramus. After removal of the bone graft, any sharp edges around the ramus are smoothed with a bur or file (Fig 5-4). The donor site can be quickly and easily filled with OrthoBlast II (The Clinician’s Preference, Golden, CO), DBX (Musculoskeletal Transplant Foundation, Edison, NJ) or Grafton (Osteotech, Eatontown, NJ) bone putty. Primary closure of the donor site should be completed after removal and fixation of the bone graft. After the graft is harvested, it may be stored in a suitable medium, such as sterile saline or PRP; however, minimal time should elapse before it is placed in the donor site.


