3
Ultrasonic Endoscopic Periodontal Debridement
John Y. Kwan and Suzanne M. Newkirk
The purpose of this chapter is to identify the benefits of minimally invasive periodontal therapy utilizing endoscopic technology that provides real-time video magnification, enabling clinicians to diagnose and treat periodontal disease subgingivally and nonsurgically under direct visualization (Figure 3.1).
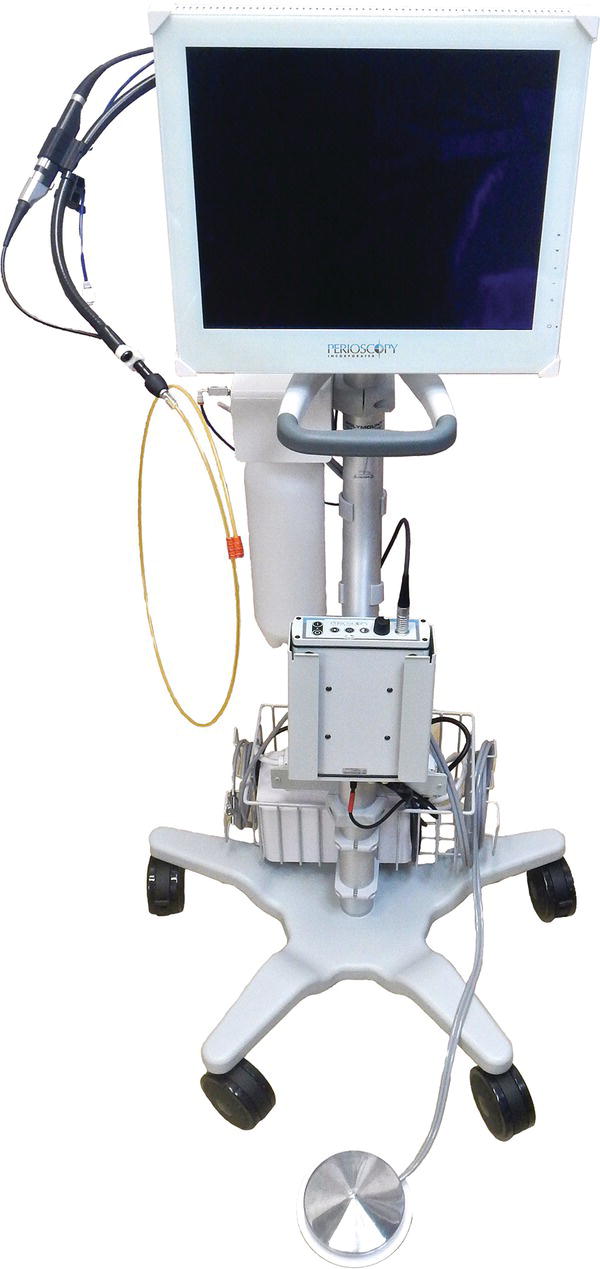
Figure 3.1 The Perioscopy System.
Source: Reproduced with permission of Perioscopy Incorporated.
Introduction
The use of the endoscope has become accepted in most medical surgical disciplines. Today, minimally invasive procedures routinely result in rapid wound healing, fewer complications, and shorter recovery times [1]. The periodontal endoscope consists of a 1 mm diameter, 1 m long, flexible endoscope/camera attached to a dental instrument referred to as an endoscopic “explorer,” which carries a lens attached to a fiber-optic cable that can be placed subgingivally and provides the clinician with visualization of the subgingival environment.
The images are immediately displayed on a chairside monitor (real-time video) and magnified 24–48 times, disclosing minute details, such as caries, root fractures, perforations, resorption, biofilm, and calculus, that previously may have been undetectable. The authors call this illumination and magnification of the subgingival environment a “microvisual” approach.
Dental endoscopy has been shown to reveal deposits so small that they cannot be seen during traditional periodontal surgery, even with a surgical microscope or dental magnifying loupes [2]. Dental microscopes have magnifications from 2 × to 20 ×. At the highest magnifications, the slightest movement can affect the image. This is because of the long distance between the objective lens of the microscope and the actual image in the mouth. In addition, visualization on the internal aspects of the dentition as well as on the distal of posterior teeth is limited. The periodontal endoscope is intimately close to the root surface; therefore, the image easily stays within the focal depth of field. With fiber-optic illumination and high magnification the dental endoscope allows for visualization of root surfaces, the inner aspects of most furcations, and into bony defects that cannot be seen with any other device except surgically with the dental video scope [2]. Endoscopic periodontal debridement is the only nonsurgical minimally invasive, real-time video technology available for the treatment of periodontal disease.
Indications for the use of the endoscopic technique
Candidates for endoscopy include patients being treated for the following:
- initial periodontal therapy;
- sites that have not responded to traditional nonsurgical debridement;
- maintenance patients with chronically inflamed, or increasing probing depths;
- residual probing depths in maintenance patients who refuse surgical therapy and/or where surgery is contraindicated for medical, or esthetic reasons;
- suspected subgingival pathology such as caries, root fractures, perforations, or resorption.
There are several endoscopic systems available for dental use. The ones described here—the DV2 Perioscopy System and the Perioscopy System— are used for providing nonsurgical periodontal therapy and minimally invasive diagnosis. These systems have six main features:
Components
| 1 | 2 | 3 | 4 | 5 | 6 |
| Camera light source | Monitor | Endoscope fiber | Sheath | Explorer | Water delivery device |
- The DV2 Perioscopy System master control unit (MCU) camera and light source provide real-time video images. The light source is an arc lamp that creates intense, focused light fiber optically delivered to the working field.
The Perioscopy System utilizes a CCD/LED camera and light coupling to provide imaging and illumination from the endoscope fiber to the monitor through a controller. The controller has window, gain control, white balance, and illumination settings that are optimized for dental endoscopy. A “handpiece” contains the camera and LED along with a focus knob (Figure 3.2).

Figure 3.2 Perioscopy System Camera/LED/controller.
Source: Reproduced with permission of Perioscopy Incorporated.
- The DV2 Perioscopy System color LCD video monitor provides real-time, detailed color images of the procedure site as viewed by the attached endoscope (Figure 3.3).
The Perioscopy System medical grade monitor provides high definition, real-time video imaging received from the dental endoscope. The image is 25% larger, and the resolution is a significant improvement over the DV2 System (Figure 3.4).
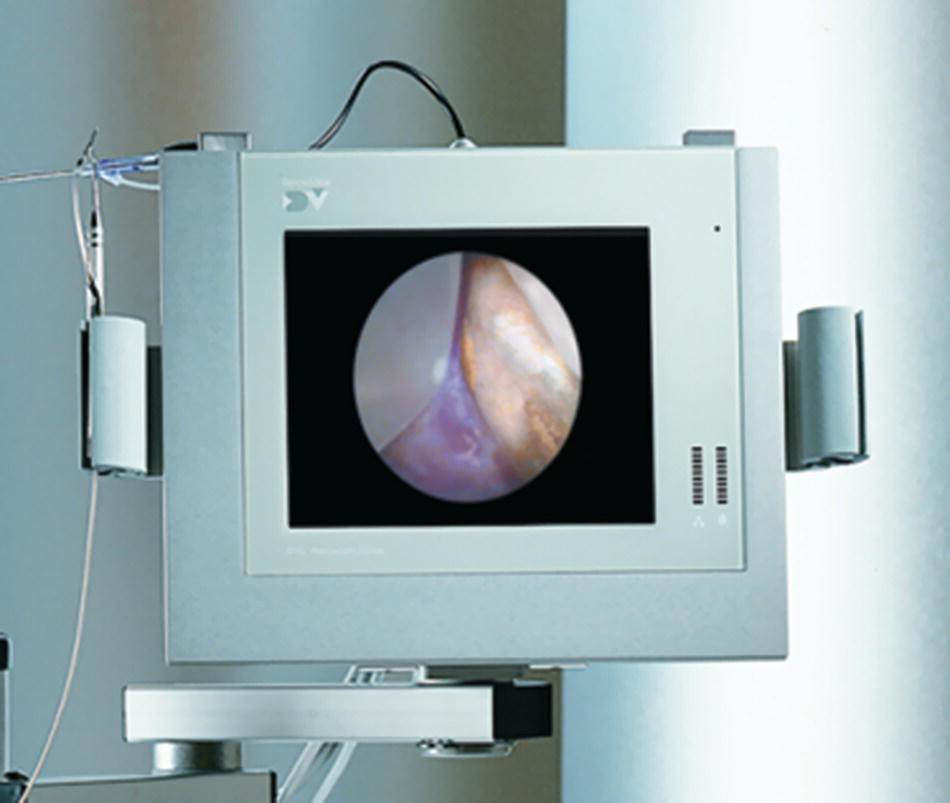
Figure 3.3 The DV2 Master control unit.
Source: Reproduced with permission of Perioscopy Incorporated.
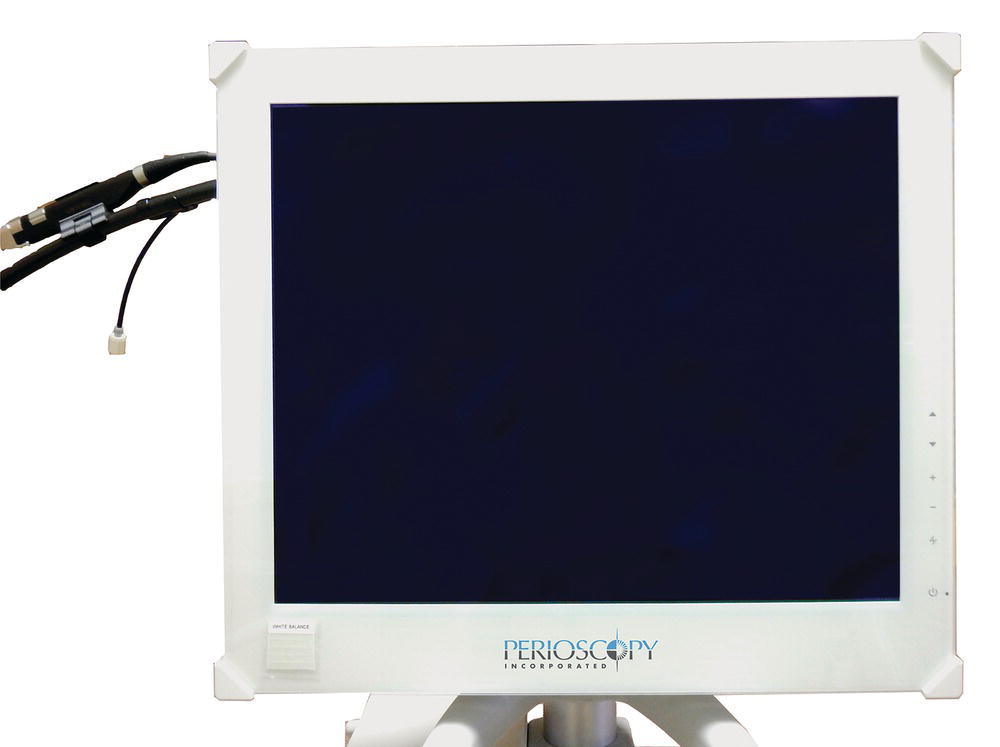
Figure 3.4 The perioscopy system medical grade monitor.
Source: Reproduced with permission of Perioscopy Incorporated.
- The dental endoscope (or fiber) is a device for use with the dental endoscope family of dental instruments. The fiber consists of a very slender, flexible shaft containing both imaging and illumination capabilities. When inserted into the dental endoscopic sheath and then the endoscopic explorers, the endoscope fiber provides detailed and highly magnified images of the diagnostic and/or treatment site (Figure 3.5).
The microscope lens system enlarges the image obtained by the fiber-optic probe and creates intense, focused light that is fiber optically delivered to the working field. This reusable fiber-optic endoscope is 1 mm in diameter and 1 m long with containing 20 different fibers. The quartz sleeve encased fiber-optic probe is made of 19, 125 μm light guides that deliver light to the working field. They surround a 10,000-pixel image guide made up of fused 2 μm fibers to capture the image. The end of the probe has a hand micropolished gradient index lens and provides a 3-mm-wide field of view. The working depth of field allows for focus from 2 to 6 mm from the tip, with 4.5 mm being optimum. The magnification is 24 × –48× depending on the closeness to the lens.
The fiber does not require routine sterilization when used with the endoscopic sheath.
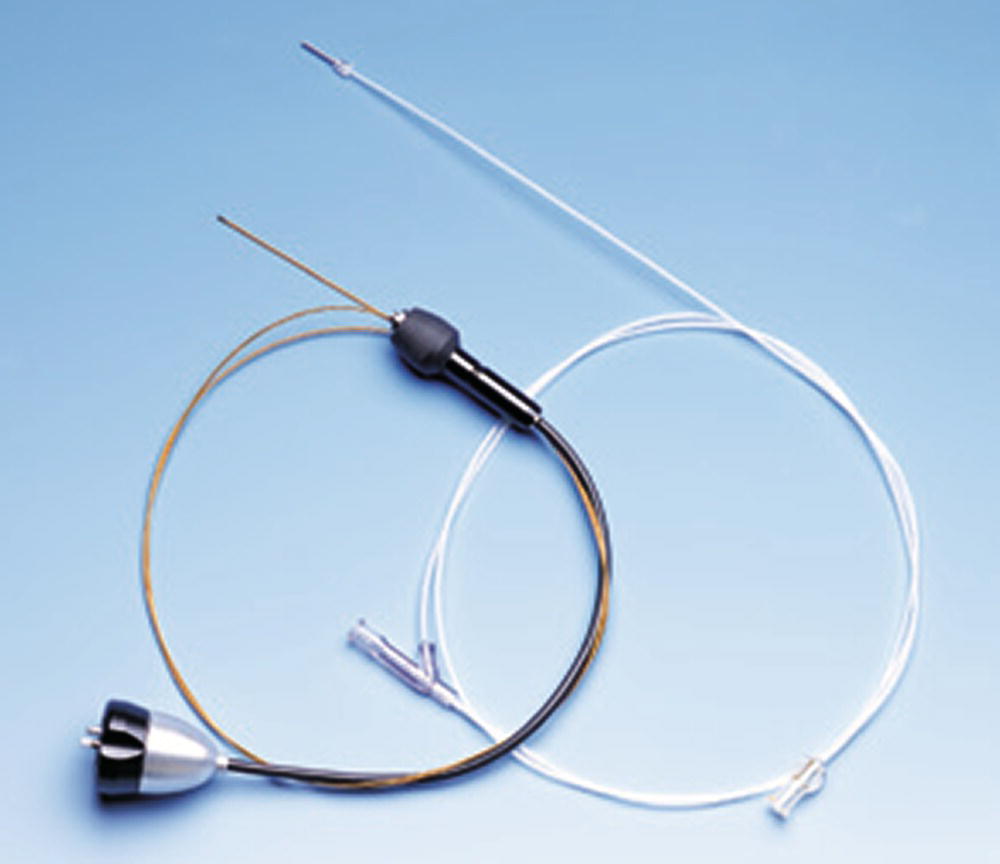
Figure 3.5 The dental endoscope (fiber) and sheath.
Source: Reproduced with permission of Perioscopy Incorporated.
- The sheath: A single-use disposable endoscopic sheath is designed to deliver water irrigation to keep the endoscope lens clear, eliminate the need to sterilize or disinfect the fiber between cases, and to provide a significantly longer fiber life. Bilumen construction consist of clear tubing that completely covers the endoscopic fiber and blue tubing that carries water irrigation to the working site (Figure 3.6).
Each sterile sheath has a sapphire window, a window cell (a stainless steel tube with sapphire lens), a precision tip seal, and dual Luer–Lock connectors for water and fiber connections. These elements create a fluid-tight seal that ensures accurate positioning to the working tip of the endoscopic explorer (Figure 3.7).
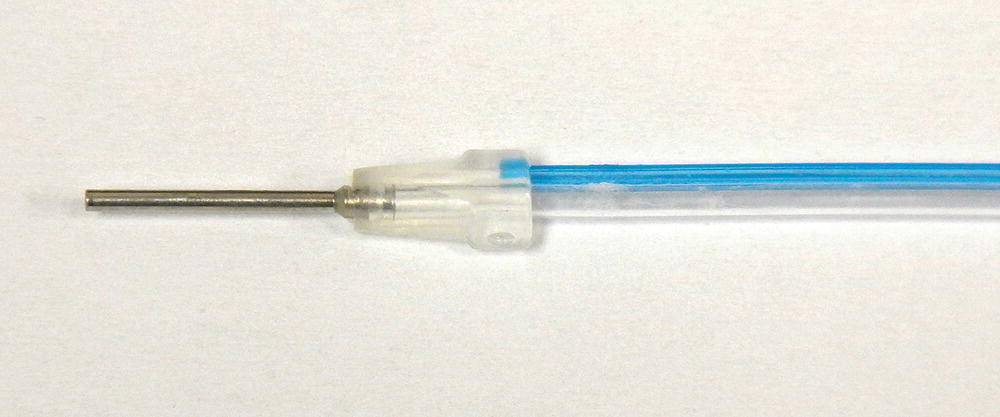
Figure 3.6 Single use, sterile endoscopic sheath.
Source: Reproduced with permission of Perioscopy Incorporated.
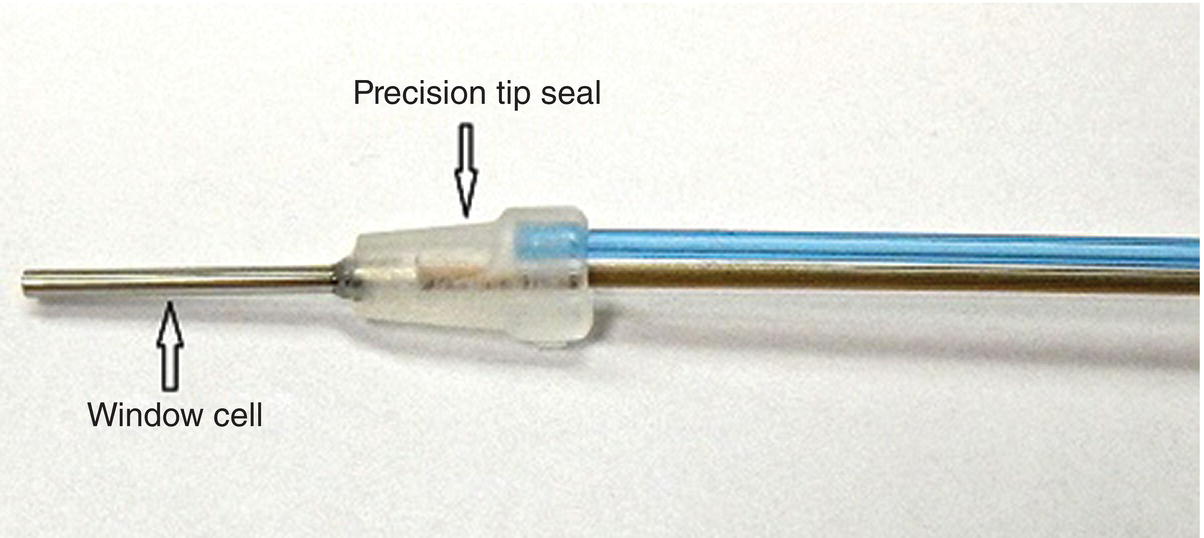
Figure 3.7 Endoscopic sheath highlighting the precision tip seal and window cell.
Source: Reproduced with permission of Perioscopy Incorporated.
- The fiber is placed into a sterile sheath and is then placed into an endoscopic explorer. The fiber–sheath–explorer complex is then placed into the sulcus by the clinician for subgingival viewing.
Dental endoscopic explorers are sterilizable dental instruments that hold the sheath/fiber complex, allowing for intraoral use.
The endoscopic explorer has a shield that deflects the pocket soft tissue away from the camera lens, creating visual access space to the root surface (Figure 3.8).
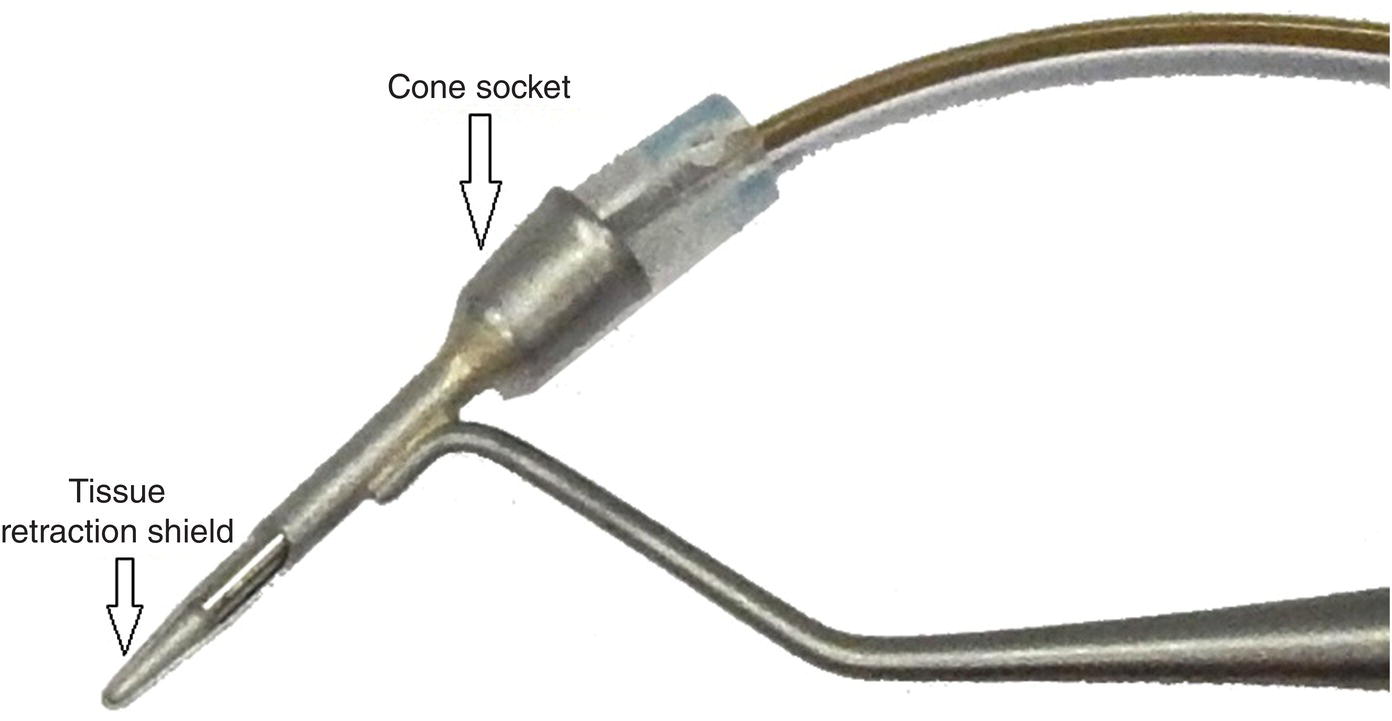
Figure 3.8 Endoscopic explorer tissue retraction shield.
Source: Reproduced with permission of Perioscopy Incorporated.
- A pressurized, self-contained water delivery device is attached to the cart of the dental endoscopic system, and it not only provides a constant source of lavage into the pocket during an endoscopic procedure but also keeps the lens free from debris such as blood and tissue, providing a clear video image. The water delivery device connects to a standard in-office air line and operates by a rheostat pedal through an air-operated valve (Figure 3.9).
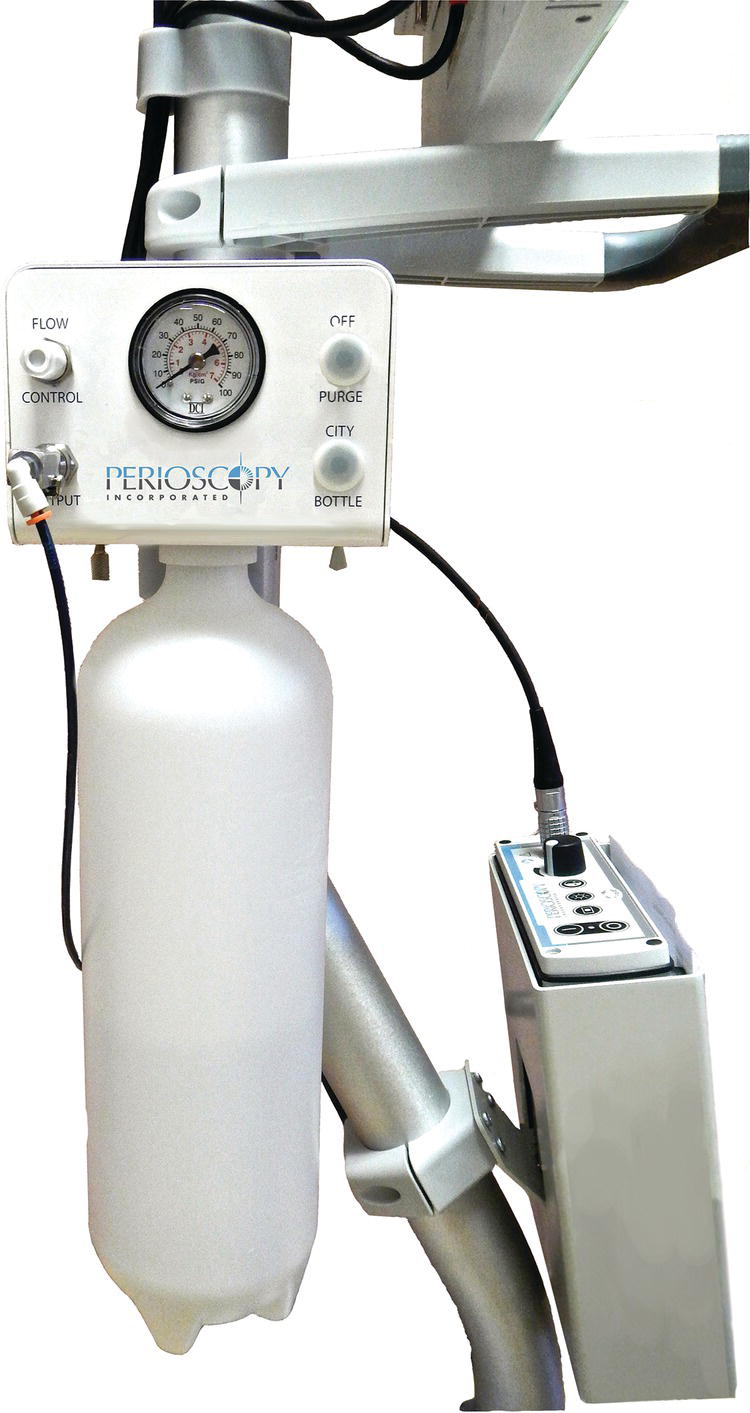
Figure 3.9 Endoscopic water delivery device.
Source: Reproduced with permission of Perioscopy Incorporated.
Exploring the subgingival environment
When the dental endoscope is used subgingivally in a periodontal pocket, a loose film adhering to the tooth is frequently observed. This material is easily disturbed by the shield on the endoscopic explorer. During scaling of the subgingival root surface, this film loses adherence and is washed away by irrigation water flowing from the endoscope probe [3]. It is assumed to be biofilm (Figure 3.10).
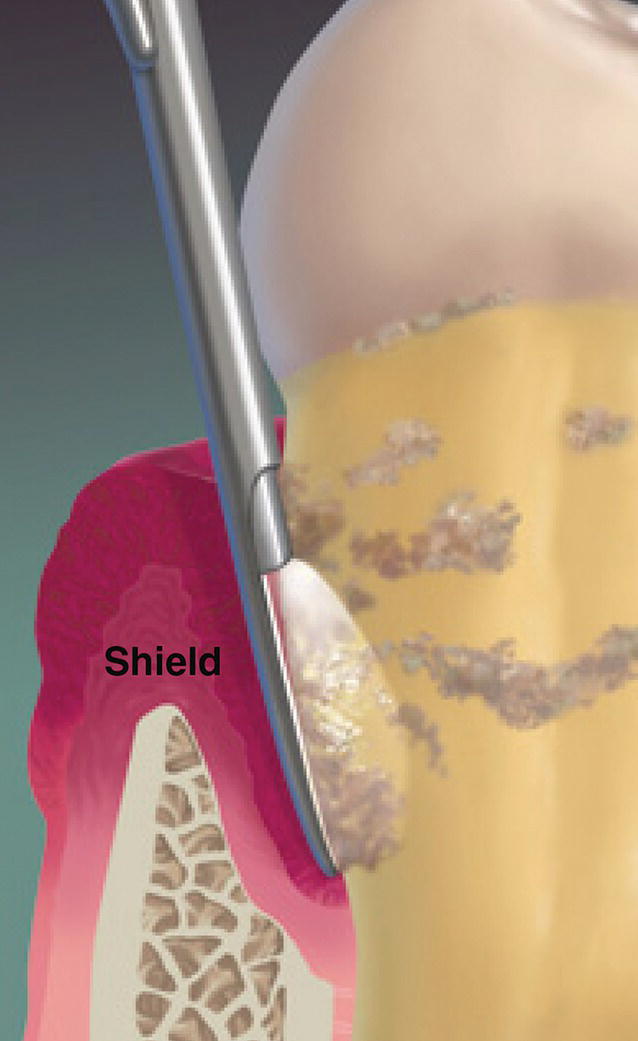
Figure 3.10 The dental endoscopic explorer shield retracting tissue from the pocket wall to expose the root surface for viewing.
Source: Reproduced with permission of Perioscopy Incorporated.
Typically, the gingival wall of the healthy sulcus is light pink in color, indicating health. In disease, islands of dark red color blotch the pocket wall. These areas vary from a slight color change to deep red with an erythematous appearance and may be discrete or diffuse. In addition, these red areas have been shown to be primarily associated with calculus covered with biofilm, not biofilm alone, which emphasizes the role of calculus in the pathophysiology of this chronic inflammatory periodontal disease [3]. This also argues strongly for removal of all calculus deposits seen subgingivally to reduce or eliminate inflammation.
Because of bright fiber-optic illumination, calculus found on the dental root structure commonly shows up as gold, yellow, or white. Calculus deposits may range from small isolated flecks, or islands, to thick, continuous layers [3]. Prior to periodontal endoscopy, visualization and more thorough debridement of the subgingival environment were only accomplished through surgical intervention via open-flap debridement. Even after traditional surgery, deposits of subgingival calculus have been shown to remain [4]. The ability to clearly visualize and remove calculus with nonsurgical therapy is a major advantage of periodontal endoscopy.
Factors affecting instrumentation in non-surgical debridement include:
| Deposit/calculus | Instrument access | Root morphology considerations | Anatomical considerations/other |
| Amount | Narrow deep pockets | Bi and tri-furcated teeth | Small mouth |
| Tenacity | Curved roots | Concavities | Muscular tongues |
| Location | Close root proximity | Line angles | Tight cheeks and lips |
| Over contoured restorations | Depressions | Gaggers | |
| Distal aspects of second or third molars | Developmental grooves | Patient cooperation | |
| Operator experience |
The primary goal of periodontal therapy is the reduction or elimination of inflammation. Traditionally, this is accomplished through removal of subgingival tooth-borne accretions using non-surgical and/or surgical treatment modalities [5]. Because periodontal pathogens reside in deep subgingival sites and also colonize supragingival plaque on the tongue dorsum and other oral sites, the control of destructive periodontal diseases may warrant a comprehensive antimicrobial approach that targets periodontal pathogens in various ecological niches of the oral cavity [5]. Scaling and root planing (with or without periodontal surgery) along with proper personal oral hygiene constitute the primary approach to controlling periodontopathogens [5].
However, traditional nonsurgical periodontal therapy provided in a closed environment utilizing a combination of hand instrumentation and powered instruments has been shown to be both time consuming and technically difficult to perform [4]. Even very experienced clinicians may be deceived by tactilely smooth surfaces achieved by instrumentation and assume the root surfaces are free of deposits. Endoscopic evaluation of root surfaces that have undergone scaling in a closed manner with various powered instruments, especially under low power, consistently reveals retained burnished calculus on the root surface ranging in size from large, smooth, and flat sheets, to small, flat “islands.” These residual deposits are usually located in furcations, developmental depressions, at line angles and around the cementoenamel junction [2].
In an evaluation of the effectiveness of traditional subgingival scaling and root planing related to depth of pocket and type of teeth, results demonstrated a high correlation between the percentage of residual calculus and probing depth. It was shown that probing depths less than 3 mm were the easiest sites for effective scaling and root planing, probing depths between 3 and 5 mm were more difficult to completely remove calculus and biofilm, and probing depths deeper than 5 mm were the most difficult sites. Tooth type did not influence the results [6]. Endoscopic examination revealed residual burnished calculus in 100% of pockets and furcations that bleed upon probing and that whenever even the smallest speck of calculus (0.5 mm in diameter or less) is seen on the tooth surface there is a corresponding inflamed, bleeding and ulcerated site in the pocket lining exactly opposite that piece of calculus [2].
Nevertheless, closed scaling and root planing without endoscopy can give good short-term clinical results with shrinkage of probing depths and a decrease in gingival inflammation, but probing depths in deeper areas often slowly return [5]. A review of studies evaluating the effectiveness of various subgingival debridement procedures showed that 5–80% of treated roots harbor residual plaque or calculus, and the deeper the pockets and furcation involvements, the more deposits are left behind [7]. Up to 30% of the total surface area of treated roots may be covered with residual calculus, following subgingival scaling [7]. These deposits may serve as the basis for reinfection of the pocket.
Traditional blind scaling and root planing, especially if performed by inexperienced operators, can result in patient discomfort, unwarranted removal of cementum and dentin, and an increase in tooth sensitivity [8]. By contrast, a pilot study evaluating endoscopic subgingival scaling and root planing reported minimal negative sequela. The study also reported elimination of histologic signs of chronic inflammation at 6 months following a single course of endoscopic periodontal debridement. Also observed was bone repair and growth of a long junctional epithelium on previously diseased root surfaces [5].
In a large unpublished case series performed in the office of one of the authors, John Kwan, a retrospective analysis of patients who received endoscopic ultrasonic periodontal debridement was performed.
After routine periodontal examination, these patients were diagnosed with generalized and or localized moderate-to-advanced chronic inflammatory periodontal disease. When the patients were evaluated at 1 year or more following treatment, a dramatic reduction in probing depths was noted. The greatest improvement was noted on posterior teeth with initial deep pocket probing depths.
Study design
This was a nonblinded prospective outcomes study. Patients with moderate-to-advanced periodontal disease were examined and pocket probing depths were recorded in a computerized charting program. All probing measurements were performed using a manual periodontal probe. The examiner was calibrated for consistent recordings.
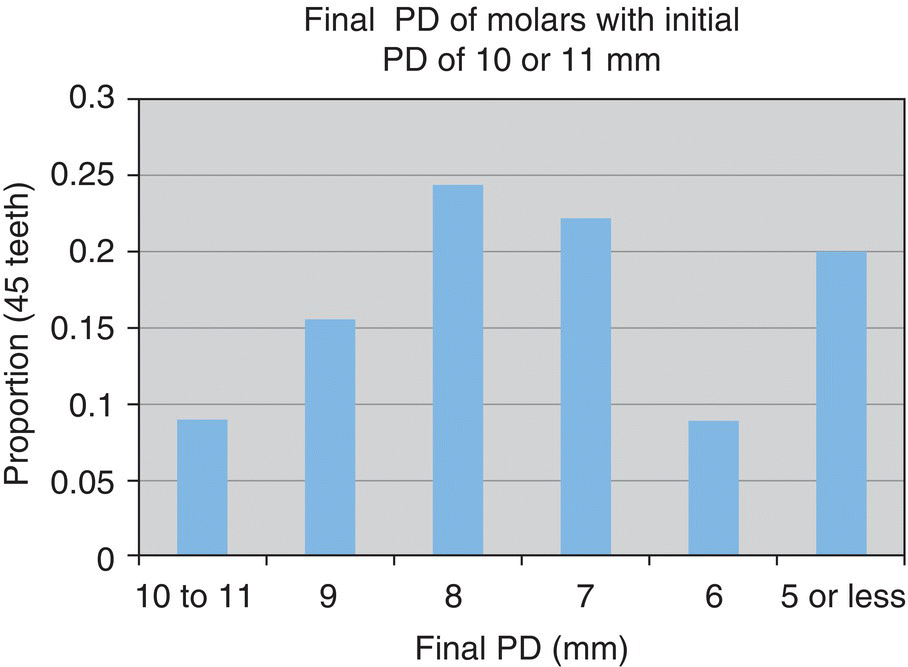
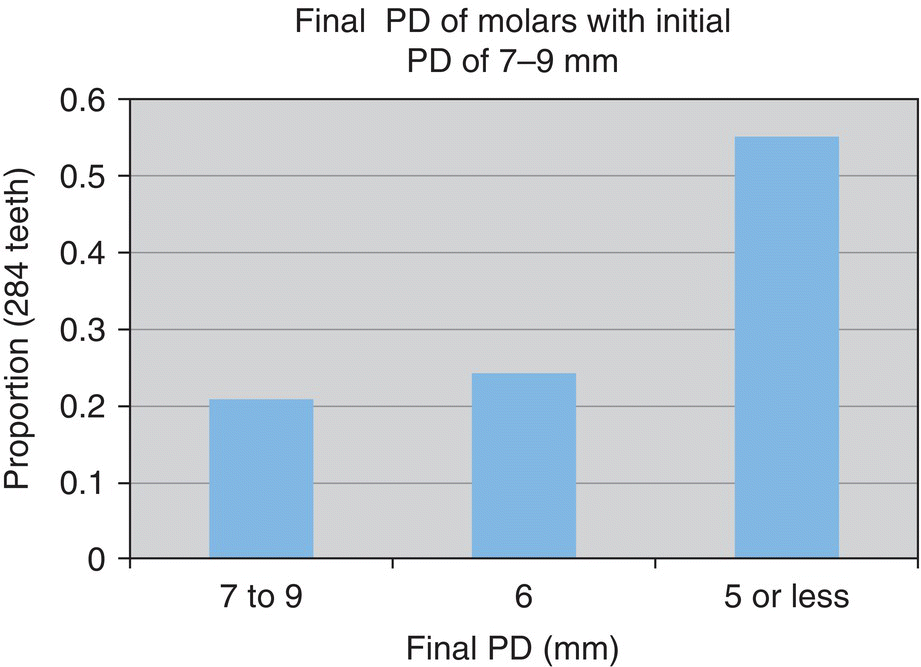
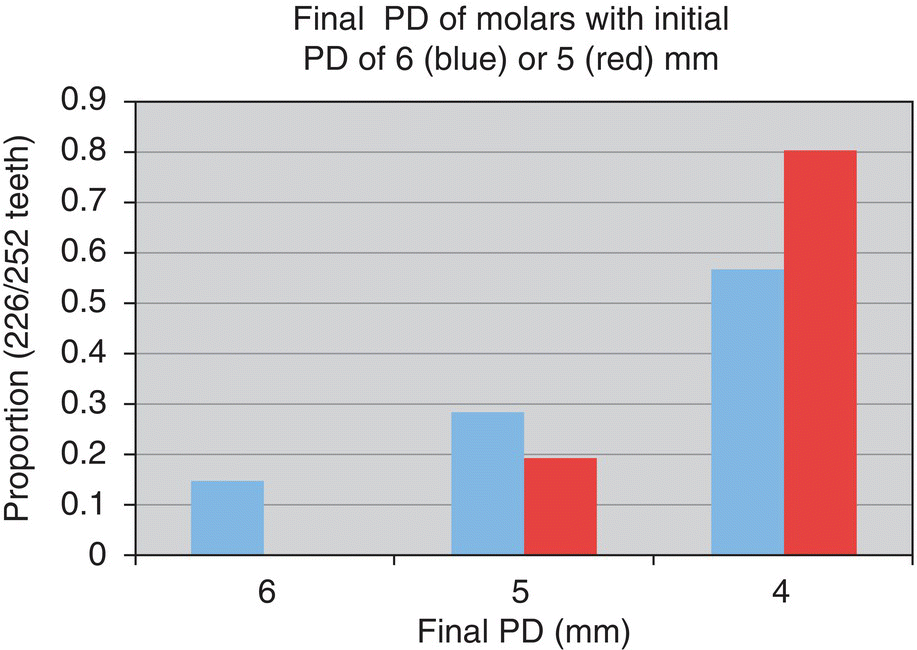
During the first 2 years’ practicing with the periodontal endoscope (2002–2004), 270 consecutively treated patients were evaluated. All treated patients were given a course of systemic antibiotics; either metronidazole 500 mg bid × 7 days, or metronidazole and amoxicillin both 500 mg bid × 7 days, or azithromycin 500 mg qd × 3 days. Antibiotics were taken either before or immediately following treatment. All treatment was completed in one visit: full-mouth ultrasonic debridement with probing depths ≥4 mm endoscopically debrided.
Patients were seen for reevaluation and periodontal maintenance every 3 months, which included full-mouth periodontal charting, periodontal instrumentation, selective polish, and oral hygiene instruction. Final comparison probing was performed at 1 year or more.
- 71% reduced to 6–9 mm
- 20% reduced to ≤5 mm
- n = 45 teeth
- 55% reduced to ≤5 mm
- n = 284 teeth
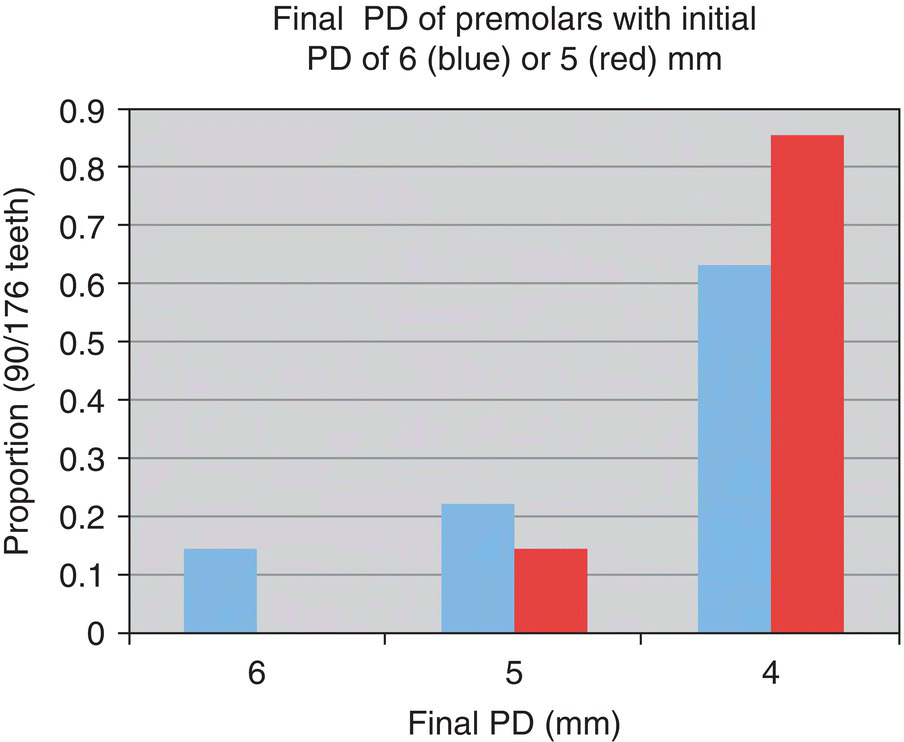
- Starting at 5–6 mm:
- 69% reduced to ≤4 mm
- n = 478 teeth
- 38% reduced to ≤5 mm
- n = 8 teeth
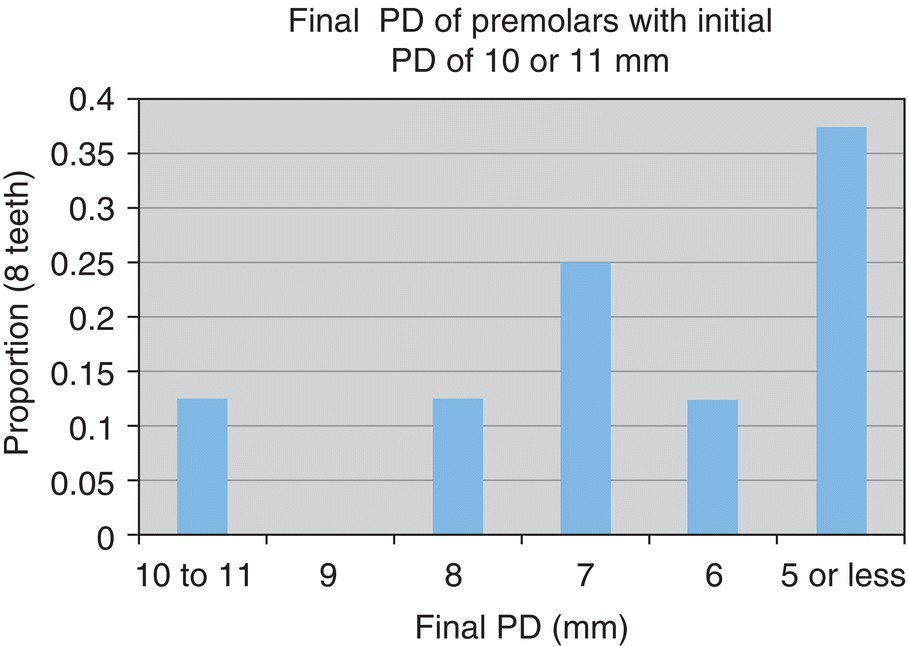
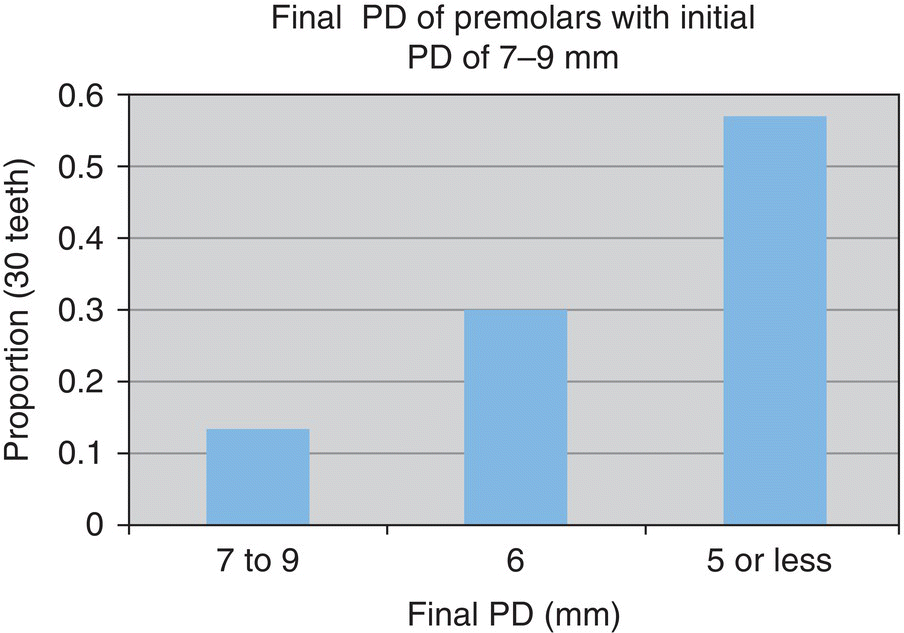
- 57% reduced to ≤5 mm
- n = 30 teeth
- 78% reduced to ≤4 mm
- n = 266 teeth
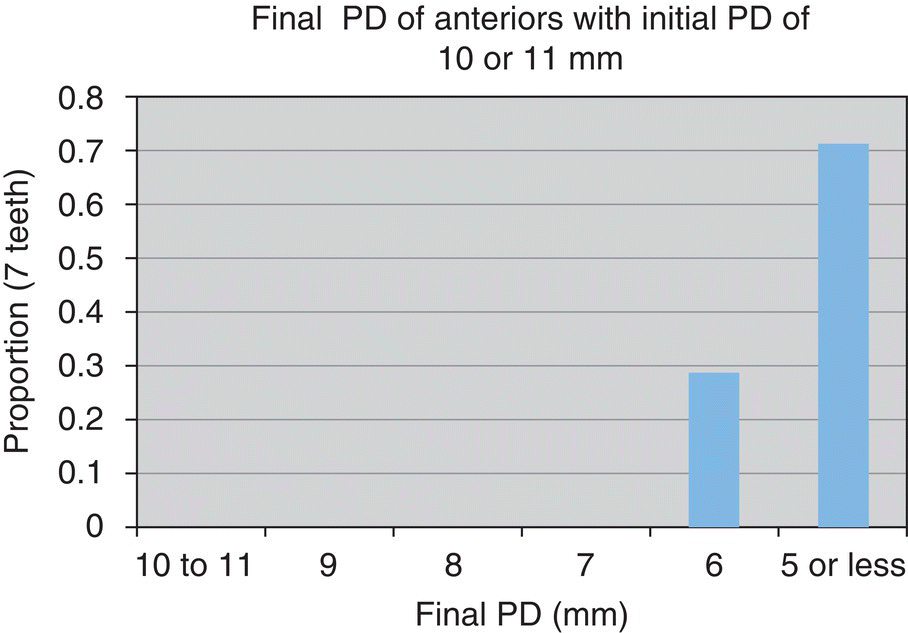
- 71% reduced to ≤5 mm
- n = 7 teeth
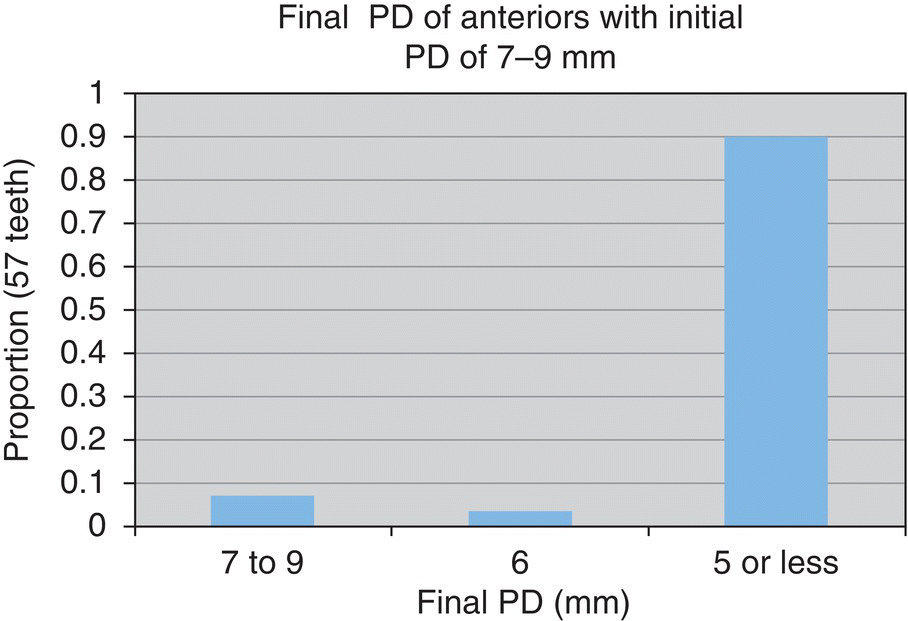
- 89% reduced to ≤5 mm
- n = 57 teeth
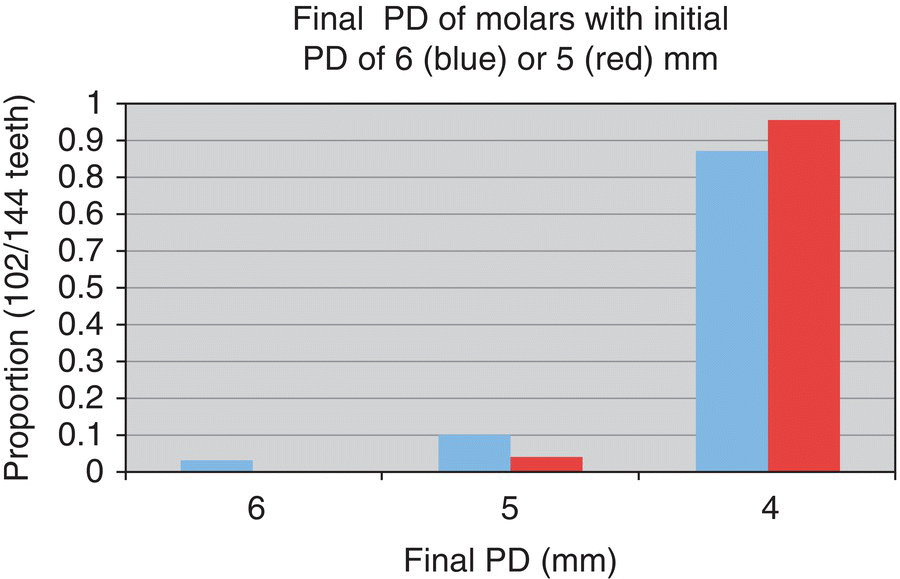
- 92% reduced to ≤4 mm
- n = 246 teeth
Stay updated, free dental videos. Join our Telegram channel

VIDEdental - Online dental courses


