Prosthodontics
Learning Objectives
1 Pronounce, define, and spell the Key Terms.
2 List the indications for and contraindications to prosthodontics.
3 Describe the differences between a full crown, inlay, onlay, and veneer crown.
4 Identify the components of a fixed bridge.
5 Identify and state the functions and the components of a partial denture.
6 Identify and state the functions and the components of a complete denture.
7 Describe the steps in the placement of an immediate denture.
8 Describe the process of relining a complete or partial denture.
Key Terms
Abutment
Articulator
Bridge
Core
Crown
Edentulous
Fixed Bridge
Flange
Framework
Gingival Retraction
Inlay
Onlay
Pontic
Post
Provisional Coverage
Rests
Retainers
Saddle
Unit
Prosthodontics comprises of two specialty areas in dentistry: fixed prosthodontics, which is the replacement of missing teeth with a cast prosthesis that is cemented in place and cannot be removed by the patient, and removable prosthodontics, which is the replacement of missing teeth with a prosthesis that the patient can take in and out of the mouth freely.
Fixed Prosthodontics
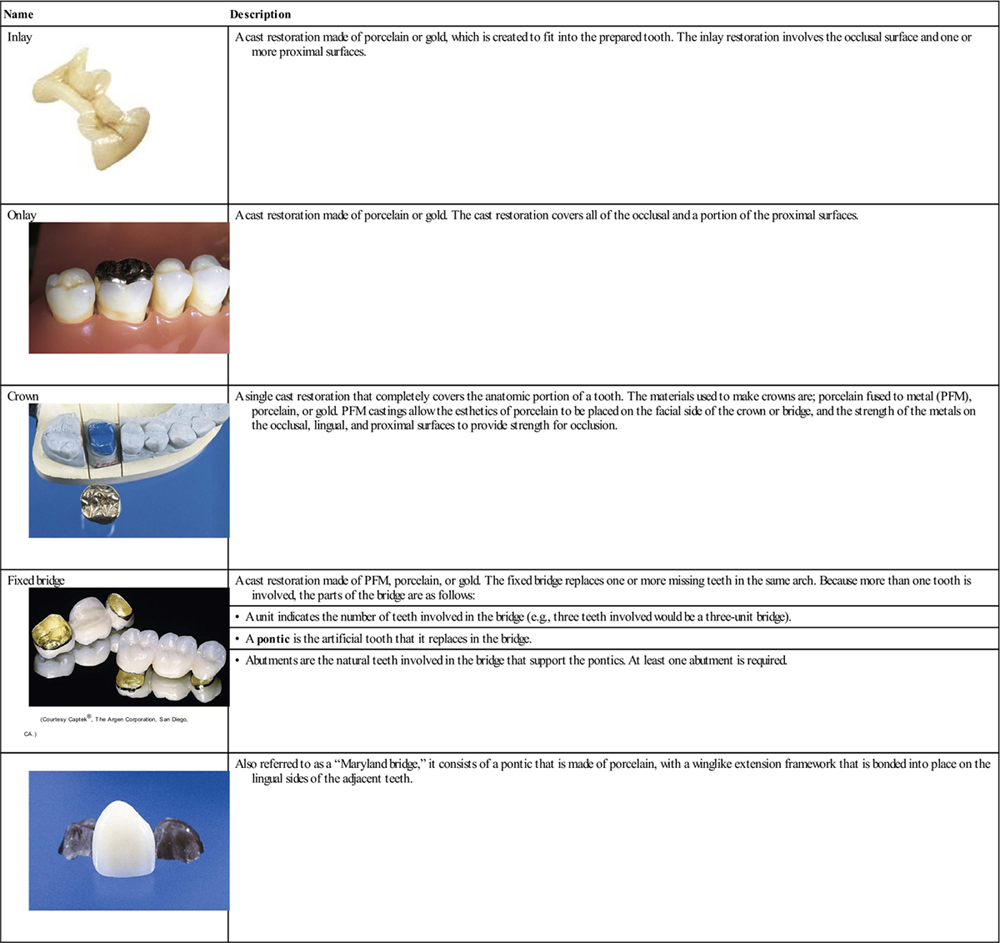
Fixed prosthodontics, also referred to as crown or bridge, is often the dentist’s preferred choice if more than three fourths of the tooth structure requires restoring. Table 23-1 reviews the different types of fixed prosthodontics.
TABLE 23-1
< ?comst?>
| Name | Description |
Inlay
 |
A cast restoration made of porcelain or gold, which is created to fit into the prepared tooth. The inlay restoration involves the occlusal surface and one or more proximal surfaces. |
Onlay
 |
A cast restoration made of porcelain or gold. The cast restoration covers all of the occlusal and a portion of the proximal surfaces. |
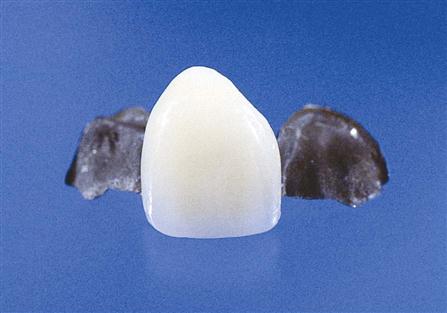
Crown
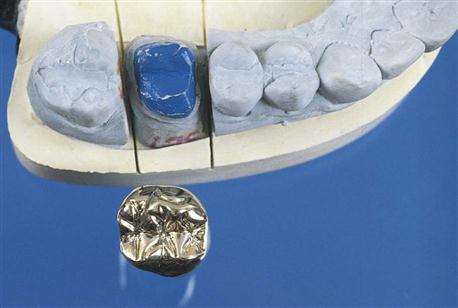 |
A single cast restoration that completely covers the anatomic portion of a tooth. The materials used to make crowns are; porcelain fused to metal (PFM), porcelain, or gold. PFM castings allow the esthetics of porcelain to be placed on the facial side of the crown or bridge, and the strength of the metals on the occlusal, lingual, and proximal surfaces to provide strength for occlusion. |
Fixed bridge
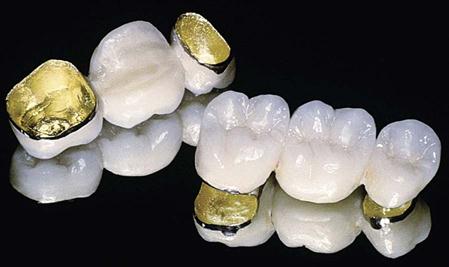 |
A cast restoration made of PFM, porcelain, or gold. The fixed bridge replaces one or more missing teeth in the same arch. Because more than one tooth is involved, the parts of the bridge are as follows: |
| • A unit indicates the number of teeth involved in the bridge (e.g., three teeth involved would be a three-unit bridge). | |
| • A pontic is the artificial tooth that it replaces in the bridge. | |
| • Abutments are the natural teeth involved in the bridge that support the pontics. At least one abutment is required. | |
 |
Also referred to as a “Maryland bridge,” it consists of a pontic that is made of porcelain, with a winglike extension framework that is bonded into place on the lingual sides of the adjacent teeth. |
< ?comen?>< ?comst1?>
< ?comst1?>
< ?comen1?>
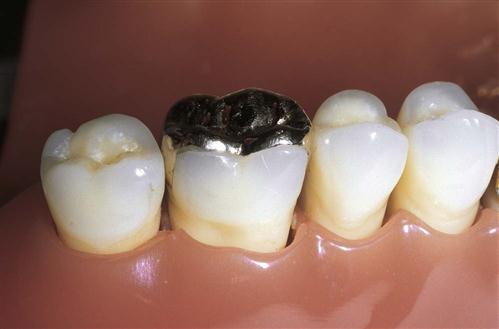
Crown and Bridge Preparation
The creation of a single unit cast restoration (crown, inlay, or onlay) or a multiple unit (fixed bridge) restoration requires a minimum of two appointments: The first appointment is scheduled for taking preliminary impressions, preparing the tooth structure, taking final impressions, and fabricating and cementing a temporary crown or bridge. The second appointment is for the try-in of the casting, adjustments and final cementation of the completed restoration.
Shade Selection
If the onlay, inlay, crown, or bridge is to be made in porcelain or porcelain fused to metal (PFM), matching the shade of the natural teeth is very important and is completed at the first appointment, before the procedure is started. A shade guide, which contains samples of all available shades, is used to match the natural tooth color (Figure 23-1).
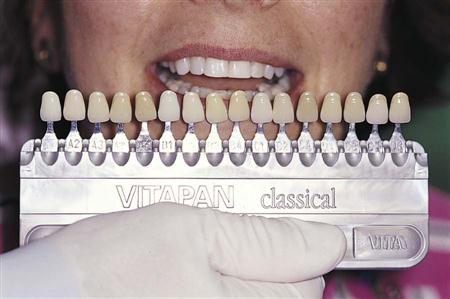
Because teeth remain slightly moist from saliva continuously, the color sample from the shade guide should be moistened as well. The shade guide is held close to the teeth to be restored and is compared in a natural light setting. To ensure an exact match, it is best to use natural light. The shade selected is identified by number from the shade guide and is noted on the patient’s record and on the laboratory prescription. The shade guide is a semicritical item that cannot withstand the heat of sterilization. After use, it must be disinfected.
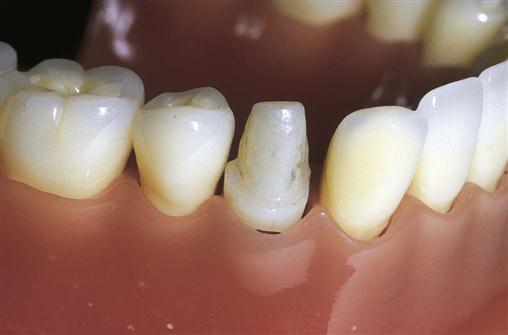
Tooth Preparation
During tooth preparation, the height and contour of the natural tooth or teeth are reduced to remove any diseased tooth structure and to prepare the tooth for the casting. The prepared tooth is shaped so that the cast restoration can fit down over the preparation to resemble its natural tooth (Figure 23-2).
If the coronal portion of the tooth is extensively decayed, fractured, or worn, it may be necessary to provide additional support for the crown.
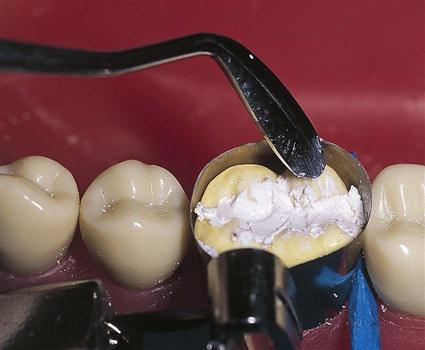
Core Buildups
A core buildup is the use of amalgam or core material, which is placed on the prepared tooth to provide enough structure to hold a fixed restoration (Figure 23-3). If an amalgam restoration is already in place, this may be shaped and prepared for use as the core.
Pin Retention
Pin retention may be necessary to add strength to the core buildup for the crown. When pins are used, they are placed before the core buildup and are then incorporated into the buildup material.
Post and Core
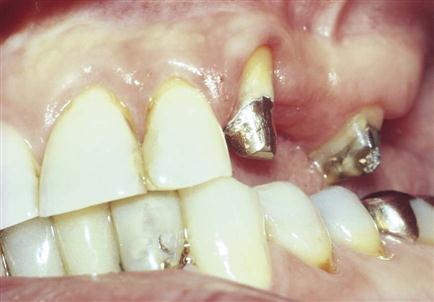
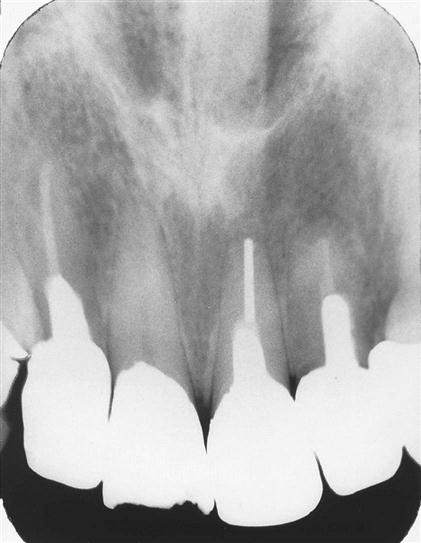
If the tooth has been treated endodontically, a post is placed into the pulp canal. The core is then built up around the post. This provides additional strength and stability for the crown (Figure 23-4).
Gingival Retraction
For the laboratory technician to create an accurate fitting cast, a final impression is taken to prepare the working cast from stone. As stated in Chapter 22, the final impression includes detail of the preparation that extends slightly below the finish line of the preparation. The best way to achieve this detail and not harm the tissue is with the use of gingival retraction cord.
Gingival retraction cord temporarily pushes the gingival tissue away from the tooth and widens the sulcus. This allows the impression material to flow around all parts of the preparation (Figure 23-5).
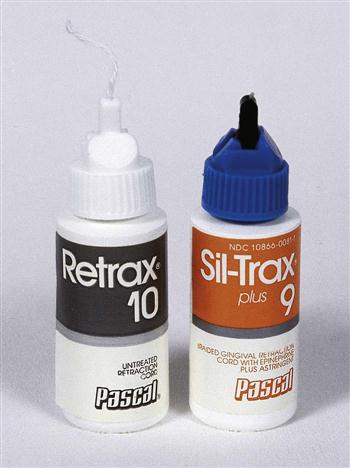
Retraction cords are available as untwisted, twisted, or braided. For easier application, the untwisted cord is moistened in water or a vasoconstrictor, and then is twisted just before placement. Once placed, the cord will expand and open the sulcus, ready to receive the impression material.
To control hemorrhage from the preparation procedure, the retraction cord can be impregnated (saturated) with an astringent and a vasoconstrictor. A vasoconstrictor controls bleeding and short-term constriction of the tissue. Special caution must be taken if the patient has cardiovascular disease; the patient should not receive any retraction cord with a vasoconstrictor.
Final Impression
Following the time period of the gingival retraction cord within the sulcus, the retraction cord is removed, the sulcus is rinsed and dried, and the final impression is taken of the prepared tooth and surrounding tissue. Refer to Chapter 22 on the procedure for taking final impressions.
See Procedure 23-1: Placing and Removing Gingival Retraction Cord (Expanded Function).
Provisional Coverage
Provisional coverage, also known as temporary coverage, is a protective covering that is temporarily cemented to the prepared tooth for a single crown or to the abutment teeth for a bridge (Box 23-1).
Provisional coverage is worn until the cast restoration or bridge is returned from the dental lab and readied for permanent cementation. This may take from several days to a few weeks. (The cements used for temporary placement of provisional coverage are discussed in Chapter 20.)
Types of Provisional Coverage
Several types of provisional coverage are available. The dentist will determine the type of temporary based on the needs of the patient. Table 23-2 provides the types most commonly used and their description. In most states, construction and cementation of temporary coverage can be delegated to the certified dental assistant.
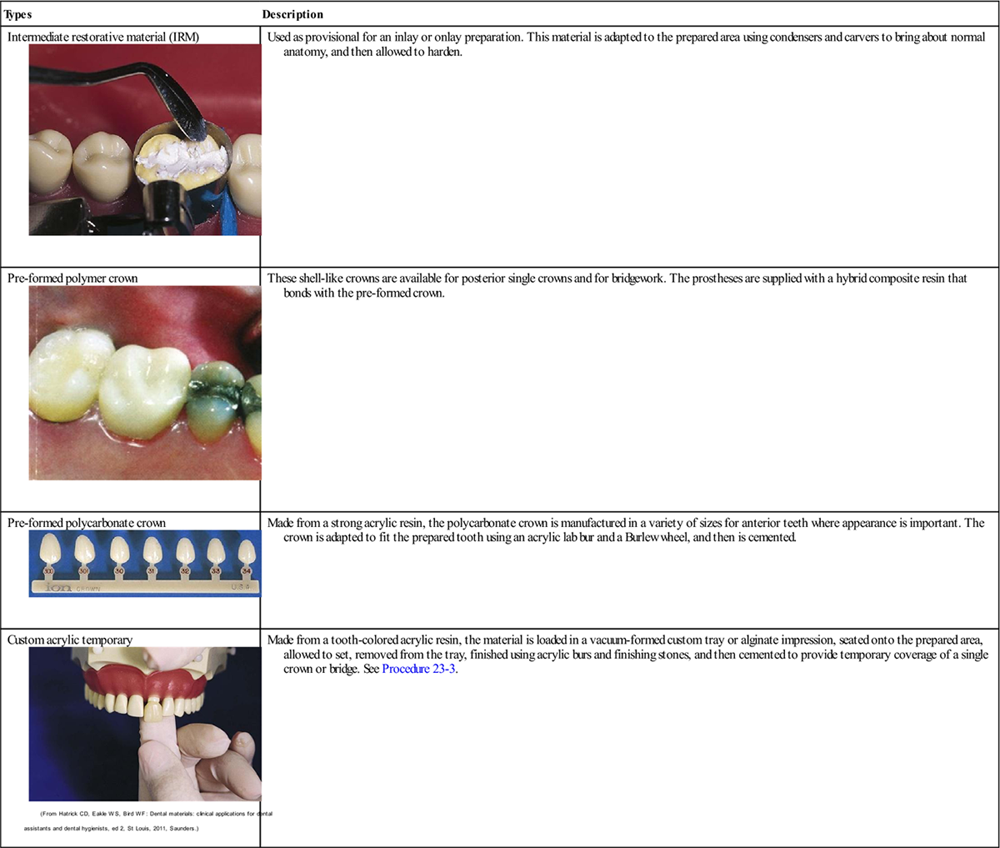
TABLE 23-2
Types of Provisional Materials
< ?comst?>
| Types | Description |
Intermediate restorative material (IRM)
 |
Used as provisional for an inlay or onlay preparation. This material is adapted to the prepared area using condensers and carvers to bring about normal anatomy, and then allowed to harden. |
Pre-formed polymer crown
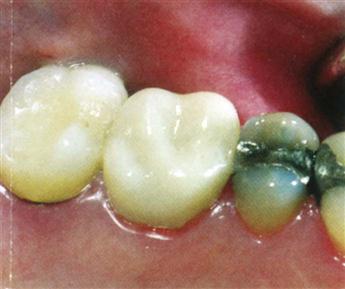 |
These shell-like crowns are available for posterior single crowns and for bridgework. The prostheses are supplied with a hybrid composite resin that bonds with the pre-formed crown. |
Pre-formed polycarbonate crown
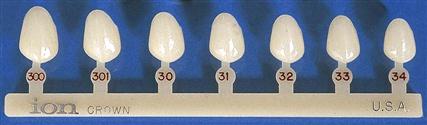 |
Made from a strong acrylic resin, the polycarbonate crown is manufactured in a variety of sizes for anterior teeth where appearance is important. The crown is adapted to fit the prepared tooth using an acrylic lab bur and a Burlew wheel, and then is cemented. |
Custom acrylic temporary
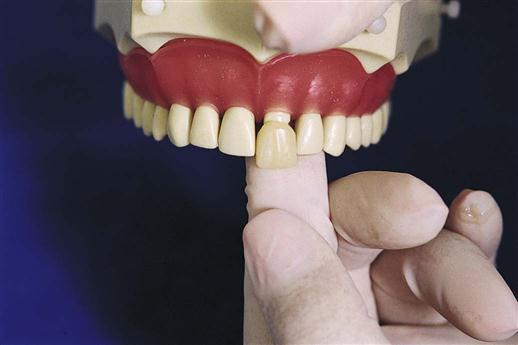 |
Made from a tooth-colored acrylic resin, the material is loaded in a vacuum-formed custom tray or alginate impression, seated onto the prepared area, allowed to set, removed from the tray, finished using acrylic burs and finishing stones, and then cemented to provide temporary coverage of a single crown or bridge. See Procedure 23-3. |
< ?comen?>< ?comst1?>
< ?comst1?>
< ?comen1?>
See Procedure 23-3: Fabricating and Cementing a Custom Acrylic Provisional Crown (Expanded Function).
The Laboratory Prescription
At the completion of the first appointment, a laboratory prescription is completed and sent to the lab along with the final impression and bite registration. The laboratory technician can fabricate a single crown or a bridge on the basis of a written prescription from the dentist (Box 23-2). Also known as a work order or requisition, one copy of the prescription is included with the case, and another copy is retained with the patient records (Figure 23-6).
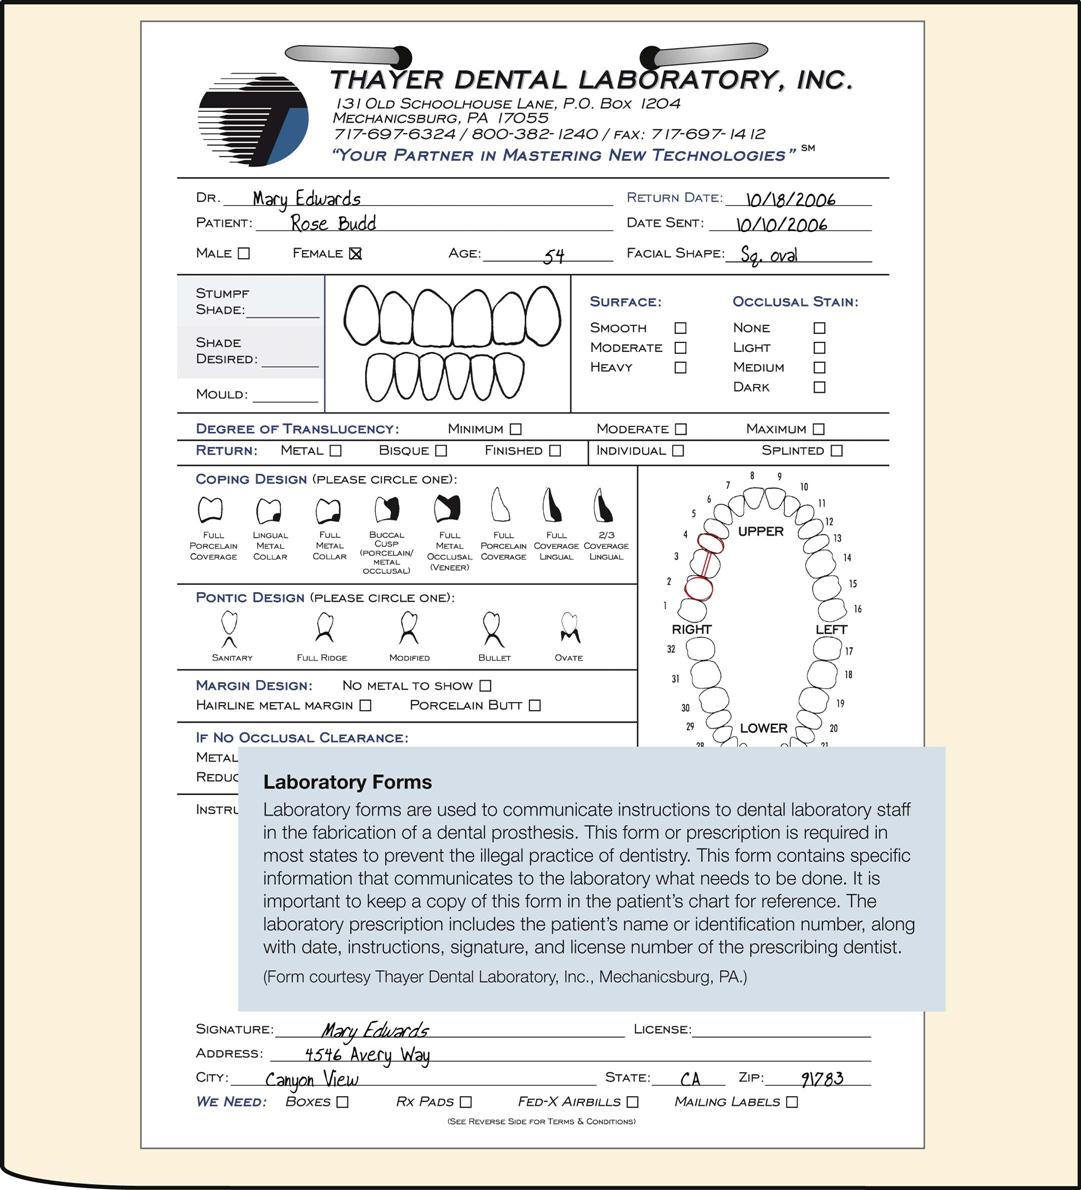
Laboratory Working Days
The laboratory requires a specific number of working days to complete the cast restoration. These needs must be taken into consideration when scheduling the patient’s return visit.
See Procedures 23-2: Assisting in a Crown and Bridge Restoration, and Procedure 23-4: Assisting in Delivery and Cementation of a Cast Restoration.
Removable Prosthodontics
Removable prosthodontics is the field of Prosthodontics involved with the replacement of missing teeth with a prosthesis (appliance) that the patient is able to remove and replace. There are two major types: removable partial dentures and removable full dentures.
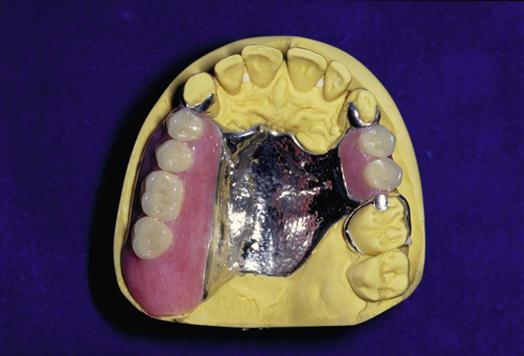
A removable partial denture, commonly referred to as a partial, replaces one or more teeth that are missing in a specific quadrant or arch (Figure 23-7).
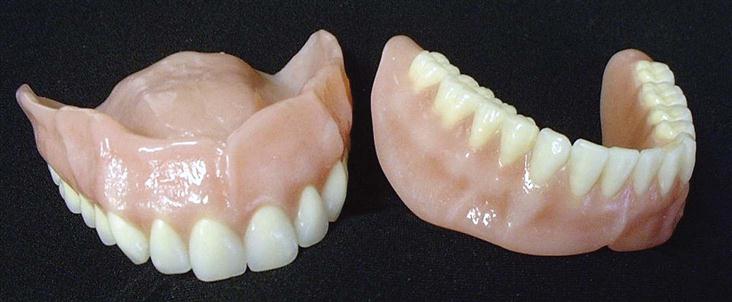
A removable full denture, commonly referred to as a denture, replaces most or all of the teeth that are missing in one arch (Figure 23-8).
The laboratory technician plays an important role in the construction of these types of prostheses. The technician follows the dentist’s written prescription and works in close cooperation with the dentist in the fabrication of the prosthesis.
Examination and Case Presentation Visits
The examination and case presentation visits are similar for removable partial dentures and removable full dentures. They include a thorough clinical examination, a medical history, a complete radiographic survey, impressions for diagnostic casts, and photographs of the full face and profile (if indicated).
If the treatment plan involves restorative, periodontal, endodontic, or surgical treatment before preparation for the prosthesis, this treatment must be completed, and healing must have taken place before treatment begins.
Partial Dentures
A removable partial denture receives its support and retention from the underlying tissue and from the remaining teeth that serve as abutments. The prosthesis is designed to distribute the forces of mastication between these abutments and the supporting tissue.
Indications for a Partial Denture
Contraindications to a Partial Denture
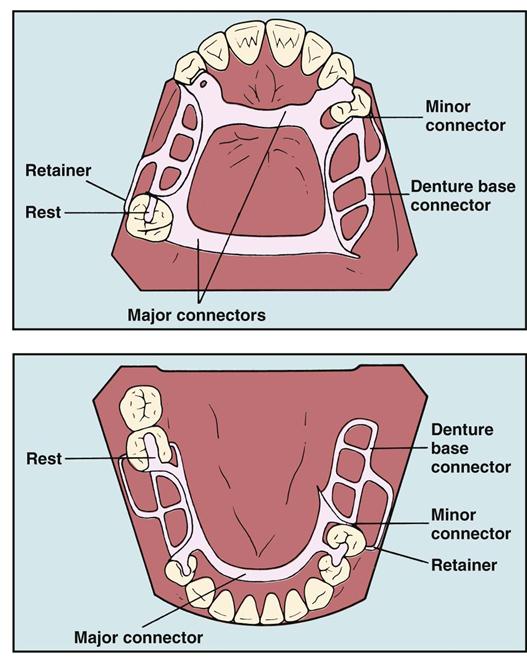
Components of a Partial Denture
The basic components of a removable partial denture are described in Table 23-3 and shown in Figure 23-9.
TABLE 23-3
Components of a Partial Denture
| Framework | The framework is the cast metal skeleton that provides support for the saddle and the connectors of the partial denture. |
| Major connector | The major connector, also known as a bar, is the piece of rigid metal that joins the right and left quadrant framework of the partial denture. |
| Saddle | The saddle is a metal mesh extension of the connector that is covered with acrylic. The saddle rests on the oral mucosa covering the alveolar ridge, holds the artificial teeth, and provides some support for the prosthesis. |
| Retainers | A retainer, also known as a clasp, is the portion of the framework that directly supports and provides stability to the partial denture by partially circling an abutment tooth. |
| Rests | A rest is a metal projection on, or near, the clasp that is designed to control the extent of seating of the prosthesis. |
| Artificial teeth | Artificial teeth are constructed from acrylic or porcelain. |
Abutment Teeth
A partial denture is supported and stabilized primarily by the abutment teeth. Abutments can be remaining natural teeth or surgical implants.
Selection of Abutment Teeth
Because of the stress placed on them, abutment teeth must have strong roots and strong bone support. Canines and molars, which have strong roots, are the teeth best suited for this purpose. Because of their relatively weak root structure, individual maxillary and mandibular anterior incisors are least acceptable for use as abutments.
Preparation of Abutment Teeth
Abutment teeth are prepared according to the type of rest selected. Preparation may involve one of the following options:
Final Impressions
A final impression, also known as the master impression, is required for creation of the working casts used by the laboratory technician during construction of the partial.
Because this must be an exact impression, a custom tray is made and an elastomeric impression material is used. The dentist chooses the type of tray, the material, and the impression technique to be used (see Chapter 22).
Even though accuracy is extremely important, the use of gingival retraction is not required because for a removable prosthesis, the teeth are not prepared below the gingival margin.
In addition to the final impression, it is necessary to take an impression of the opposing arch and to obtain an occlusal registration. Most commonly, this is an occlusal registration, and the technique is described in Chapter 22.
Selecting the Artificial Teeth
After the final impression, the shade (color) and mold (shape) of the teeth are determined. The manufacturer of the artificial teeth provides a shade guide. To identify the teeth, the mold and shade numbers are imprinted by the manufacturer on the back of each tooth in the shade guide (Figure 23-10).
Stay updated, free dental videos. Join our Telegram channel
VIDEdental - Online dental courses


