Restorative Procedures
Learning Objectives
1 Pronounce, define, and spell the Key Terms.
2 Describe the process and principles of tooth preparation.
3 Give the importance of the matrix system for Class II, III, and IV restorations.
4 Describe the procedure of an amalgam restoration.
5 Describe the procedure of a composite procedure.
8 Describe the dental assistant’s role in expanded functions for restorative procedures.
Key Terms
Bleaching
Cavity
Esthetic Dentistry
Expanded Function
Matrix
Operative Dentistry
Preparation
Restorations
Restorative Dentistry
Veneers
Wedge
Restorative dentistry, also referred to as operative dentistry, is an integral part of the general dental practice. This chapter will introduce the background knowledge and describe the techniques necessary for the clinical dental assistant to be better prepared when assisting with restorative procedures in a general dental practice (Box 21-1). The specific procedures covered include amalgam restorations, composite resin restorations, complex restorations, resin veneers, and tooth whitening.
Restorative dentistry is indicated when teeth are to be restored to their original structure with the use of direct and indirect restorative dental materials (Box 21-2).
Esthetic dentistry is primarily devoted to improving the appearance of teeth by restoring imperfections with direct and indirect restorative materials, or with the use of whitening techniques (Box 21-3).
Tooth Restoration
Regardless of the dental material selected, the main objective of the dentist is to restore a tooth or teeth to their normal function and appearance. It is important to understand the steps a dentist takes in removing decay, preparing the tooth for a dental material, and placing the dental material.
The first step is cavity preparation. The purpose of cavity preparation is to remove the decay along with a small amount of healthy tooth structure. This is done to provide a solid foundation for the restorative dental material. You will find it necessary to review cavity classifications in Chapter 12 to understand the different types of tooth preparations.
The dentist will use a high-speed handpiece, a variety of burs, and hand instruments to accomplish this step. Once the decay is removed, the dentist will utilize the high-speed handpiece with a different shaped bur to place retentive grooves in the preparation. These small grooves in the tooth allow the material to flow into the groove area, harden, and create the retentive process.
The dentist determines the type of restorative material based on the size, shape, and location of the preparation. With small preparations, an amalgam or composite material can be placed directly over sound dentin. With deeper preparations, a cavity liner, base, and bonding material may be required before the amalgam or composite is placed.
Matrix Systems
A tooth that is to receive a Class II, III, or IV restoration will have a minimum of one interproximal wall or surface of the tooth removed during the cavity preparation stage. By including the use of a matrix system, a temporary wall is created for the restorative material to be placed against until the material has set.
The universal retainer and matrix band is the system most commonly used when placing posterior restorations (Figure 21-1). The retainer firmly holds the matrix in place. A matrix is a metal or clear plastic band used to replace the missing proximal wall of a tooth during placement of the restorative material. (“Matrix” is singular. The plural is “matrices.”) Clear plastic matrices are used for anterior composite restorations.
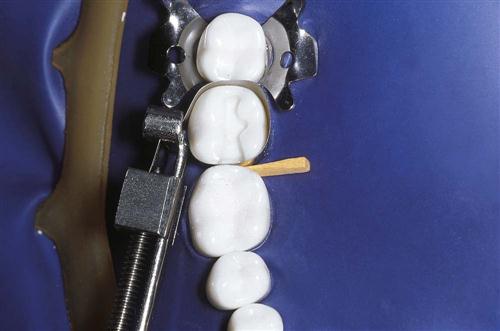
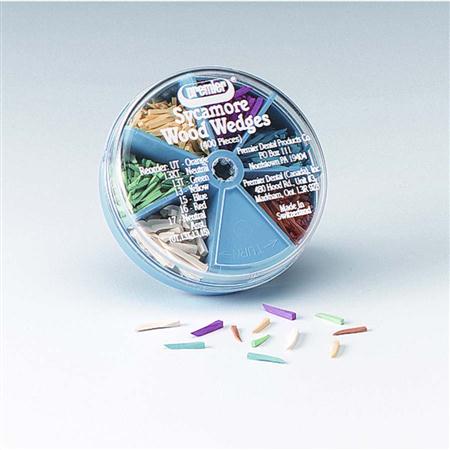
A wedge is triangular or round and is supplied in wood or plastic (Figure 21-2). The wedge is available in different sizes depending on the location and space between the teeth. By placing a wedge, you are creating the proper anatomic contour of a restoration.
Posterior Matrix System
The matrix band and universal retainer should be assembled before the procedure to save time during the procedure.
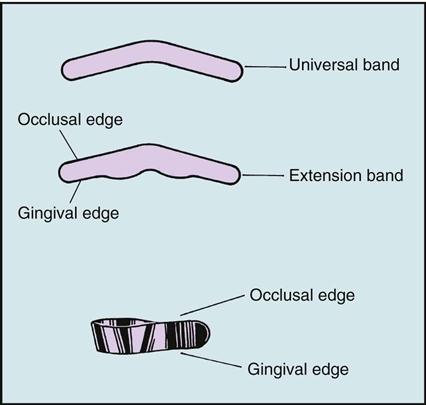
Matrix Bands
Matrix bands selected for Class II posterior restorations are made of a flexible stainless steel and are available in universal and extension sizes. The band wraps around the tooth, creating a temporary wall (Figure 21-3).
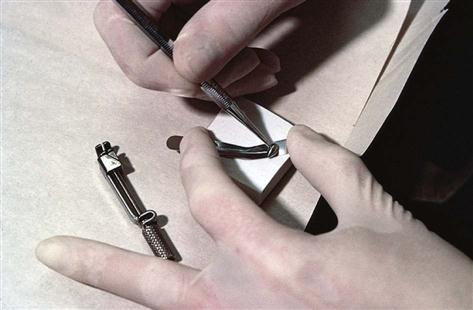
Before the band and the retainer are assembled, the band should be contoured in the proximal area so that it can make proper contact with the adjacent tooth (Figure 21-4). To contour the band, place the band on a paper pad, using a burnisher or handle end of cotton pliers. Rub the inner surface of the band until the ends begin to curl. This thins the band and provides a normal curvature of the band to fit around the tooth.
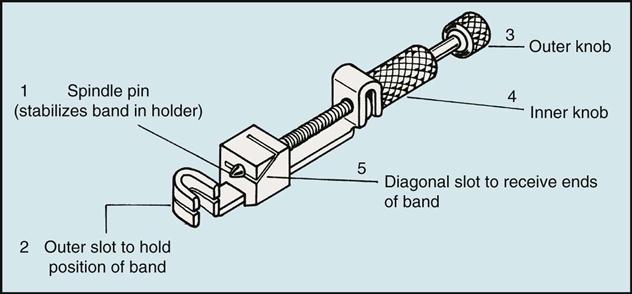
Universal Retainer
The universal retainer, also referred to as Tofflemire retainer, is a device that holds the matrix band in position. The components of the universal retainer are described in Figure 21-5.
See Procedure 21-1: Assembling a Matrix Band and Universal Retainer.
Anterior Matrix System
A clear plastic matrix strip is the matrix of choice for Class III and IV anterior restorations. Composite resins have inorganic filler particles that could be scratched or marked if a stainless steel matrix system were used.
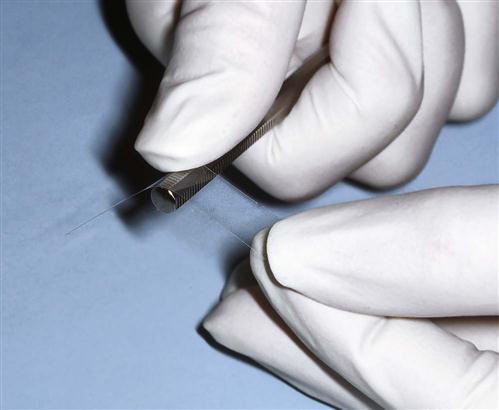
The plastic matrix strip is supplied already contoured or as a clear flat strip that is contoured (rounded) to adapt to the shape of the tooth. To contour the strip, pull it lengthwise over the handle of a mouth mirror (Figure 21-6). The strip is placed between the teeth (similar to dental floss) before etching of the tooth and placement of the restorative material. The strip is then pulled tightly around the tooth to adapt the composite to the natural contour of the tooth. The matrix is held in place by hand or with a retainer clip until the composite has been light-cured.
Wedges
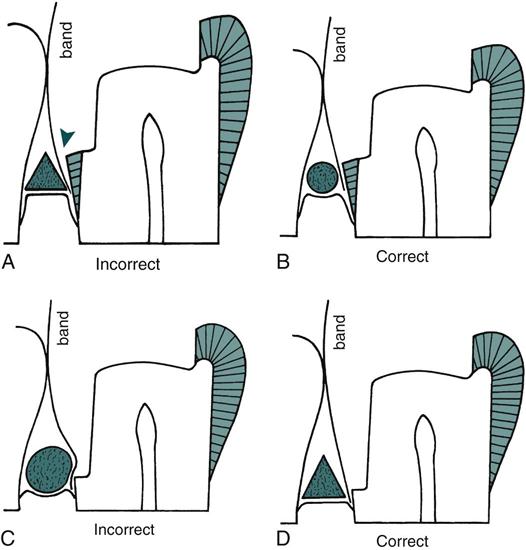
Wedges are used for all Class II, III, and IV matrix systems. A wedge is placed into the embrasure to hold the matrix band firmly against the gingival margin of the preparation (Figure 21-7). This allows the dentist to carve the restorative dental material back to the original normal contour and normal contact of the tooth. If the contact is not there, the tooth could drift slightly, allowing food to impact the area, creating problems for the patient.
Cotton pliers or Howe pliers are used to firmly place the wedge into the embrasure. If a universal retainer is used, the retainer is situated from the buccal side of the tooth, and the wedge is inserted from the lingual side
Permanent Restoration
A permanent restoration can range from a small class I restoration to an extensive class II multisurface foundation. With the exception of steps added to the procedure by using supplementary accessories and dental materials, a restorative procedure will follow a standardized format.
• Communicate with the patient about the procedure and about what to expect during treatment.
• Position the patient correctly for the dentist and specific area of the mouth.
• The dentist will evaluate the tooth to be restored.
• The dentist will administer local anesthesia (see Chapter 14).
• Prepare and assist in the type of moisture control to be used for the procedure (cotton roll, dry angles, dental dam) (see Chapter 10).
• The dentist will prepare the tooth (this includes the use of dental hand instruments and dental handpieces with rotary instruments) (see Chapter 19).
• The dentist will indicate which dental materials to be used (see Chapter 20).
• Prepare and assist in the placement of the dental materials.
See Procedure 21-3: Assisting in a Class II Amalgam Restoration, and Procedure 21-4: Assisting in a Class III or IV Composite Restoration.
Complex Restorations
If loss of tooth structure is greater than the remaining natural tooth, the dentist must decide whether to (1) move ahead and restore the tooth with an amalgam or composite material, or (2) change the treatment plan and replace the tooth structure with a cast restoration. Bonding techniques and retention pins are best suited for use in teeth that require very large restorations with little tooth structure remaining to provide strength and retention for the amalgam.
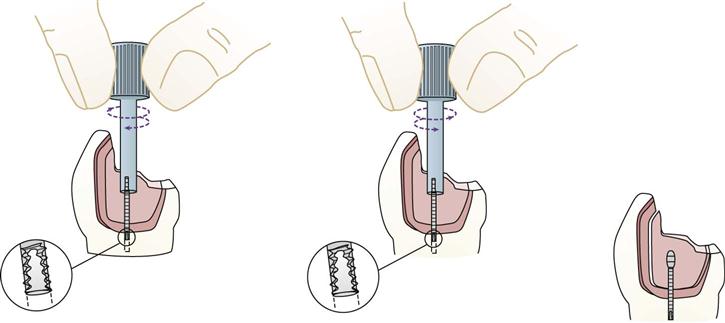
Retention pins provide internal strength to the material placed (Figure 21-8). These pins are available in a variety of diameters (widths) and styles to fit all sizes of teeth. Because all retention pins are very small (about half the size of a bur) and are easily dropped, the dental dam should be indicated for this procedure.
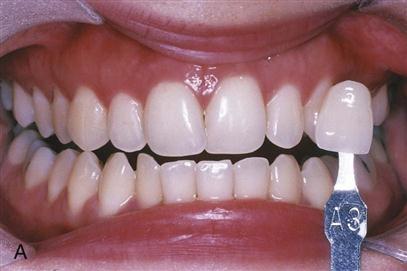
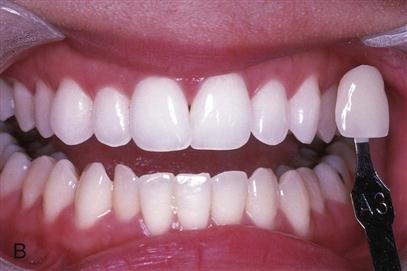
Veneers
A veneer is a thin layer of tooth-colored material that can be directly bonded onto the tooth or fabricated in the laboratory using a porcelain material and then cemented to the tooth surface (Figure 21-9).
This technique is used to improve the appearance of teeth that are slightly abraded, eroded, or discolored from stains or from an endodontic treatment. Veneers can also be used to improve the alignment of teeth or to close a diastema.
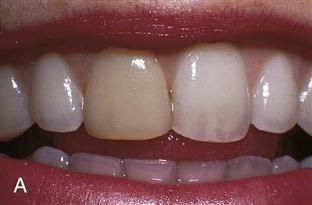
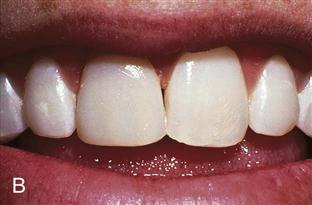
Vital Bleaching
Vital bleaching, also referred to as tooth whitening, is a technique that involves actually whitening of the external surfaces of the teeth. This desired whitening is done for esthetic purposes, not for restorative purposes (Figure 21-10).
Stay updated, free dental videos. Join our Telegram channel
VIDEdental - Online dental courses


