2
Intraoral Radiographic Principles and Techniques
In the practice of endodontics, radiographs are diagnostic tests that provide the clinician with important information during all phases of endodontic treatment: from the initial diagnostic assessment, through the treatment phase, and finally during posttreatment monitoring. Radiographic interpretation of intraoral images is limited by the fact that radiographs provide a two-dimensional representation of three-dimensional structures. Misinterpretations may occur due to image distortions and can be minimized by employing standardized techniques, including specific film placement, beam angulation, and image processing to produce images that are good representations of the structures of interest. Radiographic assessment may employ either film or digital receptors. Both intra- and extraoral radiographs are viable prescription options that may be considered alone or in combination. Intraoral imaging techniques provide superior image resolution, allowing the detection of earlier and less apparent changes. While extraoral techniques produce images with a greater field of view, they produce an image with decreased resolution, a result of multiple superimpositions.
In the everyday practice of endodontics, intraoral radiography utilizing a combination of different techniques and views generally provides the practitioner with sufficient information that can be used as an adjunct to their other diagnostic investigations, to provide a specific diagnosis, and to help provide guidance throughout the procedure. Several different intraoral views are available for use.
These include the periapical, bitewing, and occlusal views.
Intraoral Radiography
- The bisecting angle technique
- The long cone paralleling technique
- Periapical type occlusal radiographs
- Maxillary anterior occlusal
- Maxillary lateral occlusal
- Mandibular anterior occlusal
- Cross-sectional type occlusal radiographs
- Maxillary cross-sectional (vertex) occlusal
- Mandibular cross-sectional (standard) occlusal
- Anterior
- Posterior (lateral)
Intraoral radiography employs common steps in the production of a quality image.
These include patient preparation, infection control protocol, and radiation hygiene along with preparation, stabilization, positioning, exposure, and processing of the receptor, and finally, image evaluation and radiographic interpretation. Differences between the techniques are based on the principles dictating the receptor positioning and the type of stabilizing equipment used for positioning the receptor and aligning the PID (position-indicating device also known as the “cone”). Several different types of intraoral radiographs provide the practitioner with multiple viewing options that can be used alone or in combination, to help to overcome the challenge of interpreting three-dimensional structures, using two-dimensional imaging modalities.
Factors common to all intraoral techniques:
Patient Preparation
The patient is seated in an upright position in the dental chair. The patient is instructed to remove eyeglasses, all removable dental appliances, and any metallic piercings or jewelry that may be in the path of the X-ray beam. Metallic objects that have been left in place will attenuate the X-ray beam to produce radiopaque shadows (superimpositions) on the image, which may obscure important structures. The patient is covered with a lead apron and thyroid collar.
Infection Control Protocol
During the production of radiographs, the operator should wear gloves and adhere to all standard infection control procedures.
Radiation Hygiene
Radiographic prescription should be based on the standardized guidelines (The selection of patients for dental radiographic examinations, American Dental Association, 2011) in accordance with the ALARA (as low as reasonably achievable) principle of radiation hygiene.
Receptor Preparation
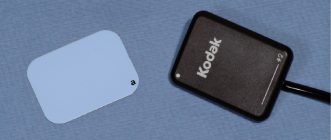
Either digital or film type receptors can be used to capture the image when exposing an intraoral radiograph. Different types of digital receptors include solid state charge-coupled device (CCD), complementary metal oxide semiconductor (CMOS), and photostimulatable phosphor (PSP). It is important to note that for infection control purposes, digital receptors must be wrapped in single-use plastic sleeves prior to intraoral placement, while film type receptors come from the manufacturer as a prepackaged sterile unit (Figure 2.1).
Figure 2.1 From left, PSP and CCD type receptors.
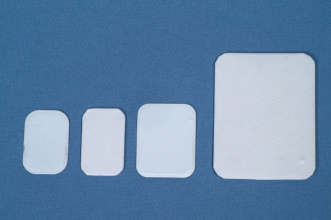
For intraoral radiographs, both digital and film type receptors are available in ANSI sizes 0, 1, 2, and 4 (ranging in size from smallest to largest). The receptor size is selected considering the specific area of interest. In general, the size 1 receptor is chosen for evaluation of the anterior teeth, while the size 2 receptor is used in the posterior regions, specifically from the distal of the canine posteriorly. The size 4 receptor is used exclusively for the occlusal type radiograph and is employed in relationship to the teeth that is unique. The size 0 receptor is reserved for use in pediatric patients or in situations where anatomic considerations limit the ability of adequate placement of a larger receptor (Figure 2.2).
Figure 2.2 From left, ANSI sizes 0, 1, 2, and 4 receptors.
(Image courtesy of B. Rakiewicz, BAA, RBP, DPES, Faculty of Dentistry, University of Toronto, 2011.)
In addition to the variety of sizes, film type receptors are available in single or double film packets. When the double film packet is used, a duplicate copy of the image is produced, which serves beneficial when a second radiograph is required for consultation with a colleague or in correspondence with an insurance company. Film type receptors are manufactured with different film speeds, which determines the amount of radiation exposure required to produce a radiograph of standard density. To produce an image of comparable density, faster film speeds require lower exposure times when compared to slower film speeds.
It is important that the receptor is always positioned with its active side facing the source of radiation:
- Films that are positioned backwards produce an image that is reversed, lighter (less dense) and have a geometric pattern superimposed on one side.
- PSP receptors positioned backwards produce no image.
- CMOS and CCD type receptors have a wire that is attached to their back surface leading directly to a computer monitor, preventing their backward positioning.
Receptor Holders
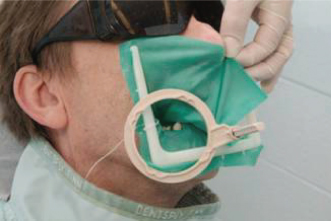
A receptor holder is a device that is placed into the mouth to support the film or sensor, while maintaining the desired position. In endodontics, radiographs that are taken during the treatment phase present a greater stabilizing challenge due to the presence of the rubber dam and clamp. Different holder designs are currently available to help circumvent this problem, and allow proper positioning of the receptor (Figure 2.3). When required, cotton rolls may be used to help to support the holder in position.
Figure 2.3 Receptor holders specifically designed for endodontics allow imaging during treatment.
(Image courtesy of Dr. B.Basrani, Toronto, Canada.)
If a cotton roll is attached to the surface of the film so that it lies against the lingual surfaces of the teeth, the desired parallelism between film and teeth is achieved, allowing the vertical angulation to be reduced, thus giving rise to improved visualization of the roots and surrounding bone. This method is based on a modification of the bisecting angle technique and results in more parallelism between the teeth and film, thus allowing a reduction in vertical angulation which decreases the incidence of superimposition of the zygomatic process. Clearly, an alternative would be to use a film holder and beam-aiming device.
It is important to emphasize that a holder should be used to support all types of receptors. The practice of engaging the patient in the stabilization process by positioning their thumb or fingers directly in the path of the X-ray beam results in unnecessary patient exposure which, according to the ALARA principle, cannot be justified.
Receptor Holders During Endodontic Procedures
While radiographs are a necessary adjunct in endodontic practice, problems are often encountered. These tend to be related to film placement and stabilization when endodontic instruments, rubber dam, and rubber dam clamps are in position. These problems are encountered most commonly among maxillary teeth and are considered the result of a rigid palate and its accompanying sloping concavity especially in the molar region (Lim and Teo, 1986).
From the earliest days of dental radiography, dentists attempted to standardize radiographic images and techniques. The focus of researchers in the 1950s to the 1970s was to develop a film holder that would hold the film and allow easy and predictable alignment of the X-ray tube. As research projects became more dependent on dental radiographic measurements, the focus shifted to producing reproducible radiographic images, from which highly repeatable measurements could be made. Existing devices have strengths and weaknesses. Readily available devices are adequate for routine clinical use; however, user-friendly and patient-friendly film-holding devices that result in highly reliable and accurate measurements have yet to be introduced (Kazzi et al., 2007).
The routine use of film holders in endodontics ranges from 21.6% (Saunders et al., 1999) to 26% (Chandler and Koshy, 2002). The increasing use of film holders has been shown to have a relationship to those clinicians who routinely use rubber dam (Chandler and Koshy, 2002), those practitioners who are specialists in endodontics (Chandler and Koshy, 2002) and also have a significant relationship to younger practitioners (Saunders et al., 1999).
The EndoRay II (Rinn Dentsply, Weybridge, UK) employing the paralleling technique fits over endodontic files, rubber dams, and clamps, and is securely held by the patient’s bite.
To assemble and use, follow these instructions:
With film centered in the basket, place the assembly over the tooth (with files and clamp) and rest it on adjacent teeth. Release the top or bottom half from the frame of the rubber dam. There is no need to completely remove the rubber dam and frame. The film should be adjacent to the subject tooth and behind the rubber dam. The patient should then bite lightly until the EndoRay II is secure. The EndoRay II is manufactured from a porous plastic material and has a limited life. It must be replaced periodically. For a longer-lasting instrument, always disassemble the three pieces before sterilizing. The EndoRay II should be sterilized in a steam autoclave or chemiclave. Other methods of sterilization are not recommended.
Receptor Exposure
Once the receptor is in place and stable, the patient is instructed to maintain position and avoid any movement. The operator leaves the room and stands behind a safe barrier to activate the X-ray unit and expose the receptor. X-ray machine settings are preset prior to receptor positioning and are determined by receptor type, patient size, and X-ray machine.
Receptor Processing
The type of receptor used determines the processing method. Film receptors require chemical processing using manual or automatic machines. The resulting image is produced on a coated polyester base that requires a lighted viewing box for evaluation. Digital receptors produce an image that is viewed on a computer monitor. CCD and CMOS receptors are directly linked to a computer monitor where the image can almost instantly be evaluated (within a few seconds) (Versteeg et al., 1997). PSP receptors require a separate scanner that “reads” the receptor and is connected to a computer monitor to produce an image resulting in longer but still rapid processing times (approximately 30 seconds) (Versteeg et al., 1997).
Image Evaluation and Radiographic Interpretation
Both film and digital receptors are initially evaluated for image adequacy. They should provide clear unobstructed images of the teeth and surrounding structures of interest. When using digital receptors image manipulation can be accomplished directly on the computer monitor using the computer’s software. Film receptors must be arranged in their correct orientation on a view box. Image evaluation is best done in a darkened room. A radiographic interpretation must be completed for all radiographic images obtained.
Seven basic steps summarize the method used to produce all types of intraoral radiographs. Specific details pertaining to each step and individual variations unique to each specific type of radiograph are discussed under their individual headings.
The Periapical Radiograph
The periapical radiograph is the most commonly employed radiograph used in the practice of endodontics. When examining a specific tooth, the periapical radiograph should provide an image of the entire tooth from the crown to the apex, including some or all of adjacent teeth, the surrounding bone, and anatomical structures in the vicinity.
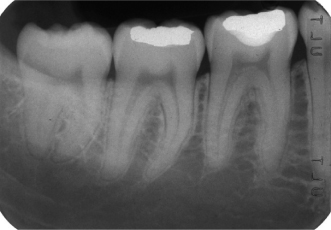
Periapical radiographs can help to provide important diagnostic information allowing the detection of new or recurrent caries, the presence of calculus, the status of restorations, the presence and degree of periodontal bone loss, as well as a providing a clear view of the periapical structures (Figure 2.4).
Figure 2.4 A periapical radiograph depicting the mandibular right posterior region.
Two different techniques are available for the production of periapical radiographs; the bisecting angle technique, and the more commonly employed long cone paralleling technique. Each technique utilizes different methods and equipment, is based on their own specific principles, and result in different limitations in the production of an optimal periapical radiograph.
Concepts Unique to Each Technique
The concepts that are unique to each specific technique are discussed under the individual technique headings. These include a discussion of the technique principles, the types and methods for using the stabilizing the receptor, and the guidelines for aiming the PID.
The Bisecting Angle Technique
Principles
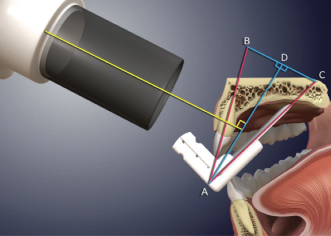
The bisecting angle technique outlines a method to produce an image of an object, minimizing its magnification and distortion, while optimizing its image clarity.
The principles of the technique are based on simple geometry. The rule of isometry states that two triangles are equal if they have two equal angles and share a common side (Figure 2.5).
Figure 2.5 A triangle with equal angles is bisected equally, producing two equal triangles that share a common side.
(Image courtesy of A. Cormier, BSc, MScBMC, DPES, Faculty of Dentistry, University of Toronto, 2011.)

To apply this principle to intraoral imaging, the receptor (film or sensor) is positioned on the lingual or palatal surface of the mouth, resting against the tooth. The long axis of the receptor meets the long axis of the tooth at point A (tip of the triangle). An imaginary line bisects or divides the triangle into two equal parts (the bisector). The central ray of the X-ray tube must be aligned so that it will strike the bisector at 90 degrees (a right angle). As a result, the rule of isometry can be applied; the two newly produced triangles share a common side and have equal angles, so that the hypotenuse (the side of a right-angled triangle opposite the right angle) AC is equal in length to the hypotenuse of the other triangle AB producing an image of the object that is accurate in length (Haring and Jansen, 2000, pp. 255, 256) (Figure 2.6).
Figure 2.6 The central ray (yellow) is aimed perpendicular to a line that bisects the triangle (blue) formed by the long axis of the tooth and the long axis of the receptor (red lines).
(Image courtesy of A. Cormier, BSc, MScBMC, DPES, Faculty of Dentistry, University of Toronto, 2011.)
Receptor Holders Used for the Bisecting Angle Technique and Their Positioning
- Styrofoam and rigid plastic stabilizers (Figure 2.7) are composed of different materials, with a similar design. The occlusal or incisal portion of the receptor rests in a groove located in the horizontal base of the stabilizer. The groove provides alignment and retains the receptor in position. The vertical component of the stabilizer supports the vertical component of the receptor, preventing any bending (more commonly a problem when using film type receptors). When positioned lingual or palatal in the mouth, the horizontal base of the stabilizer projects between the occlusal surfaces of the teeth where the patient bites firmly onto it as they close their teeth together, providing stabilization.
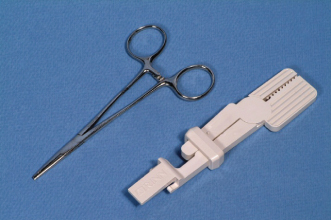
- Hemostat and the Snap-A-Ray® holders (formerly known as the Eezee-Grip® film holder) (Figure 2.8) are used in a similar fashion. The open end of each instrument grasps the occlusal portion of the receptor in a horizontal orientation (parallel to the edge), so that when the receptor is positioned palatal or lingual to the teeth, the handle of the devise protrudes out of the mouth. The Snap-A-Ray® has the unique feature of extending a horizontal plate over the occlusal surfaces of the teeth, allowing further stabilization as the patient is instructed to close their teeth together.
Figure 2.7 Styrofoam and plastic receptor stabilizers.
(Images courtesy of B. Rakiewicz, BAA, RBP, DPES, Faculty of Dentistry, University of Toronto, 2011.)
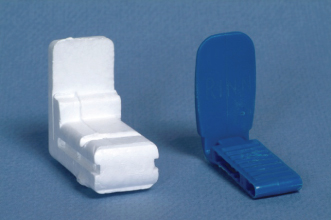
Figure 2.8 Hemostat and Snap-A-Ray® receptor holders.
(Images courtesy of B. Rakiewicz, BAA, RBP, DPES, Faculty of Dentistry, University of Toronto, 2011.)
Regardless of the type utilized, when in position, the holder aligns the receptor in an upright orientation, as close to the teeth as possible. The shape of the palatal vault or the lingual alveolar bone prevents the receptor/holder combination from aligning parallel to the long axis of the teeth. Instead, an angle is formed at the point where the two long axes intersect.
Aiming the PID
Once the receptor is stabilized intraorally in the desired location, the PID of the dental X-ray unit is aimed. To achieve optimal positioning, three factors must be considered: the horizontal angulations, the vertical angulations, and the aim of the central ray (the centermost ray of the X-ray beam).
- Horizontal Angulation
The horizontal plane of the buccal or labial surfaces of the teeth determines the horizontal angulation. The outer edge of the PID forms a circle. This circle should be aligned parallel to the horizontal plane of the buccal or labial surfaces of the teeth. When correctly positioned, the X-r/>
Stay updated, free dental videos. Join our Telegram channel
VIDEdental - Online dental courses


