16: Porcelain Veneers

Chapter 16 Porcelain Veneers

Section A Porcelain Veneers

Ross W. Nash

Relevance of Porcelain Veneers to Esthetic Dentistry and Brief History of Clinical Development and Evolution of the Procedure

The application of porcelain veneers has been in the general dentist’s list of procedures since the early 1980s when it was discovered that one could etch the inside of a porcelain restoration and get micromechanical retention similar to that achieved on etched enamel. It was also possible to treat the surface with silane and thereby increase bond strength. Surface treatments with etching and silane achieved bond strengths of over 2000 pounds per square inch (psi) whereas, without these steps only about 230 psi was possible. A further discovery was that thin layers of porcelain could be bonded to tooth structure; this was far better than having to remove significant tooth structure for a thicker restoration in order to attain the retention and resistance form, needed with G.V. Black’s preparation designs for amalgam, gold, and porcelain-fused-to-metal.

As a result of these discoveries, dentists could be more conservative with respect to tooth reduction. It was possible to maintain the maximum amount of natural tooth structure and still achieve the results the patient wanted in terms of tooth appearance. Surface improvements included better color, apparent angulation and positioning (i.e., making teeth that were not entirely straight look straight), and the closing of spaces without orthodontic treatment. It became possible to do these things without removing extensive amounts of tooth structure. Sometimes none was removed at all.

The author began offering porcelain veneers in the mid-1980s, after having applied many direct composite veneers, which were used for essentially the same purpose. Porcelain veneers made it possible to utilize the services of a talented dental technician and to adopt a team approach rather than building the entire restoration freehand on the patient’s tooth structure, as with direct composite. Indirect porcelain veneers also offered other advantages: the ceramic material has a more durable surface than composite restoratives. Ceramic does not have a resin matrix to absorb fluid, and thus it is more color stable. It also exhibits great physical strength once it has been laminated to an underlying structure, whether tooth or another material.

The reason the thin layers of porcelain work, even in functional areas, is because of the lamination process. Ceramics are inherently brittle, but when supported, their strength is considerable. An example is a piece of floor tile. A strong man can break a piece of floor tile in his hands, but once it is laminated to the floor, it generally never breaks as long as the adhesive stays intact. Supported ceramic materials are very strong. In porcelain-fused-to-metal restorations, the porcelain is laminated to a metal substrate. Now it is possible to laminate it directly to the tooth structure. This expands the possibilities. Thin layers of laminated porcelain are strong enough to withstand the forces of intraoral function well. The lamination process is also known as the bonding procedure.

Porcelain veneers differ from porcelain laminates. Laminates can cover any part of the tooth, whereas a porcelain veneer is usually limited to the buccal or facial of the tooth. The lamination process can be used successfully on any part of the tooth—lingual, occlusal, facial, or proximal. These restorations can be thought of as “extended veneers.” Knowledge of function and bite patterns is required for correct usage of this technique. Through the use of these types of restorations, patients have options that were not available before.

Clinical Considerations

Some considerations arise when ceramic materials are laminated to tooth structure. Most have to do with function; if interocclusal relationships are developed incorrectly, the entire system is likely to fail, even if it is natural tooth structure.

Material Options

Several materials are available for indirect laminates and veneers today. Indirect composite resin can be heat-treated and polymerized to a much greater degree than direct composite and thus is suitable for indirect veneers. Most practitioners, however, prefer to use ceramic veneers for the purpose of laminating teeth.

Stacked porcelain is composed of ground glass particles and/or manufactured powdered glass. The ceramist adds a little liquid, mostly water, to that powder, forming a paste or slurry. This is applied incrementally, approximating tooth anatomy, to a refractory cast; the cast is inserted into the porcelain oven and then is cut away from the stone model after the ceramic is baked. The ceramic can also be swedged onto a platinum foil matrix as in the porcelain jacket technique where the matrix is teased off the die and placed in the oven, with the matrix peeled off after baking. Regardless of the technique, these ceramic materials all involve incremental layering. The ceramist then has the opportunity to add color and opaquers to the ceramic during this build phase. This allows the colors to blend into the porcelain itself, making the stacked porcelain look very natural, preventing unesthetic surface tinting or surface staining.

The use of the stacked porcelain technique—whether employing natural or synthetic material—requires less aggressive tooth reduction than other techniques. The ultimate restoration does not have as much strength in most cases as a pressed ceramic, which is manufactured in much the same way as cast gold or metallic restorations; it is waxed up to the full contour and then sprued. Next, the wax pattern is invested in stone and melted out. A molten glass pellet is then pressure-forced into the vacant mold. Due to the nature of the pressing process, the ceramic material gains a higher density and therefore higher bending and compressive strengths. Bending strength is important in ceramic materials. Unlike composite resins, ceramics have no resilience and cannot rebound after stress.

The higher bending strength of the pressed ceramics is advantageous for functional areas, where these materials are generally preferred over stacked porcelain. However, their major disadvantage is that they are monochromatic; they are pressed in one step from a single ingot and exhibit one single color throughout. To gain the vitality of stacked porcelain restorations, the practitioner must leave adequate space to cut back about 0.2 mm from the pressed material to develop the esthetic depth and staining of the layering porcelain, which yields the desired color. Thus, more working space and a deeper tooth reduction is needed for the pressed ceramic restoration unless the patient is willing to accept a monochromatic appearance or is satisfied with surface or inside staining and/or tinting. For conventional restorations with pressed ceramics, up to 1.0 mm of tooth reduction is required, whereas stacked porcelain needs only half that preparation. Over the years, practitioners have learned to use pressed ceramics for many different purposes, including laminate veneers.

Conventional pressed ceramics are made from silica-based materials. Lithium disilicate, however, is now available for pressing as well. It has a much higher strength and can be utilized in layers as thin as stacked ceramics. Of course, it is still monochromatic until layering porcelain is added to characterize the surface. The additional strength provided by this material allows thin veneers, full crowns, and bridges to be pressed. There are even several pressed block products on the market that can be milled to produce veneers.

Artistic Elements

Every dentist can learn to bond ceramic materials to the teeth with clinical success; it is simply a matter of training. The patient’s overall smile appearance is improved more through artistry than science or mechanical procedures, however. Thus, one dentist may achieve an extremely beautiful result, whereas another dentist, using the same materials and techniques, may develop an appearance that is unsatisfactory.

The artistry lies in the skills not only of the dentist, but also in the capabilities of the team that the dentist selects. A very few dentist-ceramists are able to prepare the tooth, undertake the laboratory procedures for the restoration, and place it in the patient’s mouth. Most practitioners take the team approach, and seek out talented ceramists who can use these dental products artistically. Dentists employ the technician’s skills to complement their personal talents in patient treatment; a successful combination yields magnificent restorations. Art is not inexpensive, however, and the personalized process often requires additional time.

For elective procedures, clinical success is unimportant if the patient does not like the appearance of the restoration. If the dentist chooses to accept an elective case, it is imperative that the patient’s esthetic concerns be satisfied. Dentists must educate patients on the appearance of natural teeth, but ultimately, what the patient wants is paramount. The process becomes an interactive art. The successful dentist develops the artistic skills related to patient treatment and the management skills related to patient satisfaction. It is necessary to learn and practice the science behind dentistry, but the art is an essential part as well.

Continuing education courses that are taken after graduation from dental school offer the most significant training. Many progressive dental schools today offer courses in esthetics, but there is so much to learn at the undergraduate level that it is generally difficult to allocate adequate time to esthetics training that is necessary for the performance of such procedures, until after dental school. Most dentists subscribe to post-graduate continuing education to achieve competency in this and other areas.

Smile design principles are essential to the study of artistry in dentistry. Training in such artistic elements is offered through dental school–sponsored continuing education courses and at independent schools or institutes. Practicing dentists have the opportunity to learn skills and to develop information-sharing relationships with mentors. There is much more to esthetics than just science and technology; smile design and occlusion principles must also be mastered. Education must address function and patient feelings about appearance at a high level to contribute to the practice of esthetic dentistry.

Treatment Planning

In a general practice, dentists have an opportunity to discuss esthetics with their patients as they address other dental health concerns. Certain practices are focused on esthetics; patients seek these venues out specifically for esthetic or cosmetic reasons. There are three types of dentistry offered in general practice:

Most dentists see patients on an ongoing basis for dental health treatment only. Once patients become aware that the dentist offers esthetic treatment modalities, however, they tend to request these procedures. Ideally, the patient asks for the treatment spontaneously or after education. This is far better than the dentist trying to “sell” a treatment approach. Dentists prefer to have the patient say, “Doctor, I would like to have this procedure. I know you do it well. I have seen your other patients.” This is a situation that is set up for success. Many patients in a general practice are interested in esthetic procedures. They simply are not aware that the dentist provides these treatment options. Dentist and dental team education to the patients on what is available is the key.

The first step in a cosmetic consultation or during a general practice esthetic discussion is the taking of photographs. These images include: a full-face image, a smile picture, angled smile views, side views, retracted views, and occlusal views. Those images are uploaded onto a computer screen in the operatory or in a consultation room so that patients can see themselves more accurately than even before. It is almost as though they are looking at someone else because they perceive the images to be different from what they see in a mirror. Patients are not accustomed to viewing their smiles in this clinical fashion. They also tend to be more objective when looking at a picture rather than looking in the mirror. The dentist and patient examine the images together and decide the extent of the smile zone, typically the front 10 maxillary teeth and the front eight mandibular teeth. They then determine what changes need to be made, whether a single tooth is involved, all the smile zone teeth, or all the teeth. This initial evaluation can often be conducted without radiographic or full clinical examinations. Once the patient decides to proceed, the dentist completes the full clinical and radiographic examinations to supplement the photographic record. The patient then decides their treatment objective and the dentist recommends suitable clinical procedures.

Treatment Considerations

Procedure

At the pre-operative appointment, a full set of digital photographic images is recorded, including full-face, smile, retracted, and occlusal views. Photography serves as a communication tool between doctor and patient and doctor and laboratory, provides documentation, and is a learning tool. This “records” appointment lasts 60-90 minutes. All materials are sent to the laboratory. The technician then pours the full-arch models, mounts the models on a semi-adjustable articulator, and does a complete wax-up of the case as the dentist and patient would like it to look when it is finished.

Smile design principles are followed in a critique of the angulation, proportions, and alignment of each tooth for the patient. The design is based on sound anatomy and occlusion and usually takes a week or so for the lab to complete

The patient then returns for the first operative appointment. For some patients, the author uses conscious sedation and relaxation techniques. These are particularly useful for very long appointments. Others patients require only a local anesthetic. The ultimate goal is to help the patients relax. To this end, they may be given a comfortable blanket, earphones so they can listen to soft music, a dark eye mask to shut out light, or a massaging chair’s back massage. Once the patient is totally comfortable, the dentist can apply the anesthetic.

The dentist then begins the preparation of the selected teeth, a process which may take several hours. After tooth preparation, occlusal registrations and the final impressions are obtained. The dentist fabricates provisionals at the first operative appointment with a putty stent technique. (A polyvinyl siloxane putty impression over the wax-up is used to make a stent, which in turn is used to fabricate provisional restorations for the patient.)

Provisionals are made with a bis-acrylic material applied directly onto the prepared teeth. These can be made to look very esthetic and to simulate the appearance of the finished ceramic restorations. The colors of these acrylic materials are similar to the shades of the proposed ceramics. The patient can actually preview the final result through the provisional process. The patient normally wears the provisionals for 2 to 3 weeks.

The impressions and bite registrations are sent to the laboratory. Photographs have been taken at every step along the way to show the prepared teeth, the shade guide with the prepared teeth, the provisionals, and models of the provisionals. The dentist communicates with the laboratory using all of this information.

Once the technician has fabricated the ceramic veneers or laminates, the patient returns and the dentist spends up to a full day placing these restorations. The patient is relaxed and then anesthetized at this second appointment. The provisionals must first be removed. (While they can function well for several weeks, provisionals ultimately fail.) During removal, the dentist typically breaks them apart to protect the underlying tooth structures; they are not reusable.

With routine home care, the tissue should be relatively healthy. Gingival bleeding can make the adhesion process difficult or impossible. The dentist tries on the laboratory-fabricated restorations on the prepared teeth. Water may be used as a try-in medium between the teeth and the ceramic. If the restoration looks good with water, an untinted resin luting cement is used to bond it into place. If some color modification is necessary, tinted resin cement materials may be considered at this time.

The dentist must ensure that the patient is satisfied with the results at this stage. The patient typically inspects these restorations while lying down on the dental chair through a hand-held mirror; this is the worst way imaginable to look at the restoration, but is the only practical option. This is the step where the dentist must solicit the patient’s approval for the restoration. Ideally, the esthetics are right the very first time. If the patient is less than satisfied, and does not like the appearance, the restorations are not yet cemented, and the dentist can change them as needed.

Clinical Conservation Concepts

The author’s philosophy has always been to assist the patient in maintaining the maximum amount of natural tooth structure. One might ask why a dentist would want to maintain the maximum amount of natural tooth structure, when reductive preparation permits increased retention and a better resistance form (concepts that drive amalgam, gold, and porcelain-fused-to-metal techniques). The simple answer is that the author does not feel comfortable in guaranteeing the patient that porcelain laminates are a “permanent” restoration. It is likely that the process will have to be redone at some point in the future. If the dentist has previously prepared the tooth with resistance and retention form for a specific type of restoration, it is difficult to remove the restoration without removing more tooth structure. It is likely that significant additional tooth structure must be removed when the restoration is to be replaced. In situations where the tooth has been reduced to the point where there is little remaining natural structure, the patient has few options for re-treatment. It is therefore wise to maintain as much natural tooth structure as possible to maximize future choices for the patient.

Porcelain laminate products, and thus clinical treatment options, are constantly improving. Pressed ceramics appeared in the early 1990s, and zirconium in the early 2000s. These newer options are available to the patient and dentist. While the author prefers stacked porcelain laminates to pressed ceramics for elective veneers, innovative materials such as lithium disilicate allow for thin veneers that have all the strength of pressed materials. The ever-developing fields of esthetic and cosmetic dentistry continue to provide improved intraoral solutions for our patients.

The author’s approach has always been to conserve as much natural tooth as possible. The best dentistry is no dentistry; minimizing the amount of tooth structure reduced is a service to the patient. Adhering to the principle of maintaining natural tooth structure is the most conservative approach.

Maintenance

A common concern is whether every porcelain veneer patient needs a night guard as part of the treatment. The author believes that functional occlusion is the key to the long-term restoration and long-term maintenance of natural tooth structures. If the patient has comfortable, good occlusion with anterior guidance and posterior disclusion, a night guard is rarely needed. Those patients who exhibit bruxism and occlusal wear of the natural teeth are furnished with appliances (these represent 10% of the author’s patients who wear nightguards).

Beyond the above, patients may treat these laminates just as they do natural tooth structure. Brushing, flossing, and bi-annual dental visits are mandatory. Patients with these bonded restorations can comfortably eat corn on the cob and apples, chew meats, and function quite normally. They must be aware, however, that these laminates can fracture just like natural teeth. It is important that patients not abuse these restorations by chewing ice or hard candy or any other activity that would normally cause harm or stress to the natural anterior or posterior teeth. However, these restorations can also be replaced. A fracture or a delamination is not the end of the world; it is simply a temporary irritation.

Patients should continue regular in-office maintenance with non-abrasive polishing paste as the porcelain surface glaze can be scratched and the esthetic gloss lost. There are methods available to repolish porcelain if necessary. The hygienist should not use an ultrasonic scaler at the margins.

It is recommended that acidulated fluorides not be used because they tend to etch porcelain. A Prophy-Jet remove stains from natural tooth structures, but it can roughen the surface of porcelain and make it more susceptible to staining. Hand cleaning and polishing with prophy cup and nonabrasive prophy paste is sufficient.

Clinical Case Study

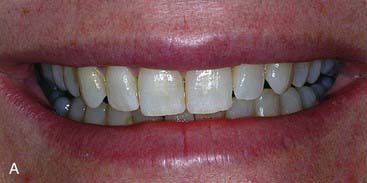
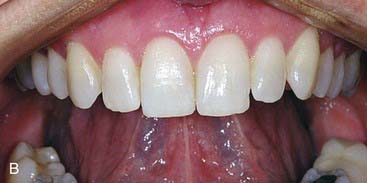
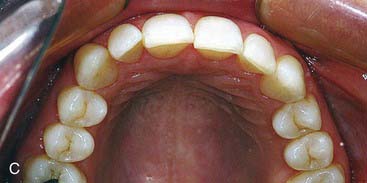
The elective case presented here was performed to enhance the patient’s smile by providing 10 porcelain veneers with minimal preparation. Layered porcelain was used to achieve the maximum esthetics in a veneer. Figure 16-1, A, shows the patient’s smile before treatment. Her teeth were slightly malaligned, but were in excellent condition. She was free from dental disease and was well aware that the cosmetic treatment she was seeking was not reversible and not permanent. She was comfortable with a 10- to 15-year life expectancy of her veneers and was prepared to replace them when needed to achieve the esthetic benefits they would provide. Figure 16-1, B, shows a retracted view of the maxillary 10 most anterior teeth before treatment, and Figure 16-1, C shows the incisal view of her teeth before treatment.

Preparation

The first step was to anesthetize the patient’s teeth and place depth cuts of 0.5 mm on the facial surfaces of the teeth to be veneered (Figure 16-2, A). The depth cuts were joined with a chamfer-ended diamond bur (Figure 16-2, B). Subtle chamfer margins were created at the height of the tissue (Figure 16-2, C). Incisal preparation involved 1.0 to 1.5 mm of reduction, leaving a “butt” margin and rounded corners (Figure 16-2, D). Interproximal preparation involved continuing the chamfer to the proximal contacts, forming an “elbow” preparation (Figure 16-2, E). A diamond strip was used to slightly open the contacts (Figure 16-2, F). Where no occlusal preparation was performed on the premolar teeth, a 0.25-mm horizontal groove for seating purposes was placed (Fi/>

Stay updated, free dental videos. Join our Telegram channel

Jan 3, 2015 | Posted by in Esthetic Dentristry | Comments Off on 16: Porcelain Veneers

VIDEdental - Online dental courses

Get VIDEdental app for watching clinical videos