Occlusal Appliance Therapy
“THE OCCLUSAL APPLIANCE: AN ADJUNCTION TO MANAGING TMD.”
—JPO
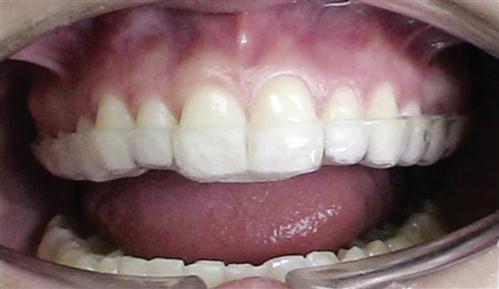
AN OCCLUSAL APPLIANCE is a removable device, usually made of hard acrylic, which fits over the occlusal and incisal surfaces of the teeth in one arch, creating precise occlusal contact with the teeth of the opposing arch (Figure 15-1). It is commonly referred to as an occlusal splint, bite guard, night guard, interocclusal appliance, or even orthopedic device (orthotic).

Occlusal appliances have several uses, one of which is to temporarily introduce a stable occlusal condition that can alter neuromuscular reflex activity, leading to improvement in certain muscle pain disorders. Occlusal appliances can also provide an occlusal condition that allows the condyles to assume their most orthopedically stable joint position. They are also used to protect the teeth and supportive structures from abnormal forces that may create breakdown and/or tooth wear.
General Considerations
Appliance therapy has several favorable qualities that render it helpful for the management of many temporomandibular disorders (TMDs). Since the etiology and interrelationships of many TMDs are often complex, the initial therapy should generally be reversible and noninvasive. Occlusal appliances can offer such therapy while temporarily improving the functional relationships of the masticatory system. When an occlusal appliance is specifically designed to alter an etiologic factor of TMDs, even temporarily, the symptoms are also altered. In this sense the appliance becomes diagnostic. Care must be taken, however, not to oversimplify this relationship. As discussed later in this chapter, an appliance can affect a patient’s symptoms in several ways. When it reduces symptoms, it is extremely important that the precise cause-and-effect relationship be identified before irreversible therapy is begun. These considerations are necessary to assure that more extensive treatment will produce long-term success. Occlusal appliances are equally helpful in ruling out certain etiologic factors. When a malocclusion is suspected of contributing to a TMD, occlusal appliance therapy can quickly and reversibly introduce a more desirable occlusal condition. If it does not affect the symptoms, the malocclusion is probably not an etiologic factor and certainly the need for irreversible occlusal therapy should be questioned.
Another favorable characteristic of occlusal appliance therapy in managing TMDs is that it is useful in reducing symptoms.1–5 An early and extensive critical review of the literature6,7 revealed that its effectiveness is between 70% and 90%. However, a more recent article using the Cochrane Database Systematic Review reported that occlusal appliances do not have a strong or reliable effect on the symptoms of TMDs.8 This is likely a reflection of the poor research design commonly used in earlier studies. The precise mechanism by which appliances may reduce TMD symptoms has been debated, and there is no clear conclusion at present.9–11 The profession must provide better evidence-based data to better understand the role of appliances in TMD. What is evident is that they are generally a reversible, noninvasive modality that can help manage the symptoms of many TMDs. They are often indicated, therefore, in initial and in some long-term treatments of TMDs.12,13
The success or failure of occlusal appliance therapy depends on the selection, fabrication, and adjustment of the appliance and on patient cooperation.
Proper Appliance Selection
Several types of appliances are used in dentistry. Each is aimed at affecting a specific etiologic factor. To select the proper appliance for a patient, one must first identify the major contributing etiologic factor causing the disorder. An appliance can then be selected that will best affect that factor. No single appliance is useful with all TMDs. In fact, some TMDs do not respond to appliance therapy at all. Once again, a thorough history, examination, and diagnosis are critical.
Fabrication and Adjustment of the Appliance
Once the proper appliance has been selected, it must be fabricated and adjusted such that the treatment goals will be met. Care must be taken to construct an appliance that will be both compatible with the soft tissues and provide the exact alteration in function needed to eliminate the cause. An improperly adjusted appliance will not only diminish treatment effects but may also introduce doubt on the part of both patient and dentist regarding the diagnosis and future treatment.
Patient Cooperation
Since appliance therapy is reversible, it is effective only when the patient is wearing the appliance. Patients must be instructed regarding its appropriate use. Some appliances require extensive use while others require only part-time use. Patients who do not respond favorably to this therapy should be questioned regarding their compliance with the prescribed use of the appliance. A properly selected appliance that is accurately adjusted will fail to reduce symptoms in a patient who does not wear it appropriately.
Types of Occlusal Appliances
Many types of occlusal appliances have been suggested for the treatment of TMDs. The two most commonly used are the stabilization appliance and the anterior positioning appliance. The stabilization appliance is sometimes called a muscle relaxation appliance because it is primarily used to reduce muscle pain.1,2,13,14 The anterior positioning appliance is sometimes called an orthopedic repositioning appliance, since its goal is to change the position of the mandible in relation to the cranium. Other types of occlusal devices are the anterior bite plane, the posterior bite plane, the pivoting appliance, and the soft or resilient appliance. The description of each appliance and treatment goals for each are reviewed below, and the indications for each are given.
Since the stabilization appliance and the anterior positioning appliance are the most important in the treatment of TMDs, a fabrication technique for each of these is presented.
Stabilization Appliance
Description and treatment goals
The stabilization appliance is generally fabricated for the maxillary arch and provides an occlusal relationship considered optimal for the patient (Chapter 5). When it is in place, the condyles are in their most musculoskeletally stable position at the time that the teeth are contacting evenly and simultaneously. Canine disocclusion of the posterior teeth during eccentric movement is also provided. The treatment goal of the stabilization appliance is to eliminate any orthopedic instability between the occlusal position and the joint position, thus removing this instability as an etiologic factor in the TMD (Chapter 7).
Indications
The stabilization appliance is generally used to treat muscle pain disorders.1,2,13 Studies15–20 have shown that wearing it can decrease the parafunctional activity that often accompanies periods of stress. Thus, when a patient reports with a TMD that relates to muscle hyperactivity such as bruxism, a stabilization appliance should be considered.21 More recent studies are less convincing regarding the precise mechanism by which occlusal appliances help reduce TMD symptoms, but most authors still support their use.1,2,11,13,22 The patient with local muscle soreness or chronic, centrally mediated myalgia may likewise be a good candidate for this type of appliance. Stabilization appliances are also helpful for patients experiencing retrodiscitis secondary to trauma. This appliance can help minimize forces23 to damaged tissues, thus permitting more efficient healing.
Simplified fabrication technique
The full-arch hard acrylic stabilization appliance can be used in either arch, but maxillary placement provides some advantages. The maxillary device is usually more stable and covers more tissue, which makes it more retentive and less likely to break. It is also more versatile, allowing opposing contacts to be achieved in all skeletal and molar relationships. In class II and III patients, for example, achievement of proper anterior contact and guidance is often difficult with a mandibular appliance. The maxillary appliance provides increased stability, since all mandibular contacts are on flat surfaces. This may not be possible with a mandibular device, especially in the anterior region. Another advantage of the maxillary appliance is the ability of certain features of the appliance to help locate the musculoskeletally stable relationship of the condyles in the fossae. As discussed below, a mandibular appliance does not afford all of these advantages. The major advantages of the mandibular appliance are that it is easier for the patient to speak with it in place; also, for some patients, it is less visible (thus more esthetic). However, this advantage is present only if the patient needs to wear the appliance during the day (discussed below).
Many methods have been suggested for the fabrication of occlusal appliances. One frequently used begins with casts mounted on an articulator. Undercuts in the maxillary arch are blocked out and the appliance is developed in wax. The waxed appliance is invested and processed with heat-cured acrylic resin and then adjusted for final fit intraorally.24–27 Another common technique utilizes mounted casts and autocuring acrylic.28 Undercuts in the maxillary teeth are blocked out, a separating solution is applied to the casts, and the desired outline of the appliance is bordered with rope wax. Acrylic monomer and polymer are sprinkled on the maxillary cast, and the occlusion is developed by closing the mandibular cast into the setting acrylic. Eccentric guidance and the thickness of the occlusal device are developed by using an anterior guide pin and a previously developed guide table (Chapter 20).
The following section describes a more simplified occlusal appliance fabrication technique. As with other techniques,29–33 it does not require mounted casts. The precise position of the mandible is located with direct assistance of the muscles, thus minimizing cast mounting inaccuracies. The finished appliance can also be inserted at the same appointment during which the impression was made. It should always be remembered, however, that the manner in which an appliance is fabricated is not important in resolving symptoms. The technique is important only to the dentist. Resolution of symptoms is dependent on how well the appliance meets the treatment goals. Regardless of the technique used, it is the responsibility of the dentist to make sure that before the patient leaves the office, the appliance is correctly adjusted to meet the optimal criteria for orthopedic stability reviewed in Chapter 5. This technique is offered as a simple method of achieving these goals.
Fabricating the appliance
The fabrication of a maxillary occlusal appliance involves several steps:
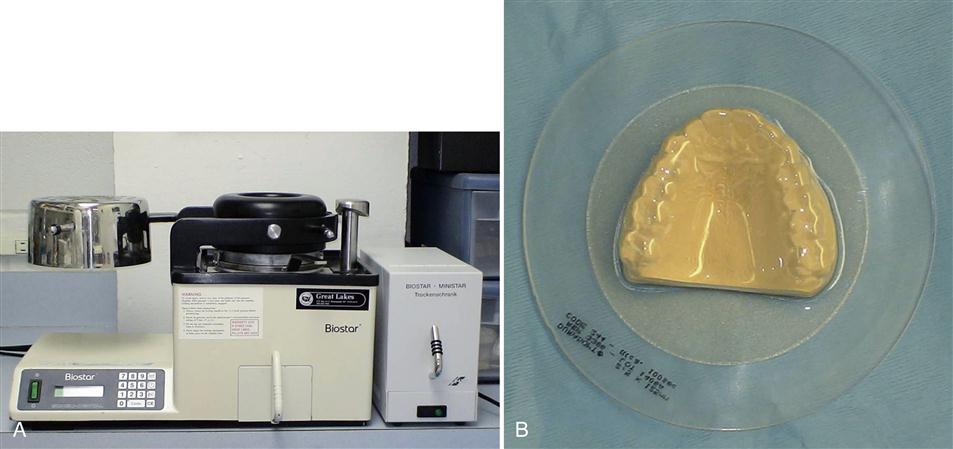
2. The excess stone labial to the teeth is trimmed on a model trimmer to the depth of the vestibule. With a pressure or vacuum adapter (Figure 15-2, A), 2-mm-thick hard, clear resin sheet of material is adapted to the cast (Figure 15-2, B). Some companies offer a dual-sided resin sheet with a soft side for the teeth and a hard side on which to develop the occlusion. This product (which is 2.5 mm thick) should be considered since it offers good retention and comfort for the patient while still allowing the development of a precise occlusal contact scheme.
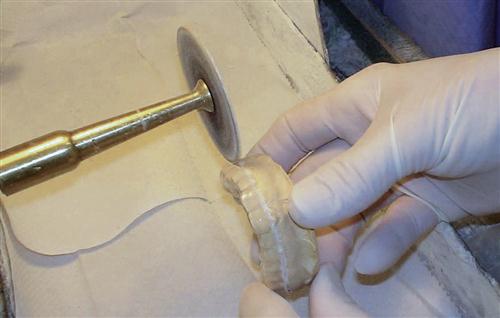
3. The outline of the appliance is then cut off the cast with a separating disk. The cut is made at the level of the interdental papilla on the buccal and labial surfaces of the teeth. The posterior palatal area is cut with a separating disk along a straight line connecting the distal aspects of each second molar (Figure 15-3).
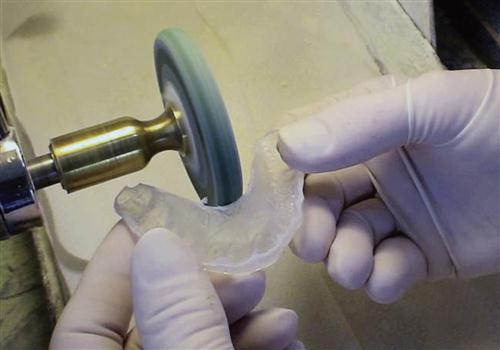
4. The adapted occlusal resin appliance is removed from the stone cast. A lathe with a hard rubber wheel can be used to eliminate excess resin in the palatal area (Figure 15-4).
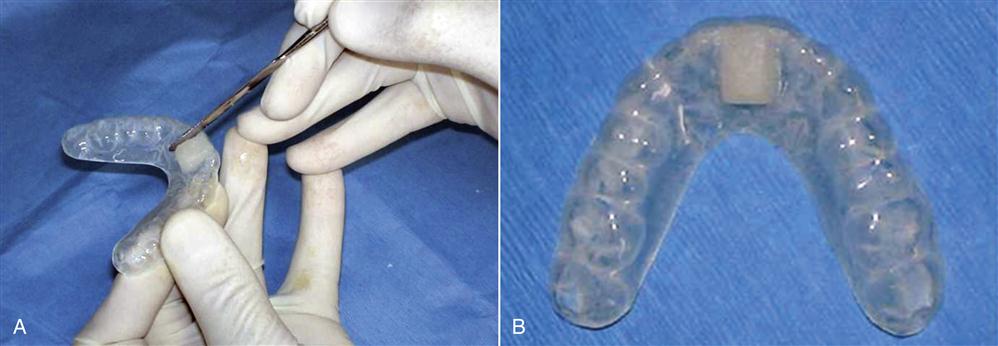
6. A small amount of clear autocuring acrylic resin is mixed in a dappen dish. As it thickens, it is added to the occlusal surface of the anterior portion of the appliance (Figure 15-5, A). This acrylic will act as the anterior stop. It is approximately 4 mm wide and should extend to the region where a mandibular anterior central incisor will contact (Figure 15-5,B).
Fitting the appliance to the maxillary teeth
The occlusal appliance is then evaluated intraorally (Figure 15-6). It should fit the maxillary teeth well, offering adequate retention and stability. Lip and tongue movement should not dislodge it. Pressure applied to any portion should not cause tipping or loosening. If the borders of the appliance have been maintained near the junction of the middle and incisal thirds on the facial surfaces of the teeth, adequate retention will exist.
If the appliance does not seat completely, it can be carefully heated extraorally with a hair dryer and reseated on the teeth. This will help to achieve a good fit. Care must be taken not to overheat the plastic or all shape may be lost.
On occasion, when the resin does not adapt well to the teeth or retention is poor, the occlusal appliance can be lined intraorally with clear autocuring acrylic resin. This can be accomplished only when the solid acrylic sheets are used. When a dual-surface sheet is used (with soft and hard sides), relining is not possible. Before a relining procedure begins, the patient is examined for any acrylic restorations (e.g., temporary crowns). To proceed:
When the occlusal device has been adequately adapted to the maxillary teeth, the occlusion is developed and refined.
Locating the musculoskeletally stable position
For the stabilization appliance to be optimally effective, the condyles must be located in their most musculoskeletally stable position, which is centric relation (CR). Two techniques have become widely used for finding CR.
The first utilizes the bilateral manual manipulation technique described in Chapter 9. There it was pointed out that, when the condyles are seated to the musculoskeletally stable position in the normal TMJ, the discs are properly interposed between the condyles and the articular fossae. If a disc is either functionally displaced or dislocated, the manual mandibular guiding technique will seat that condyle on retrodiscal tissues. When manual mandibular guidance produces pain in the joint, an intracapsular disorder should be suspected and the stability of this position should be questioned. Treatment should be directed toward the source of this intracapsular pain. An anterior positioning appliance might then be more appropriate therapy.
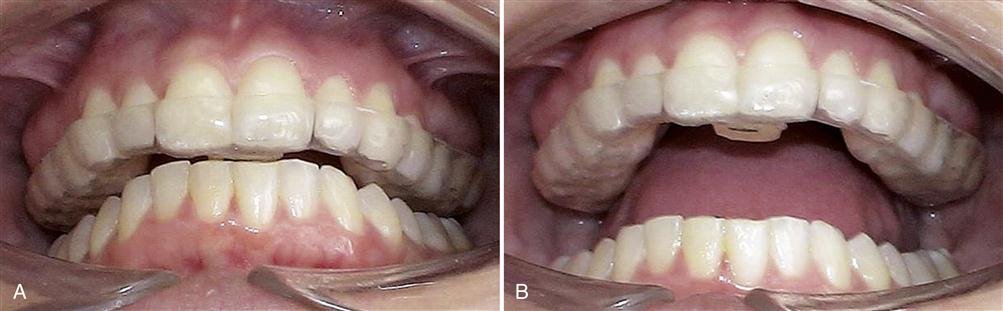
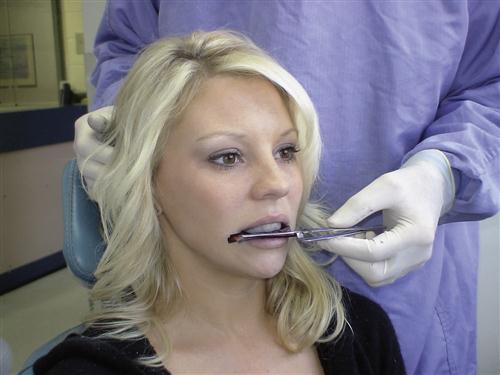
A second technique utilizes a stop placed on the anterior region of the appliance, so that the muscles are used to locate the musculoskeletally stable position of the condyles. (This technique uses the same principles employed with the leaf gauge, as described in Chapter 9.) In a reclined position, the patient is asked to close on the posterior teeth, which causes only one mandibular incisor to contact the anterior stop of the appliance. The stop should provide a thickness that maintains the anterior teeth 3 to 5 mm apart. This will result in the posterior teeth being separated only 1 to 3 mm. The mandibular posterior teeth should not contact on any portion of the appliance. If the posterior teeth contact the appliance, it should be thinned to eliminate these contacts.
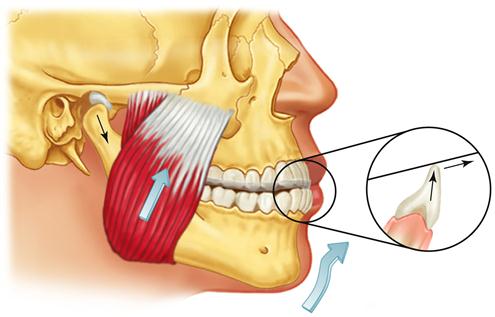
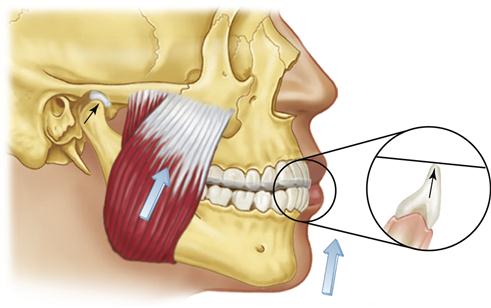
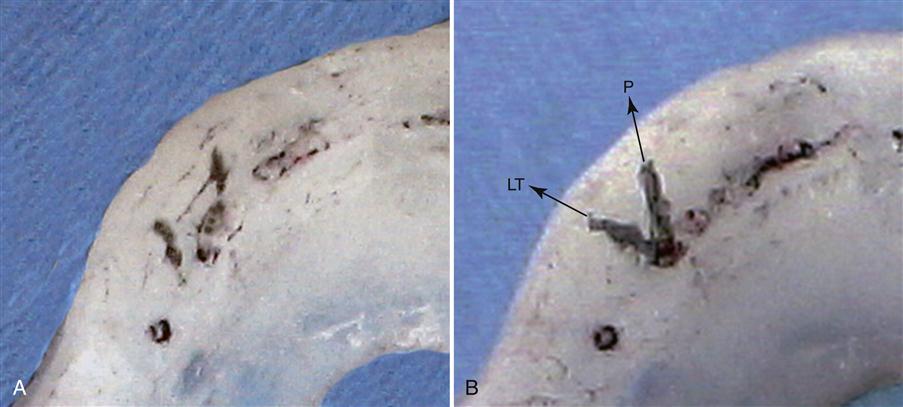
The contact on the anterior stop is marked with articulating paper and adjusted so it provides a stop that is perpendicular to the long axis of the mandibular tooth being contacted. It is important that there be no angulation to the contact, since angulation will tend to deflect the mandibular position. If a distal inclination exists on the stop, clenching will force the mandible posteriorly (retrusively) away from the musculoskeletally stable position (Figure 15-7). This anterior stop should not create a retrusive force to the mandible. Likewise the anterior stop should not be mesially inclined and create a forward shift or slide of the mandible, because the clenching will tend to reposition the condyle forward, away from the most musculoskeletally stable position (Figure 15-8). When the anterior stop is flat and the patient attempts closes on the posterior teeth, the functional pull of the major elevator muscles will seat the condyles in their most superoanterior position at the base of the posterior slopes of the articular eminences34 (Figure 15-9).

In both techniques it is important to communicate well with the patient regarding the precise mandibular position. Since the anterior stop is flat, the patient can protrude, closing in a position anterior to musculoskeletally stable position. This is avoided by asking the patient to attempt to close on the posterior teeth. Also, when the patient is reclining in the dental chair, gravity tends to position the mandible posteriorly. In some cases it is helpful to have the patient place the tip of the tongue on the posterior aspect of the soft palate while slowly closing.
Probably the most reliable and repeatable method of finding the musculoskeletally stable position of the condyles is to utilize both of these techniques simultaneously. With the appliance in place and the patient reclining, one first locates the musculoskeletally stable position with a bilateral manipulation technique, bringing the teeth close together and then asking the patient to repeatedly close on the posterior teeth. After a few closures, the contact marked on the anterior stop should become very reproducible, reflecting a location of the stable mandibular position (Figure 15-10).
Developing the occlusion
Once the CR position has been located, the patient should become familiar with it by wearing the appliance for a few minutes. Instructions are given to tap on the anterior stop. This is helpful in influencing the neuromuscular control system that coordinates muscle activities related to the existing occlusal conditions. Since the anterior stop eliminates the existing occlusal conditions, any muscle engrams associated with neuromuscular protection will be eliminated, thus promoting stabilization and allowing more complete seating of the condyles in their musculoskeletally stable positions. When a masticatory muscle disorder exists or it is difficult to locate a repeatable CR position, it may be helpful to have the patient wear the appliance with only the anterior stop for 24 hours before the appliance is completed. However, although this is sometimes helpful in decreasing symptoms, there are some disadvantages, which are discussed in a later section.
When the musculoskeletally stable position has been carefully located by the patient (with or without manual guidance), the appliance is removed from the mouth and autocuring acrylic is added to the remaining anterior and posterior regions of the occlusal surface (Figure 15-11). Sufficient resin must be added to allow the setting acrylic to contact each mandibular tooth, and additional acrylic is added to the anterior region labial to the mandibular canines for the future guidance ramp.
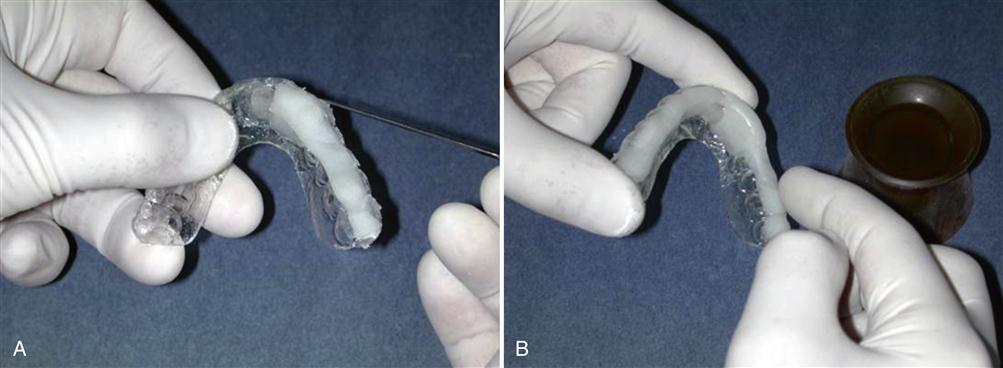
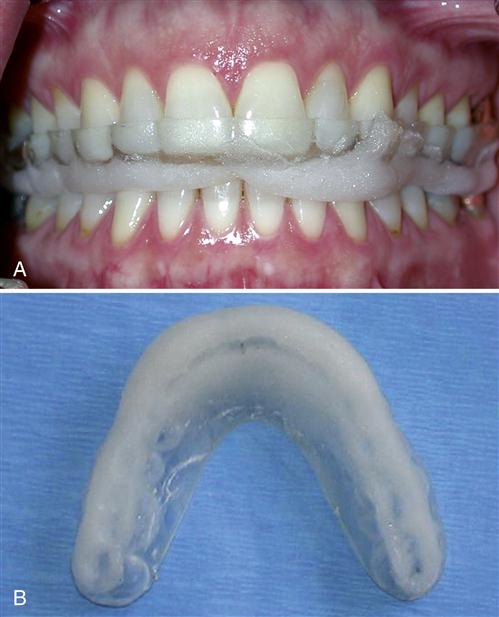
Before the appliance is returned to the mouth, it is important that all free monomer is eliminated with an air syringe. Once the setting acrylic is dried of free monomer, the appliance is thoroughly rinsed with warm water. The appliance is then returned to the mouth and fully seated on the maxillary teeth. A bilateral manual manipulation procedure is then performed. Once the clinician feels that the condyles are properly located, the patient is asked to close the posterior teeth into the setting acrylic. The mandibular teeth should sink into the setting acrylic until the incisors contact the anterior stop (Figure 15-12). After 5 to 6 s, the patient is instructed to open the mouth and the appliance is removed. The occlusal surface of the appliance is visualized to make sure that all mandibular teeth have made indentations in the setting acrylic and there is sufficient acrylic labial to the canines for the future development of eccentric guidance. The appliance can be returned to the mouth several times, each time relocating the musculoskeletally stable position, until the setting acrylic becomes firm and holds its shape. Then the appliance is removed for the final set.
Adjusting the centric relation contacts
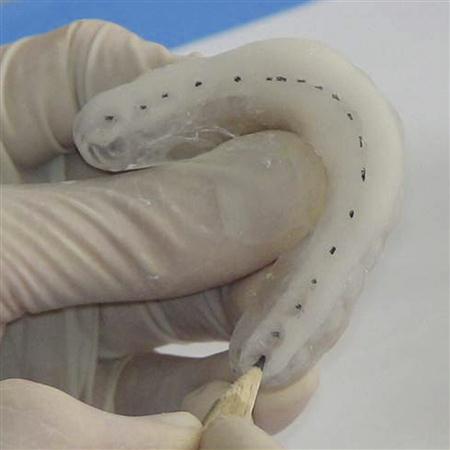
The occlusal surface of the appliance is best adjusted by first marking the deepest area of each mandibular buccal cusp tip and incisal edge with a pencil (Figure 15-13). These represent the final centric relation occlusal contacts that will be present when the appliance is completed. The acrylic surrounding the pencil marks is removed so the relatively flat occlusal surface will allow eccentric freedom. The only areas preserved should be those that are anterior and labial to each mandibular canine. These areas will create the desired contacts during mandibular movement.
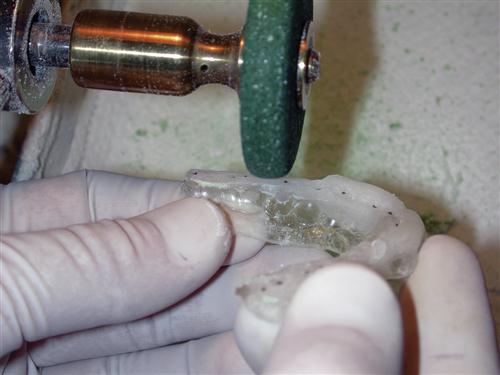
If there is a great excess of acrylic, it is most quickly removed with a hard rubber wheel on a lathe or slow-speed handpiece (Figure 15-14). The acrylic is flattened to the pencil marks in all areas except anterior and labial to the canines. A large acrylic bur in a slow-speed handpiece is helpful in refining and smoothing the appliance after the lathe. When the appliance has been adequately smoothed, it is returned to the mouth and the CR contacts are marked by red articulating paper as the patient closes. All contacts, both anterior and posterior, should be carefully refined so that they will occur on flat surfaces with equal occlusal force. In many cases normal setting shrinkage of the resin will distort the occlusal surface so that the cusp tips cannot reach the depths of the imprints and circular marks will result around the pencil dot. When this occurs, the resin around each imprint must be reduced, allowing the cusps to contact completely in the fossae. The patient should be able to close and feel all the teeth contacting evenly and simultaneously with cusp tips on flat surfaces (Figure 15-15).

Adjusting the eccentric guidance
Once the desired CR contacts have been achieved, the anterior guidance is refined. The acrylic prominences labial to the mandibular canines are smoothed. They should exhibit about a 30- to 45-degree angulation to the occlusal plane and allow the mandibular canines to pass over in a smooth and continuous manner during protrusive and laterotrusive excursions (Figure 15-16).
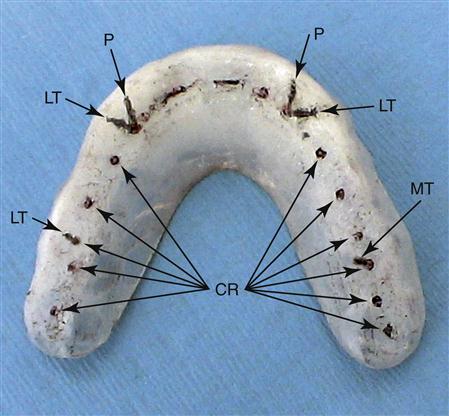
It is important that the mandibular canines move freely and smoothly over the occlusal surface of the appliance. If the angulation of the prominences is too steep, the canines will restrict mandibular movement and may aggravate an existing muscle disorder. Confusion can be avoided by using a different-colored articulating paper to record the eccentric contacts. The appliance is returned to the patient’s mouth. With blue articulating paper, the patient closes in CR and moves in left laterotrusive, right laterotrusive, and straight protrusive excursions. The blue articulating paper is then removed and replaced with red articulating paper. Again the mandible closes in CR and the contacts are marked. The appliance is then removed and examined. Blue lines on the anterior portion depict laterotrusive and protrusive contacts of the mandibular canines and should be smooth and continuous. If a canine follows an irregular pathway or displays a catching movement, the pathway must be adjusted (Figure 15-17).
Canine guidance must provide a smooth and gentle disocclusion of the posterior teeth. Any contacts marked in blue on the posterior surface of the appliance will have been made by posterior eccentric interferences and must be eliminated, leaving only the red marks of CR. Eccentric contacts of the mandibular central and lateral incisors must also be eliminated so that the predominant marks are those of the mandibular canines (Figure 15-18).
During a protrusive movement, guidance by the mandibular canines, not the mandibular central and lateral incisors, is the goal. The mandibular incisors can be used to assist in protrusive movements; but when this is done, care must be taken not to deliver the entire force of a protrusion to a single incisor. When the mandibular incisors are used for guidance during a protrusion, all lateroprotrusive excursions must be examined, since they will be the indicators of whether a single incisor is likely to be traumatized by a particular movement. These adjustments can take time. Often a simpler (and equally acceptable) solution is to place protrusive guidance only on the mandibular canines, thereby allowing for quick elimination of any eccentric contacts of the mandibular incisors. After these adjustments have been made, the appliance is returned to the patient’s mouth to repeat the markings. Adjustments should continue until the posterior tooth contacts occur only on flat surfaces in CR.
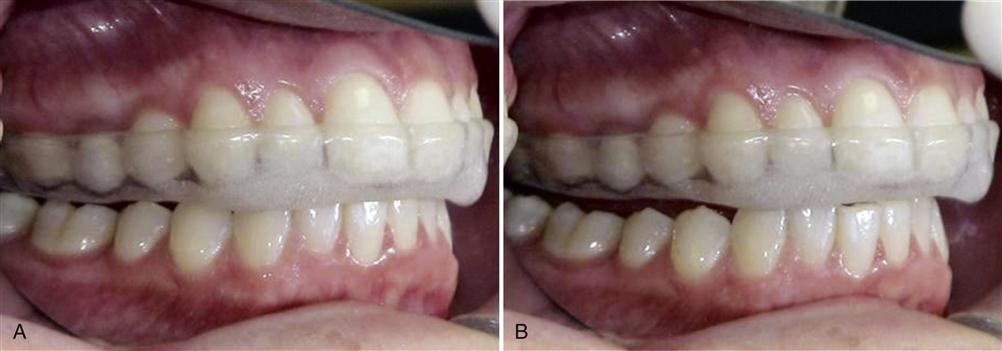
Once the stabilization appliance has been adjusted in the reclined position and all desired contacts are present, the patient is raised to the upright or slightly forward head position (Figure 15-19) and instructed to tap lightly on the posterior teeth. If the anterior contacts are heavier than the posterior contacts, the mandible has assumed a slightly anterior position during this postural change (see Chapter 5) and the anterior contacts must be reduced until they are lighter than the posterior. As soon as the patient can close lightly and feel predominantly posterior contacts, the adjustment is complete.
Once the stabilization appliance has been properly adjusted, it is smoothed and polished. The patient should be asked to check with the tongue and lips for any sharp or uncomfortable areas. In some cases the acrylic extending over the labial surface of the maxillary teeth will not be important for retention and not needed for eccen/>
Stay updated, free dental videos. Join our Telegram channel
VIDEdental - Online dental courses


