13
Overdenture Implants
In recent years, a new generation of dental implants called overdenture implants have been introduced to the field of implantology. These mini implants have been designed specifically to support an implant overdenture. One of the pioneers of this concept is Dr. Victor Sendex, who conducted more than twenty years of study and documentation on Mini Dental Implants concept and design. Currently, there are several different types of these implants available on the market. The main design difference between these type of implants and traditional implants is that a part of the stud attachment, either male or female (depending on the manufacturer), has been combined with the implant body. In traditional restorative implants, the stud attachment should be screwed into the implant body as a separate component.
CLASSIFICATION OF OVERDENTURE IMPLANTS BASED ON ATTACHMENT DESIGN FEATURES
- Implants with Male Attachment: Maximus OS™ (Biohorizons) is a parallel sided implant and the male part of the stud attachment is part of the implant body. MDI® Implant (Imtec) is tapered.
- Implants with Female Attachment: ERA® implant (Sterngold) is a tapered implant and the female part of the stud attachment is part of the implant body.
These types of implants make the implant overdenture treatment more cost effective and simpler. They are narrower than most narrow-diameter traditional implants, so they can be used in cases with a deficiency in the width of the bone, avoiding a horizontal bone augmentation procedure.
TWO BASIC PURPOSES FOR OVERDENTURE IMPLANTS
Providing Immediate Stabilization for an Overdenture
Although the FDA has never approved a dental implant under 3.0mm in diameter for permanent use, overdenture implants are often used as a less expensive and simpler alternative to traditional implants for stabilizing an overdenture over a longer period of time. This technique may give the patient time to deal with the financial realities of implant dentistry or it may be a less traumatic way for the patient to get used to the idea of dental implants. In this application, it is strongly recommended to utilize advanced surface characteristics such as acid-etched or resorbable blast texturing (RBT) to enhance the implant-bone interface, as well as to expedite the osseointegration process. Placement of these implants should be limited to the anterior mandible between the two mental foramens. In fact, the greatest need for affordable implant overdentures is from patients who are unhappy with their complete lower dentures.
Acting as Transitional Implants during Initial Healing Phase
The small size of implant overdentures allows them to be placed between traditional implants, and they often fit best if placed slightly lingual to the traditional implants. If bone augmentation is part of the treatment plan, the overdenture implants provide a positive vertical stop and lateral stability to limit the force applied to the augmented area. This procedure greatly improves the success of new bone growth and limits the excess force applied to the traditional implants.
After completion of the healing period for traditional implants, the overdenture implants should be unscrewed once they have served their transitional purpose. The small bony defect usually heals with no further treatment. With this treatment scenario, it is strongly recommended to use a machined surface characteristic instead of advanced surfaces such as acid-etched or RBT, because these surfaces enhance the implant-bone interface and cause implant removal to be more difficult compared to when a machined surface is used.
The surgical procedure for overdenture implants is often composed of only a few simple steps. Many general dentists who might not perform traditional implant surgery have found placement of overdenture implants a quick, simple, and predictable procedure. Obviously, it is critical to identify important anatomical landmarks, such as the mental foramen, the mandibular nerve canal, the inferior border of the mandible, the floor of the nasal cavity, and the maxillary sinuses during treatment planning and the surgical procedure.
MAXIMUS OS OVERDENTURE IMPLANT
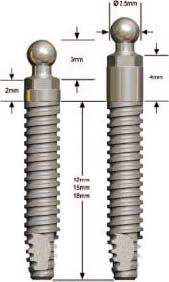
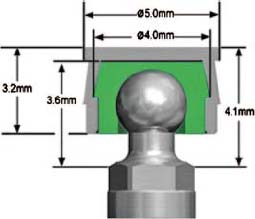
The Maximus OS overdenture implant is a 3.0mm diameter implant made of titanium alloy. A 2.5mm ball attachment has been added to the implant body. This implant is available with two different gingival cuff heights of 2.0mm and 4.0mm, and three different lengths of 12.0mm, 15.0mm, and 18.0mm (Figures 13.1 and 13.2).
Unique Features
- Square Tread Pattern: This tread pattern provides better force distribution and stability compared to traditional V-shaped treads.
- RBT (Resorbable Blast Texturing) Surface Characteristic: The surface of this implant has been blasted with an apatitic blast medium such as (tri-calcium phosphate) to create a surface roughness, and then the surface has been cleaned and passivated with acid solution.
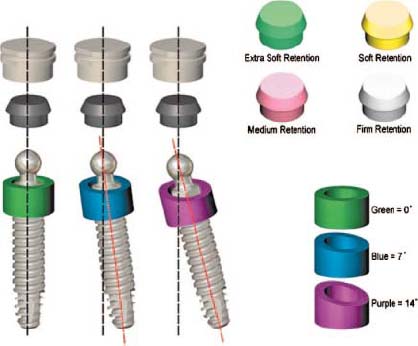
- Interchangeable Female Components Included with Implant Package: The female component is available in four different retention levels from softest to firmest: Green— extra soft retention, Yellow—soft retention, Pink—medium retention, White—firm retention (Figure 13.3).
- Parallel Body with Tapered Apical Portion: Having a parallel body provides more surface area compared to a tapered implant with a similar length and diameter. However, its apical portion is tapered, which enhances penetration in the bone and faster stabilization.
Clinical Considerations
- Always start with the least retentive female attachment during the initial healing phase. After eight weeks, it is possible to switch to more retentive female attachments, which will minimize the chance of jeopardizing the initial stability of supporting implants. However, if the implants have been placed in D3 type bone such as a maxillary overdenture case or if the implants’ primary stability is not optimum, avoid utilizing the female attachments on the day of implant placement. Instead, mark the location of the implant heads inside the denture and relieve the acrylic base in those areas. Then reline the inside of the denture with tissue conditioner for the first two weeks, replace the tissue conditioner with soft liner starting on week three, and keep the soft liner until end of week eight. Utilize the female attachments eight weeks after implant placement.
- Maximus OS implants should always be utilized with a well-fitting denture and accurate occlusion.
- Avoid utilizing the Maximus OS as a transitional implant, because its RBT surface characteristics will cause an expansive implant bone interface, which makes it very difficult to unscrew this implant without leaving a big bony defect and risking implant fracture during the unscrewing process.
- A minimum of four Maximus OS implants should be used for lower implant overdenture if the bone quality is ideal. With poor bone quality, five or six implants are recommended.
- All of the Maximus OS implants should be placed perfectly parallel to each other. Utilization of a paralleling device or an accurate surgical guide is strongly recommended. The maximum correctable discrepancy in the trajectory of each implant from the sagittal plane is 14 degrees. In this situation, a proper directional ring should be used to offset this discrepancy. There are three directional rings available with Maximus OS: 0, 7, and 14 degrees.
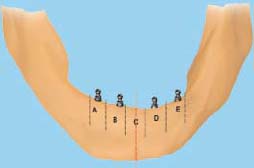
- The implants should be placed at least 6mm apart from center to center. However, to simplify the implant spacing, the distance between the two mental foramens can be divided into five equal columns. Then, when placing five implants, one implant can be placed in the center of each column. When placing four implants, skip the middle column and place one implant on each side column (Figure 13.4).
Surgical Steps
1: GAINING ACCESS TO THE ALVEOLAR BONE
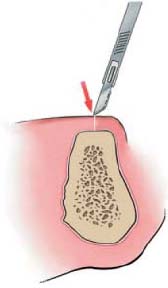
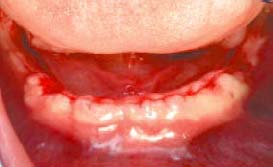
- Performing a Flap Technique: This approach provides great access and maximizes visualization of the shape and contour of the alveolar bone (Figures 13.5 and 13.6).
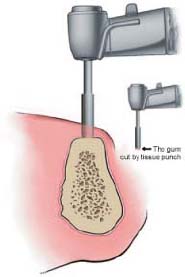
- Performing a No-Flap Technique: This approach minimizes post-operation symptoms and complications, and there is no need for suturing.
2: ALIGNING THE TRAJECTORY OF THE IMPLANT
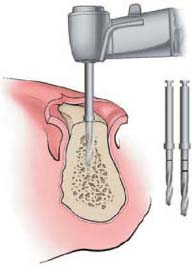
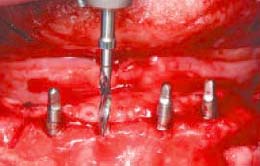
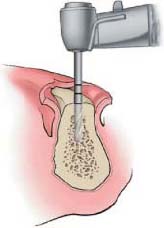
- Using the Alignment Drill and Guide Pins: Use the alignment drill to initiate the first osteotomy to a depth of 5mm. After preparation of the first osteotomy, place a guide pin in that spot and start drilling the next site with a 2mm depth drill to the proper depth and exactly parallel to the guide pin. Then remove the guide pin from the first osteotomy site and place it in the second osteotomy site, and use the 2mm depth drill to drill to the proper depth. Make sure that the trajectory of the depth drill stays parallel with the guide pin. Continue preparation of the other osteotomies with the depth drill for all the implant sites (Figures 13.8–13.18).
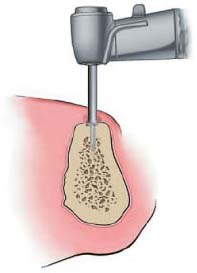
FIGURE 13.9.
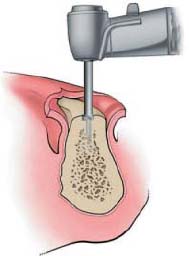
FIGURE 13.10.
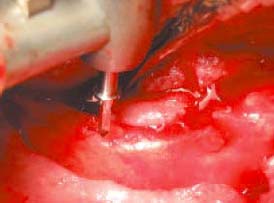
FIGURE 13.11.
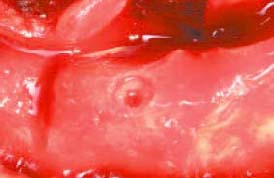
FIGURE 13.12.
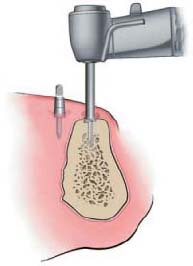
FIGURE 13.13.
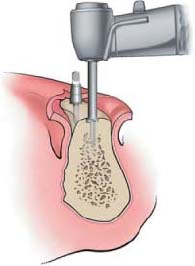
FIGURE 13.14.
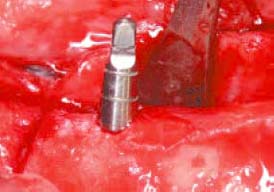
FIGURE 13.15.
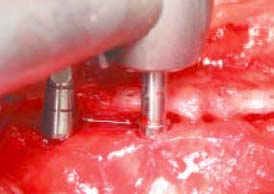
FIGURE 13.16.
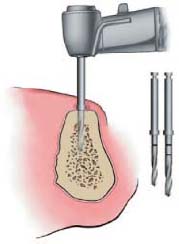
FIGURE 13.17.
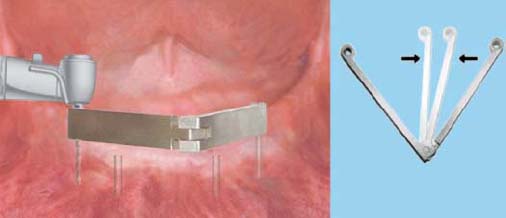
- Using Paralleling Device: Prepare the first osteotomy with the alignment drill, and then insert the anchor pin of the paralleling device into that hole and use the 2mm depth drill to prepare the rest of the osteotomoies at the appropriate depth. Remove the anchor pin of the paralleling device from the first osteotomy site and insert it in another osteotomy, and then use the 2mm-depth drill to drill the first osteotomy site to the proper depth (Figure 13.19).
Note: Drilling must be performed with constant irrigation and with sterile saline at a maximum of 1,000rpm rate. A pumping motion should be employed to prevent overheating of the bone. If the drill cannot advance 2mm/second in the osteotomy, it has become dull and should be replaced.
3: WIDENING OF THE OSTEOTOMY
Use a 2.5mm finishing drill to widen the osteotomy at the previously established depth (Figures 13.20–13.22).
Note: The finishing drill doesn’t have a cutting end, so it will automatically stop at the depth determined by the depth of the drill in Step 2. It is not recommended to use the finishing drill in poor bone quality (D3), such as in maxillary overdenture cases, because it will increase the chance of over-widening the osteotomy and compromise the primary stability of the implants. Use of the bone tap is recommended if the implants are being placed in a very dense cortical bone (D1). Tap in a clockwise direction at a speed of 30rpm. Remove the tap by reversing the hand-piece’s movement at the same 30rpm (Figure 13.23–13.25).
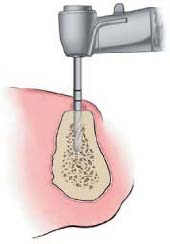
FIGURE 13.21.
Stay updated, free dental videos. Join our Telegram channel

VIDEdental - Online dental courses


