Treatment Plans Related to Key Implant Positions and Implant Number
Carl E. Misch
Treatment plan options for abutments in partially edentulous patients are more often related to clinical experience and the art form of dentistry rather than science or clinical studies. The periodontal, endodontic, and structural health of the teeth adjacent to the edentulous space(s) is variable. As a result, there are more than 100,000 combinations of missing teeth and available bone in one dental arch.1 The dentist uses past experiences and art to splint together the best abutment teeth available to replace the missing teeth. Hence, several different options may be present from one patient or doctor to another to replace the same missing teeth in an arch.
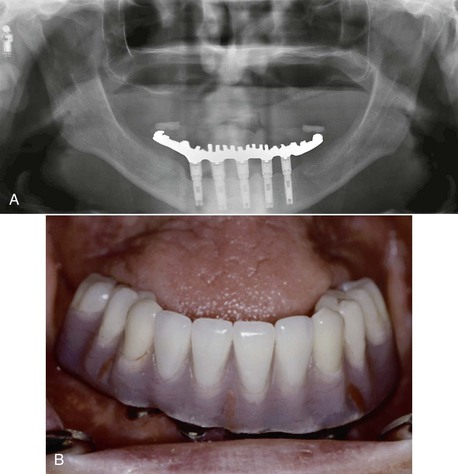
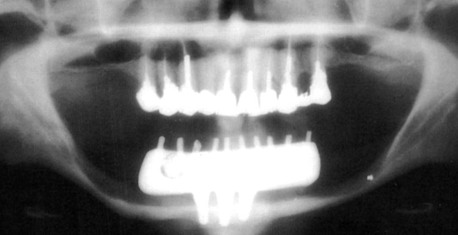
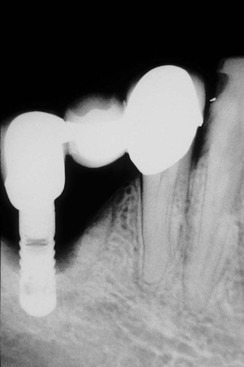
Implant dentistry has become the most predictable method to replace missing teeth. However, the doctor and the patient often have an incentive to do treatment that is faster, easier, and less expensive. As a consequence, treatment planning for implant dentistry is often driven by the existing bone volume in the edentulous sites. Faster, easier, and cheaper are only justified if the clinical outcome is as predictable and has fewer complications than other options. For example, in the mid 1980s, the most common treatment plan in the literature of completely edentulous patients was to place implants between the mental foramen in the mandible and anterior to the maxillary sinuses in the maxilla (with the number of implants related to the existing bone volume).2 Full-arch fixed restorations were then cantilevered to the posterior regions of the jaws (Figure 12-1). This treatment plan is still popular today because bone grafting is often not required and the fees are lower than many other options. Yet often this treatment option has significant complications, especially when the opposing arch is natural teeth or implants and the existing bone volume is limited (Figure 12-2).
Placing implants in existing bone volumes is often problematic. In partially edentulous patients, more than 6 mm of bone height is found in fewer than 40% of posterior maxillae and 50% of posterior mandibles.3 This percentage is further reduced in the posterior regions to fewer than 20% of completely edentulous patients in either arch. Therefore, the treatment plan without bone grafting often presented to the patient uses cantilevers from anterior implants or short implants in the posterior region. However, the posterior regions of the jaws have the greatest bite forces (which are generated on the cantilever), and the existing bone (to support short implants) in the posterior regions is less dense than the anterior regions.
Treatment Plan Rationale
When implants are inserted into abundant bone volume and allowed to integrate for 4 or more months before loading, the surgical success rate is over 98%. This success rate is not related to implant number, size, or design. However, when the implant is occlusal loaded with the prosthesis, the failure rate may be greater than three to six times the surgical failure rate. For example, a meta-analysis reveals 15% failure rates (with several reports above 30% failure) when the implant prosthesis is occlusal loaded with implants shorter than 10 mm or when they are placed in softer bone.4 This failure most often occurs during the first 18 months of loading and is called early loading failure. The primary cause of this complication in implant dentistry is related to biomechanical factors, with too much biomechanical stress applied to the implant support system or bone too weak to support the load.5 The biomechanical stress can be reduced by several methods (e.g., eliminating cantilevers and splinting together additional implants of adequate size).
Mechanical complications of the implant components or prosthesis outnumber surgical failures, and many reports are more frequent than early loading failures. Mechanical complications include abutment screw loosening, uncemented prostheses, and porcelain fracture.4 These complications are found more often in bruxism patients, in men, when the implant restoration is opposing another implant prosthesis, and with group function occlusion.6 All of these factors increase the amount of stress on the implant system (occlusal porcelain, cement, implant abutment screw, and implant–bone interface). Hence, mechanical complications are also related to biomechanical factors.
Biomechanical stress may also cause marginal crestal bone loss.7 Because the implant does not have a periodontal membrane as a tooth does, the stress to the implant–bone interface is mostly to the crestal marginal bone. When the stress is beyond the bone physiologic limit, resorption may occur. The bone loss may increase the risk of anaerobic bacteria and periimplantitis, or the surrounding soft tissues may shrink and result in poor cervical esthetics. Hence, biomechanical factors can lead to early loading failure, mechanical complications, marginal bone loss, or periimplantitis around an implant. As a consequence, a primary objective to develop a treatment plan in implant dentistry should be to reduce biomechanical stress in the system.
Treatment Fees and Economics
The doctor and patient are motivated to place implants without bone grafting because the cost is greater and the procedure is more difficult (and may be less predictable) than placing shorter or angled implants into existing bone volume. The discomfort after bone augmentation is usually more than what occurs after implant surgery. An extended healing time of 4 to 9 months may be necessary for the bone graft to mature compared with implant healing in native bone. The costs associated with bone augmentation are often greater than the fees related to implant insertion. In addition, there are usually more implants and more teeth replaced after bone augmentation compared with situations when implants are inserted into existing volumes of the bone and teeth are cantilevered to the posterior regions. More implants and more teeth replacements further increase the cost to the patient. As a consequence of these considerations, the doctor and the patient are both motivated to use existing bone volumes for implants and restore fewer posterior teeth in the prosthesis. In addition, the patient undergoes one surgery and therefore experiences less discomfort.
An example of the patient and doctor having an economic incentive to perform procedures with higher biomechanical risks is when a patient has four teeth missing in a posterior maxillary quadrant (two premolars and two molars), with a pneumatized maxillary sinus cavity. There are typically two treatment options. The first is to place two implants anterior to the sinus, which supports a three-unit prosthesis (with a first molar cantilever) (Figure 12-3). A second option is to perform a sinus bone graft and the insertion of three implants (in the first premolar, first molar, and second molar positions) and to fabricate a four-unit restoration.
The first treatment option in this example is half the fee of the second option because it does not require a sinus graft and has fewer implants and fewer teeth replaced. The typical fees associated with treatment in implant dentistry are related to the number of implants and teeth replaced. Hence, a three-unit fixed partial denture (FPD) supported by two implants is half the fee of a six-unit FPD supported by four implants. As a result, in a posterior maxilla, instead of posterior bone grafts and additional implants supporting a four-unit FPD, a three-unit FPD with a distal cantilever is often extended from two anterior implants, anterior to the maxillary sinus. The first option is also faster and easier because a bone augmentation is not required.
Although the first treatment option is less expensive and has less discomfort, treatment is not equivalent to the four-unit FPD with more implants. The second treatment option has three to four times better chance for long-term success because it does not cantilever a pontic in the molar region and has more implant support. Cantilevers increase the biomechanical force to the anterior implants. Therefore, there is an increased risk of an unretained prosthesis on the first premolar (because of a tensile force to the retainer and cement is 20 times weaker to tension compared with compression). This results with one implant (the second premolar) supporting all three teeth and the risk of overload and failure. In addition, the first option more often has more bone loss from occlusal overload related to the increased biomechanical stress as a result of the cantilever. In addition, the opposing mandibular second molar may erupt past the plane of occlusion with the first option (because it only has one molar), and each protrusive mandibular movement would result in a lateral premature contact on the maxillary prosthesis. This force direction increases the shear force and may even trigger parafunction. All of these increased risks of complications are related to the increased biomechanical stress.
Biomechanical-related complications often occur within the first few years of function. As a result, the patient expects the dentist to repeat the treatment for no charge. When the first option fails, the second treatment option may be selected, often from a different dentist, which is associated with a greater cost. As a result, the patient is more likely to bring litigation against the first treatment team in order to pay for the additional costs of the second treatment option.
Treatment Fees and Risk Factors
As a consequence of an increased risk of complications in the first treatment option (cantilevered prosthesis), the fees for this option should be more than the second treatment option. In other words, the fee for services rendered should not only be based on the sum of the number of implants and teeth in the prosthesis; it should also include the amount of risk associated with the treatment.8
A more basic example of charging for risk factors is the treatment for a crown on a maxillary central incisor implant compared with a mandibular molar implant. The time and technique for an anterior tooth soft tissue drape development, preparation, impression, and transitional prosthesis is greater than to restore a mandibular posterior implant. The risk that an anterior maxillary crown has to be redone because of gingival recession, shade selection, and so on is greater than the mandibular crown. Yet most dentists charge the same fee for both procedures. The maxillary anterior crown has more risk; therefore, the fee should be greater.
In conclusion, the treatment plan in implant dentistry should have a biomechanical rationale to decrease stress to the implant system. The fees for an implant treatment plan that has fewer implants or cantilevers should be greater than restorations supported by more implants or without cantilevers. The risks in dentistry are factors that should be included in the cost of most all procedures that are associated with greater complications. The implant and associated restoration is not a commodity in which the cost is solely related to the number of implants and prosthetic units.
Treatment Plan Sequence
Because the primary causes of complications in implant dentistry are related to biomechanics, Misch developed a treatment plan sequence to decrease the risk of biomechanical overload, consisting of the following steps9:
This chapter considers the key implant positions for a prosthesis followed by the overall number of implants to support the restoration.
Abutment Options
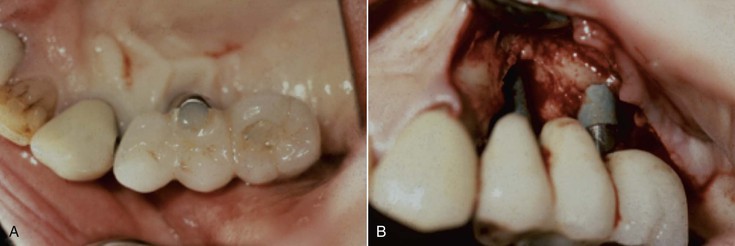
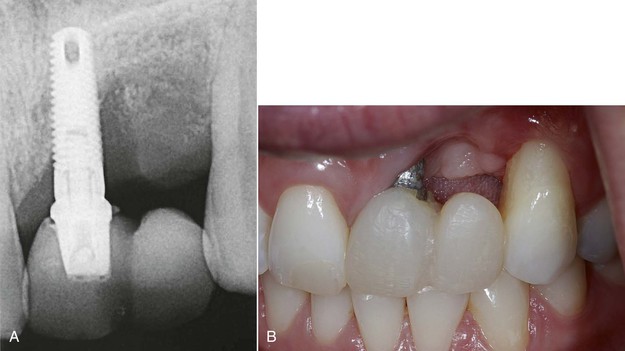
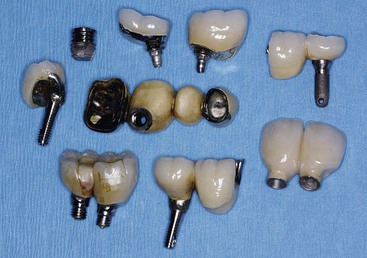
Several treatment options are available for the adequate restoration of an edentulous segment. As a general rule, in a partially edentulous patient, implant-supported prostheses should be independent from natural adjacent teeth. There are biological and biomechanical factors that favor independent implant prostheses, and the greatest benefits are biological factors of less decay and endodontic risks. The incidence of decay when teeth are splinted together in a FPD accounts for 22% of the complications within 10 years (because the pontic acts as a plaque reservoir), whereas individual crowns have a less than 1% risk of decay within this time frame.10–12 When the adjacent tooth to the edentulous site is a natural tooth and an independent implant prosthesis is fabricated, there is less risk of decay on the tooth, and implants do not decay. A second common complication of teeth-supported fixed prosthetic restorations is endodontic-related factors that occur in approximately 15% of cases within 10 years. When independent prostheses are designed, implant abutments do not require endodontic procedures, and unsplinted natural teeth have less endodontic procedures, especially if they are not prepared for crowns. Therefore, the unprepared tooth has less risk of endodontic failure or fracture (Figure 12-4).
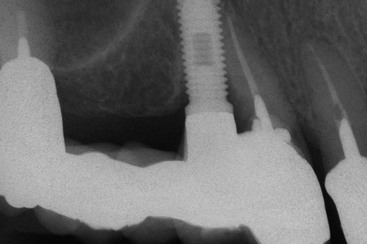
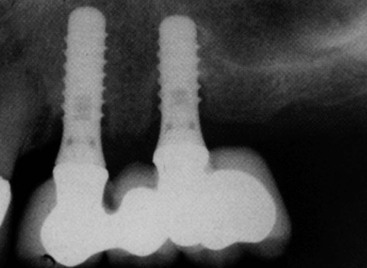
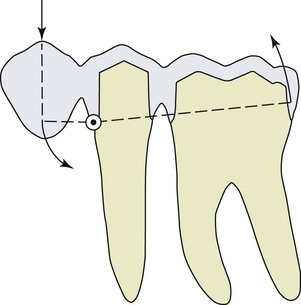
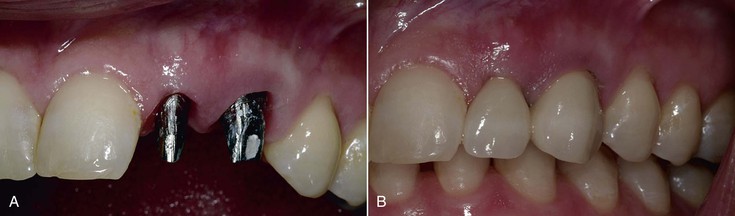
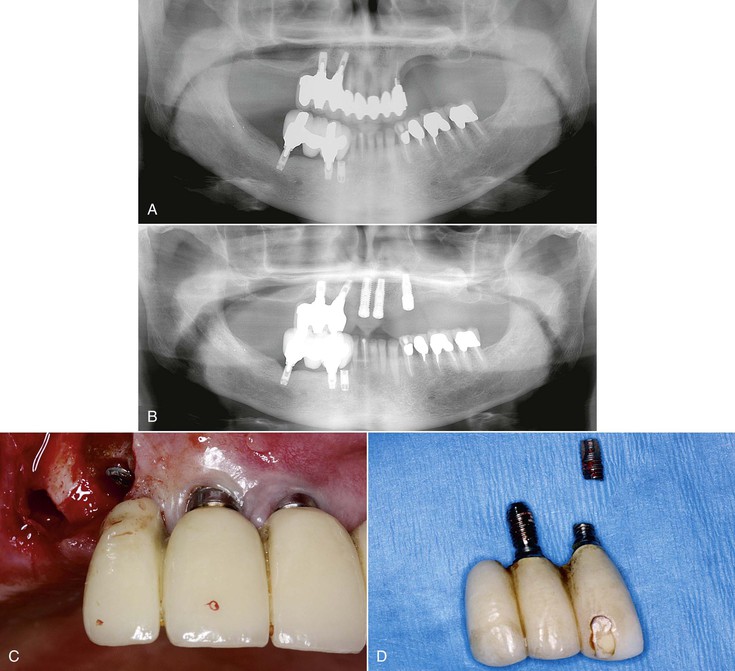
There are also biomechanical advantages for implant-supported independent prostheses.13 The tooth has physiologic movement of 28 microns apically and 56 to 108 microns in the horizontal dimension.14 Hence, a tooth joined to the implant (with much less movement) may act as a cantilever on the implant and increase biomechanical complications (Figure 12-5). As a consequence, when an implant restoration is joined to a natural tooth, an increased risk of abutment screw loosening, implant marginal bone loss, and unretained restoration may occur (Figure 12-6). In addition, independent implant prostheses may reduce or eliminate pontics between the tooth and the implant (by adding an additional implant next to the tooth). This simultaneously increases the number of abutments and distributes forces more effectively. The increase in abutment number decreases the risk of an unretained restoration, which is the third most common fixed prosthesis complication supported by natural teeth.10,11 Therefore, independent implant prostheses cause fewer complications and exhibit greater long-term success rates of the prosthesis and greater survival rates of the adjacent teeth.
In addition, the distribution of occlusal forces is optimized when independent implant prostheses are designed. This distribution of forces also decrease the risk of abutment screw loosening, unretained restorations, and marginal bone loss. As a result, the ideal treatment plan for a partially edentulous patient includes an independent implant restoration (Box 12-1).
Key Implant Positions
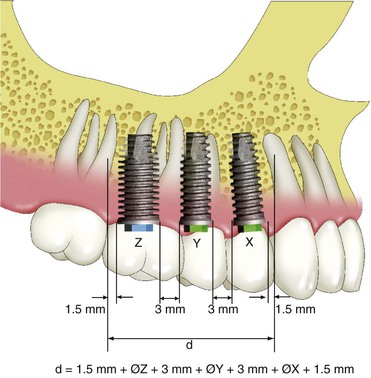
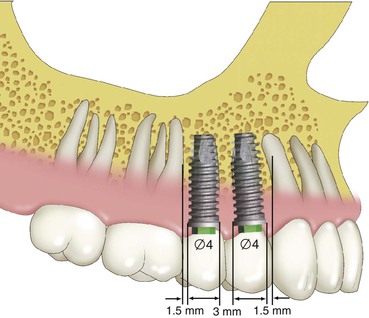
Implant dentistry may use implants that have ideal qualities of health. Rather than using a compromised tooth for support, the implant more often has an ideal clinical condition. However, some implant positions are more critical than others in regard to force reduction to the implant system. The maximum number of potential implants that may be used in a fixed prosthesis is usually determined by allowing 1.5 mm or more from each natural tooth and a 3-mm space between each implant and adding the diameter of the implant (Figure 12-7). This results with dividing the length of the span by 7 mm for the maximum number of implants (when the implants are 4 mm in diameter). Hence, a 21- to 27-mm span may have three implants, and a 28- to 34-mm span may have four implants. The key implant positions are implant sites that are more important than the others to reduce biomechanical forces. The key implant abutment locations mean that biomechanical complications will be increased when an abutment is not positioned in the site.15 Hence, even if a bone graft before implant placement is necessary, the additional training, surgery, costs, and time are warranted. After the final prosthesis is determined, the key implant positions for the prosthesis may be established.
The key implant positions are determined with no limitations. In other words, the radiograph is used for diagnosis to determine the prosthesis and pathology but not the available bone and implant position. Rather, the dentist “pretends” the patient has all the available bone necessary to place the implant in the key sites, the patient has no financial limitations to do the ideal treatment, time is not an issue related to treatment, and the skill necessary to place (or augment and place) an implant in the key sites is present by the dentist or the referring team (Box 12-2).
There are four general guidelines to determine key implant positions for a fixed prosthesis in the edentulous site with multiple adjacent teeth missing15:
4. When the first molar is missing, the first molar site is a key implant position for all partially edentulous patients and completely edentulous maxillae (Box 12-3).
No Cantilevers
The first rule for ideal key implant positions is that no cantilever should be designed in the fixed prosthesis for partially edentulous patients or full-arch maxillary fixed restorations. Cantilevers are significant force magnifiers to the cement or prosthesis screws, prosthesis superstructure, abutment screws, implant–bone interface, and the implants.16,17
Cantilevers on FPDs supported by teeth have a higher complication rate than prostheses with terminal abutments.9,12,18 The primary causes of traditional three-unit FPD failure with natural tooth abutments are caries and endodontic complications (often related to the tooth preparation or decay). The 5-year survival rate of the traditional FPD is often above 95%.11 However, when a cantilevered three-unit FPD supported by two teeth is used to replace a missing tooth, the failure rate is over 25% within the first 5 years, and the complication rate increases to 40% by 10 years; the primary cause of failure is biomechanics.12,18
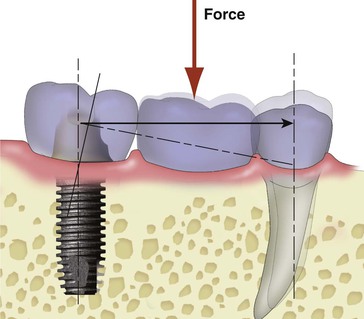
When a load is placed on the cantilever portion of a prosthesis, the abutment farthest from the cantilevered pontic has a tensile and shear force applied to the cement seal because the tooth adjacent to the pontic acts as a fulcrum (Figure 12-8). Cements are 20 times weaker to tension and shear compared with forces in compression.19 Hence, with a cantilevered prosthesis, the cement seal breaks on the most distal abutment, and then the abutment often decays. The abutment closest to the cantilever becomes mobile or fractures (especially when endodontics was performed) because it is the only retained abutment for the prosthesis. These biomechanical-related complications usually occur in a relatively shorter period of time compared with biological complications (e.g., decay or periodontal disease).
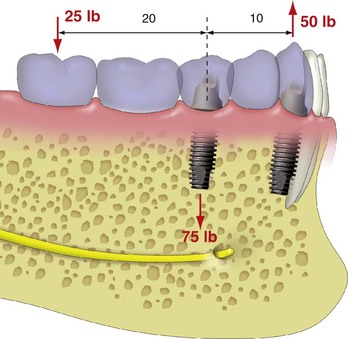
The maximum bite force in the anterior region approaches 25 lb, is increased to 100 lb in the region of the canine to premolar area, and further increases to 250 lb in the molar region. Cantilevers on the prosthesis are stress magnifiers to the implant system and may double the bite force.16 When cantilevers are used in the posterior molar regions, the greater bite force (up to five times greater than the anterior region) is further magnified by the cantilever and may increase the force on the implant system severalfold. For example, a bite force of 100 lb may exist on a premolar implant with no cantilever. When a cantilever is used to replace the molar, this force may be magnified by a 250-lb force on a cantilevered posterior molar pontic, which results in a 500-lb force on the anterior premolar abutment. Instead of 100-lb force on the premolar, the force may be five times greater (Figure 12-9).
Teeth have more physiologic movement than an implant. The physiologic movement absorbs some of the tensile and shear force on the cement seal. In fact, cantilevered fixed prostheses survive best when the teeth are mobile because the cement seal less often breaks. Implant abutments have higher stresses applied to the implant system than the tooth system. Hence, the biomechanical risk factors of a cantilever are worse on implants than on teeth (Figure 12-10). Cement seal breakage, prosthesis screw loosening, and abutment screw loosening are at greater risk with implants. Bone loss is more often observed from biomechanical stress on implants than teeth. Teeth may become mobile, but when the force is reduced, the mobility decreases. The fulcrum implant may even fail or fracture as a consequence of the uncemented prosthesis.

The length of the cantilever is directly related to the amount of the additional force placed on the abutments of the prosthesis.16,20 When a 25-lb force is placed along the long axis of an implant, the implant system (i.e., crown, cement, abutment, abutment screw, implant body, implant marginal bone, and implant–bone interface) receives a 25-lb load. When a force of the same magnitude (25 lb) is applied on a 5-mm cantilever, the moment force on the abutment is increased to a 125-lb mm force (Figure 12-11).
One Missing Tooth
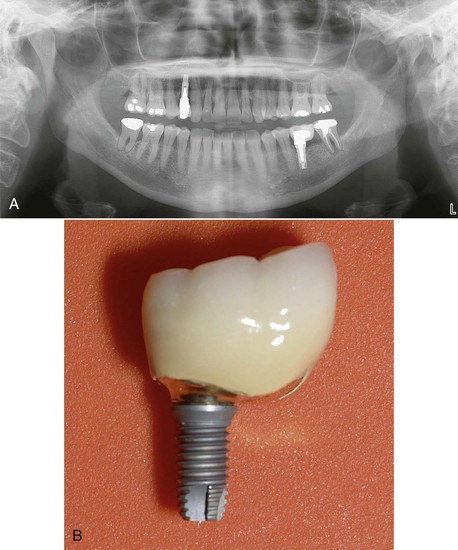
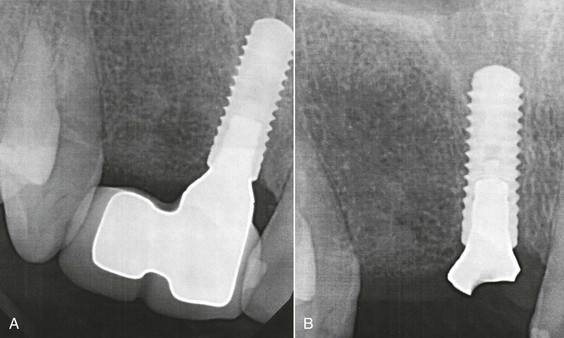
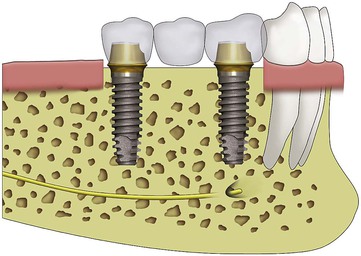
When one tooth is replaced with an implant, the implant should be inserted into the mesiodistal center of the site. As a general rule, the implant should be 1.5 to 2 mm from an adjacent tooth. Hence, a 4-mm implant requires 7 mm of space. When a molar (10–12 mm) is replaced, the implant should be larger in diameter to decrease the mesial and distal cantilever and placed in the mesiodistal center of the edentulous site. This decreases the biomechanical-related risks to the implant system (Figures 12-12 and 12-13).
Two Missing Teeth
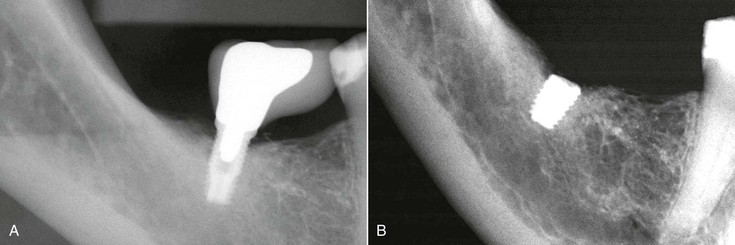
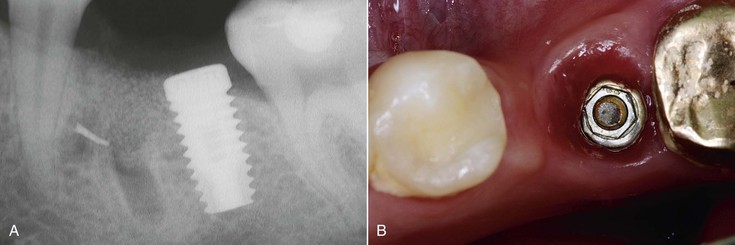
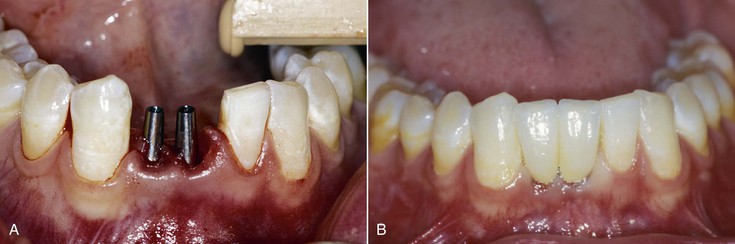
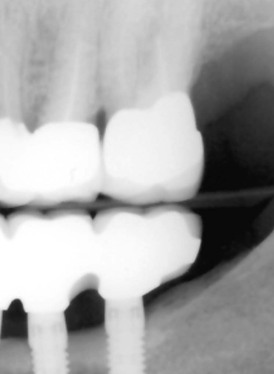
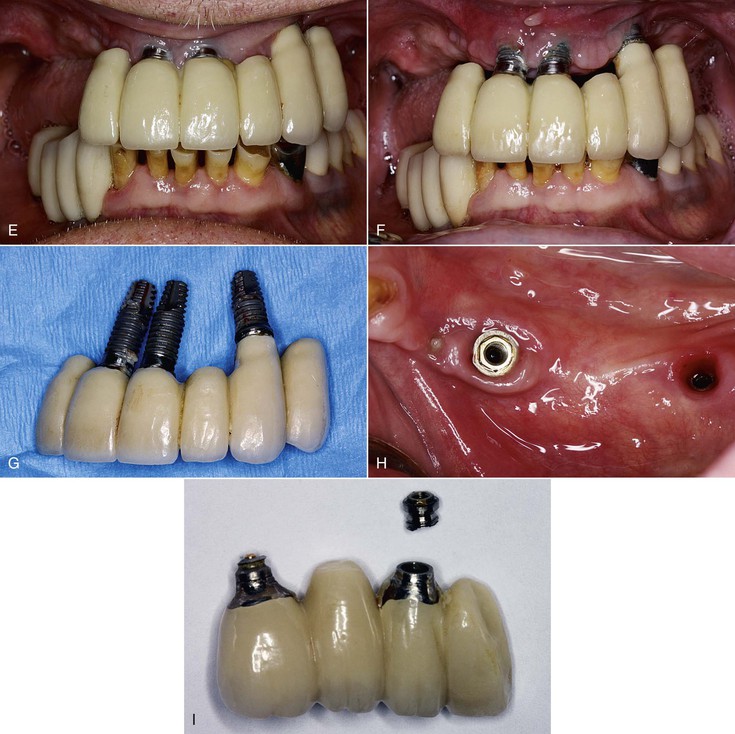
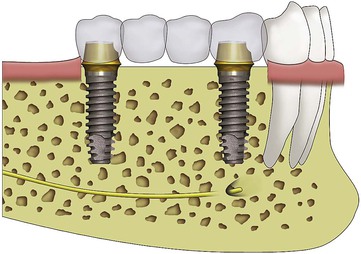
When two adjacent teeth are missing, two implants should support the implant restoration. A trend in implant dentistry related to soft tissue esthetics is to have an ovate pontic cantilevered off one implant whenever two adjacent teeth are missing in the esthetic zone21 (Figure 12-14). The reason most often cited is that it is difficult to obtain an interdental papilla between adjacent implants.22 However, the biomechanical complications of uncemented prostheses, screw loosening, and increased force also increase the risk of marginal bone loss and implant fracture or failure (Figure 12-15). As a consequence, the soft tissue may be significantly affected (Figure 12-16). Interimplant papilla may be generated between two implants as long as the space between the implants is 3 mm or more and  mm from adjacent teeth (Figure 12-17).23,24 As a result, whenever two adjacent teeth are missing and the space is 12 mm or more, two adjacent implants should be inserted even in the esthetic zone.
To enforce the rule of no cantilever, the key implant positions indicate one implant per tooth when one or two adjacent teeth are missing with a span of more than 12 mm (when the implant diameter is 3 mm), 13 mm (when one implant is 3 mm and the other 4 mm), and so on (Figure 12-18). However, if the cervical region is not in the esthetic zone (high smile line in the maxilla or low lip line during speech in the mandible), it is more advantageous to place two implants in limited mesiodistal spaces (e.g., 10–11 mm) to avoid the increased biomechanical complications. The interimplant papilla will not be ideal under these conditions, but the biomechanical risks are greater than the esthetic risks when the region is out of the soft tissue esthetic zone (Figure 12-19).
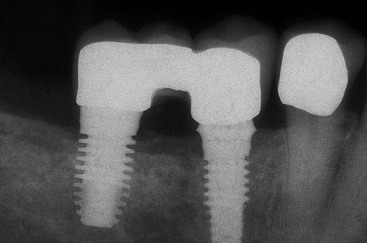
When one of the two (or more) missing teeth include a molar, one of the terminal implants should be positioned 1.5 mm from the anterior adjacent tooth and the other terminal implant at the distal of the last molar, not in the middle of the molar. In this fashion, the 3-mm cantilever from the midmolar to the marginal ridge is eliminated when the implants are splinted together (Figure 12-20). When the implant is not positioned in the distal molar position, the size of the last molar should be reduced to eliminate the cantilever (Figure 12-21). The dental laboratory technician and dentist should be aware the last molar should be a premolar-size crown when the distal implant is positioned in the mesial to midmolar position.
Cantilever Option.
When two adjacent teeth are missing in the esthetic zone anterior to the canines and the intratooth space is less than 12 mm, a cantilever may be an acceptable option. The most common time this clinical condition occurs is two adjacent incisors in the anterior mandible. When the cantilever on the prosthesis is represented by only a mandibular lateral incisor pontic, the ideal implant positions may not include the lateral incisor site. When a pontic replaces the lateral incisor, the soft tissue drape may be improved compared with an implant with less than 3 mm of space from the adjacent implant. The mandibular lateral incisor is the smallest tooth in the arch, so the cantilever is limited. When the mesiodistal space is less than 12 mm, the lateral incisor cantilever should be 5 mm or less. The anterior bite forces are lowest in the central and lateral incisor region. The occlusal force is in the long axis of a mandibular incisor tooth. The occlusal contact on the lateral incisor pontic should be eliminated to further reduce the risk of overload. As a result, the ideal implant position based on force and esthetics may be a larger-diameter implant in the central position (i.e., 4 mm diameter vs. 3 mm) and a cantilevered pontic to replace the mandibular lateral incisor. It should be noted that the cervical region of the mandibular incisors is rarely in the esthetic zone. Hence, a lack of interdental papilla is usually not a consequence.
When a maxillary lateral incisor and central incisor is missing, the intratooth space is almost always greater than 12 mm because a central incisor is usually 8 mm or more wide. Hence, two implants can almost always be inserted. Note: A two-unit cantilever should not be used from a canine implant because the force magnitude increases and the direction of force in the excursion also increases the force to the canine implant.
The fact that, on occasion, a cantilever may be acceptable when force factors are low and bone density is favorable does not negate the ideal goal that no cantilever should be designed in the prosthesis, especially in the posterior regions. Therefore, whenever the intratooth space is 12 mm or more, the terminal abutments at each end of the prosthesis are first designed in the treatment plan. When this option is not readily available, a larger-diameter implant size or greater implant surface area designs are indicated. In addition, the occlusal forces to the cantilevered portion of the prosthesis should most often be reduced or even eliminated.
Three Missing Teeth
When three adjacent teeth are missing, the key implant positions include the two terminal abutments, one on each end of the prosthesis (Figure 12-22). A three-unit prosthesis may be fabricated with only these abutments when most of the force factors are low to moderate and the bone density is favorable. A cantilevered restoration on multiple splinted implants may be compared to a class I lever.16 The extension of the prosthesis from the last abutment is the effort arm of the lever. The last abutment next to the cantilever acts as a fulcrum when a load is applied to the lever. The distance between the last abutment and the farthest abutment from the end of the cantilever represents the resistance arm, and the distance between the implants may be called the anteroposterior distance or A-P spread.
The length (usually in millimeters) of the cantilever (effort arm) divided by the resistance arm represents the mechanical advantage. Therefore, when two implants are 10 mm apart with a cantilever or extension of 20 mm, the mechanical advantage is 2 (20 mm/10 mm). In this example, a 25-lb force on the cantilever results with a 50-lb tensile force on the farthest abutment from the cantilever (25 lb × 2 = 50 lb). The abutment closest to the cantilever (fulcrum) receives a compressive force equal to the sum of the other two forces, or, in this example, 75 lb (25 lb + 50 lb). In other words, the force on the cantilever increases the force on the implants by two to three times (Figure 12-23). Therefore, cantilevers magnify forces to all the abutments supporting the prosthesis.
As important as the increase in force magnitude, the greater load to the implant farthest from the cantilever is a tensile or shear type of force. As a result, any part of the implant system is at an increased risk of biomechanical failure (e.g., porcelain fracture, uncemented prosthesis, abutment screw loosening, crestal bone loss, implant failure, implant component or body fracture) (Figure 12-24). This is especially observed when parafunction or increased crown height space (CHS) exists25 (Figure 12-25).
To eliminate posterior cantilevers, a bone augmentation is often indicated. Most bone augmentation procedures are not as predictable as implant integration in existing bone volumes. Bone augmentation often requires an additional surgery before implant placement. Additional training is required to learn bone augmentation procedures, and the learning curve is longer and more difficult to become accomplished in these techniques. Complications related to bone augmentation are more common than implant surgery in existing bone volumes and may be more extensive and even debilitating to the patient. However, cantilevered implant prostheses have a more frequently observed biomechanical risk than the surgical risks of augmentation, and these risks can cause the loss of the entire implant support and prosthesis. In addition, bone loss from the implant failure may make the following bone augmentation procedures even more difficult to perform than when treatment was rendered in the original condition.
Four or More Adjacent Teeth Missing
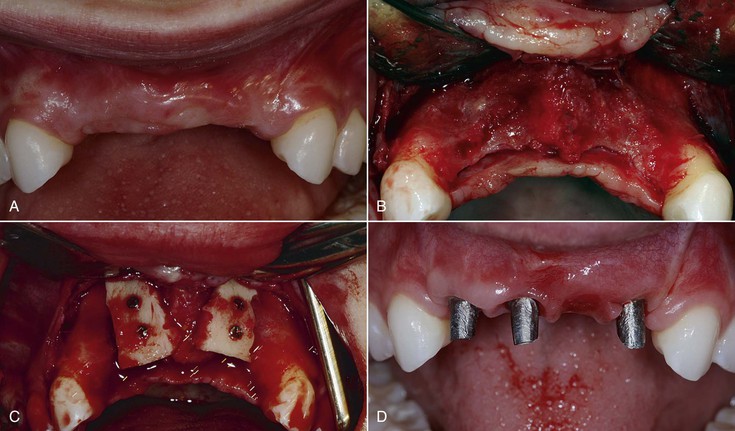
When four adjacent teeth are missing, the terminal abutments are the key implant positions (Figure 12-26). Most often, an additional implant is required, especially when the missing teeth include a canine or posterior teeth or when the bone density is poor (Figure 12-27). Restorations of five to 14 units require the key terminal positions plus additional abutments regardless of force factors or bone density. The other guidelines to the key implant positions determine the most important additional sites for the implant placement.
Cantilever Options.
The ideal treatment plan should eliminate cantilevers in partially edentulous patients and in complete arch maxillae. However, in completely edentulous mandibles, a cantilever is often the most prudent treatment option. For example, in a completely edentulous mandible, available bone in the posterior regions may/>
Stay updated, free dental videos. Join our Telegram channel
VIDEdental - Online dental courses


