Porcelain Veneers: An Esthetic Therapeutic Alternative
Robert L. Nixon
Introduction
Each decade in dentistry is characterized by emerging concepts, which become generally accepted due to academic and clinical research, materials’ technology, and perceived public need. In the 1980s, porcelain laminate veneers qualified for this distinction, expedited by the growing demand for esthetic dentistry. Although often hailed as “new,” porcelain veneers have definite antecedents, which predate the current era.
Porcelain veneers were introduced by Dr Charles Pincus in Hollywood in the 1930s, to enhance an actor’s appearance for close-ups in the movie industry. Dr Pincus attached these thin veneers temporarily with a denture adhesive powder. He then removed them after the filming for the day was completed because no adhesive system existed at that time to permanently attach them.1
Indirect veneering did not progress over the next several decades until Dr Frank Faunce described a prefabricated acrylic resin veneer in the 1970s, integrating the adhesion principles of Buonocore2 and Bowen3 with an indirect veneer alternative to porcelain.4 These veneers were primed with ethyl acetate or methylene chloride liquid and luted to the etched tooth with a composite resin. Although the processed acrylic resin veneer initially exhibited greater stain resistance than direct composite resins of this period, debonding of the veneer occurred frequently at the veneer and luting resin interface because of inadequate chemical bond strength.5 Additionally, wear resistance was poor, which contributed to staining.6
Seeking a viable alternative to indirect acrylic veneers, Simonsen and Calamia7 as well as Horn8 reactivated interest in porcelain veneering by reporting procedures for long-term porcelain veneer retention. Simonsen and Calamia7 demonstrated that etching of the internal surface of the porcelain veneer allowed the veneer to be retained on etched tooth enamel as well as or better than composite resins or acrylic resin. Horn8 advocated the use of a light-curing resin luting agent for efficacy and convenience. Further studies revealed the enhancement of the etched porcelain/luting resin bond by chemical means through pretreatment with silane.9 Research in the recent past has shown that the bond strength of a silanated etched veneer to the luting resin is routinely greater than the bond strength of etched tooth enamel to the same luting resin.10
The advent of the etched porcelain laminate veneer represents the progress of several decades of research, culminating in the synthesis of the acid-etch technique and dentistry’s most time-honored esthetic material, porcelain. Glazed porcelain or cast ceramics offer abrasion resistance, biocompatibility with gingival tissues, long-term color stability, and esthetic attractiveness. The creative initiative of the dentist is coordinated with the ceramic skill of the laboratory technician to achieve attractive predictable results. The inherent advantages of laboratory-fabricated veneers are numerous, such as relative thinness (0.4 to 0.6 mm), precise fit, anatomic accuracy, gradient shading, and appropriate surface texture. Overall, the esthetics and longevity of porcelain veneers surpass any indirect or direct resin alternative at this time.
From this background, the clinical and laboratory techniques have undergone continuing refinements.11–13 Because porcelain veneers are relatively technique-sensitive,14 detailed educational materials have recently been published to help clarify the nuances of the clinical approach.15,16
This chapter provides a comprehensive description of the clinical technique for porcelain laminate veneers. In a broader sense, it is designed to present porcelain laminate veneers as a viable esthetic alternative to traditional metal ceramic and all-ceramic crowns in certain clinical situations.
The cornerstone of every good treatment plan is an accurate diagnosis. An esthetic treatment plan requires an esthetic diagnosis. The truly esthetic dentist devises an attractive dental composition not only from stereotypical guidelines of form and function but also as an organic expression of personality, status, life-style, gender, occupation, and other characteristics that distinguish one individual from another. The smile is perceived as an integral part of the face and, in a larger sense, of the whole person. It is an expression of beauty, youth, age, or persona. In addition, the esthetic dentist must have an awareness of contemporary fashions, a perception of patient expectations and self-image, and the creativity and technical skill to orchestrate this information into a successful therapeutic result.
An initial step in determining patient desires is to provide a written questionnaire to be answered. Properly structured, this questionnaire provides a focus from which a personalized treatment plan is eventually derived. Having patients elaborate on their questionnaire responses is a good starting point for the clinical evaluation. Perceived smile deficiencies are noted, and the desired image that is sought is discussed in great detail. In short, each patient is encouraged to articulate both smile likes and dislikes. The key concern is the patient’s desires. Sometimes the desires are blatantly obvious; other times they are deceptively subtle.
Moving from the verbal to the visual, patients are invited to scan a photo album of assorted faces and smiles from completed cases to further clarify subjective preferences. If a photo album of completed cases has not been assembled, then close-up clippings of fashion models or celebrity smiles can be substituted. Smile books for dentistry currently on the market can also be used, as can brochures, videotapes, color slides, or articles that vividly illustrate the dynamics of esthetic dentistry.
The esthetic and morphopsychologic factors that must be thoroughly evaluated to formulate treatment recommendations appropriate to the needs of any patient are systematically discussed in Chapters 1 to 4. This primarily objective information, once discovered, must now be harmoniously integrated with the patient’s subjective desires to finalize the treatment plan. In other words, the treatment plan must represent a symbiotic balance between a patient’s needs and a patient’s desires.
Tooth color must be discussed in a general way and then selected specifically for each patient. The patient’s perception of tooth color during the selection process can be greatly enhanced by multiple tooth “smile guides.” These are six porcelain denture teeth, luted together, and made up of four maxillary incisors in one shade (eg, Vita A2) and two canines in a slightly darker shade (eg, Vita A3). They provide the patient with a realistic “collective” color, rather than merely one or two shade guide buttons that are customarily used. Smile previewing through computer-assisted dental imaging represents a new high-tech system capable of clarifying further a patient’s preferences for contour and color in a dramatic way.
Staff enthusiasm, knowledge, and finesse in guiding patients through this important introductory phase can be a significant asset toward establishing the necessary rapport. Generally, some constructive guidelines concerning specific smile parameters emerge from exposure to these visual stimuli.
The final phase of the case evaluation is to unify the objective analysis of clinical data with the patient’s subjective desires. Throughout this delicate interaction, it is important to remain sensitive to the patient’s responses as they are guided to the optimal treatment plan. Reciprocally, the patients must orient us through this refinement process by means of self-observations. In this manner, patient expectations can be effectively coordinated with the ultimate treatment plan.
Indications for porcelain veneers
1. Multiple discolored teeth.
2. Multiple teeth with enamel defects and unsatisfactory tooth color (Figs 12-1 and 12-2).
3. Multiple teeth with spacing and unsatisfactory tooth color (Figs 12-3 and 12-4).
4. Multiple worn or foreshortened teeth.
5. Multiple misaligned teeth and unsatisfactory tooth color.
6. Teeth with generalized facial discoloration from amalgam shine-through.

Fig 12-1 Before placement of eight maxillary porcelain veneers, this pretty young woman displayed yellowish, mottled teeth.

Fig 12-2 After placement of the porcelain veneers she displays a radiant smile. This esthetically pleasing result can be achieved routinely with the clinical technique to be described.

Fig 12-3 An attractive woman presents a pretreatment condition of both discolored and spaced maxillary teeth.

Fig 12-4 After receiving eight maxillary porcelain veneers, her entire face “lights up” from her attractive new smile.
Contraindications for porcelain veneers
1. Teeth with defective enamel over the entire crown.
2. Teeth with insufficient coronal tooth structure (less than one half of coronal tooth structure remains).
3. Teeth that are still actively erupting.
4. Teeth exhibiting severe crowding.
5. Teeth in which an intracoronal resin restoration would suffice.
6. Teeth exhibiting extreme occlusal trauma or wear.
Porcelain veneer indications are generally based on color change and, to a certain degree, on contour and alignment modifications. Porcelain veneer contraindications usually stem from insufficient enamel to ensure a durable, long-term cement bond or extreme tooth crowding. Dentitions with extensive wear from bruxism are also poor candidates for porcelain veneering.
Stratification is the process of forming in layers (Fig 12-5). A porcelain veneer that is bonded to a tooth with a resin cement is an example of stratification. The layers are as follows: inner layer, the tooth; middle layer, the resin cement; and outer layer, the porcelain veneer.
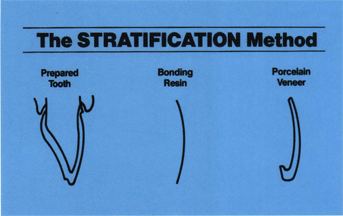
Fig 12-5 Stratification method is based on the concept that the tooth, the resin cement, and the porcelain veneer must be manipulated precisely for optimal clinical results.
Various principles, which enhance control of porcelain veneer color by correlating tooth preparation, resin interface space, and porcelain veneer formulation, have been discovered through clinical research. The dynamic application of these principles to the complex area of porcelain veneer coloration is called the stratification method. The collective impact of the stratification method is best understood by examining the manipulation of each of the three layers.
Tooth preparation
Without graded tooth preparation, color control is inconsistent, and overbulked veneers are the rule. Graded tooth preparation rests on the principle that the greater the color change, the greater the misalignment toward the facial, or the greater the occlusal function, the greater the amount of tooth reduction. Two levels of graded tooth preparation are necessary to create space: one level for a moderate color change (the universal preparation) and another level for profound color change (Fig 12-6).
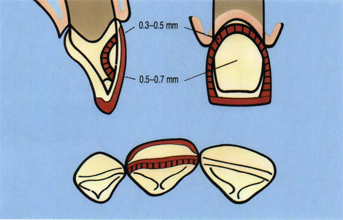
Fig 12-6 Stratification method—facial tooth preparation for most cases is 0.3 mm deep in the cervical one third and 0.5 mm deep in the remaining two thirds. For profound color change, up to 0.5 mm depth in the cervical area and 0.7 mm in the remaining facial surface is advisable.
For moderate color change, defined as two shades or less, a two-plane facial reduction of 0.3 mm in the cervical one third and 0.5 mm in the incisal two thirds is indicated. This is considered the universal preparation because more than 90% of the cases necessitate this preparation (Fig 12-7). For profound color change, defined as three shades or more, including tetracycline and endodontically discolored teeth, a deeper biplane facial reduction is desirable. For all teeth except mandibular incisors, at least 0.4-mm enamel reduction in the cervical area and at least 0.6-mm enamel reduction along the remaining facial surface are indicated (Figs 12-8 and 12-9).
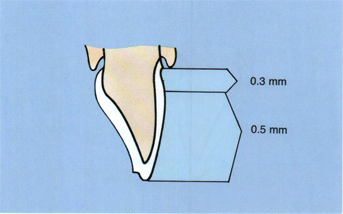
Fig 12-7 Stratification method—for a two-shade color shift in all teeth, a 0.3-mm tooth reduction in the cervical one third and a 0.5-mm tooth reduction in the remainder of the facial surface are sufficient.
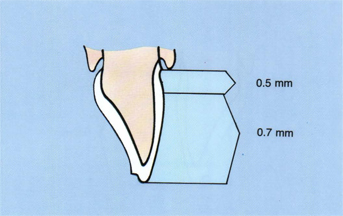
Fig 12-8 Stratification method—for the larger enamel-plated teeth, tooth reduction levels of 0.5 mm in the cervical one third and 0.7 mm in the remaining facial surface are possible when the color change is profound.
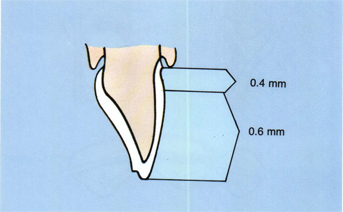
Fig 12-9 Stratification method—teeth with thinner enamel plates can only be reduced 0.4 mm in the cervical one third and 0.6 mm in the remaining facial surface for three shade shifts or more.
Mandibular incisors cannot be reduced more than 0.3 mm cervically and 0.5 mm on the remaining facial surface without substantial dentin exposure (Fig 12-10). Color control for mandibular incisors will be developed through greater emphasis on resin interface space and intrinsic veneer opacity.
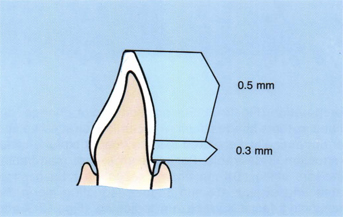
Fig 12-10 Stratification method—mandibular incisors, with the thinnest enamel plates, are confined to 0.3-mm cervical depths and 0.5-mm remaining facial depths, even with three shade shifts or more. Color correction will depend more on resin spacer and porcelain formulation.
In summary, the rationale for graded tooth preparation is to create sufficient space to totally convert the existing tooth color to the desired veneer color without undesirable overcontouring or color compromise.
Resin interface space
Just as graded tooth preparation was based on the degree of color shift between the prepared tooth color and the intended veneer color, in a similar manner, graded resin interface space is also related to this change. In the stratification method, this is perhaps the most significant factor in controlling veneer color, with tooth preparation and porcelain veneer formulation ranking a close second and third.
Before coordinating resin interface space with tooth preparation and with porcelain veneer formulation, it is advantageous to discuss light reflection and veneer vitality: the greater the surface reflection (specular reflection) of light off the surface of a porcelain veneer (as with a mirror), the lower the vitality of the veneer. The greater the internal reflection (diffuse reflection) of light (as with a natural tooth), the more vital the veneer becomes. In effect, this means that a veneer formed with a highly opaque porcelain will mask undesirable tooth color but display limited vitality due to the predominance of surface light reflection. By contrast, a more translucent porcelain allows considerably more light transmission and reflection internally, which significantly enhances vitality. However, at an average veneer thickness of 0.6 mm, the translucent porcelain allows some of the undesirable color of teeth with profound discoloration to bleed through. If neither opaque nor translucent porcelain produces both the desired color and vitality by itself, how can porcelain veneers simulate natural teeth against the backdrop of profoundly discolored teeth? The stratification method offers a solution to this seeming dilemma by:
1. Using graded resin interface space to allow the resin to dilute the tooth discoloration, ie, the principle utilized for graded tooth preparation is also applicable to graded resin interface space: the greater the color change, the greater the resin interface space.
2. Fabricating porcelain veneers with graded opacities.
For moderate color changes of two shades or less, graded resin interface space is accomplished by applying six coats of die spacer (one coat is assumed to be approximately 10 to 15 μm) as uniformly as possible over the entire preparation surface of veneer dies or a solid model, except for a 1-mm zone at the finish line and the incisal edge (Fig 12-11). This 1-mm unrelieved zone is established to retain accurate veneer seating and to minimize excessive resin cement film thickness at the margins.

Fig 12-11 Stratification method—correlated with the tooth preparation for a two-shade shift or less is resin spacing of 0.1 mm and a relatively translucent porcelain veneer.
For profound color changes of three shades or more, twelve die spacer coats are recommended (Fig 12-12). Again, the 1-mm zone at the margin remains free of die spacer. More than twelve die spacer coats up to 18 coats (0.2 mm) are reserved for the most severely discolored teeth, such as tetracycline and endodontically stained teeth. The rationale of using graded die spacer to occupy a portion of the space, created by graded tooth preparation, is to permit the resin cement color to dilute the tooth discoloration to a sufficient degree that the overlying porcelain veneer can establish the desired color and retain a high degree of vitality. In short, the resin cement value (lightness or darkness), hue (color), and chroma (intensity of color) will exert a decisive influence on the establishment of the desired color without sacrificing vitality because of the graded resin interface space.
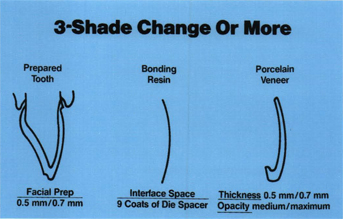
Fig 12-12 Stratification method—in a three-shade shift or more, along with the appropriate tooth preparation, a 0.1 to 0.2 mm die spacer is advocated. The porcelain veneer must increase in opacity as well.
Porcelain veneer formulation
For a given case, the ceramist must formulate a porcelain veneer that will contain graded opacity appropriate to the desired color change. This could range from virtually no color change to a profound color correction of tetracycline or endodontically discolored teeth. The brand of porcelain used, the degree of opacity or pigmentation of the porcelain, the method of establishing the graded opacity, and the layered characterization of the porcelain veneer varies with the ceramist. In general, for a two-shade color change or less, the porcelain of choice tends to be relatively translucent (see Fig 12-11). For a three-shade shift or more, it is preferable to use a more opaque porcelain. To produce a polychromatic, natural tooth color gradation in the more opaque veneers, the veneers are more highly characterized than a porcelain crown (Fig 12-13).

Fig 12-13 Stratification method—a typical porcelain veneer for a three-shade color shift or more is formulated with medium to high opacity. It is also more highly characterized, especially in the incisal zone and cervical zone.
Verification of the stratification method is apparent in the results of case after case, which demonstrate lively, natural color (Figs 12-14 and 12-15).
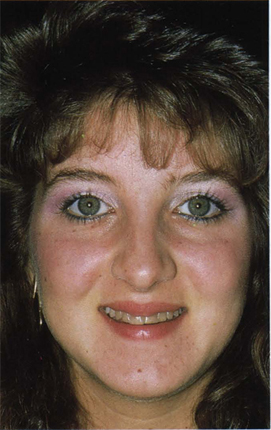
Fig 12-14 Stratification method—a young woman with dark tetracycline-stained teeth before placement of eight maxillary porcelain veneers.
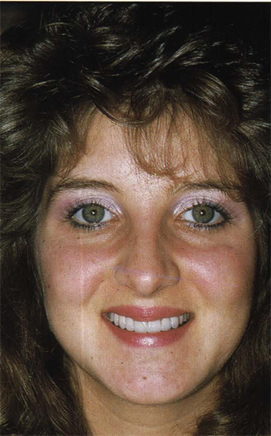
Fig 12-15 Stratification method—the striking improvement in her smile is obvious. The stratification method greatly simplifies difficult cases such as this one.
Tooth preparation and impression taking
Advantages of tooth preparation
The main advantage of tooth preparation is control over a number of factors, which, if left haphazard, can seriously jeopardize the biologic and esthetic final result. Correct tooth preparation initiates control of the following:
1. Contour.
a. Emergence angle.
b. Margin.
c. Facial profile.
2. Color without overbulking.
3. Margin placement for concealment.
4. Veneer seating for placement and bonding.
5. Definitiveness of margin for the technician.
6. Porcelain bulk for occlusal loading.
7. Glaze preservation in finishing procedures.
8. Tooth recontouring for misalignment correction.
9. Enamel etch by removing fluoride-rich layer.
Tooth preparation will vary somewhat from tooth to tooth, depending on tooth size, tooth alignment, and existing enamel. For example, a maxillary central incisor would require more tooth preparation than a mandibular incisor. A protruding tooth would necessitate more tooth preparation than a correctly aligned tooth. A younger tooth, with minimal enamel wear, would permit more tooth preparation than an older tooth with considerable enamel wear.
It is assumed that before porcelain veneering is undertaken, restoration of all carious lesions, replacement of all failing restoratives, and eradication of all periodontal disease has been completed on all teeth to be veneered. Pumice all teeth to be veneered to remove any extrinsic stain. Make a shade determination for the veneers based on as much patient input as possible if this important decision was not made during case evaluation. Any occlusal abnormalities should also be corrected before starting.
The stratification method is now employed to determine the correct amount of tooth preparation. Note the shade(s) of the existing teeth to be veneered, and lower it one shade because of tooth preparation, eg, if the unprepared teeth are A3, then assume they will be A3.5 after preparation. Based on the guidelines of the stratification method, if the veneer shade is A1, then a 0.5-mm emergence/0.7-mm facial plane preparation should be made in the thickest teeth and 0.4-mm/0.6-mm and 0.3-mm/0.5-mm in the thinner and thinnest teeth. If the veneer shade is A2, however, this would necessitate only a two-shade shift (from A3.5 to A2), and a 0.3-mm emergence/0.5-mm facial plane preparation would be used. As an additional example of stratification method logic, if the shade of the unprepared teeth is A2 and the prepared teeth become A3, then no matter how light an A shade the patient selects, the preparation would still be 0.3-mm/0.5-mm. Estimating the shade of the prepared tooth to be one shade darker than the unprepared tooth to determine the amount of tooth preparation is correct for the majority of teeth. Occasionally, the prepped tooth violates this estimate, being more than one shade darker or remains the same shade or gets lighter. In these situations, the final preparation is always determined by the actual shade of the prepared tooth. Sometimes this necessitates changing a 0.3-mm/0.5-mm preparation into a 0.5-mm/0.7-mm preparation to properly control color.
Tooth preparation for maxillary anterior teeth
It is much easier to visualize tooth preparation in enamel if the teeth are prepared dry: periodically (every 15 seconds) a water–air syringe spray is activated to wash away powdered tooth cuttings and cool the tooth. The lack of a continual water-mist introduces much greater control and obviates inadvertent overpreparation. If dentin is exposed, water spray must be activated for pulpal health. Anesthesia, which may or may not have been necessary up to this point (based on patient subjectivity), should be administered at this time, as a general rule.
Before initiating tooth preparation, it is necessary to determine where to place the gingival margin. The advantages of a slightly supragingival margin (0.5 mm) are numerous, such as minimal tissue trauma in preparation, lessened likelihood of exposing dentin, reduced probability of tissue retraction for impression taking, greater control of surface contamination during bonding, easier access for marginal finishing procedures after placement, reduced probability of contour alterations in the bonded restoration (potentiating gingival inflammation), and improved patient accessibility for soft tissue maintenance procedures. Therefore, with the exception of pronounced tooth discoloration or a patient who is obsessive about disguising the margin, it is highly desirable to place the margin slightly supragingival in enamel. In cases in which a 0.5-mm supragingival margin has been prepared, as previously stated, placement of retraction cord is usually unnecessary.
Tooth preparation sequence: Maxillary teeth
To control the depth of the facial tooth preparation and remain primarily in enamel for bond strength and reliability of marginal seal, self-limiting, depth-cutting disks are used. These depth-cutting disks permit 0.3-mm, 0.5-mm, and 0.7-mm cuts to be placed anywhere on the facial surface (Fig 12-16). In more than 90% of the cases, the 0.3-mm and 0.5-mm depth-cutting disks are used because the color change is two shades or less.
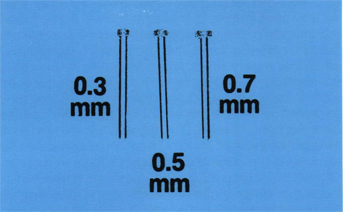
Fig 12-16 Tooth preparation sequence—the 0.3-mm, 0.5-mm, and 0.7-mm self-limiting depth-cutting disks provide controlled facial reduction. They are part of the Nixon Porcelain Veneer Kit 2 (Brasseler).
To illustrate the correct sequence of tooth preparation in stages, a maxillary right central incisor tooth has been colored white. The distal one half of the facial surface will be prepared to graphically demonstrate the tooth preparation sequence. In everyday clinical practice, both mesial and distal surfaces would be prepared according to this sequence (Figs 12-17 to 12-22).
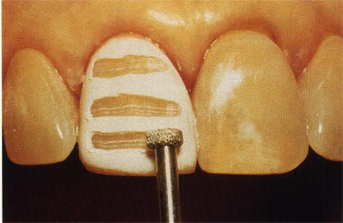
Fig 12-17 Tooth preparation sequence—depth cut placements, appropriate to the maxillary central incisor in this case, are illustrated. The cervical horizontal depth cut is 0.3 mm. The midfacial and incisal depths cuts are 0.5 mm.
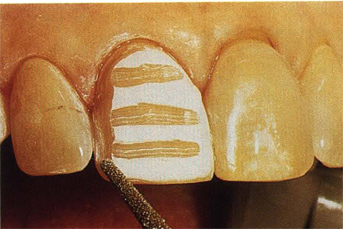
Fig 12-18 Tooth preparation sequence—the gingivoproximal chamfer finish line is illustrated on the distal one half of the tooth. Note that the finish line is slightly supragingival, has an indentation or elbow below the papilla tip, and does not penetrate into the contact zone.
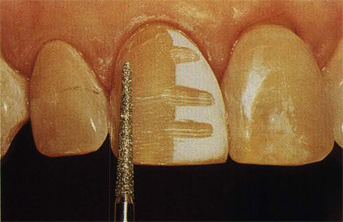
Fig 12-19 Tooth preparation sequence—facial reduction is accomplished by removing the depth cuts and “rolling” the proximal corners into the preestablished chamfer finish lines, eliminating any sharp line angles.
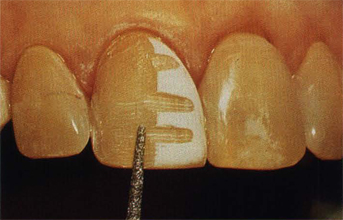
Fig 12-20 Tooth preparation sequence—facial reduction in the incisal one fourth is sometimes incomplete due to placing the incisal depth cut too high. If this situation occurs, correct it with further reduction.
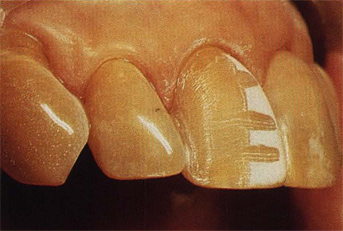
Fig 12-21 Tooth preparation sequence—side view of the completed gingivoproximal and facial reduction of the distal one half of the tooth. Note that the finish line resembles a dog leg, to hide the margin and facilitate veneer finishing.
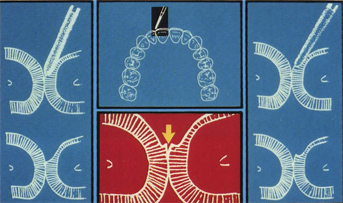
Fig 12-22 Tooth preparation sequencea—a diagrammatic representation of tooth preparation at the contact zone (arrow) emphasizes the correct placement of the proximal finish line. It also demonstrates the advantage of a snub-nosed diamond bur tip (Nixon Porcelain Veneer Kit 2) over a bullet-nosed diamond bur tip. The snub-nosed diamond bur tip produces a cavosurface angle of 110° to 120° or more. The bullet-nosed diamond bur tip cuts a 135° angle and tends to thrust into the contact zone.
Placement of depth cuts
Whether a single tooth or multiple teeth are to be prepared, the 0.3-mm depth-cutting disk (or infrequently the 0.5-mm depth-cutting disk for profound color change) is used first to place a uniform horizontal depth cut from the mesioproximal line angle to the distoproximal line angle. This horizontal cut should be placed in the cervical one third of the tooth and preferably at least 3 mm from the cementoenamal junction. If multiple teeth are to be veneered, then the 0.3-mm depth cuts are placed as described on each of these teeth. The 0.3-mm depth-cutting disk is now replaced by the 0.5-mm depth-cutting disk (or infrequently the 0.7-mm depth-cutting disk for profound color change). The 0.5-mm depth-cutting disk is now used on all teeth to be veneered to place two additional depth cuts. One horizontal depth cut is placed midfacially from the mesioproximal line angle to the distoproximal line angle. The other horizontal depth cut is placed in the incisal one third of the facial surface, approximately 3 mm from the incisal edge. This horizontal depth cut also extends from the mesioproximal line angle to the distoproximal line angle (see Fig 12-17).
Gingivoproximal preparation
To establish the veneer margin, using a long, tapered medium or fine grit snub-nosed diamond bur, prepare a definitive chamfer (0.3 to 0.4 mm in depth) uniformly 0.5 mm supragingival from the gingival margin. Begin at the height of the free gingival margin and prepare the chamfer margin to the distal papilla tip. Then prepare the chamfer margin to the mesial papilla tip (see Figs 12-18 and 12-21).
Continue the definitive chamfer finish line from the distal papilla tip to the beginning of the contact zone, far enough lingually, to hide the veneer margin when viewed from the side of the tooth. This produces an elbow-like cut, which translates into the “wings” of the forthcoming veneer, which will conceal the margin from an unesthetic display (see Fig 12-21). Without breaking into the tooth contact from the labial, carry the definitive chamfer from the elbow cut incisalward to the incisal embrasure, cutting just labial (0.2 mm) to the entire contact zone. The tooth contact is left intact with a narrow island (0.2 mm) of proximal tooth structure, just labial to the contact zone, remaining unprepared (see Figs 12-18 and 12-21). This sliver of unprepared tooth structure just labial to the contact is significant because it permits a small separation between the veneer margin and the adjacent tooth or veneer. This slight separation, which is not perceptible to a casual observer, permits access for finishing the cemented veneer to remove resin cement flash or an irregular porcelain ledge (see Fig 12-22). Naturally, the same type of definitive chamfer is placed from the mesial papilla tip to the end of the incisal embrasure in clinical practice before beginning facial reduction. The purpose of establishing the entire gingivoproximal definitive chamfer margin before beginning facial depth cut removal is to avoid overpreparation, which often occurs when facial reduction is begun first. The no. 850-014 diamond bur from the Nixon Porcelain Veneer Kit II (Brasseler) is recommended for the gingi-voproximal preparation for most teeth. The no. 850-016 diamond bur in the Nixon Porcelain Veneer Kit II is used occasionally for larger teeth in the proximal preparation.
Facial preparation
Based on the stratification method, remove 0.3 mm of enamel (0.5 mm for profound color change) in the cervical one third, blending this enamel reduction into the gingival chamfer. Avoid overreduction or underreduction by preparing until the depth cuts just disappear. Paralleling the remaining facial surface, remove from 0.5 mm of the facial enamel (0.7 mm for profound color change), depending on the stratification method guidelines. Again, use appropriate depth cuts as a precise measurement to gauge tooth reduction. Use a no. 850-014 Brasseler diamond bur (medium grit). Be sure to round off any sharp angles that develop during facial preparation, such as the facioproximal line angles or the facioincisal line angle. These sharp angles create potential stress zones, which render porcelain more prone to fracture (see Fig 12-19). Check facial reduction in the incisal one third. Sometimes it is not fully prepared, resulting in a labialization of the incisal edge. If a mirror check from the incisal reveals this underreduction, remove more tooth structure (see Fig 12-20). Adequate facial preparation allows room for matching, modifying, or masking of various tooth colors, and it makes it unnecessary to perceptibly overcontour the veneer.
Incisal preparation
Before completing the final stage of basic tooth preparation, the incisal preparation, it is necessary to evaluate each tooth in regard to the esthetic treatment plan. If porcelain is to cover the incisal table, it is essential to allow for sufficient porcelain bulk in the preparation design to resist functional failure due to crack propagation in the porcelain. This ranges from 0.75 to 1.5 mm, depending on the severity of occlusal loading, with 1.0 mm being a generally accepted average incisal thickness of porcelain. Additionally, it is necessary to terminate the incisal margin in such a manner as to protect against marginal “peel” (progressive fatiguing of the bonding resin over time until cohesive failure occurs, resulting in incisal fracture of the bonded veneer). This requires developing resistance form in the incisal preparation by either ending it at the linguoincisal line angle after reducing the incisal table more toward the lingual to provide added support to the restoration, or by ending it at the beveled facioincisal line angle to provide support from the incisal table of the tooth.
Bearing these factors in mind, for maxillary incisors, if the teeth are not to be lengthened and the facial reduction has resulted in an incisal table of less than 1 mm width, then the incisal edge should be reduced approximately 1 mm or more for central incisors and 0.75 mm or more for lateral incisors. The reduction of the incisal table should not be done perpendicular to the long axis of the tooth but about 30° to 40° off perpendicular toward the lingual (Figs 12-23 and 12-24). This slight angulation toward the lingual provides resistance form against porcelain edge fracture and a sharp finish line for the ceramist to form a porcelain butt margin against. The facioincisal angle, which becomes sharp from the facial reduction, must now be rounded off or it will create an area of stress under the veneer (Fig 12-25).
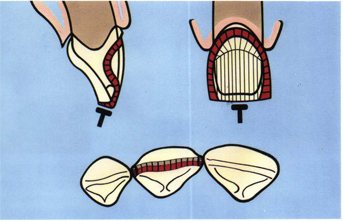
Fig 12-23 Tooth preparation sequence—a diagrammatic representation of the incisal reduction for a tooth that will not be lengthened and will have a porcelain incisal edge. Note the angle toward the lingual edge of the edge-reducing disk. It is 30° to 40° off perpendicular to the long axis of the tooth toward the lingual.
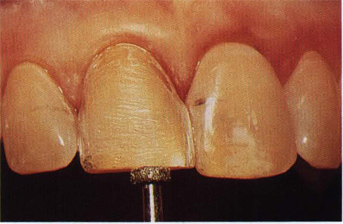
Fig 12-24 Tooth preparation sequence—the incisal reduction of 1 mm is correct, but the angle of the disk is incorrect. By not tilting the cutting surface lingually, no resistance form is created to withstand functional edge fracture.
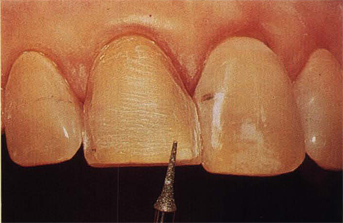
Fig 12-25 Tooth preparation sequence—to avoid stress concentration, which could result in eventual porcelain fracture, the facioincisal angle, which becomes sharp after facial preparation, is rounded off.
If the maxillary incisors are not to be lengthened and facial reduction leaves an incisal table greater than 1 mm in width, then the sharpened facioincisal line angle can be given a 30° bevel, and the termination of that bevel on the incisal table serves as the incisal finish line. In other words, when a thicker incisal table exists after facial reduction, the porcelain veneer does not need to fully replace the incisal edge. Rather, it can merge with the incisal boundary of a 30° bevel of the resultant facioincisal line angle. This alternative incisal preparation is a reliable way of preserving existing incisal length.
If the maxillary incisors are to be lengthened up to 2 mm and the incisal table is less than 1 mm in width, then the incisal table is reduced in a 30° to 40° plane toward the lingual until the incisal table width reaches 1 mm or more. The added tooth length desired will be accomplished by additional incisal porcelain in the veneer. If the incisal table after facial reduction is 1 mm or more in width and the tooth is to be lengthened, then the existing incisal table is lightly beveled 30° to 40° toward the lingual. The added length will be built into the incisal of the porcelain veneer.
Because of its role in anterior guidance, the canine is best handled one of two ways. If the existing incisal length and shape are satisfactory, then a “window” preparation is advisable because it does not alter anterior guidance in any way. A window preparation of the canine incisal table, which is usually twice the width of the incisal table of incisors following facial reduction, is accomplished by undermining the incisal table and removing about one third of the incisal table toward the facial. This is done by pointing the snub-nosed diamond bur downward (from cervical to incisal) and running the tip from the mesioproximal chamfer terminus to the distoproximal chamfer terminus, with the tip following at all times the line of the incisal table. By creating a continuous 360° finish line, essentially on the facial surface, the preparation roughly resembles a window, hence the name window preparation.
If the canine is worn at the incisal edge and the treatment plan is to restore the tooth to a more rounded incisal shape and lengthen it, then a different incisal preparation is advisable. Perform at least enough tooth reduction by angling 30° to 40° toward the lingual to permit 1.0 to 1.5 mm incisal thickness in the porcelain veneer in the area of incisal guidance, as well as at least 1 mm thickness in the remaining areas of the incisal table. The sharp linguoincisal angle from this incisal preparation will be the finish line for the ceramist to form a butt porcelain margin. As with the maxillary incisors, the facioincisal line angle is rounded off. [Note of caution: there is no advantage to carrying the incisal chamfer several millimeters onto the lingual surface.] Naturally long teeth, eg, canines with blunted papillae or periodontally involved teeth treated with flap therapy, require maximal interproximal penetration without undercuts to hide margins. Veneer seating is best accomplished by a direct facial line of insertion or an incisofacial rotation. In the incisofacial rotation, the incisal porcelain of the veneer is seated first and acts as a pivot, and the cervical portion of the veneer is gradually seated by rotating the veneer into place with gentle finger pressure. Neither of these preferred seating methods is served by having a lingual chamfer, which is several millimeters cervical to the linguoincisal line angle. This creates a considerably more incisal line of insertion and increases the probability of fracture of the thin proximal wings on seating, incomplete seating of the veneer, an open lingual margin in fabrication to permit seating, and fracture of the thin lingual extension during placement or subsequent function.
Occlusal preparation for premolars involves two variations from the maxillary anterior tooth preparations. Carry the chamfer finish line about 1.0 to 1.5 mm onto the occlusal surface to a depth of about 0.75 mm. This will “hood” the cusp and diminish greatly the possibility of shear fracture. Carry the distal chamfer only to the distal line angle not within 0.2 mm of the contact. This surface is not seen from a frontal or side view. This little adjustment simplifies finishing and polishing of this surface, which becomes increasingly difficult the more posteriorly the veneers are placed.
If a subgingival finish line is to be prepared because of severely discolored teeth, as mentioned, at the outset of tooth preparation an atraumatic retraction cord should be placed (Fig 12-26). The gingival chamfer is then carried slightly subgingival (maximum of 1 mm) from its original location at the gingival crest (Fig 12-27). Anesthesia for cord placement may or may not be necessary depending on subjective pain tolerance of the patient.
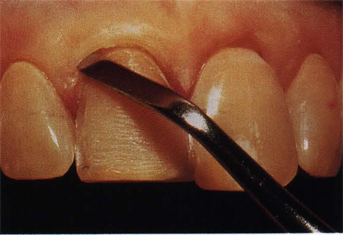
Fig 12-26 Tooth preparation sequence—if a subgingival margin is necessary to hide extremely dark teeth, prepare the chamfer to the edge of the unretracted gingival margin. Then, delicately retract the gingiva with one or two strands of thin, braided cord.
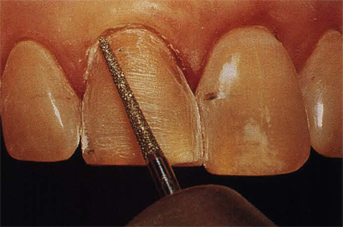
Fig 12-27 Tooth preparation sequence—following atraumatic retraction of gingiva, carefully extend the chamfer finish line, prepared to the unretracted gingiva, approximately 0.75 to 1.0 mm apically. Avoid going more than 1 mm subgingival due to problems of finishing access, contamination, and soft tissue irritation.
Even if subgingival margins are not placed, unless there is a 0.5 mm or more supragingival margin, thin braided retraction cord should be placed beneath t/>
Stay updated, free dental videos. Join our Telegram channel
VIDEdental - Online dental courses


