Casting and Soldering
Objectives
After reading this chapter, the student should be able to:
< ?mpslid E1?>< ?mpslid S2?>
2. Describe the lost-wax technique and its accuracy in producing a dental casting.
< ?mpslid E2?>< ?mpslid S3?>
3. Explain the advantages and disadvantages of using wax in the casting process.
< ?mpslid E3?>< ?mpslid S4?>
4. Define what a sprue is, what it may be made of, and its importance to the casting process.
< ?mpslid E4?>< ?mpslid S5?>
< ?mpslid E5?>< ?mpslid S6?>
6. Explain why the conditions used to burn out the wax pattern influence the fit of a casting.
< ?mpslid E6?>< ?mpslid S7?>
7. Describe a centrifugal casting machine and how it works.
< ?mpslid E7?>< ?mpslid S8?>
< ?mpslid E8?>< ?mpslid S9?>
< ?mpslid E9?>< ?mpslid S10?>
10. Compare solders with casting alloys in terms of composition and properties.
< ?mpslid E10?>
Key Terms
Burnout
Casting
Casting ring
Flux
Hygroscopic expansion
Investments
Lost-wax technique
Pickling
Solder
Sprue
Substrate alloy
Thermal expansion
In dentistry, casting is a process by which a detailed wax pattern of a dental restoration is converted into alloy or ceramic. The casting process allows the dentist and dental laboratory to custom-make precision restorations for missing or damaged teeth. Casting is complex and takes place largely in commercial dental laboratories. However, dental auxiliaries must understand casting to communicate effectively with the dentist, patients, insurance companies, and the dental laboratory. This chapter provides an overview of casting at an introductory level. Although machining of restorations is a growing alternative to casting, the majority of dental prostheses are still cast using the methods described in this chapter.
 Casting uses the lost-wax technique to fabricate precision restorations for teeth.
Casting is used to fabricate inlays, onlays, crowns, ceramic–alloy crowns, some all-ceramic crowns, partial dentures, implant restorations and frameworks, and occasionally a complete denture. Thus, the casting process plays a large role in dentistry. In dentistry, casting uses a technique called the lost-wax technique. Figure 12-1 shows a diagrammatic summary of the steps involved in the lost-wax technique: making the wax pattern, spruing the pattern, investing, burnout, casting, removal of investment (devesting), and finishing. In many cases, such as with a ceramic–alloy crown, the casting is not the final restoration but is modified to obtain the final restoration through ceramic application, machining, or soldering. Castable or pressable ceramics have been developed that also use the lost-wax technique to form either the final restoration or a substructure onto which other ceramics are applied.
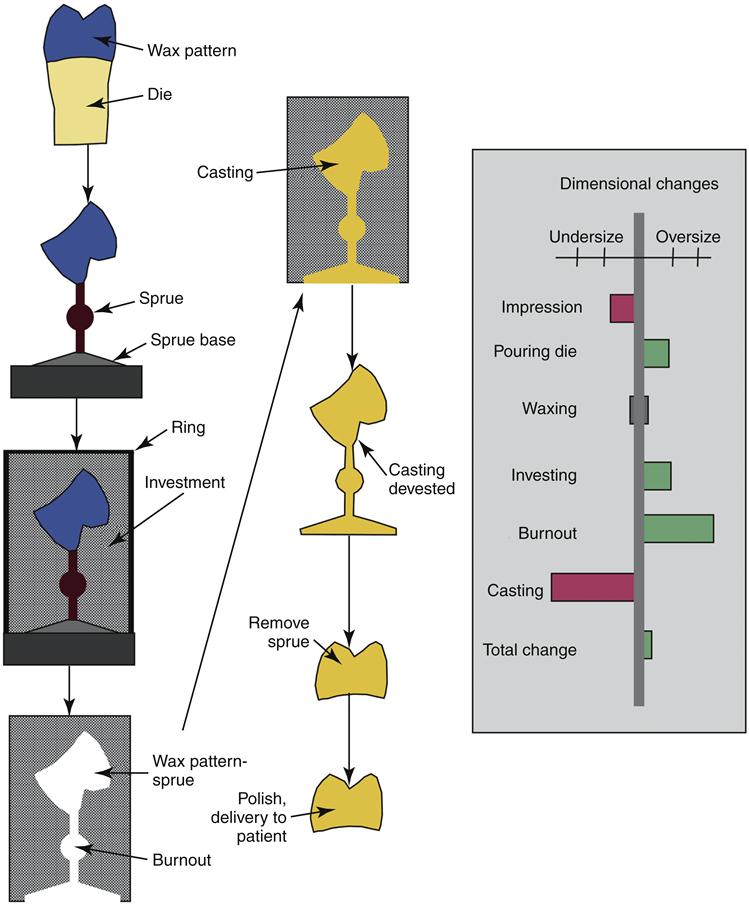
If done correctly, casting is exceedingly accurate, which is truly remarkable because each step in the process influences the final size of the casting (see Figure 12-1). The accuracy of a cast restoration can be as good as 0.05%. This accuracy translates into a tolerance of less than 20 µm for most dental restorations. To achieve this degree of accuracy, each step in the casting process must be done carefully. An error in any step will result in a final restoration that is clinically unacceptable. In general, the casting should be slightly oversized to optimize clinical fit and space for the luting cement. The remainder of this chapter discusses each step of the casting process in the order presented in Figure 12-1.
Waxing and Spruing
Waxing
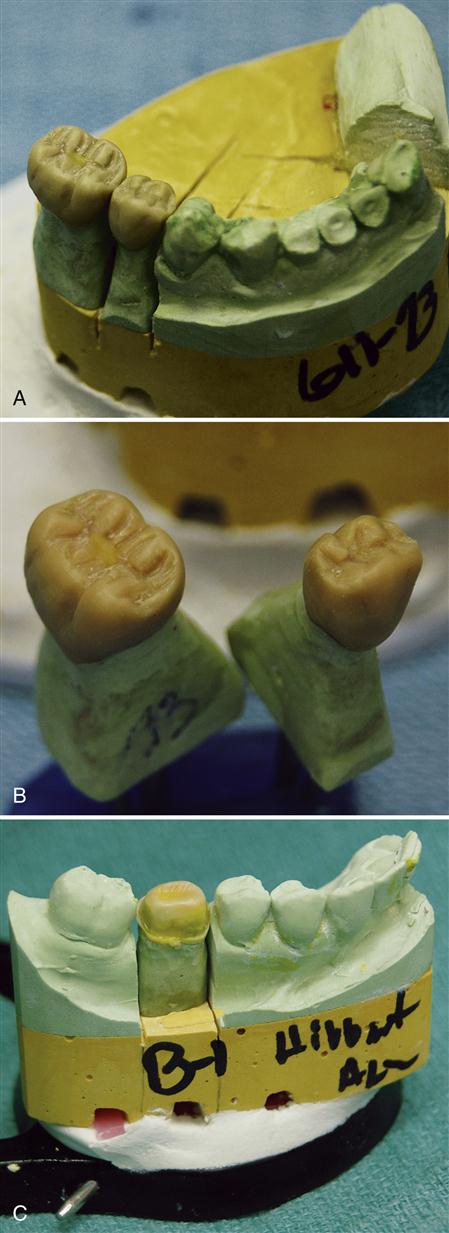
The wax pattern is a detailed model of the final dental restoration, including all anatomy, contours, occlusal function, and proximal contacts. Wax is used because it is easy to manipulate, inexpensive, and well suited to making custom restorations. Wax also is easy to completely eliminate (via burnout) after investing. Wax patterns are formed most often on a working die of the tooth or arch. These dies retain detailed information about the teeth to be restored and the oral structures around them. When the wax pattern is formed on a die versus the tooth itself, the waxing technique is described as indirect (Figure 12-2). In past times, the wax pattern of small restorations was formed directly on the tooth. This “direct technique” was used for relatively simple restorations such as small two-surface inlay restorations. The direct technique is technically demanding and uses special waxes that do not distort at mouth temperature. The direct technique is seldom used today; use of the indirect technique is nearly ubiquitous.
Although wax is a convenient material for making a pattern of the dental restoration, it also has a tendency to flow, release stress, and expand or contract with changes in temperature. The waxing process itself does not oversize or undersize the dimensions of a restoration (see Figure 12-1), but distortion of the wax pattern is a serious risk. Even when supported by the die, a wax pattern may distort significantly if the ambient temperature changes or time (days) passes. However, when the wax pattern is removed from the die, distortion may occur in only 1 to 2 minutes. Thus, the shortest time possible should elapse between the time the pattern is removed from the die and the time it is invested. For this reason, the wax pattern is generally sprued while it is still on the die.
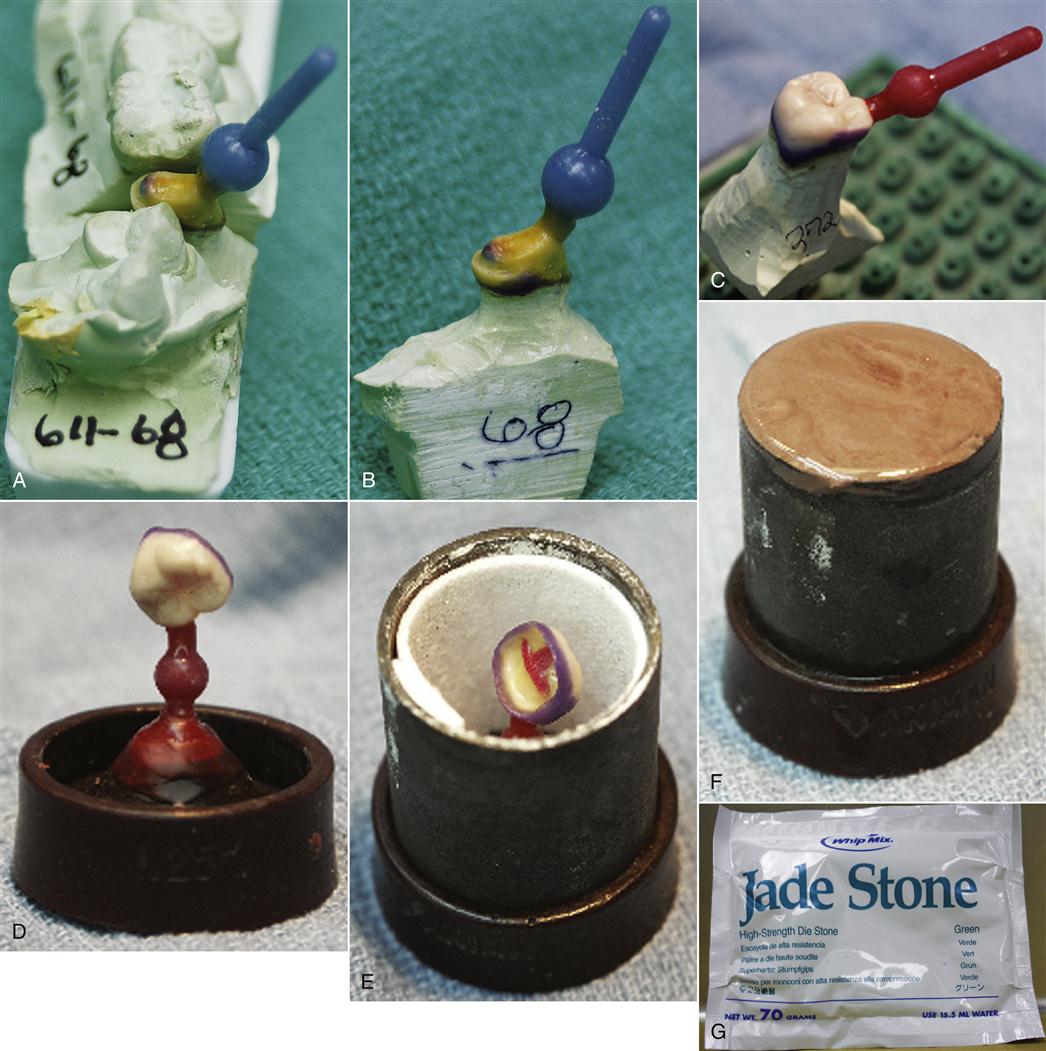
Spruing
 A sprue forms the channel through which molten alloy travels to form the restoration in the space formerly occupied by the wax pattern.
A sprue forms a channel in the investment through which the molten alloy travels to form the restoration. Sprues often are wax but also may be plastic or even metal. If metal, the sprue must be removed before casting because the metal will not burn out. The decision of where to place one or more sprues onto a wax pattern is complex and depends on the type of restoration, the type of alloy to be cast, and the experience of the technician. In the simplest case, a single sprue is placed on one of the cusps of the wax pattern (see Figures 12-1 and 12-3). In more complex cases, multiple sprues may be placed. The other end of the sprue is attached to a base made of rubber (see Figures 12-1 and 12-3). The sprue is attached at the apex of the cone of the sprue base. The cone ultimately forms a depression in the investment to help guide the molten alloy into the sprue hole. Sprue diameter and length vary considerably depending on the type of restoration but should be selected to ensure that the molten alloy solidifies last in the sprue. This strategy allows the sprue to continue to “feed” the casting with molten alloy as the casting solidifies. To prevent premature freezing in the sprue channel, sprues are generally as big in diameter and as short as possible; a reservoir is often added in the sprue itself to increase the sprue mass. The wax pattern is ready to be invested after it is sprued and the sprue is attached to the sprue base (see Figure 12-3).
Investing and Burnout
Investments
During investing, the wax pattern and sprue are embedded in investment, a stonelike material that withstands the high temperatures and forces of burnout and casting. Investments are composed of a binder, which holds the investment together, and a refractory, which helps them to resist the heat of burnout and casting. The refractory in most dental investments is a form of silica (SiO2). Both the binder and the refractory material contribute to expansion of the investment, which is necessary to compensate for shrinkage of the alloy during casting and produce a casting that fits the tooth (see Figure 12-1).
Investments that use gypsum as a binder are described as “gypsum bonded.” Gypsum-bonded investments are used to cast inlays, onlays, full-alloy crowns, and some Ni-based partial denture frameworks. Gypsum alone (without silica) cannot be used for investing because it lacks sufficient resistance to heat. Even with the silica refractory added, the melting temperature of the alloy cannot exceed 1200° C and the burnout temperature cannot exceed 700° C or the gypsum will decompose and degrade the casting. If higher-melting alloys are needed, then phosphate-bonded investments are used.
Phosphate-bonded investments also use a silica refractory but use a monoammonium phosphate-magnesia binder. The binder is the product of the reaction of ammonium hydrogen phosphate with magnesium oxide. During burnout, the binder undergoes additional chemical reactions that increase its resistance to damage at high temperatures. Phosphate-bonded investments are much stronger than gypsum investments and are used for ceramic–alloy restorations, implant substructures, and partial denture frameworks where casting alloys with high melting ranges are used.
Investing
Investing the wax pattern captures all details of the wax pattern into the investment and, once the wax is burned away, provides a defined space into which the molten alloy is cast. To retain the investment while it sets, a casting ring is placed onto the sprue base (see Figure 12-3). The casting ring also supports the investment during the casting process. The ring is commonly lined with a ceramic-paper liner to help the investment to expand during setting and burnout. The liner is moistened before the investment is added to prevent it from absorbing water from the investment. Before investing, the wax pattern may be treated with a surfactant that aids flow of the water-based (hydrophilic) investment material over the water-hating (hydrophobic) wax pattern. The surfactant generally is sprayed onto the pattern with a fine atomizer.
After these preparatory steps, the investment is mixed. Most manufacturers provide the powder bulk quantities, but it also comes in premeasured packets (see Figure 12-3), so the operator needs to measure only the water. However, the water must be measured. The investment generally is mixed in a power-driven vacuum mixer. The water is added to the bowl; then the powder is sprinkled into the water to eliminate air in the powder. The lid is applied to the bowl, and a vacuum is attached to remove air from the container so that it will not be incorporated during mixing. The entire apparatus is applied to the power mixer for the exact number of seconds specified by the manufacturer. Once mixed, the investment is poured slowly into the casting ring, taking extreme care to flow the investment around the wax pattern without forming bubbles or voids (see Figure 12-3). A vibrator often is used to aid in the flow of the investment material and to eliminate bubbles. The investment is added until the casting ring is full. Because the wax pattern is dimensionally unstable once removed from the working die, the time taken to invest should be minimized but certainly should be less than 10 minutes. T/>
Stay updated, free dental videos. Join our Telegram channel
VIDEdental - Online dental courses


