10
Surgical Considerations for Implant Overdenture
PRESURGICAL INSTRUCTIONS
Prior to embarking on the surgical treatment of an elderly patient, a complete medical history is required. While many abnormalities may be noted, specific disease processes can adversely affect the outcome of implant surgery. Many elderly patients take medications that can affect the coagulation process. Clopidogrel (Plavix), warfarin (Coumadin), and aspirin are common medications that can have a profound effect on homeostasis after surgery. Preoperative evaluation by the prescribing physician is needed to ascertain the reason for the anticoagulant, and the possibility of withholding the medication prior to surgery. If warfarin is taken, measurement of the International Normalized Ratio (INR) is needed to determine the level of anticoagulation.
Many elderly surgical patients take steroids for treatment of systemic disorders. Steroids can affect the patient’s ability to withstand the stress of surgery and heal after surgery. Prednisone, dexamethasone, and betamethasone are common examples of corticosteroids. While many patients are on sub-physiologic doses of corticosteroids (less that 20mg of cortisol per day), others may be on doses that suppress the adrenal gland’s ability to release cortisol. A decision, in conjunction with the patient’s primary care physician, will need to be made as to the need for steroid supplementation.
Diabetes is a disease that affects glucose metabolism. While many patients only require adjustments in lifestyle, the majority of patients will be placed on either oral or injectable form of medications. While a well-controlled diabetic is a good surgical candidate, a poorly controlled patient is at risk for an infection and other mi-crovascular damage. If the glucose control of a patient is unknown, a Hemoglobin A1C will provide a gauge of the previous three months of control. If the patient takes insulin, a preoperative (that morning) glucose level is needed to ensure the patient does not become hypoglycemic during the procedure.
Hypertension is common in the elderly surgical patient. While hypertension is not a contraindication to surgery, uncontrolled hypertension can result in cardiovascular accident. It is important to confirm that patients are taking their medication as prescribed by their physician. A blood pressure reading prior to surgery is certainly desirable.
Inhalation analgesia is generally avoided due to the awkwardness of the nasal hood when positioning surgical stents and orienting pilot drills to the horizontal plane. Premedication with Ibuprofen 600mg and Xanax 0.25–0.5mg P.O. one hour before appointment is useful if intravenous sedation is not used. Intravenous sedation is advisable for highly apprehensive patients, but if the immediate implant-supported overdenture techniques are being utilized, the IV sedation is contraindicated, because these techniques require patient cooperation during the operation. A one-minute preoperative rinse with 0.12 percent chlorhexidine or other oral antiseptic rinse is also advisable to reduce levels of oral microflora.
Treatment Room Preparation and Utilization Protocol
The treatment room should have a large table covered by sterile drapes on which to organize all the sterile equipment. The sterile area is accessed only by those who are using sterile gloves. The aseptic chain must not be broken.
All the people involved in surgery should prepare as follows:
- Protective Cover: Clean gown, cap, protective glasses, and facemask must be worn.
- Gloves: Use only disposable sterile gloves.
- Surgical Hand Disinfection: Disinfect hands and forearms by regular scrubbing or by using medical based skin sanitizer.
Patient
- Mouth: Clean patient’s mouth with chlorhexidine 0.12 percent mouthwash.
- Draping: Use a sterile surgical drape.
Instruments
Arrange the instruments in the surgical cassette and then sterilize them, or place individually sterilized instruments on a surgical tray covered with a sterilized surgical drape. Only individuals with sterilized gloves are allowed to handle the instruments. Make sure that you have additional spare sterile instruments, gloves, and implants available to deal with any unforeseen circumstances.
INCISIONS AND FLAP DESIGN
Block- and infiltration-anesthesia is obtained using local anesthetics containing vasoconstrictor 1:100,000 epinephrine. A number 15 Bard-Parker blade on a round handled scalpel holder is the ideal blade for making incisions on the fully edentulous alveolar ridge. The blade is drawn from posterior to anterior making firm contact with the underlying bone severing the periosteum. An Orban number 1/2 knife is passed through the incision line to ensure the periosteum is completely severed before reflecting the mucoperiosteal flap using a Prichard elevator.
Incision and Flap Design Objectives
- Providing ease of access to visualize the underlying osseous structures
- Preserving existing crestal gingival tissue
- Avoiding critical neurovascular structures
- Allowing stable positioning of the surgical stent
Basic Flap Designs
Three basic flap designs are considered in the edentulous arch. All of these flaps are full thickness, and the selection depends on the number and location of implants being placed.
ANTERIOR CRESTAL INCISION WITH OR WITHOUT VESTIBULAR RELEASE
This flap design permits access for implant placement in the inter-canine region of either the maxilla or mandible. This design is used when two to four implants are being placed. The incision is intended to split the keratinized mucosa at the ridge crest in order to provide each flap margin with durable keratinized tissue for suturing and post-operative primary closure. The flap is reflected full thickness and affords the surgeon the ability to assess the alveolar ridge width and contour. This is important as apical concavities and irregularities are often masked by the overlying mucosal tissue giving a false impression of available bone to support the dental implant. The anterior vertical releasing incisions leave the posterior alveolar ridge unaffected, providing a stable base to position the surgical stent and mark the osteotomy sites. Care must be taken in the mandibular arch to identify the position of the mental foramina. The mental artery, vein and nerve are often near or at the alveolar crest in the atrophic mandible. Localization and avoidance of this structure with both the crestal and vertical releasing incisions is required to prevent nerve injury resulting in post-surgical lip paresthesia. The surgeon may likewise elect not to disrupt or sever the nasopalatine artery, vein, and nerve at the incisive foramen when operating in the maxillary arch. Although not as critical a structure as the mental neurovascular bundle, severing the nasopalatine artery can result in excessive intraoperative bleeding causing an otherwise avoidable surgical complication. A modification of this incision and flap design relies upon “mini” flaps placed directly at the site of the desired implant location. This technique is minimally invasive and preserves keratinized tissue for the facial tissue margin.
FULL ARCH EXTENDED CRESTAL INCISION The full arch crestal incision and flap design is performed when six implants are being placed for a hybrid fixed detachable overdenture or fully implant-supported bar overdenture. The flap is reflected full thickness, and the maxillary or mandibular ridge is effectively “degloved” or exposed. This flap preserves keratinized tissue at the margin but lacks stability for the surgical stent. This is especially true in the mandible.
VESTIBULAR INCISION This incision is placed lateral to the crest of the ridge. The aim of this design is to archive closure of the flap that is away from the crest of the ridge, providing full coverage of the cover screws. It is important to note that this incision can risk injuring superficially positioned mental nerves. There are no similar concerns in the maxilla.
MANDIBULAR SURGERY
1: Crestal Incision
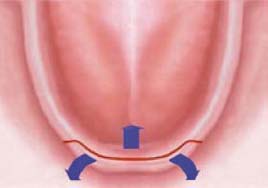
WITHOUT RELEASING INCISIONS The crestal incision without releasing incisions is indicated for placement of overdenture implants as well as uncovering submerged implants during second-stage surgery (Figure 10.1).
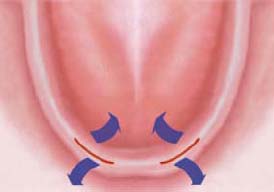
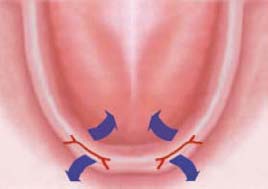
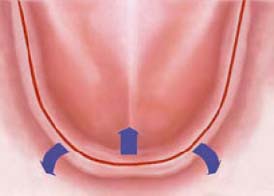
WITH VESTIBULAR RELEASING INCISIONS When multiple regular restorative implants are being placed, it is important to have a clear view of the crest of the ridge as well as width of the bone. This incision design permits visualization of alveolar ridge topography including crestal ridge width and vestibular or lingual concavities when tomograms are not available to assess the ridge dimensions. Vertical releasing incisions must be shallow or be placed well anterior or posterior to the mental foramina (Figures 10.2 and 10.3).
2: Extended Crestal Incision
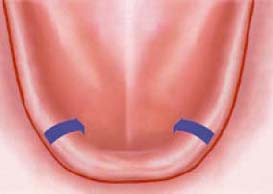
This incision is indicated when the treatment plan involves implant placement distal to the mental foramina. Care should be taken to assess the position of the mental foramen. In Class C and D bone quantity cases advanced alveolar ridge atrophy often results in the mental neurovascular bundle exiting the mandible at the crest of the ridge (Figures 10.4 and 10.5).

If you can paltate the foramen, avoid it by locating your incision to the lingual of this structure. If you are unsure of the nerve position, you must carefully reflect the flap with blunt dissection until the structure is localized. One can then protect the mental nerve from improperly placed incisions or implant osteotomy (Figure 10.6).
3: Vestibular Incision
The vestibular incision is indicated when multiple submerged implants are being placed between the mental foramina and the crestal gingiva is narrow (Figure 10.7). This approach creates a lingually reflected flap and provides complete coverage of the implants. With this type of incision, the mental nerve is at a higher risk for injury. Care should be taken to localize and avoid this structure.
MAXILLARY SURGERY
1: Crestal Incision
The crestal incision is ideal for single-stage overdenture implants as well as the second-stage uncovering step. A generous band of keratinized mucosa is retained in the buccal flap (Figures 10.8 and 10.9).

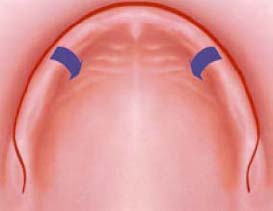
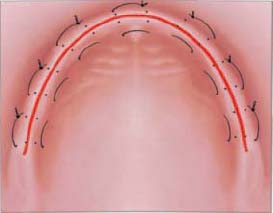
2: Palatal Incision
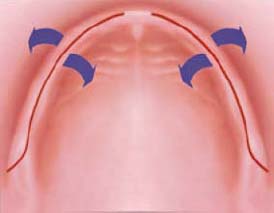
The primary incision is palatal to the crest of the ridge with two releasing incisions toward the buccal vestibule (Figure 10.10). The flap will be reflected buccally. This design provides very good visual access.
3: Buccal Incision
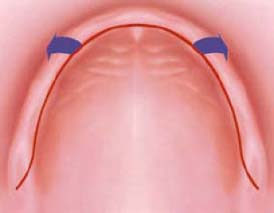
The primary incision is buccal to the crest of the ridge. The flap will be reflected palatally. This design provides very good visual access as well as easy use of traditional as well CT generated surgical guide (Figure 10.11). With this flap, the patient may experience more postoperative edema and discomfort.
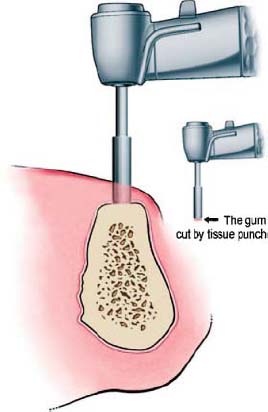
Tissue Punch Technique
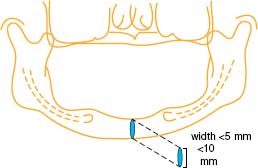
The alternative tissue punch or “flapless” implant placement procedure often obliterates all keratinized tissue, requiring an otherwise unnecessary gingival grafting procedure to reestablish a margin of keratinized tissue around the implant (Figure 10.12). This technique is indicated when the width of keratinized tissue is at least 6–8mm and the ridge is wide. This will leave 1–2mm of peri-implant gingiva when conventional diameter implants are being used. The disadvantage of this technique lies in the inability of the clinician to visualize alveolar ridge concavities when aligning the implant drills for the osteotomy. The surgeon may inadvertently perforate the buccal or lingual plate, bringing the successful implant integration into jeopardy.
OSTEOTOMY AND IMPLANT PLACEMENT
The patient should be positioned such that the clinician is comfortable and can visualize the surgical site and the horizontal plane related to the maxillary or mandibular occlusal plane. The first implant placed is often used as a reference to parallel subsequent implants in an overdenture case. If the first implant is not perpendicular to the path of denture insertion, then subsequent implants will also be misaligned, compromising the function of the overdenture attachment. The attachment design dictates the implant positioning. In the case of a bar overdenture, a minimum of 18–20mm is required between the implants to permit adequate space for the bar and sleeve attachment. Surgical stents should be used to their fullest potential, as spatial orientation in the edentulous patient is difficult.
The osteotomy should always be prepared according to the implant manufacturer’s guidelines regarding drill rpm and drill sequencing. Sharp surgical drills are mandatory to prevent trauma while preparing the osteotomy. This is especially true in type I and type II bone where excessive speed or force on the implant drill creates heat and bone necrosis. The surgeon should also abide by insertion torque limits on threaded implants. Dense bone sites should be pre-tapped for threaded implant designs, as excessive insertion torque can damage or fracture the internal or external attachment design on the implant.
PROCEDURAL CONSIDERATIONS DURING THE SURGERY
Every instrument must be used only for its specific and intended purpose. Keep the surgical burs free from dry blood throughout the procedure by dipping them in saline or Ringer’s solution. Dry blood can prevent you from correctly reading the marking on the burs. Bone particles that become attached to the cutting blades of the burs should be collected and preserved for possible use at the conclusion of implant placement.
SUTURING TECHNIQUES USED FOR IMPLANT OVERDENTURE SURGERIES
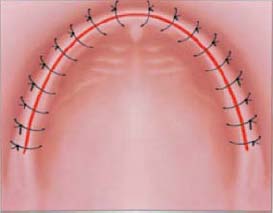
1: Simple Interrupted
The interrupted suturing technique is simple and efficient in closing most wounds. It is particularly helpful in uneven and irregular wounds. Multiple knotted sutures make the security of closure very good, as the flap will not displace if one knot unties or if it pulls through the tissue. This technique is slightly more time-consuming than a continuous suture (Figure 10.13).
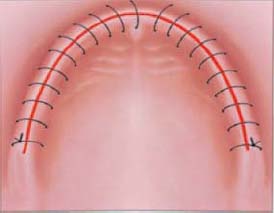
2: Continuous (Locking or Non-Locking)
The continuous suture provides a uniform distribution of tension across the length of the suture and wound margin (Figures 10.14 and 10.15). It is fast and simple. It provides rapid closure of a long incision with a single knot placed at the beginning and another at the end of the suture. Generous bites greater than 4mm should be made while suturing to reduce tearing at the tissue margin and loss of suture tension. Long incisions are best managed using continuous suturing techniques.

Disadvantages
- The disadvantage of the continuous suture technique is that if the suture unties or if one or more passes of the material tears through, the flap tension is lost across the entire wound margin, allowing the displacement of the flap and healing by secondary intention.
- Minor bleeding under the flap will generally seep through the edges of the flap or migrate through the muscle planes, causing bruising or swelling at a site distant to the wound.
- Continuous locking sutures may add more pressure on the edges of the wound, compromising the vascularity of the wound edges and increasing the chance of necrosis.
3: Horizontal Mattress
The objective of this suturing technique is to evert the wound edges, maximizing their contact and providing a more secure tension-free closure (Figure 10.16). This is particularly helpful when graft material has been placed. In these cases, a combination of the periosteal-releasing incision, which provides flap mobility for closure over regenerative barriers, and the horizontal mattress suture is recommended. The wide bite of this suture permits the use of secondary continuous or interrupted suturing at the incision line for added security.
Most Common Suturing Techniques for Implant-Supported Overdenture Cases
Selection of the easiest and most reliable suture technique depends upon the length of the incision requiring closure. A short incision is easily managed with interrupted sutures, whereas a long incision is managed best with a continuous suture supplemented with isolated interrupted sutures at critical points requiring more security if the continuous suture should fail.
Suture Material
Options of sutures materials for implant overdenture cases include the following:
RESORBABLE MATERIAL
- Chromic gut
- Vicryl
NON-RESORBABLE MATERIAL
- Silk
- Monofilament (prolene, nylon)
- PFTE polytetrafluoroethylene
A resorbable suture is one that the clinician should not have to remove and should remain for the appropriate period of time to achieve wound stability. Wounds that require longer stabilization benefit from the use of non-resorbable monofilament materials. They generally remain clean and last for very long time. 4–0 or 5–0 with a 3/8- or 1/2-round c/>
Stay updated, free dental videos. Join our Telegram channel
VIDEdental - Online dental courses


