Moisture Control
Learning Objectives
1 Pronounce, define, and spell the Key Terms.
2 Describe moisture control techniques utilized in dental procedures.
3 Give the two types of oral evacuation systems used in dentistry.
4 List the benefits of using the dental dam for a procedure and the patient.
Key Terms
Dental Dam
Evacuator
Isolation
Malaligned
Septum
One of the main responsibilities of the clinical assistant is to maintain moisture control throughout a procedure. The tooth, surrounding tissue, and oral cavity can become a “catch all” for water, saliva, blood, and tooth fragments.
The type of procedure and access to the area will determine what is the best type of isolation method to use. This chapter describes several techniques and different applications that will help you determine what works best for the situation.
Mouth Rinsing
The two basic types of rinsing procedures used in dentistry are limited-area rinsing and complete mouth rinsing.
Limited-area rinsing is performed frequently throughout a procedure because debris can accumulate during preparation of the tooth. This must be accomplished quickly and efficiently without causing any delay in the procedure. A limited-area rinse is commonly utilized when the dentist pauses for a closer inspection.
The complete mouth rinse is performed at the completion of a dental procedure. A complete mouth rinse is always used to leave the patient with a comfortable and fresh feeling.
Oral Evacuation Methods
Saliva Ejector
The saliva ejector is used to remove small amounts of saliva or water from the patient’s mouth. This small straw-like tube has the flexibility to conform to many areas in the mouth (Figure 10-1). Placement of the saliva ejector is simple and comfortable for the patient. To maintain its position in the mouth, bend it in the shape of a candy cane and place it under the tongue on the opposite side that you are working on.

High-Volume Oral Evacuation
The high-volume oral evacuator (HVE) is a stronger source of moisture control that is commonly used during a dental procedure when the handpiece is being utilized.
The HVE system, also referred to as the oral evacuator, works on a vacuum principle similar to that of a household vacuum cleaner.
• Maintain the mouth free from saliva, blood, water, and debris
• Retract the tongue or cheek away from the procedure site
• Reduce the bacterial aerosol caused by the high-speed handpiece
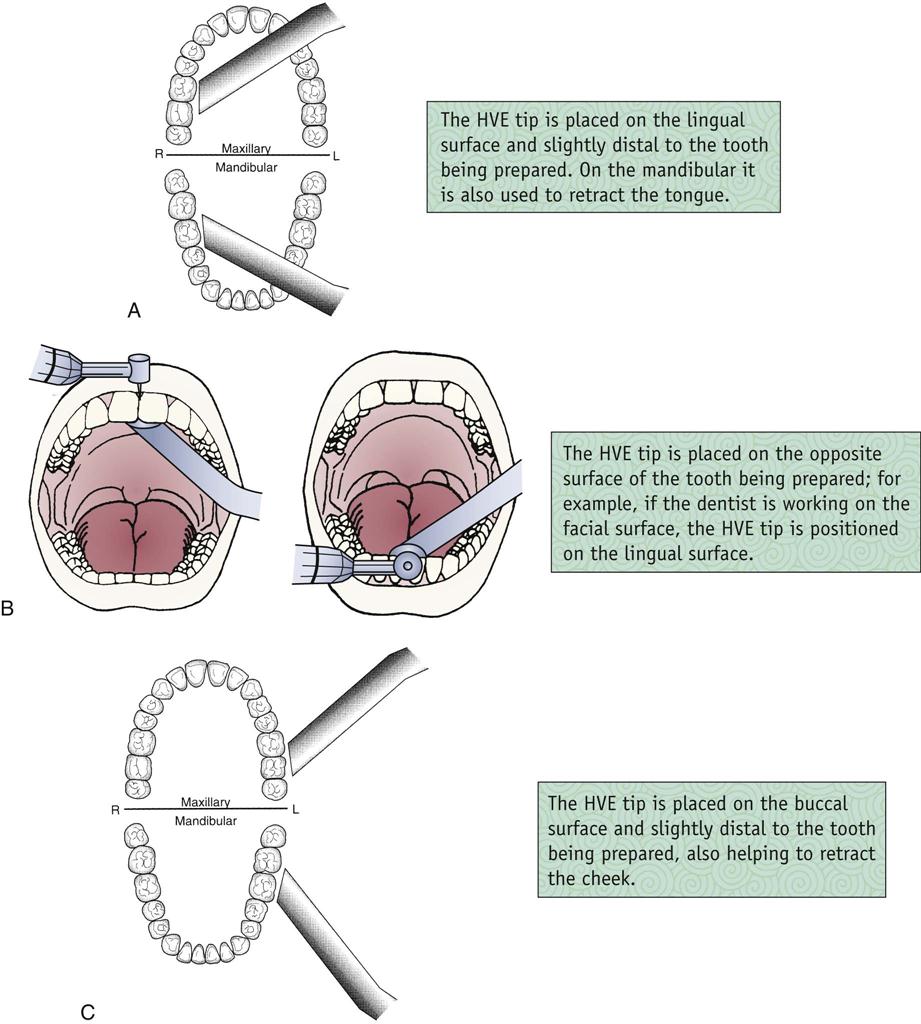
HVE Tips
The most commonly used HVE tips are made of a durable plastic and are disposed of after a single use, or stainless steel, which must be sterilized before reuse (Figure 10-2).

HVE tips are available straight or with a slight angle in the middle. All types have two beveled working ends (beveled meaning slanted). The bevel is slanted downward for use in the anterior portion of the mouth. For use in the posterior portion of the mouth, the bevel is slanted upward.
When the HVE tip is placed into the handle of the suction unit, the tip is pushed into place through a plastic protective barrier, which will cover the HVE handle. If the incorrect end of the tip has been placed in the suction, do not turn it around; it is now contaminated and must be replaced with a new tip.
Holding the Oral Evacuator
The oral evacuator may be held in one of two ways: the thumb-to-nose grasp or the pen grasp (Figure 10-3). Either method provides control of the tip, which is necessary for patient comfort and safety. Many assistants alternate between positions, depending on the resistance of the tissue to retract and the area being treated.
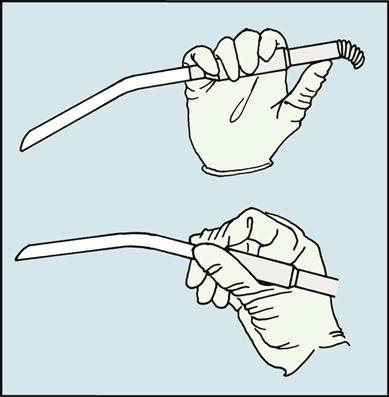
When assisting a right-handed dentist, hold the evacuator in the right hand. When assisting a left-handed dentist, hold the evacuator in the left hand.
The other hand is then free to use the air-water syringe or to transfer instruments to the dentist as needed.
To be most efficient in HVE placement, position the HVE tip in the mouth first, and then allow the dentist to position the handpiece and the mouth mirror (Figure 10-4).
See Procedure 10-2: Positioning the High-Volume Evacuator (HVE) During a Procedure.
Oral Evacuation Caution
Improper or careless placement of the HVE can cause soft tissue to be accidentally “sucked” into the tip, and tissue damage could result. Keeping the tip at an angle of the soft tissue helps prevent this from happening.
If the soft tissue is accidentally “sucked” into the tip, rotate the angle of the tip to break the suction, or quickly turn the vacuum control off to release the tissue.
Isolation Techniques
Cotton Rolls
During tooth preparation, water is expressed from the high-speed handpiece to cool the tooth and remove debris. However, when placing a composite or amalgam restoration or when cementing a cast restoration, a clean, dry environment is necessary.
One method of ensuring dry conditions is the use of cotton rolls. If the dental dam is not an option, cotton roll isolation can be used as an alternative method to control moisture in the operative area. (Isolation, as used here, means to keep the area separate and dry.)
Cotton rolls are available in a variety of sizes and are flexible, so they can be formed to fit an available space. Some cotton rolls have a light coating on the surface to make them slightly stiff. A softer type of cotton roll is not coated but is wrapped with a cotton thread.
There are advantages and disadvantages to using cotton rolls (Box 10-1).
Cotton Roll Placement
When part of the maxillary arch is isolated, cotton rolls are placed on the cheek side of the teeth in the mucobuccal fold. This fold holds the cotton rolls securely in place. The mucobuccal fold is the area where the masticatory mucosa covering the alveolar ridge turns upward and becomes the lining mucosa of the cheek (Figure 10-5).
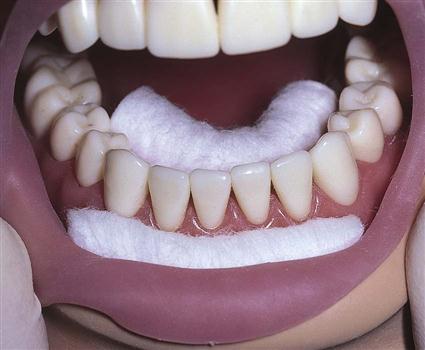
Because of movements of the tongue and the tendency of saliva to pool in the floor of the mouth, cotton roll isolation is more difficult to achieve in the mandibular arch. Cotton rolls are placed in both the mucobuccal fold and the lingual side of the arch (Figure 10-6).
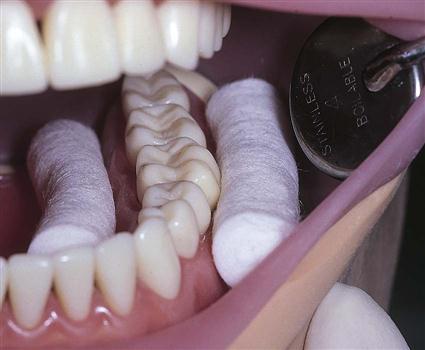
When the anterior portion of the mandible is isolated, cotton rolls and a saliva ejector can be used. To isolate the posterior portion, two cotton rolls and a saliva ejector may be used (Figure 10-7).
Depending on the location, cotton rolls are placed and removed with cotton pliers or with gloved fingers. If the cotton rolls become saturated before the procedure is completed, they should be replaced as necessary.
Related Aids
Dry Angles
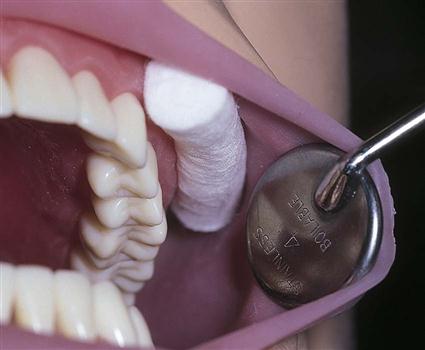
Some dentists will use a triangle-shaped absorbent pad to help isolate posterior areas in both the maxillary and mandibular arches. The pad is placed on the buccal mucosa over Stensen’s duct (Figure 10-8). (This duct from the parotid gland is located opposite the maxillary second molar.)
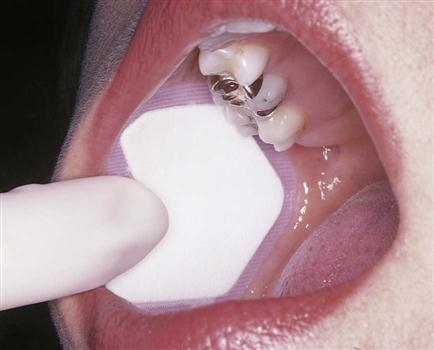
These pads block the flow of saliva and protect the tissue in this area. Follow the manufacturer’s directions for placement and, if necessary, replace the pads if they become soaked before the procedure is completed. To remove, use water from the air-water syringe to thoroughly wet the pad before separating it from the tissue.
The Dental Dam
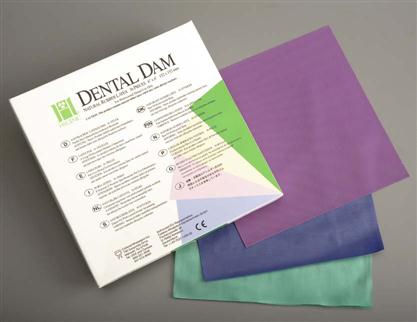
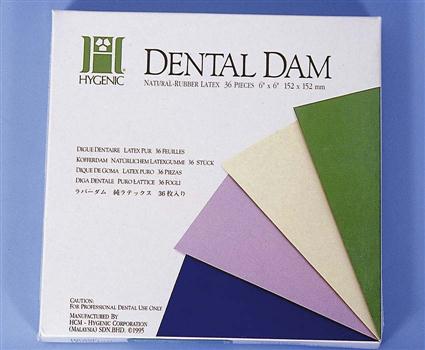
The dental dam is a thin latex barrier used to isolate a single tooth or several teeth during treatment (Figure 10-9). These teeth are referred to as isolated. Specific indications for using the dental dam are located in Box 10-2.
Before placing the dental dam, review the patient’s medical history for any indications of latex sensitivity or allergy. If this is a problem, the dentist must be consulted before the application is continued.
The dental dam is applied after the local anesthetic has been administered and while the dentist is waiting for the anesthesia to take effect.
The teeth that will be isolated should be clean and free of plaque or debris. When indicated, tooth brushing or selective coronal polishing is performed before dam placement (see Chapter 18). If not removed, the plaque or debris could become dislodged and may irritate the gingival tissue.
Dental Dam Equipment (Fig. 10-10)
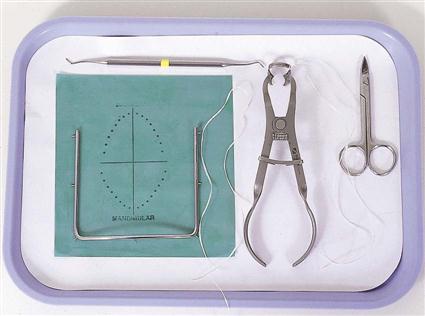
The equipment used for preparation, placement, and removal of the dental dam is described in Table 10-1.
TABLE 10-1
< ?comst?>
Stay updated, free dental videos. Join our Telegram channel
VIDEdental - Online dental courses


