Mastering the Art of Tissue Management
Harold M. Shavell
Introduction
The Little Man Who Wasn’t There
As I was going up the stair
I met a man who wasn’t there.
He wasn’t there again today.
I wish, I wish he’d stay away.
Hughes Mearns, 1875-1965)
To extrapolate this poem into the realm of dentistry, it might be read as follows. On the way to making final impressions, the dentist meets “a man who wasn’t there” (gingival health). The absence of tissue health has given the dentist a difficult time, and the dentist fails in the attempt to make a proper impression of the boggy, prolapsed tissues. Another attempt is subsequently made, and the same failure ensues. (“He wasn’t there again today.”) Frustrated by the specter of the man who “wasn’t there,” and at this point willing to accept just about anything that even vaguely resembles a final impression, the dentist pleads for the apparition to stay away and not confront him with its reality (“I wish, I wish…”). The dentist, realizing the inability to control the tissue, proceeds nonetheless to forge ahead, consciously abjuring the “man” but secretly haunted by the ghost of what was once healthy tissue.
Atraumatic mechanical manipulation of the delicate gingival tissues during high-speed tooth preparation, retraction, and final impression making is a challenge dentistry has invented for itself. If imprudently performed, it can cause a multitude of adverse effects, not the least of which is irreversible damage to the complex dento-gingival attachment region. This entire zone histologically is miniscule compared with the size of the mechanical contrivances with which we attack the area. The potential for trauma is great.
Should harm actually occur, injury to the junctional epithelium results in a series of cellular reorganizational changes at the attachment complex level that will inevitably alter gingival marginal heights. If, for example, final impressions for the maxillary anterior teeth were also “taken” (they are precisely made, not “taken”) during preparation and provisionalization — adding to the chemomechanical insult to the tissues — the planned esthetics may not turn out exactly as anticipated.
Irreversible loss of interproximal tissue may have occurred; one, several, or all the papillae may have been rendered necrotic. Or perhaps just a few were only reversibly damaged, became ulcerated, and reformed at a different level and in a different shape. Because preparational trauma is not always equally distributed, not all gingival margins recede to the same degree. Add to this the possibility of hastily made “temporary” crowns with inconsistent margins and bulky, rough surfaces. Next, the entrapment of cement and possibly soft tissue tags between the edges of the ill-fitting provisional restorations and the margins of the preparation during temporary cementation seals the fate of the tissue more than it does the tooth itself. Cement spews into the sulcus, where it remains unseen and forgotten, left there to be colonized by bacteria and subsequently cause even further tissue destruction. Ironically, against this intemperate background, the final crowns are often being fabricated in the laboratory.
At the next appointment (try-in or perhaps cementation) something odd is observed. The newly fabricated crowns are no longer intracrevicular, and most margins are now readily apparent. The patient objects to the “dark lines at the gum line,” and the teeth look as though they are of different lengths because of the disparate gingival levels. The dark interproximal spaces are powerful, and the eye is drawn to them. The patient does not like the shapes or the color of the crowns. The tissues are friable and inflamed and bleed easily. The beguiled dentist searches for an explanation.
Simply stated, as dentists we are licensed to perform what in many instances we do not understand. This chapter addresses itself to these issues in the hope that some light can be shed on proper clinical tissue management to avoid unnecessary gingival trauma during mechanical maneuvers in a region where errors of a fraction of a millimeter can lead to disastrous results. Basic anatomic and morphologic guidelines will be discussed for provisional and final crown form. Instrumentation, armamentarium, retraction, and margin placement will be discussed for tooth preparation. A method of tissue protection during high-speed cutting will be presented, and the key element to predictably successful final impressions will be demonstrated. Final esthetic and functional restorative results using these techniques will be shown.
Mastering the art of seeing
It is hoped as well that some light can be shed (however small) on the processes of artistic creativity. Dentists to a great degree must objectify their thoughts as they engage in visual thinking. They then must make those thoughts visible (ie, tangible), but if they never really engage in an information-rich visual language (suffer stagnant visual infantilism), how will they ever perceive relationships, proportions, lights, shadows, form, or negative spaces? And isn’t this what restorative dentistry is all about?
To understand the topographic anatomy of the healthy periodontium, to evaluate the flow of the tissues as they envelop the teeth, to perceive the entire perioprosthetic gestalt, or to deal with rehabilitational esthetics, visual thinking (not verbal) is required. It is most often an acquired talent that must be learned, but it may not be capable of being taught. It is the difference between looking and seeing. Thus, the leitmotif of this chapter will be to present its visual material descriptively, hoping to stimulate artistic, creative dentists not only to look, but to see; not only to read, but to visualize.
Visual perception is an essential precept that conveys a mystical sense of connection to nature’s perfection. Nature is governed by design, and an exquisitely attentive eye can detect in out-of-the way corners traces of beauty that reflect the basic order of the universe. However, an absolute, impersonal recognition of the significance of facts is the initial prerequisite for subsequent esthetic revelation.
Perioprosthetic rationale
To achieve the lasting circumcoronal tissue health as well as the consistent intracrevicular margination of these labially butted metal ceramic restorations at 6 years (Fig 10-1c), the gingival tissue must be atraumatically manipulated during retraction, tooth preparation, provisionalization, and final impression making. In addition, the dentist must have a thorough knowledge of specific anatomic, occlusal, and esthetic requirements before treatment. The dentist must then be able to successfully test this knowledge in the most crucial way possible — against the tissue itself, beginning with the provisional restoration. In the examples of provisionalization shown (Figs 10-1a and b), notice the physiologic form and health of the surrounding tissues: the intracrevicular margination, the knife-like interproximal tissue, the stippling, and the lack of inflammation. Although obviously a product of atraumatic tissue management during preparation, this tissue health is also a reflection of provisional marginal seal, emergence profile, proximal concavity, labial contour, surface texture smoothness, personal oral hygiene instruction, and patient follow-through. The term emergence profile refers to the cervical outline of the tooth or restoration as it emerges (exits) the periodontium. It may also be thought of as egression silhouette. Such tissue does not just magically appear. It is earned by both doctor and patient working together for a common purpose: a healthy, peaceful coexistence between dental restoration and surrounding periodontium. An ideal restoration is the Utopian reintegration of lost morphotypia.
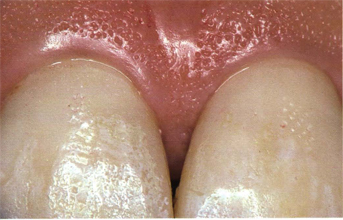
Fig 10-1a
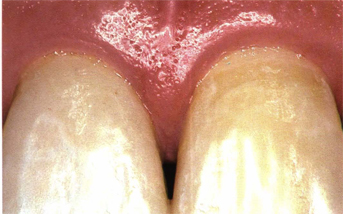
Fig 10-1b
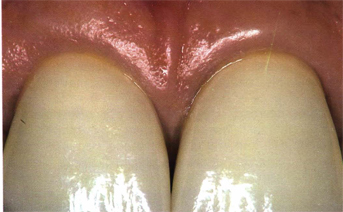
Fig 10-1c
Figs 10-1a to c The provisional restorations (10-1a and b) interface with the periodontium in a benign and respectful fashion, as do the metal ceramic restorations (10-1c). Every restoration must consider the periodontium and the occlusion.
Tissue mirrors technique
Upon provisional restoration removal (Fig 10-2), tissue mirrors technique. Notice the absence of inflammation, the normal-appearing interproximal papillae, the stippling, the physiologic restitution of sulcular epithelium, and the absence of retained cement, plaque, or debris in the gingival crevices. These revealing inferior-superior incisal photographs are the quintessential evaluative views of interproximal provisional tissues. Poor provisional physiologic form, open margins, and inattentive professional and/or personal oral hygiene mitigates against achieving such tissue health. To aspire to this level of tissue response, a methodology must be practiced to perfection by both dentist and patient. After initial atraumatic soft and hard tissue preparation, provisionalization, and subsequent meticulous cementation, the patient is seen weekly for tissue evaluation. Once the overt signs of labial-palatal gingival health become manifest (return to normal color, form, texture, density, crevice depth, and epithelial attachment), the provisional restorations are then removed for this direct interproximal tissue evaluation. This step generally takes place 2 to 3 weeks postprovisionalization. Final impressions are not scheduled until the interproximal tissues appear completely normal (4 to 6 weeks). A well-made, well-cemented provisional restoration is a storehouse of vitally important technical information and the scaffolding upon which the architecture of gingival healing takes place.
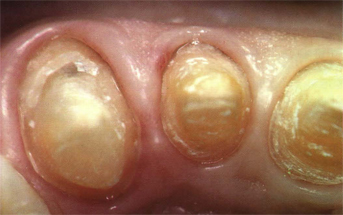
Fig 10-2a
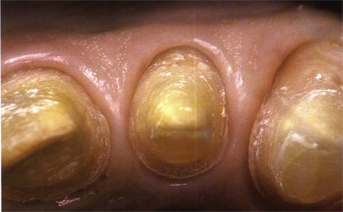
Fig 10-2b
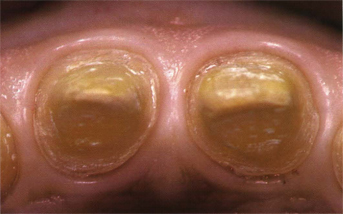
Fig 10-2c
Figs 10-2a to c The tissue talks. This periodontium indicates the peaceful coexistence that prevails between it and the provisional restorations. The principle of gingival nonviolence is illustrated. Note the interproximal papillary epithelialization and the absence of sulcular debris.
Anatomic variations
Whether the tissue management is in the maxilla or the mandible, anterior or posterior, the essential precepts of gingival nonviolence hold true. However, there are certain regional anatomic variations in provisional (and of course, final) crown form that must be considered to maintain a physiologic periodontium. For all anterior teeth (Fig 10-3c) proximal contacts occur in the incisal one third cervicoincisally and in the labial one third labiolingually. The maxillary and mandibular posterior regions (Figs 10-3a and b) are progressively broader based anteroposteriorly, and the interproximal tissues vary accordingly. Proximal contacts are always more occlusal on the mesials, and mesial contacts always more buccal than distal contacts. The cervical rise of the cementoenamel junction (CEJ) proximally is always greater on the mesial than on the distal aspect of the same tooth. It generally decreases as it proceeds posteriorly, allowing for parallel alignment of the CEJ, marginal ridges, and the underlying bony crest. Buccal contours for all teeth occur in the cervical one third or at the junction of the cervical and middle one third. Occlusal morphologic form in the mandible is trapezoidal, and in the maxilla, rhomboidal. All these criteria ultimately become manifest in the gingival architectural form shown. Structural beauty (provisional or final) must be a determining criterion if we are to achieve successful function (gingival health).
Fig 10-3a
Fig 10-3b
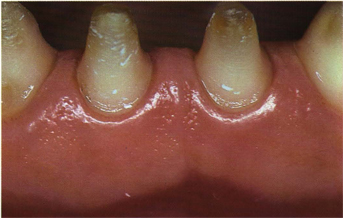
Fig 10-3c
Figs 10-3a to c In addition to the marginal integrity of the provisional restorations, provisional crown contours must strictly adhere to classic morphology to nurture a healthy periodontium. Tissue like this does not magically appear; it has to be earned. Form follows function. The molar in Fig 10-3b has yet to be cored.
“Dry” retraction concept
Case 1 (Figs 10-4 to 10-12) illustrates the “dry” method of tissue retraction. In the example shown of the maxillary six anterior teeth (Fig 10-4), note the presenting cervical discoloration, which cannot be removed by prophylaxis. It will serve as a benchmark for visual comparisons of soft tissue height alteration during subsequent preparational maneuvers. The periodontium is essentially noninflammatory, there is ample attached tissue, the crevice depth is 2 to 2.5 mm, the texture is stippled, and the teeth are reasonably well aligned. All proximal contacts are initially removed to gain access to the interproximal regions; the presenting diastemata in this particular case facilitates this step. Next, the soft tissue is always prepared before the hard tissue. In other words, gain gingival retraction first. Then, leaving the retraction cord in place, prepare the teeth to the already retracted (and thus protected) gingival level. No attempt is made to prepare deeply within the sulcus because doing so would clearly constitute an encroachment upon (and possibly a violation of) the attachment apparatus. Instead, only the occlusal one third of the gingival crevice is entered (approximately 1 mm), and even then only gently with the retraction cord. Having thus produced chemomechanical ischemia and retraction, and having prepared only to the retracted gingival level, all margins will become intracrevicular upon cord removal and tissue rebound. At the same time, the sulcus has been atraumatically manipulated and is laceration-free.
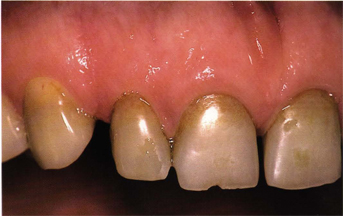
Fig 10-4a
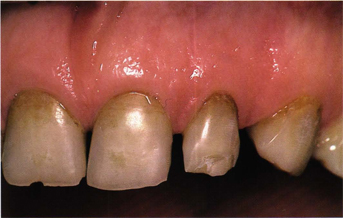
Fig l0-4b
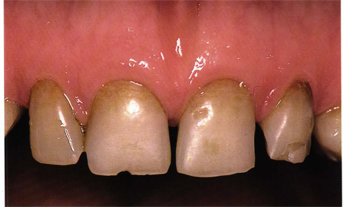
Fig 10-4c
Figs 10-4a to c Case 1 at presentation. The six anterior teeth are to be crowned. Note the cervical discoloration that will later be used to judge tissue movement. The periodontium is within normal limits and must always be addressed first.
Retraction armamentarium
Although the retraction armamentarium is essentially the operator’s choice, there are certain instruments and materials that are of great help in achieving the desired results. Figure 10-5a illustrates the Gingibraid retraction cords used in the dry method, sizes 0 and 2. Although there are a variety of Gingibraid sizes and chemicals available, numbers 0 and 1 are generally employed; the cords are either nonimpregnated (n) or impregnated with potassium aluminium sulfate 10% (a). Each size has its own color code. At no time whatsoever should epinephrine be used in the retraction procedure. In Fig 10-5b, interproximal and premolar length circumferential cords are illustrated in different sizes. The white cord on the top is size 0 (n), next in succession are 0 (a), 1 (a), 1 (n), and 2 (a). The latter size is used least often and never as the initial retraction cord. All cords are braided, will not shred, and keep their tubular form during handling. The preferred gingival retraction instrument is the Retracta-Gard (Fig 10-5c). It is binangle, 0.5 mm thick, 3 mm wide, has smooth, rounded edges, a light, slender, polished shank for greater tactile sense, and serves a dual purpose as retractor and deflector. The key to predictable gingival esthetics is trauma-free gingival tissue, unscathed even after high-speed coarse diamond tooth preparation, and subsequent provisionalization. The additional guarding/deflecting use of the instrument will soon be apparent.
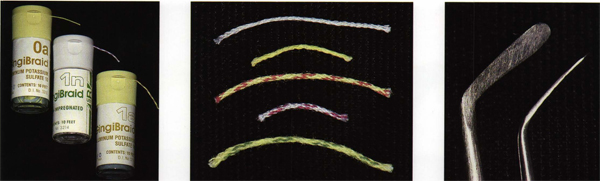
Figs 10-5a to c The retraction armamentarium for the “dry” technique. Things are subservient to technique, which is subordinate to principle. The principle of gingival nonviolence is a sine qua non of operative and prosthodontic treatment.
Retraction technique
In Fig 10-6, the retraction technique is demonstrated on the central incisors with a no. 1 (a) Gingibraid cord. The canines and lateral incisors have already been retracted as evidenced by the gingival ischemia and beginning apical displacement. This can conveniently be assessed via the tissue’s progressive movement away from the benchmark cervical enamel discoloration seen in these and subsequent illustrations. Notice the long axis angle of the Retracta-Gard instrument as it is placed against the enamel of the left central incisor and directed gently into the sulcus in the direction from whence the cord issues (Fig 10-6a). This prevents the cord from being displaced, which has previously been tucked into position. By placing the instrument initially flat against the enamel and then engaging the innermost aspect of the cord, a rolling effect is produced, which has the effect of spinning the cord into the sulcus. To initially place the instrument peripherally against the tissue during retraction would invite slippage and laceration and would also produce a displacing effect on the cord. The retraction instrument is moved in a distal direction with a gentle tucking stroke directed mesially (Fig 10-6b). The cord is almost to place, and the retraction effect is already becoming evident. The retraction is complete for the left central incisor (Fig 10-6C). Properly sizing the cords is vital to avoid overlapping and consequent excessive tissue displacement; this will require intraoperative customizing of the previously cut cord. The instrument at no time is placed greater than 1 mm intracrevicularly. No encroachment must ever be made upon the junctional epithelium.
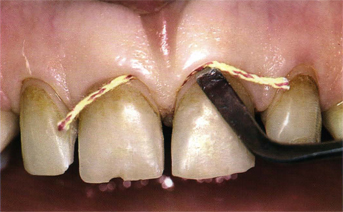
Fig 10-6a
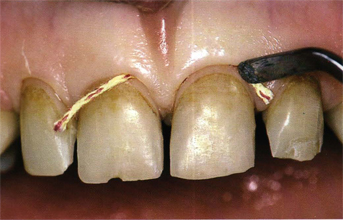
Fig 10-6b

Fig 10-6c
Figs 10-6a to c The retraction technique for the maxillary left central incisor. Delicate intracrevicular tamping and tucking of healthy tissue is bloodless. Always address the soft tissue before the hard tissue.
Figure 10-7 illustrates the gingival tissue of the right central incisor being retracted in the same fashion as has been described. Note the absence of clear, yellow, or red sulcular exudate. Also note the minimum depth placement of the retraction instrument intracrevicularly, the effect of the chemomechanical ischemia without resorting to problem-producing epinephrine, and the progressive retraction effect. To aid in clear field, saliva-free operation, 15 mg of propantheline bromide is taken orally 1 hour before appointment time. Major contraindications are glaucoma, prostatitis, and obstructive bowel disease. To attempt “dry” retraction in a saliva-ridden and mucous-laden environment seems pointless because it defeats the purpose and makes treatment more time-consuming and less effective. However, once the retraction cord has been placed in the sulcus free of the concerns of copious ropey saliva, partially prepared teeth, lacerated bleeding tissue, and completely obstructed vision, it may now be moistened with an adjunctive astringent. This enhances ischemia and swells the cord, which also serves to further enhance the mechanical retraction. As will be shown, neither during the “dry” technique nor during the “wet” technique, which follows, does the tissue ever become injured, escharotic, or necrotic. The gingival tissue may be maneuvered and manipulated, but never macerated.
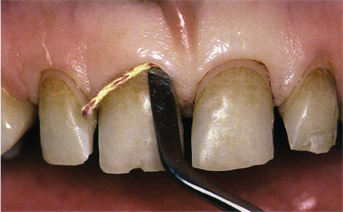
Fig 10-7a
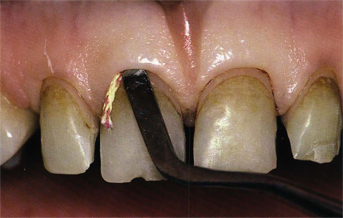
Fig l0-7b
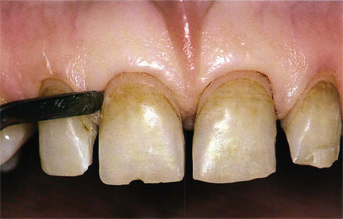
Fig 10-7c
Figs 10-7a to c The right maxillary central incisor retraction is completed. Note the amount of gingival movement compared with the (preoperative) marginal cervical discoloration.
Preparation armamentarium
The adjunctive astringent used to moisten retraction cords is Styptin, a 20% aluminium chloride solution in a buffered glycol concentrate (Fig 10-8b). Clinically, there is no adverse tissue reaction noted with the use of this concentration, and it has the added advantages of being colored while also possessing a gelatinous base (see Fig 10-9a). This aids in keeping the solution localized and readily visible as opposed to runny and colorless, in which case it always seems to slip unseen into the mouth where it is perceived by the patient as foul tasting. The nos. 3 and 5 Big Bite Diamonds chosen from a complete kit of six are shown in Figs 10-8a and c. Big Bite burs are slightly tapered, unusually coarse natural diamond burs that have remarkable longevity, are completely concentric at maximum speeds, and efficiently reduce tooth structure at an astonishingly rapid rate.
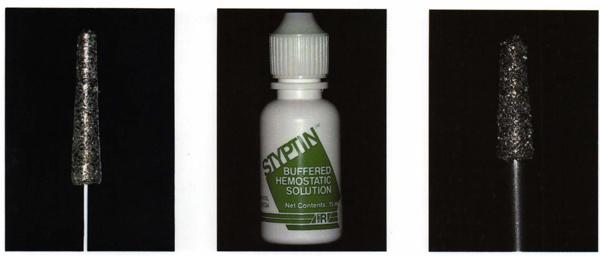
Figs 10-8a to c The adjunctive, synergistic astringent (10-8b) is 20% aluminum chloride in a buffered glycol solution. The nos. 3 and 5 Big Bite Diamond Cutting Instruments selected from a set of six (10-8a and c).
The no. 3 Big Bite Diamond (Fig 10-8a) is roughly equivalent in size to the average preparation diamond chosen by most dentists. The no. 5 Big Bite Diamond (Fig 10-8c) is two sizes larger and clearly shows the degree of coarseness needed for efficient, atraumatic tooth reduction. Indeed, this same coarseness will chew up gingival tissue as rapidly as the tooth is prepared if the tissue is inadvertently allowed to get in the way. Hence, the ironic contrast in the technique being presented: a method for gentle, protective tissue management that uses an unusually large, extremely coarse diamond running at high speed in close proximity to the tissues but yet never abrading them.
Preparation rationale
The ubiquitous Retracta-Gard is used to apply the gelatinous aluminum chloride over the completed retraction, thus potentiating the ischemia and swelling the Gingibraid (Fig 10-9a). A few moments later, the teeth are tamped dry and the appropriate preparation diamond is selected. In this particular case, the no. 3 Big Bite bur (


