10
Advanced restorative dentistry
N.M. Kilpatrick and L.A.L. Burbridge
Chapter contents
10.2 Advanced restorative techniques
10.2.1 The hydrochloric acid–pumice micro-abrasion technique
10.2.3 Vital bleaching—chairside
10.2.4 Vital bleaching—nightguard
10.2.5 The inside–outside bleaching technique
10.2.6 Localized composite resin restorations
10.2.7 Composite resin veneers
10.2.9 Adhesive metal castings
10.2.10 Indirect composite resin onlays
10.5 Inherited anomalies of enamel and dentine
10.6 Molar incisor hypomineralization
10.1 Introduction
The aim of this chapter is to cover the management of more complicated clinical problems associated with children and adolescents: tooth discolouration, inherited enamel and dentine defects, hypodontia, and tooth surface loss. As there is considerable overlap in the application of the various restorative techniques, the chapter is divided into two parts. The first outlines the clinical steps involved in the various procedures, while the second covers the more general principles of management of particular dental problems.
10.2 Advanced restorative techniques
It is not the remit of this chapter to cover advanced restorative dentistry in detail, but many of the techniques used in children are the same as those for adults (Boxes 10.1 and 10.2).
With the aid of some clinical examples, seven of the restorative procedures will be described in simple stages. Omitted from this list are the stages involved in the provision of full crown restorations and bridgework, which are the specific remit of a restorative dentistry textbook. However, the provision of porcelain veneers, more commonly associated with adult patients, will be mentioned briefly.
10.2.1 The hydrochloric acid–pumice micro-abrasion technique
This is a controlled method of removing surface enamel in order to improve discolourations that are limited to the outer enamel layer. It is achieved by a combination of abrasion and erosion—the term ‘abrosion’ is sometimes used. In the clinical technique that will be described no more than approximately 100mm of enamel is removed. Once completed, the procedure should not be repeated again in the future. Too much enamel removal is potentially damaging to the pulp and cosmetically the underlying dentine colour will become more evident. This approach is described in further detail in the BSPD guideline on treatment of intrinsic discolouration in permanent anterior teeth in children and adolescents (Wray and Welbury 2004).
Indications
• Fluorosis
• Idiopathic speckling
• Post-orthodontic treatment demineralization
• Prior to localized composite restorations or veneer placement for well-demarcated stains
• White/brown surface staining, e.g. secondary to primary predecessor infection or trauma (Turner teeth)
Armamentarium
• Bicarbonate of soda/water
• Soft white paraffin
• Fluoridated toothpaste
• Pumice
• Rubber dam
• Rubber prophylaxis cup
• Soflex discs (3M)
• 18% hydrochloric acid
Technique
1. Perform preoperative vitality tests; take radiographs and photographs (Fig. 10.1(a)).
2. Clean the teeth with pumice and water, wash, and dry.
3. Isolate the teeth to be treated with rubber dam, including placement of soft white paraffin under the dam.
4. Place a mixture of sodium bicarbonate and water on the dam behind the teeth as protection in case of spillage (Fig. 10.1(b)).
5. Mix 18% hydrochloric acid with pumice into a slurry and apply a small amount to the labial surface for 5 seconds using either a rubber cup rotating slowly or a wooden stick (Fig. 10.1(c)), before washing for 5 seconds directly into an aspirator tip. Repeat until the stain has reduced up to a maximum of ten 5-second applications per tooth. Any improvement that is going to occur will have done so by this time.
6. Remove the rubber dam.
7. Polish the teeth with the finest Soflex discs.
8. Polish the teeth with fluoridated toothpaste in a rubber cup for 1 minute.
9. Review in a month to assess the outcome and to undertake vitality tests and clinical photographs (Fig. 10.1(d)).
10. Review biannually, checking pulpal status.
Critical analysis of the effectiveness of the technique should not be made immediately, but delayed for at least a month as the appearance of the teeth will continue to improve over this time. Experience has shown that brown mottling is removed more easily than white, but even where white mottling is incompletely removed it often becomes less perceptible. This phenomenon has been attributed to the relatively prismless layer of compacted surface enamel produced by the ‘abrosion’ technique, which alters the optical properties of the tooth surface.
Long-term studies of the technique have found no association with pulpal damage, increased caries susceptibility, or significant prolonged thermal sensitivity. Patient compliance and satisfaction is good, and any dissatisfaction is usually due to inadequate preoperative explanation. The technique is easy to perform for the operator and patient and is not time-consuming. Removal of any mottled area is permanent and is achieved with an insignificant loss of surface enamel. Failure to improve the appearance by the hydrochloric acid–pumice micro-abrasion technique has no harmful effects and may make it easier to mask some lesions with veneers or composite restorations.
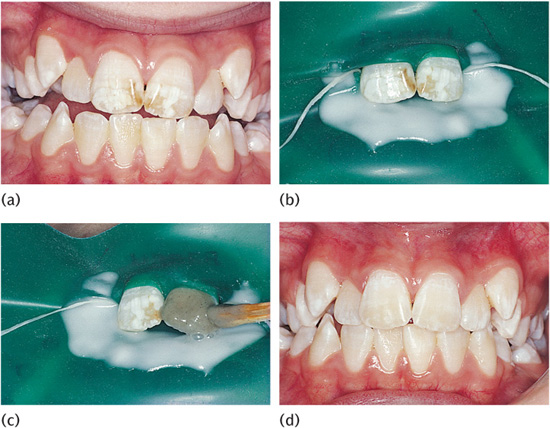
Figure 10.1 (a) Characteristic appearance of fluorotic discolouration. (b) Rubber dam isolation with bicarbonate of soda in position. (c) Application of hydrochloric acid–pumice slurry with a wooden stick. (d) Appearance 2 years after treatment.
10.2.2 Non-vital bleaching
This technique describes the bleaching of teeth that have become discoloured by the diffusion into the dentinal tubules of haemoglobin breakdown products from necrotic pulp tissue.
Indications
• Discoloured non-vital teeth.
• Well-condensed gutta percha root filling.
• No clinical or radiological signs of periapical disease.
Contraindications
• Heavily restored teeth.
• Staining due to amalgam.
Armamentarium
• Rubber dam
• Glass ionomer or IRM cement
• 37% phosphoric acid
• Bleaching agent, e.g. sodium perborate, hydrogen peroxide, or carbamide peroxide
• Cotton wool
• White gutta percha
• Composite resin
• Non-setting calcium hydroxide
Technique
1. Take preoperative periapical radiographs. These are essential to check for an adequate root filling (Fig. 10.2(a)).
2. Clean the teeth with pumice and make a note of the shade of the discoloured tooth.
3. Place rubber dam, isolating the single tooth. Ensure adequate eye and clothing protection for the patient, operator, and dental nurse.
4. Remove palatal restoration and pulp chamber restoration.
5. Remove root filling to 1mm below the level of the dentogingival junction. You may need to use adult burs in a miniature head (Figs 10.2(b) and 10.2(c)).
6. Place 1mm of cement over the gutta percha.
7. Gently freshen dentine with a round bur. Do not remove excessively.
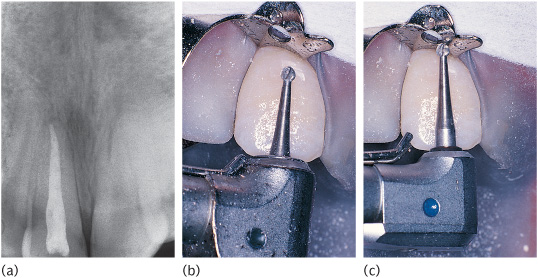
Figure 10.2 (a) Radiograph of upper right central incisor with a well-condensed root filling. (b) A standard bur in a contra-angled head may not reach the dentogingival junction. (c) Correct depth is achieved using a standard bur in a miniature head.
8. Etch the pulp chamber with 37% phosphoric acid for 30–60 seconds, wash, and dry. This will facilitate the ingress of the hydrogen peroxide.
9. Place the bleaching agent, either alone or on a cotton wool pledget, into the pulp chamber.
10. Place a dry piece of cotton wool over the mixture.
11. Seal the cavity with glass ionomer cement.
12. Repeat the process at weekly intervals until the tooth is slightly over-bleached.
13. Place non-setting calcium hydroxide into the pulp chamber for 2 weeks. Seal with glass ionomer cement.
14. Finally, restore the tooth with white gutta percha (to facilitate reopening the pulp chamber again, if necessary, at a later date) and composite resin.
Figures 10.3(a) and (b) show an example of a highly successful result. If the colour of a tooth has not significantly improved after three changes of bleach, it is unlikely to do so and further bleaching should be abandoned. The maximum number of bleach applications is usually accepted as ten. Failure of a tooth to bleach could be due to either inadequate removal of filling materials from the pulp chamber or ‘time expired’ bleaching agent. Both these factors should be checked before abandoning a procedure.
Slight over-bleaching is desirable, but the patient should be instructed to attend the surgery before the next appointment if marked over-bleaching has occurred.
Non-vital bleaching has a reputation of causing brittleness of the tooth. This is probably the result of the endodontic treatment along with previous injudicious removal of dentine (which only needs to be ‘freshened’ with a round bur) rather than a direct effect of the bleaching procedure itself.
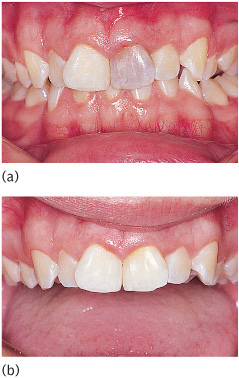
Figure 10.3 Intensely darkened non-vital upper left central incisor (a) treated by four changes of bleach (b).
This method of bleaching has been associated with the later occurrence of external cervical resorption. The exact mechanism of this association is unclear, but it is thought that the hydrogen peroxide diffuses through the dentinal tubules to set up an inflammatory reaction in the periodontal ligament around the cervical region of the tooth. For this reason the use of hydrogen peroxide mixed with sodium perborate crystals in this technique is now recommended to be used with caution. In a small number of teeth there is a gap between the end of the enamel and the beginning of the cementum, and in these cases the above explanation is tenable. The purpose of the 1mm layer of cement is to cover the openings of the dentinal tubules at the level where there may be a communication to the periodontal ligament. In the same way, non-setting calcium hydroxide is placed in the pulp chamber for 2 weeks prior to final restoration in order to eradicate any inflammation that may have been initiated in the periodontal ligament.
Clinical studies have demonstrated that regression can be expected with this technique. The longest study gave a 21% failure rate after 8 years.
The advantages of the technique are many: easy for operator and patient; conservation of tooth tissue and maintenance of the original crown morphology; no irritation to gingival tissues; no problems with changing gingival level in young patients compared with veneers or crowns; no technical assistance required.
10.2.3 Vital bleaching—chairside
This technique involves the external application of hydrogen peroxide to the surface of the tooth followed by its activation with a heat source. The technique has become increasingly popular in recent years, but it is a lengthy and time-consuming procedure that requires a high degree of patient compliance and motivation.
Indications
• Very mild tetracycline staining without obvious banding
• Mild fluorosis
• Yellowing due to ageing
• Single teeth with sclerosed pulp chambers and canals
Armamentarium
• Rubber dam with clamps and floss ligatures
• Orabase® paste
• Topical anaesthetic
• Gauze
• 37% phosphoric acid
• Heating light with rheostat
• 30–35% hydrogen peroxide
• Polishing stones
Technique
1. Take preoperative periapical radiographs and perform vitality tests. Replace any leaking restorations.
2. Clean the teeth with pumice and water to remove extrinsic staining. Take preoperative photographs with a tooth from a Vita shade guide, registering the shade adjacent to the patient’s teeth.
3. Apply topical anaesthetic to gingival margins.
4. Coat the buccal and palatal gingivae with Orabase® paste as extra protection from the bleaching solution.
5. Isolate each tooth to be bleached using individual ligatures. The end teeth should be clamped (usually from second premolar to second premolar).
6. Cover the metal rubber dam clamps with damp strips of gauze to prevent them from getting hot under the influence of the heat source.
7. Etch the labial and a third of the palatal surfaces of the teeth with phosphoric acid for 60 seconds, wash, and dry. Thoroughly soak a strip of gauze in the hydrogen peroxide and cover the teeth to be bleached.
8. Position the heat lamp 13–15 inches (33–38cm) from the patient’s teeth. Set the rheostat to a mid-temperature range and increase it until the patient can just feel the warmth in their teeth; then reduce it slightly until no sensation is felt.
9. Keep the gauze damp by reapplying the hydrogen peroxide every 3–5 minutes using a cotton bud. Make sure that the bottle is closed between applications as the hydrogen peroxide deactivates on exposure to air.
10. After 30 minutes remove the rubber dam, clean off the Orabase® paste, and polish the teeth using the Shofu stones. Apply the fluoride drops for 2–3 minutes.
11. Note that postoperative sensitivity may occur and should be relieved with paracetamol.
12. Assess the change—it may be necessary to repeat the process three to ten times per arch. Treat one arch at a time. Keep the patient under review as rebleaching may be required after a year or more.
13. Take postoperative photographs with the original Vita shade tooth included.
This technique is very time-consuming and re-treatment may be necessary, so the patient must be highly motivated. The technique can be used in the treatment of discolouration caused by pulp chamber sclerosis (Fig. 10.4). These cases require isolation of the single tooth.
10.2.4 Vital bleaching—nightguard
This technique involves the daily placement of carbamide peroxide gel into a custom-fitted tray on either the upper or the lower arch. As the name suggests, it is carried out by the patient at home and is initially done on a daily basis.
Indications
• Mild fluorosis
• Moderate fluorosis as an adjunct to hydrochloric acid–pumice micro-abrasion
• Yellowing of ageing
• Single teeth with sclerosed pulp chambers and canals
• Selective bleaching for aesthetic purposes
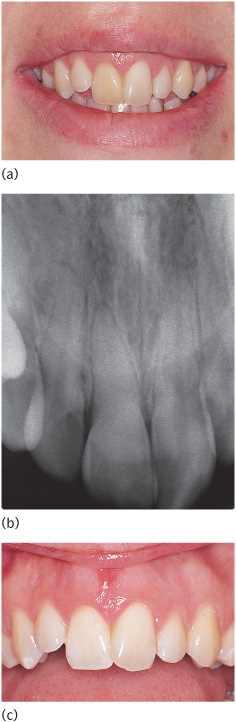
Figure 10.4 (a) A discoloured upper right central incisor with (b) a radiograph confirming sclerosis of the pulp chamber and root canal. (c) Appearance of upper right central incisor after four chairside bleaching treatments.
Armamentarium
• Upper impression and working model
• Soft mouthguard—avoiding the gingivae
• 10% carbamide peroxide gel.
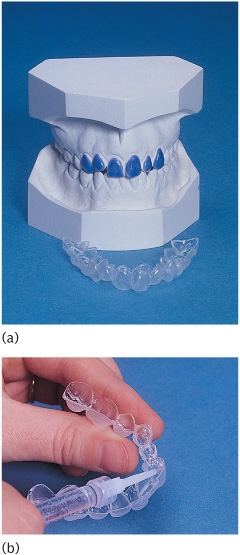
Figure 10.5 (a) Model of upper arch with wax relief for construction of a nightguard. (b) Mouthguard being loaded with carbamide peroxide gel.
Technique
1. Take an alginate impression of the arch to be treated and cast a working model in stone.
2. Relieve the labial surfaces of the teeth by about 0.5mm and make an acrylic pull-down vacuum-formed splint as a mouthguard with or without reservoirs for bleaching agent on the teeth requiring lightening (Fig. 10.5(a)). The splint should be no more than 2mm thick and should not cover the gingivae. It is only a vehicle for the bleaching gel and is not intended to protect the gingivae.
3. Instruct the patient on how to floss their teeth thoroughly. Perform a full-mouth prophylaxis and instruct them how to apply the gel into the mouthguard (Fig. 10.5(b)).
4. Note that the length of time the guard should be worn depends on the product used.
Carbamide peroxide gel (10%) breaks down to 3% hydrogen peroxide and 7% urea in the mouth. Both urea and hydrogen peroxide have low molecular weights, allowing them to diffuse rapidly through enamel and dentine. This explains the transient pulpal sensitivity occasionally experienced with home bleaching systems.
Pulpal histology with regard to these materials has not been assessed, but no clinical significance has been attributed to the changes seen with 35% hydrogen peroxide over 75 years of usage, except where teeth have been overheated or traumatized. By extrapolation, 3% hydrogen peroxide in the home systems should be safe.
Although most carbamide peroxide materials contain trace amounts of phosphoric and citric acids as stabilizers and preservatives, no indication of etching or a significant change in the surface morphology of enamel has been demonstrated by scanning electron microscopy analysis. There was early concern that bleaching solutions with a low pH would cause demineralization of enamel when the pH fell below the ‘critical’ value of 5.2–5.8. However, no evidence of this process has been noted to date in any clinical trials or laboratory tests, possibly because the urea (and subsequently the ammonia) and carbon dioxide released on degradation of the carbamide peroxide elevate the pH.
There is an initial decrease in bond strengths of enamel to composite resins immediately after home bleaching, but this returns to normal within 7 days. This effect has been attributed to the residual oxygen in the bleached tooth surface which inhibits polymerization of the composite resin. The home-bleaching systems do not affect the colour of restorative materials. Any perceived effect is probably due to superficial cleansing.
Minor ulceration or irritation may occur during the initial treatment. It is important to check that the mouthguard does not extend onto the gingivae and that the edges of the guard are smooth. If ulceration persists, a decreased exposure time may be necessary. If there is still a problem, allergy is a possibility.
There are no biological concerns regarding the short-term use of carbamide peroxide. It has a similar cytotoxicity on mouse fibroblasts to zinc phosphate cement and Crest toothpaste, and has been used for a number of years in the USA to reduce plaque and promote wound healing. However, there are no long-term studies of its safety. Laboratory studies have shown that carbamide peroxide has a mutagenic potential on vascular endothelium and there may be harmful effects on the periodontium, together with delayed wound healing.
Published clinical studies of 1–2 years’ duration have shown that the yellowing of ageing responds best to this treatment. Although this would appear to take home bleaching out of the remit of paediatric dentistry, it may still have a part to play in cases of mild fluorosis. Irrespective of the clinical application, evidence suggests that annual retreatment may be necessary to maintain any effective lightening. This further highlights the importance of more research into the long-term effects of this treatment on the teeth, mucosa, and periodontium.
The exact mechanism of bleaching in any of the methods described is unknown. Theories of oxidation, photo-oxidation, and ion exchange have been suggested. Conversely, the cause of re-discolouration is also unknown. This may be a combination of chemical reduction of the oxidation products previously formed, marginal leakage of restorations, allowing ingress of bacterial and chemical by-products, and salivary or tissue fluid contamination via permeable tooth structure.
There is currently, and has been for some years, continued confusion relating to the legal position of dentists using tooth-whitening techniques which involve the use of bleach. The situation at the time of publication is that it is illegal in the UK to supply a product for the purpose of tooth-whitening if that product contains or releases more than 0.1% hydrogen peroxide. When considering such products for clinical use it is advisable to seek medico-legal advice.
10.2.5 The inside–outside bleaching technique
An alternative approach to the management of the discoloured endodontically treated tooth has been described. Known as the inside–outside bleaching technique, it is essentially a combination of the walking and vital bleaching techniques. Tooth preparation is the same as described for the walking bleach technique (Section 10.2.2) with particular attention being paid to removal of the gutta percha below the cemento-enamel junction followed by the placement of a barrier (usually a glass ionomer cement or IRM cement) to seal the root canal from the oral cavity. A custom-made tray (see Fig. 10.5 (b)) is constructed as a vehicle for the bleaching gel. However, rather than creating space labially as in the vital bleaching technique, a small reservoir is created palatal to the affected tooth only. The gel (10% carbamide peroxide) is placed by the patient into both the access cavity of the non-vital tooth and the tray. The tray is then worn full time for up to 4 days, with the gel being replaced every 2–4 hours. Once an aesthetically acceptable result is achieved, the access cavity is refilled appropriately. Long-term results for this approach are not yet available, but relapse is as likely as for any of the other bleaching techniques.
10.2.6 Localized composite resin restorations
This restorative technique uses recent advances in dental materials science to replace defective enamel with a restoration that bonds to and blends with enamel.
Indications
• Well-demarcated white, yellow, or brown hypomineralized enamel such as those seen in MIH (see Section 10.6 and Fig. 10.25 (c))
Armamentarium
• Rubber dam/contoured matrix strips
• Round and fissure diamond burs
• Enamel–dentine bonding kit
• New-generation highly polishable hybrid composite resin
• Soflex discs (3M) and interproximal polishing strips.
Technique
1. Take preoperative photographs and select the shade (Fig. 10.6(a)).
2. Apply rubber dam and contoured matrix strips if required.
3. Remove full extent of demarcated lesion with a round diamond bur down to the amelodentinal junction (ADJ).
4. Chamfer the enamel margins with a diamond fissure bur to increase the surface area available for retention if required.
5. Etch the resultant cavity margins. Wash and dry.
6. Apply the prime and bonding agent as per the manufacturer’s instructions.
7. Apply the chosen shade of composite, use a brush lubricated with the bonding agent to smooth and shape, and light-cure for the recommended time.
8. Remove the matrix strip/rubber dam.
9. Polish with graded Soflex discs (3M), finishing burs, and interproximal strips if required. Add characterization to the surface of the composite.
10. Take postoperative photographs (Fig. 10.6(b)).
The localized restoration is quick and easy to complete. Despite the removal of defective enamel down to the ADJ, there is often no significant sensitivity and therefore no need for local anaesthesia. If the hypo-plastic enamel has become carious and this extends into dentine, administration of local anaesthesia will be necessary. Advances in bonding and resin technology make these restorations simple and obviate the need for a full labial veneer. Disadvantages are marginal staining, accurate colour match, and suboptimal aesthetics if the full extent of the demarcated lesion is not removed to the ADJ.

Figure 10.6 Well-demarcated white opacities on the upper central incisors (a) treated by localized composite restorations (b).
10.2.7 Composite resin veneers
Although the porcelain jacket crown (PJC) may be the most satisfactory long-term restoration for a severely hypoplastic or discoloured tooth, it is not an appropriate solution for children for two reasons: the large size of the young pulp horns and chamber, and the immature gingival contour.
Composite veneers may be direct (placed at the initial appointment) or indirect (placed at a subsequent appointment having been fabricated in the laboratory). Conservative veneering methods may offer not just a temporary solution, but a satisfactory long-term alternative to the PJC. Most composite veneers placed in children and adolescents are of the ‘direct’ type, as these can be placed in a single visit and outcomes for both techniques are equivocal.
Before proceeding with any veneering technique, the decision must be made as to whether to reduce the thickness of labial enamel before placing the veneer. Certain factors should be considered.
1. Increased labiopalatal bulk makes it harder to maintain good />
Stay updated, free dental videos. Join our Telegram channel
VIDEdental - Online dental courses


