
DIAGNOSIS AND TREATMENT PLANNING FOR BLEACHING
White teeth are commonly associated with health, beauty, success, and happiness. As a method of achieving whiter teeth, bleaching is a relatively low-cost, noninvasive, and highly effective esthetic dental treatment. Generally speaking, 9 out of 10 patients will have successful bleaching results. Treatment longevity usually ranges from 1 to 3 years, and some patients never require touch-ups or re-treatment. A certain percentage of patients will experience sensitivity, primarily of the tooth but also of the gingivae, during bleaching; however, all side effects cease upon termination of treatment. Nevertheless, there are many considerations to be made before bleaching treatment is initiated.
Bleaching Basics
Mechanism of bleaching
It is helpful to understand the way in which bleaching works when determining whether it can be used to treat different clinical scenarios. Initially, it was thought that the color change occurred either through the removal of the discoloration from the surface of the enamel or through a change in the enamel only. However, it has since been established that the tooth is a semiper-meable membrane, and the ingredients for bleaching— carbamide peroxide and hydrogen peroxide—penetrate the enamel and dentin, reaching the pulp in 5 to 15 minutes. It is not only the enamel but mainly the dentin that changes color, and it does so as quickly next to the pulp chamber as it does next to the dentinoenamel junction. This explains why bleaching is effective in removing not only extrinsic stains but also intrinsic stains such as those caused by the ingestion of tetra-cycline, a drug that binds to the dentin.
Several other observations regarding the bleaching process have been made over the last 10 to 15 years. For example, it seems that each tooth has a maximum degree of whitening beyond which it will not progress, regardless of how long material is applied or what type of material is used. Also, each tooth has a maximum rate of change. There is an optimum bleaching formulation beyond which higher concentrations of the material or special activation techniques will not affect the speed of the color change. Lastly, it has been observed that once the tooth has reached its maximum color change during bleaching and the treatment is terminated, there is a small relapse in shade equivalent to about half of the difference between standard shade tabs. This phenomenon is believed to be related to a change in the optical qualities of the tooth that occurs during treatment as a result of oxygen release from the peroxide, which makes the tooth appear to be whiter. Once treatment is discontinued, this effect is lost and the teeth appear to darken slightly. When using tray bleaching, it is recommended that patients wait 2 weeks to allow the color to stabilize before undergoing restorative treatment to ensure a good match between the teeth and the restorative materials. This also allows the bond strengths between the enamel and composite materials to return to normal. Various explanations for this reduction in bond strength have been offered, but it appears that the oxygen remaining in the tooth from the bleaching process inhibits the setting of the composite material in the etched enamel. When in-office bleaching is used, the enamel is more greatly affected, and it seems that the bond strengths never again reach their pretreatment values.
Bleaching options
There are a number of different techniques for bleaching teeth. These are generally classified into one of three categories: in-office procedures, nightguard vital bleaching, or over-the-counter (OTC) products. Within each of these classes, there are variations in procedure; type and concentration of material; barrier type; and duration of treatment. All of these bleaching techniques can be used for vital or nonvital teeth; however, no bleaching treatment should be initiated without a comprehensive examination, including radiographic imaging. When considering which technique to choose, the clinician must consider the available literature on safety, efficacy, and cost.
In-office bleaching, or power bleaching, has been practiced since the late 1800s. In-office bleaching has been associated with heat or light activation and involves isolation of the teeth with either traditional rubber dam or the newer paint-on rubber dam (Fig 1-1).
FIG 1-1
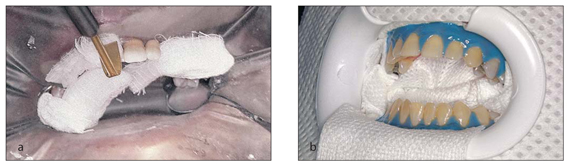
In-office bleaching using 35% hydrogen peroxide and isolation with traditional rubber dam (a) and paint-on rubber dam (b).
After proper isolation, a high concentration (originally 35%) of hydrogen peroxide is applied for a specific time period and possibly for a number of applications per visit. Research has indicated that light activation does not affect the efficacy or final outcome of bleaching, but only creates the temporary illusion of additional whitening due to dehydration. In-office bleaching generally requires one to four complete treatments to obtain the maximum whiteness for the patient.
Nightguard vital bleaching, or tray bleaching, was officially introduced to the profession in 1989, but its origins can be traced back to 1968. It involves fabrication of a custom-fitted tray on a cast of the patient’s teeth generated from an alginate impression. A low concentration of carbamide peroxide (originally 10%) is applied overnight for 2 to 6 weeks. Results can be obtained in as few as 3 days or as long as 6 weeks, but the average treatment time is 2 weeks. Of all the bleaching techniques, nightguard vital bleaching has been the subject of more research and has the longest history of safety in controlled research. Most importantly, the cost to the patient is very reasonable since the majority of the treatment can be done outside of the dental office.
OTC products offer several methods, from imitations of the clinical techniques involving trays, to strips, wraps, or paint-on products. The most notable product, introduced in 2002, is the whitening strip (Fig 1-2). This tape-like product contains low concentrations of hydrogen peroxide and is applied one or two times per day for 30 minutes to 1 hour. Other OTC products include toothpastes and chewing gums, but these only treat extrinsic stains and do not change the color of the tooth.
FIG 1-2
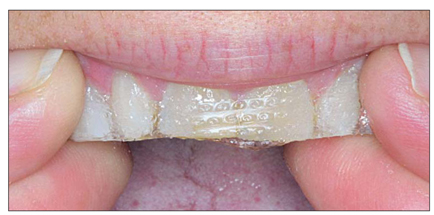
The most popular OTC whitening product is the bleaching strip, which contains low-concentration hydrogen peroxide on a tape-like matrix.
Materials used for bleaching
There are two basic materials used to whiten teeth: hydrogen peroxide and carbamide peroxide. The original in-office bleaching technique used a high concentration of hydrogen peroxide, usually 30% to 35%, which is capable of burning the skin or gingivae upon contact. Extreme caution should be used in handling this product, as it is a potent oxidizer and can harm the patient, the clinician, or the assistant. This danger is one reason that in-office bleaching has never been universally accepted by clinicians, even though it has been in clinical practice for 125 years. Newer bleaching methods use hydrogen peroxide in much less caustic concentrations, generally in the 6% to 14% range.
The original nightguard vital bleaching technique used 10% carbamide peroxide in a custom-fitted tray that was worn overnight for 2 to 6 weeks. Carbamide peroxide is a combination of hydrogen peroxide and urea, and is also known as urea peroxide. A 10% carbamide peroxide solution is equivalent to 3.5% hydrogen peroxide and 6.5% urea. The hydrogen peroxide degrades to oxygen and water, while the urea becomes ammonia and carbon dioxide. The action of carbamide peroxide is very different from that of hydrogen peroxide, which influences both application time and side effects. Hydrogen peroxide is very unstable and remains active only for 30 to 60 minutes, with most of its activity occurring in the first 30 minutes after application. Consequently, all hydrogen peroxide products have application times of 30 to 60 minutes. When urea is added to hydrogen peroxide to make carbamide peroxide, it is much more stable. Carbamide peroxide releases about 50% of its active ingredients in the first 2 hours of application, then the remainder is released over the next 4 to 6 hours (Fig 1-3). Therefore, carbamide peroxide–containing bleaching materials are ideally applied in trays worn overnight. If the patient decides to use the product during the day, then 2 to 4 hours would be the minimum application time.
FIG 1-3
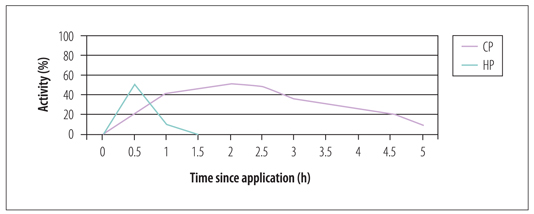
Activity of hydrogen peroxide (HP) compared with carbamide peroxide (CP). The release of active ingredients from carbamide peroxide is much more gradual, which is why it is best applied in trays overnight.
In addition to adding stability to the hydrogen peroxide, urea elevates the pH of the material in the tray and the saliva in the mouth to about 8 within 5 minutes of application and for several hours thereafter. This is very important in minimizing the effects of a low pH material such as hydrogen peroxide on the enamel, which affects the caries process. In order for enamel to demineralize in the caries process, the pH must be below 5.5; for dentin, the pH only needs to be below 6.8 for the caries process to begin. Hence, carbamide peroxide avoids the need to treat active caries prior to bleaching; the caries process is either stopped or inhibited during bleaching. The only time restorative procedures should be carried out prior to bleaching on teeth affected by caries is when the decay is encroaching on the pulp or when the patient has tooth sensitivity.
There are different concentrations of hydrogen peroxide and carbamide peroxide used in tray and strip bleaching. Generally, the higher the concentration, the greater the chance of tooth or gingival sensitivity. Ultimately, the concentration does not affect the outcome, since the final color of the tooth is determined by the genetics of the tooth, not the product used in bleaching. Higher concentrations may work slightly faster, but the difference is not directly proportional (eg, a 20% solution is not twice as fast as a 10% solution). With a more highly concentrated material, there does seem to be a greater illusion of whitening, followed by a more noticeable rebound to the actual color of the tooth after termination of bleaching. This can sometimes cause frustration and disappointment in patients who want extremely white teeth but whose teeth are genetically unable to maintain such a level of whiteness. It is important to note that the majority of research on safety and efficacy has only been done on 10% carbamide peroxide. Although there is some research on 15% products, defense of safety in legal terms is best supported with data for 10% carbamide peroxide. All products that have obtained the American Dental Association’s seal of approval use 10% carbamide peroxide.
Safety of carbamide peroxide
Carbamide peroxide originally appeared as an oral antiseptic in the 1960s. The most familiar form that is still on the market is Gly-Oxide (GlaxoSmithKline), which is used for intraoral wound debridement for canker sores or after oral surgery. In addition, the original Proxigel (Reed & Carnrick Pharmaceuticals) is now available in a thicker version (GlaxoSmithKline). Earlier, in the late 1800s, low concentrations of hydrogen peroxide were used as rinses to prevent tooth decay in children with pitted teeth. Since the early 1960s, 10% carbamide peroxide has been used in newborn infants who have candidiasis or throat infections. Ten drops are applied to the throat every 2 hours for 7 to 10 days, considerably reducing the duration of the infection. In the 1970s, research was performed on use of the material in orthodontic patients to reduce the incidence of white spot lesions following debanding. Later carbamide peroxide was studied as an oral hygiene agent for elderly patients in nursing homes. For all of these applications, there were no reported side effects or dangers to the patients, with the exception of a laxative effect in the elderly population due to the glycerine base. More recently, research has determined that the liver produces about 648 mg of peroxide per day, while the amount of bleaching material in two trays is only 3.5 mg. Saliva contains peroxidases that break down naturally occurring hydrogen peroxide at a rate of 29 mg of peroxide in 1 minute. Based on the minimal amount used in a tray, the previous history of oral use, and the body’s mechanisms for clearance, little concern exists about the effects of swallowing the material. Long-term follow-up of patients who bleached their teeth using carbamide peroxide shows no subsequent need for root canal therapy, no internal or external resorption, no sensitivity outside normal limits, and no detrimental effects on tooth structure.1–5
Concerns are often expressed regarding free radical formation in the breakdown of hydrogen peroxide and its effects on soft tissue. However, the American Dental Association, World Health Organization, and the US Food and Drug Administration have all stated that low concentrations of hydrogen peroxide do not cause cancer.6–9 After more than 15 years of clinical use of tray bleaching and with millions of patients having performed bleaching treatment on their teeth, there has been no increase in the incidence of tongue cancer or other oral manifestations.10 Researchers have repeated the studies that initially raised concerns but found no evidence to support the earlier findings.11 Moreover, in one of the most significant documents recently released on the subject, the European Commission and the Scientific Committee on Consumer Products12 reviewed all of the safety literature on bleaching, focusing on data compiled since the introduction of tray bleaching. The report concluded that bleaching with low concentrations of peroxide is safe. However, they did not support the use of OTC products due to the lack of a proper examination by a clinician. At the time of the review, the maximum allowable concentration was 6% hydrogen peroxide, which is equivalent to approximately 17% carbamide peroxide. Thus, as long as the material is provided in a safe delivery mode, such as a tray that can be altered to accommodate individual patient needs, and in a low concentration that the body can handle, it can be considered safe for use.
There have been many articles written evaluating the effects of bleaching with carbamide peroxide on the enamel, and some evaluating its effect on dentin.13–18 The effects on the enamel are considered within normal limits with a neutral pH solution. The hardness of the enamel is not affected by carbamide peroxide bleaching, nor is the subsurface hardness. Due to the permeability of the tooth and the small size of the urea peroxide molecules, the bleaching will occur under existing restorations and throughout the tooth, even when only placed in one area. Although every procedure has some effect on the enamel, including brushing and oral prophylaxis, the effect of bleaching is minimal. One study indicated that 6 hours of bleaching has the same effect on the enamel as 2.5 minutes of contact with a cola beverage.19,20 Many studies show the detrimental effects of soda beverages, fruit juices such as apple and orange, white wine, and yogurt on enamel. Most of these foods and beverages have the same pH as stomach acid, which is about 2.6. Patients who are comfortable with the ingestion of these materials should also be comfortable with bleaching using a 10% carbamide peroxide material.
Bleaching Examination
The most essential component of bleaching treatment is proper examination by the clinician to evaluate the prognosis. It is a good idea to clean the teeth prior to examination to remove any superficial extrinsic stains and determine the baseline color of the teeth.
Bleaching is the treatment of choice when teeth have good form and function but are discolored in some manner. Patients may be born with genetic tooth discoloration, they may acquire discoloration from habits such as smoking, or it may occur as a natural result of the aging process. There can also be partial tooth discolorations, such as brown or white spots resulting from high fluoride ingestion. The antibiotic tetracycline can cause mild to severe discolorations, mainly when ingested during tooth formation, but it also may occur in fully formed adult teeth. Some patients present with a single dark tooth resulting from trauma and/or endodontic therapy. Bleaching is an option, whether such traumatized teeth are vital or nonvital (see chapter 5).
During the examination, the clinician should look for moderate to severe tetracycline staining, especially dark blue or gray discolorations located at the cervical area, as well as white spots on the teeth. Such tetracycline stains are resistant to bleaching treatment, and white spots do not change color with bleaching, although they will become less noticeable as the background tooth color lightens.
Overall, the following factors would lead to a guarded prognosis for bleaching:
• History or presence of sensitive teeth
• Extremely dark gingival third of tooth visible during a smile
• Extensive white spots that are very visible
• Temporomandibular joint dysfunction or bruxism
• Translucent teeth or exposed root surfaces
The contraindications for at-home whitening are as follows:
• Unrealistic expectations
• Unwilling or unable to comply with at-home treatment
• Excessive existing restorations not requiring replacement
• Inability to tolerate the taste of the product
• Pregnancy or lactation
Following are some special considerations for the bleaching examination.
Discolorations related to pathology
When discolorations are caused by pathology, bleaching will mask but not resolve the problem. Discoloration could be a sign of an abscessed or nonvital tooth. Often teeth abscess over a long period of time after trauma with no pain or fistulae, and the first indication of a problem is the discoloration in the tooth (Fig 1-4). Endodontic therapy may be required; bleaching would remove the discoloration, but the abscess would remain and ultimately may cause loss of the tooth due to root resorption from the long-standing infection.
FIG 1-4
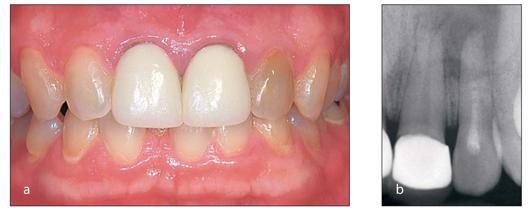
(a) A single dark tooth may be the sign of a necrotic pulp. (b) Because this pathology can occur in the absence of other clinical signs, such as pain, swelling, and tooth mobility, a radiograph should be taken prior to bleaching to determine if endodontic treatment is required.
Interproximal decay that remains for a long period of time without restoration will typically turn black from the staining of foodstuffs (Fig 1-5). This problem requires restorative treatment, not bleaching. Occasionally bleaching may be indicated in addition to the proximal restorations, but the primary cause of the discoloration is the long-standing decay. Again, pain may not be present as an indicator of a problem.
FIG 1-5
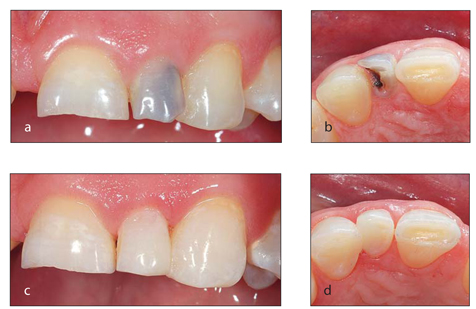
(a and b) The tooth is dark as a result of decay. (c and d) A restoration has been placed to resolve the problem.
The most insidious yet least common cause of discoloration is internal or external resorption. This condition, which is characterized by the loss of tooth substance, may occur after trauma. The first indication of internal or external resorption is often the slight discoloration of the tooth (Fig 1-6).
FIG 1-6
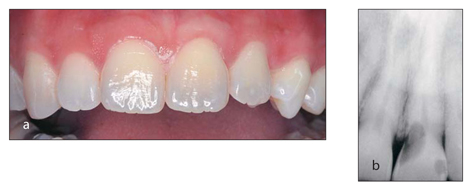
(a)This patient presented with a slight darkening of the maxillary left central incisor but no pain or other clinical signs of pathology. (b) A radiograph revealed internal resorption. (Courtesy of Dr Tom McDonald.)
All of the aforementioned conditions can be identified during an examination that includes radiographic imaging. Prior to planning any treatment for tooth discoloration, a radiograph should be taken of the anterior teeth and any single discolored tooth regardless of location. A radiograph of the anterior teeth can be obtained using bitewing film rotated to a vertical orientation. This size and orientation of film should reveal the apices of the four incisors. A radiograph also affords the dentist the opportunity to discover dissimilar pulp sizes that may cause one tooth to lighten faster than another, supernumerary teeth that may be a contraindication for endodontic therapy, or other anomalies. Such an examination would also reveal calcific metamorphosis, a situation in which, after trauma, the pulp chamber is completely obliterated. This condition is very difficult for endodontic therapy, but an excellent opportunity for bleaching.
Translucency
Some teeth are discolored primarily in the incisal region. In some cases, this discoloration could be a result of the translucency of the teeth. When teeth are bleached, often they become more opaque; however, occasionally they will become more translucent. If the teeth look dark before bleaching as a result of translucency and become more translucent during bleaching, they will look even darker following bleaching due to the contrast with the adjacent teeth (Fig 1-7). A simple way to diagnose this situation is to place a white-gloved finger behind the incisal discoloration prior to bleaching. If the tooth turns white, then it is translucent; if the discoloration remains the same, then it is internal to the tooth, and the patient is a good candidate for bleaching. Patients with translucent teeth should be informed of the possibility of the teeth becoming more translucent with bleaching. Should this occur, additional restorative treatments may be required to obtain a uniform smile. Treatment options in such cases could range from bonding composite material on the lingual surface to block the translucency (if the occlusal situation allows for it) to composite or porcelain venee/>
Stay updated, free dental videos. Join our Telegram channel
VIDEdental - Online dental courses


