Armamentarium
| Basic Armamentarium |
|
| Advanced Armamentarium |
|
History of the Procedure
The first report of diagnostic arthroscopy of the temporomandibular joint (TMJ) was given by Ohnishi. This report included Ohnishi’s experience with arthroscopic examination of the joint using the No. 24 arthroscope developed by Watanabe. Ohnishi also developed a puncture method, which utilized a puncture needle and a sheath needle to examine the joint cavity. Additional research on puncture techniques was performed in the 1980s by Holmlund and Hellsing. In their research, they identified puncture sites that correlated with the tragal-lateral canthus line. In addition, Johnson reported on diagnostic arthroscopy of the joint, and Murakami described normal anatomy and a safe and effective method of joint puncture, followed by topographic terminology and histologic studies. However, much of the information on the joint was standardized in a report published by Murakami and Hoshino. McCain presented the first American work in an abstract on his research and development with the joint from 1983 to 1985 at a meeting of the American Association of Oral and Maxillofacial Surgeons (AAOMS) in 1985. McCain’s report included his experience with puncture techniques, irrigation systems, diagnostic observations, and complications. Shortly thereafter, Sanders published articles describing the therapeutic benefits of arthroscopy in patients with acute painful hypomobility of the joint. McCain followed with an article describing normal anatomy, a technique for joint arthroscopy, the appearance of joint pathology, and the complications associated with the procedure.
Indications for the Use of the Procedure
Arthroscopic surgery is not performed primarily for preventive reasons. The patient should be motivated by pain and dysfunction, and the surgical goals should be to correct that particular problem. Restoring anatomy or eliminating or reducing joint inflammation through surgery ultimately provides long-term benefits. There is no justification, however, to operate on a patient purely for preventive reasons.
There are many indications for the use of diagnostic arthroscopy. Patients who present with unexplained persistent joint pain unresponsive to medical forms of therapy should be considered for this procedure. This also includes patients who present with persistent joint pain and impaired function with an absence of positive findings on conventional imaging studies. The technique also allows the surgeon to enhance understanding of other diagnostic findings such as clinical signs and positive imaging studies. Lastly, it is also useful for the biopsy of suspected lesions or diseases.
Operative arthroscopy also has distinct indications for the use of the procedure. Clearly the technique is useful for the management of patients with synovitis affecting the temporomandibular joint. Juvenile idiopathic arthritis (JIA) is a good model for inflammatory arthritis. JIA is a group of heterogeneous chronic arthropathies of children. Subtypes of JIA share features with rheumatoid arthritis (RA) and Adult-onset Still’s disease in adults. Other indications include the management of internal derangements of the TMJ. Wilkes classified internal derangement according to radiographic stages of severity, which, in many patients, can be longitudinal over time. These stages (II to V) serve as a useful method for evaluating the disease.
For patients with inflammatory arthritis or internal derangements, TMJ arthroscopy is used to wash out and remove the inflammatory substrates or any mechanical barrier in order to improve maximal incisal opening and decrease the inflammatory condition, thus alleviating the pain and improving the function of the joint. Hypomobility secondary to intrajoint adhesions can also be effectively managed during operative arthroscopy by releasing adhesions. Operative TMJ arthroscopy is also used for patients with degenerative joint disease and for the management of hypermobility resulting in painful subluxation or dislocation. Hypermobility or TMJ dislocation is a common occurrence that is generally treated with conservative therapy. In some patients, this can become a chronic recurrent condition. This recurrent temporomandibular joint dislocation (RTD) can significantly decrease the patient’s quality of life and require some form of surgical intervention for correction. The incidence has been described as acute, chronic, recurrent, and longstanding. Operative TMJ arthroscopy presents a minimally invasive alternative treatment for RTD.
Limitations and Contraindications
Arthroscopy, although a versatile procedure, does have some limitations in its application. Clearly, patients with bony ankylosis of the TMJ require an open procedure for management. Other circumstances that may mitigate the use of TMJ arthroscopy include surgery on patients with significant overlying skin infections and situations in which the surgeon is concerned that tumor seeding may occur from surgical instrumentation. Like all medical procedures, the surgeon must also weigh medical circumstances unique to each patient. The effective and safe use of arthroscopy also requires significant operator skill.
Technique: Primary TMJ Arthroscopy (Single-Puncture Arthroscopy)
Step 1:
Patient Preparation
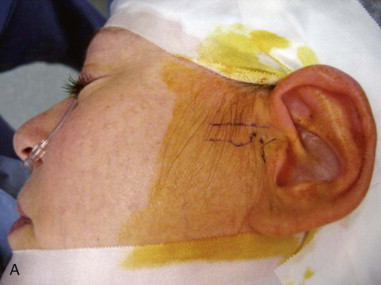
Primary arthroscopy is performed under local anesthesia or under local anesthesia and intravenous sedation or monitored anesthesia care (MAC). The patient is brought to the operating suite, placed in the dorsal supine position, and brought to the proper plane of MAC anesthesia. The patient’s head should be turned to one side so that it maintains a completely flat level. The hair is placed in a bouffant cap and secured by silk tape. After digital localization of the greatest concavity of the glenoid fossa, the preauricular skin is prepped with Betadine and draped in the usual manner for TMJ arthroscopy, and ear wick is placed for protection ( Figure 128-1, A ).
Step 2:
Local Anesthesia
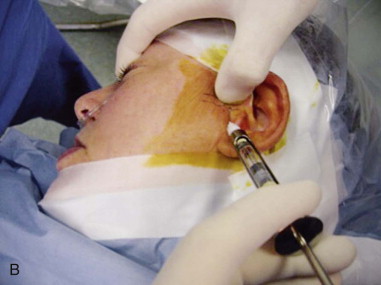
After standard landmarks have been marked, local anesthesia is deposited using 2% Xylocaine with a 30-gauge needle in the preauricular area to the fossa portal lavage tract and insufflation tract ( Figure 128-1, B ).
Step 3:
Insufflation
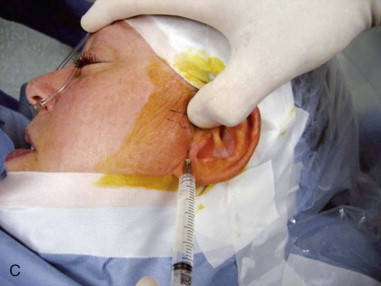
The superior joint space is then insufflated via an inferior and lateral approach utilizing a 30-gauge needle and insufflated with 2% Xylocaine to approximately 2.5 cc with good plunger rebound ( Figure 128-1, C ).
Step 4:
Fossa Portal Puncture
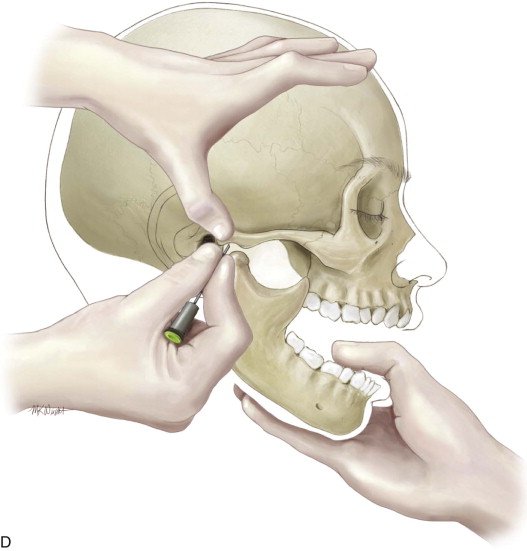
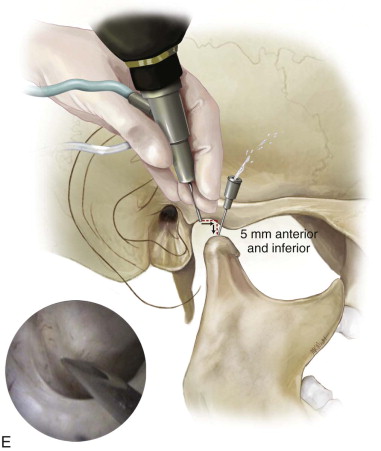
The first puncture is always placed at the maximum concavity of the glenoid fossa while the mandible is in protruded position. Hold the cannula in the right hand for a right joint puncture, the left hand for a left joint puncture. Grip the cannula with an index finger controlling the tip and the base of the cannula in the palm of the hand.
Using the trocar, penetrate the skin at the fossa puncture site with a slow rotational motion. The fossa puncture should be made deliberately and carefully in an attempt to pass one time through the lateral capsule and into the joint space to avoid extravasation problems. Advance the trocar until contact is felt with the bone above. Always use the bony landmark; never pass the instrument straight through the capsule without locating the bone. Advance the cannula completely into the joint space. At this point, the cannula should be inserted approximately 20 to 25 mm as measured from the skin to the center of the joint, which is known as the safety zone. Then remove the trocar and hook the scope set up in Figure 128-1, D .
Step 5:
Stay updated, free dental videos. Join our Telegram channel
VIDEdental - Online dental courses


