Key points
- •
Sound technical craft requires a consistent surgical routine.
- •
Knowledge of the tips and traps associated with each surgical step makes surgical efforts occur smoothly.
- •
Correct positioning of the mandibular condyle in the glenoid fossa is mandatory for successful treatment outcome.
- •
The application of an established step-by-step operating technique prevents intraoperative uncertainty and often postoperative complications.
Introduction
The correction of dentofacial deformities demands accurate treatment planning for the orthodontic preparation and subsequent surgery. It is also mandatory that the surgical correction be performed accurately to ensure predictable and successful outcomes. This article describes the technique for the sagittal split mandibular ramus osteotomy in a step-by-step fashion with tips and traps with each step.
In 1970, J M Ferrer in said: “it must be recognized that at every operation the surgeon inevitably injures the patient; this injury can and must be minimized by the use of careful, gentle, and accurate surgical technique.”
Sound technical craft, science, and operating experience all come together to make most surgical procedures occur smoothly and successfully. No 2 surgeons’ surgical techniques are identical; however, there are certain basic principles that have to be adhered to when performing orthognathic surgery. This will not only ensure good surgical outcome but also limit complications. Moreover, important details of diagnosis and management of operative complications are difficult to master, since no 2 complications are ever identical.
Although the anatomy and shape of the human mandible lends itself to splitting in a sagittal plane, the surgical osteotomy of the mandible remains a challenging procedure. Over the last 30 years, the ingenuity of modifications to the original technique as described by Obwegeser and Trauner in 1955, development of special instruments, and improvement of surgical skills have made it possible to achieve surgical goals relatively quickly and atraumatically. The surgical repositioning of the mandible has developed from a life-threatening procedure to outpatient surgery (in some parts of the world).
Each surgeon should develop a routine that will enable the surgical team to anticipate each step, thus increasing efficiency and decreasing operating time and eventually limit postoperative morbidity.
The surgical technique of the sagittal split mandibular ramus osteotomy can be performed in 32 steps. Each step will have certain tips and traps.
Step 1—infiltrate the soft tissue with vasoconstrictor
The lips should be kept lubricated with steroid ointment throughout the surgical procedure.
The area of dissection is infiltrated with a local anesthetic containing a vasoconstrictor (epinephrine in a concentration of 1:100,000) 10 minutes before surgery.
Step 2—the soft tissue incision
An incision is made through the mucosa, muscle, and periosteum from just lingual to the external oblique ridge, halfway up the mandibular ramus superiorly to mesial of the second molar inferiorly.
At least 5 mm of nonkeratinized mucosa should be left buccally at the lower end of the incision for ease of suturing later.
Step 3—buccal subperiosteal dissection
Strip the periosteum from the body and anterior aspect of the mandibular ramus to allow for adequate visualization.
Dissection must remain subperiosteal, decisive, clean, and neat.
It is not necessary to strip the entire masseter muscle attachment off the mandibular angle. Total stripping of the muscle will result in dead space and encourage swelling and hematoma formation.
Step 4—superior subperiosteal dissection
Strip the lower fibers of the temporalis muscle off the anterior border of the ramus.
Dissect the periosteum from the internal oblique ridge down to the medial aspect of the retromolar area.
Place a swallowtail (forked or notched) retractor over the anterior border and pull upwards for good visualization.
Step 5—exposure of the lingula
Start the medial dissection from above and then dissect inferiorly ( Fig. 1 ).
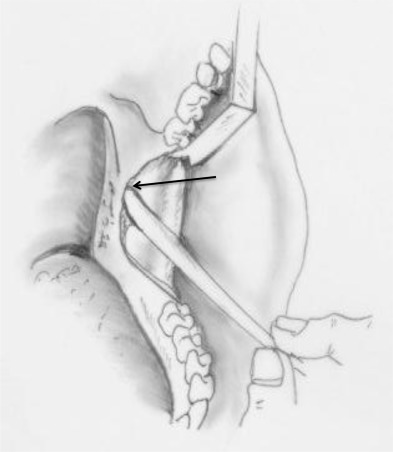
Stay subperiosteal at all times.
Carefully identify the lingula and ensure visualization.
Perforation of the periosteum in this area may cause brisk hemorrhage (usually from the medial pterygoid muscle); however it often subsides spontaneously.
Step 6—medial ramus osteotomy
Use a Lindeman or 701 fissure bur, aim at the notch of the ligula and angle the osteotomy parallel to the occlusal plane ( Fig. 2 ).
The convexity of the internal oblique ridge may obscure the lingula. If visualization is difficult, the ridge should be reduced with a large trimming burr ( Fig. 3 ).
Terminate the osteotomy just posterior to the lingula into the fossa (see Fig. 2 ).
If the osteotomy is terminated short of the fossa, the bone will tend to split anterior to the foramen, leaving the inferior alveolar nerve and canal attached to the proximal segment.
When a mandibular setback procedure or a clockwise rotation of the maxillomandibular complex will be performed, a small segment of bone should be removed superior to the osteotomy. This will prevent bony interferences in this area following setback of the mandible or superior rotation of the distal segment (clock wise rotation).
Step 7—sagittal osteotomy
Use a saw or 701-fissure bur; start at the medial horizontal osteotomy superiorly, and stay just inside the buccal cortex of the mandibular ramus and body ( Fig. 4 ).
Ensure the osteotomy is made through the cortex (approximately 5 mm).
The presence of an impacted third molar tooth may interfere (ideally impacted third molars should be removed at least 9 months before surgery). However the tooth should be treated as bone, and the osteotomy performed through the tooth.
Step 8—buccal osteotomy of the mandibular body
Remove the swallowtail (forked or notched) retractor and place a channel retractor at the lower border of the body. Start the buccal osteotomy at the lower border, and join it superiorly with the vertical osteotomy (see Fig. 4 ).
Ensure that the cortex of the lower border is included in the osteotomy ( Fig. 5 ). The actual start of the split should be at the lower border and include the lingual cortex.
Cut toward the mandible and feel the bur perforate the cortex; however, be careful not to damage the inferior alveolar nerve. The inferior border cut should be preferably slightly angled posterior–medially, not at a right angle to the buccal cortex, so the initiation of the split begins in the proper direction and osteotomes may be inserted easily.
Step 9—drill holes for a holding wire
Positioning the condyle in the glenoid fossa is the most important step of the procedure and should be performed as a separate step prior to placement if rigid fixation. The use of a holding wire is optional; however, it allows the surgeon to position and maintain the condyle in the fossa while applying rigid fixation.
The holes of the positioning wires should be drilled in such a way that the proximal segment is directed distally. The ideal distance between the holes after repositioning the segments should be 4 mm.
For a patient requiring an advancement of 6 mm, the holes should be drilled 10 mm apart. After advancement of 6 mm, the holes will be 4 mm apart with the hole in the distal segment anterior and the hole in the proximal posterior ( Fig. 6 A ).
For setback procedures (ie, 6 mm), the holes should be drilled 2 mm apart (anterior in the distal segment and posterior in the proximal segment). Once the mandible is set back, the holes will be 4 mm apart (see Fig. 6 B).
Alternative techniques
Some surgeons make use of a bone clamp to hold the segments in position. However, there is a danger that the segments will be compressed, which may lead to peripheral condylar sag.
Stay updated, free dental videos. Join our Telegram channel
VIDEdental - Online dental courses


