Procedures in Prosthodontics
Michael Fenlon
Crowns and Bridges
Crowns are fixed extracoronal restorations of individual teeth and bridges are fixed replacements for teeth. Crowns and bridges can be supported by natural teeth or by implants but for the purposes of undergraduate clinical practice, tooth‐supported fixed restorations will only be considered here.
Crowns replace the outer part of a tooth and are primarily used to preserve the integrity of extensively restored or broken down teeth. They can be used to restore root canal treated teeth. However, when they are used to restore vital teeth, up to 20% of these may lose their vitality over the subsequent 5 years. Therefore, crown preparation should be prescribed cautiously, particularly for vital teeth in younger patients where tooth pulp size is at a maximum. The indications for crowns include:
- Protection of weakened tooth structure following root canal treatment.
- Support to weakened tooth structure following extensive coronal restorations, caries or tooth wear.
- Changes to shape and colour of teeth.
- Replacement of existing crowns.
Treatment Planning
Treatment planning is the cornerstone of successful restorative dentistry. The essential steps in treatment planning are:
- Thorough history.
- Careful examination.
- Appropriate special tests.
- Diagnosis.
- Prevention of further disease.
- Preliminary treatment – stabilisation of disease.
- Definitive treatment usually involving crowns and bridges.
For fixed prosthodontics, the standard history and examination should be augmented with specific examination of the partially dentate mouth and of teeth that may be crowned or used as bridge abutments (Table 19.1).
Table 19.1 Oral examination of relevance to fixed prosthodontic.
| Condition of soft tissues | |
|
Gingival biotype determines the thickness of the gingival margins and susceptibility to recession around restorations. |
|
If the lip line is high crown margins and the interface between the crowns and the gingival will be visible, potentially compromising appearance. |
|
Complex prosthodontics requires healthy periodontal supporting tissues. The BPE is a screening tool used to identify at‐risk patients. When levels are recorded above 3, a full mouth periodontal examination is required. |
| Abutment considerations | |
|
How do the opposing teeth meet? Will they meet the crowned tooth in maximum intercuspation, in lateral excursions, in protrusion? Is there enough space for a bridge pontic? Have the opposing teeth over erupted? |
|
Crowns, fillings etc. Endodontically treated? |
|
Tooth wear can lead to short clinical crowns which reduce the amount of tooth tissue necessary for retention of crowns. Tooth wear can be caused by bruxism, a very unfavourable indicator for longevity of crowns and bridges. |
|
Tilted or angled teeth need to be assessed particularly if bridges are planned. Consideration needs to be given to orthodontics or when bridges are possible, cantilever or fixed movable designs. |
|
A positive response will improve the longevity and prognosis of any restoration. Loss of vitality and subsequent endodontics reduces the available tooth tissue. Teeth with extensive restorations and root‐filled canals have a lower prognosis than vital teeth. |
|
Mobile teeth tend to have poor prognosis. |
|
Abutment teeth should be periodontology healthy. |
Any treatment plan should include prevention and treatment of existing conditions, including caries, periodontal problems and endodontic issues. The placement or replacement of fillings, posts, cores and other primary or foundation restorations must be successfully completed before commencing construction of crowns and bridges.
Procedure: Crown Preparation
Following treatment planning, radiographic examination, sensibility testing and the preoperative procedures detailed in Table 19.2, a polyvinylsiloxane (PVS) temporary crown matrix is required (Figure 19.1). In some cases, a diagnostic wax‐up and thermoplastic former may be required if it is necessary to change tooth alignment, shape and/or occlusion.
Table 19.2 Stages in crown or bridge construction.
| Stage | Aims of stage | Materials and aids |
| Choose design of bridge |
|
|
| Primary impression stage |
|
Alginate or polyvinylsiloxane (PVS) putty. |
| Temporary crown matrix |
|
PVS putty. |
| Jaw relation record |
|
Use partial denture type wax rims if necessary. |
|
Temporary crown and bridge cement. | |
| Fit stage |
|
Fit checker. |
|
Articulating paper. | |
|
||
|
Resin‐based or glass‐ionomer cement. |
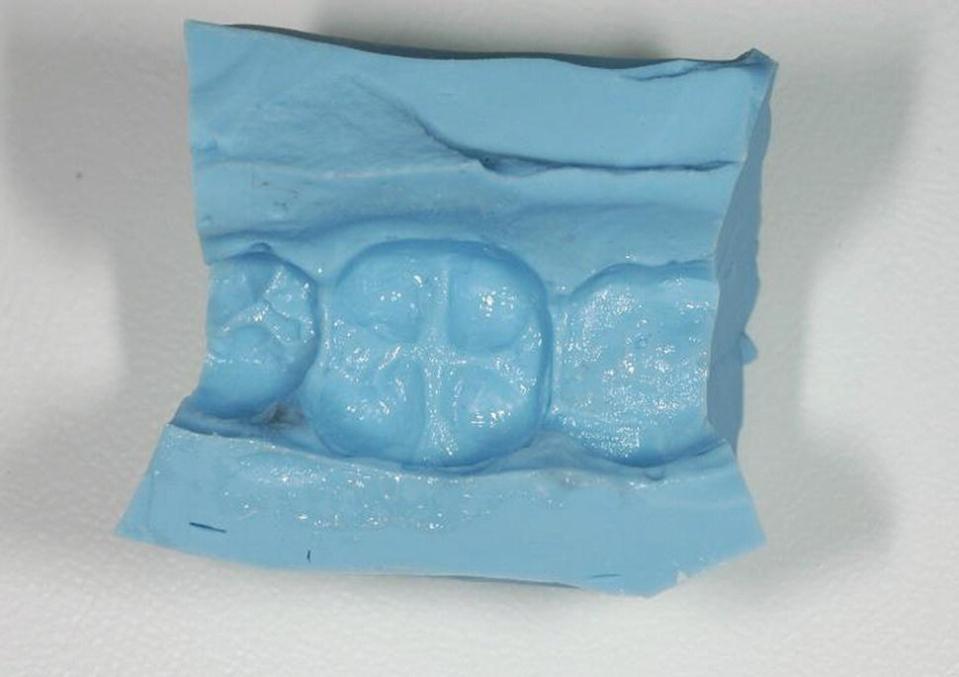
Figure 19.1 Prepreparation, single tooth, polyvinylsiloxane matrix for the construction of a temporary crown.
The phases of tooth preparation will depend upon personal choice and training (Table 19.3).
Table 19.3 Procedure for preparation for porcelain‐fused to metal anterior and posterior crowns.
| Incisal/occlusal reduction | Incisal/occlusal reduction: depth orientation grooves <2 mm deep. |
| Buccal/facial reduction | Buccal depth orientation grooves in three planes to facilitate curved facial reduction of 1 mm for porcelain and 0.5 mm for metal (Figure 19.2). |
| Buccal/facial shoulder | Shoulder, 1.5 mm wide, with well‐defined margin to accommodate porcelain and metal alloy. Continue shoulder preparation interproximally, breaking contacts without damaging proximal surfaces of adjacent teeth. The vertical orientation of the bur should remain constant when forming the buccal and interproximal shoulder (1.5 mm wide). Most of the retention for the crown is derived from the proximal surfaces. |
| Proximal and palatal reduction | Complete axial reduction, including the palatal surface, using a chamfer bur if a metal surface is planned, with the chamfer finish line blending into the proximal shoulder line smoothly. Axial reduction of 1.5 mm using a flat‐ended tapered bur, if porcelain fused to metal surface full coverage is planned. The shoulder finish line must be continuous around the tooth. The vertical orientation of the bur used for this should be the same as the orientation used for facial and proximal reduction. |
| Cingulum reduction | In anterior teeth use a round or (American) ‘football’ shaped bur to complete the preparation, reducing the cingulum by <1.5 mm, depending on the proposed design of the crown. |

Figure 19.2 Buccal reduction in the preparation of a maxillary premolar for a full crown.
During any tooth preparation, excessive cutting pressure should be avoided as this can result in rapid focal heating of tooth structure, causing pulpal damage which may be irreversible. Tooth cutting should be done with controlled, light, constantly changing contact between tooth and bur, thus allowing maximum cooling effect while minimising frictional heating. Some authors decry the use of depth orientation grooves, citing the risk of overheating the base of grooves during preparation. An alternative to using depth orientation grooves is the use of polyvinylsiloxane (PVS, addition‐cured) silicone putty overcasts of the tooth/teeth to be prepared and the neighbouring teeth. A sausage of freshly mixed heavy‐body PVS putty is pressed onto the teeth to be prepared and the neighbouring teeth, covering the crowns of the teeth and adjacent gingival tissues. When set, this is removed and trimmed. During preparation, the PVS overcast is sectioned with a scalpel and the space between the overcast and prepared teeth examined. The width and contour of this space represents the amount of tooth removed.
Management of Soft Tissues
Ideally all crowns and bridges should have supragingival finish lines with emergence and contour profiles similar to those of natural teeth. Such arrangements minimise damage to the soft tissues during preparation, possibly make the use of a retraction cord unnecessary, reduce the risk of postoperative gingival recession and increase the likelihood of a good clinical outcome, including the aesthetic qualities of the completed crown. However, many teeth to be crowned have existing restorations with subgingival margins that need to be included in the preparation. Wherever possible, subgingival preparations should be confined to critical aesthetic areas and where existing restorations already have subgingival finish lines.
In the aesthetic zone, subgingival preparations should be confined to <1 mm within the gingival crevice.
When undertaking subgingival preparation, it is essential to minimise damage to the soft tissues. It is advisable to use a flat plastic instrument to protect the tissues where there is a high risk of iatrogenic damage. If the soft tissues are traumatised, it is often impossible to achieve haemostasis adequate for impression taking on the same visit. In these circumstances, it may be necessary to temporise and record the definitive impression at a subsequent visit.
Temporary Crowns (Table 19.4)
Table 19.4 Procedure for the construction of a temporary crown.
| Prior to tooth preparations | Polyvinylsiloxane (PVS) matrix (Figure 19.1) formed, or thermoplastic blow‐downs constructed in the laboratory, using the primary models. If the shape of a temporary crown is to be altered from that of the unprepared tooth, modifications can be made using a diagnostic wax‐up on the primary model prior to overcast construction. This approach is essential if a temporary fixed bridge is planned. |
| Making a temporary crown with a PVS matrix | After preparations are complete, check that the PVS matrix fits well, examining where the cut surfaces of the overcast abuts the proximal teeth. Fill the indentation in the overcast representing the tooth to be temporised with a temporary crown and bridge material. Insert and seat firmly the filled matrix, checking that it is fully home. Excess material will be visible. Once the temporary crown and bridge material has set, remove the matrix, separate the matrix and the temporary crown, and check the crown for thickness and the absence of deficiencies. If the thickness of the crown is insufficient to function in clinical service or it includes deficiencies, then a remake may be indicated, possibly following further reduction of the tooth. |
| Adjusting a temporary crown | Trim marginal excess off the temporary crown until the margins match the margins of the prepared tooth, with neither horizontal nor vertical discrepancy between the margins of the crown and the margins of the preparation. The emergence profile and contour of the crown should be preserved during adjustments. The trimmed margins of the crown should be finished using an appropriate finishing system. |
| Trial insertion of temporary crown | Insert crown and check:
|
| Cementation of temporary crowns | Temporary crowns should be cemented with an appropriate provisional cement. If correctly seated during cementation the occlusion should not change. Nevertheless, the occlusion should be rechecked after cementation and any necessary adjustments made. All excess cement, particularly interproximal and subgingival cement, should be eliminated. |
Temporary crowns serve several important functions:
- Protection of exposed dentine: this prevents sensitivity for the patient and reduces the risk of pulpal death due to exposure of prepared dentine surfaces to the oral environment.
- Preservation of relative positions of prepared and proximal teeth ensures that the definitive crown should fit with firm proximal contacts.
- Prevention of overeruption of opposing teeth – if this happens there may be no space for the definitive crown.
- Restoration of appearance.
- An intraoral assessment of the design of the bridge or crown. Frequent debonding or fractures during the provisional stage will indicate changes are needed to the design of the restoration.
Impression Taking (Table 19.5)
Table 19.5 Procedure for impression taking.
| Checking fit of special/stock tray | Trays should fit comfortably over teeth. Adjust as necessary. |
| Gingival retraction, as indicated clinically | Retraction cord: either single stage or two stage. Place one thin and then one thick retraction cord around each subgingival preparation and leave for 5 min. Then thoroughly wet retraction cord, carefully remove the upper (thicker) cord, and carefully dry with air stream for 30 s. |
| Impression taking | Fill syringe with light‐bodied impression material and load impression tray with either heavy‐body putty (stock tray) or medium‐bodied material (special tray), having placed adhesive on tray 5 min previously. Syringe impression material into gingival crevice. Air blow carefully with three‐in‐one syringe to encourage material into the depths of the gingival crevice. Inject remaining light‐bodied material over the preparation and adjacent teeth. Insert the loaded impression tray, seat carefully and hold in a fixed position in the mouth. Allow the impression material to set. Remove the impression using a technique to minimise distortion. |
| Verification of impression | Carefully wash and dry impression. In good light, preferably using magnification, carefully check impression. There should be no defects or bubbles involving surfaces and margins of the prepared teeth, surfaces of teeth adjacent to prepared teeth and occlusal surfaces of all teeth. All margins should be recorded clearly, with a narrow ‘skirt’ of impression material extending beyond the finishing line of the preparation. Deficient impressions should be re‐recorded. If in doubt, an impression may be cast to assess its sufficiency. Impressions should be disinfected prior to despatch to the laboratory, together with an opposing arch impression and a detailed laboratory prescription. |
Traditional crown and bridgework requires the recording of typically a PVS impression. With the advent of ‘digital dentistry’, impression taking is increasingly being replaced by digital impressioning using intraoral scanners.
Crown Cementation (Table 19.6)
Table 19.6 Procedure for crown cementation.
| Before the patient arrives |
|
| Checking fit of definitive crown |
|
| Checking occlusion of definitive crown |
Any margin or surfaces of a crown that has been adjusted should be polished until all visible evidence of adjustment has been eliminated. |
| Assessment of appearance | A good appearance meeting the patient’s expectations is essential for success. Both the patient and the clinician should be happy with the appearance before cementation. If the metalwork fits well, but the shade or contour of the crown is unacceptable, it may be possible to have the ceramic part of the crown redone. Otherwise, new impressions and a remake may be indicated. Do not cement crowns that the patient does not like or has uncertainties about. |
| Cementation |
|
| Review | It is good practice to review cemented crowns a week or so after placement. The review should verify that fit is acceptable, the occlusion is as intended, no excess cement has been overlooked, especially interproximally and subgingivally, and the patient is satisfied with the clinical outcome. |
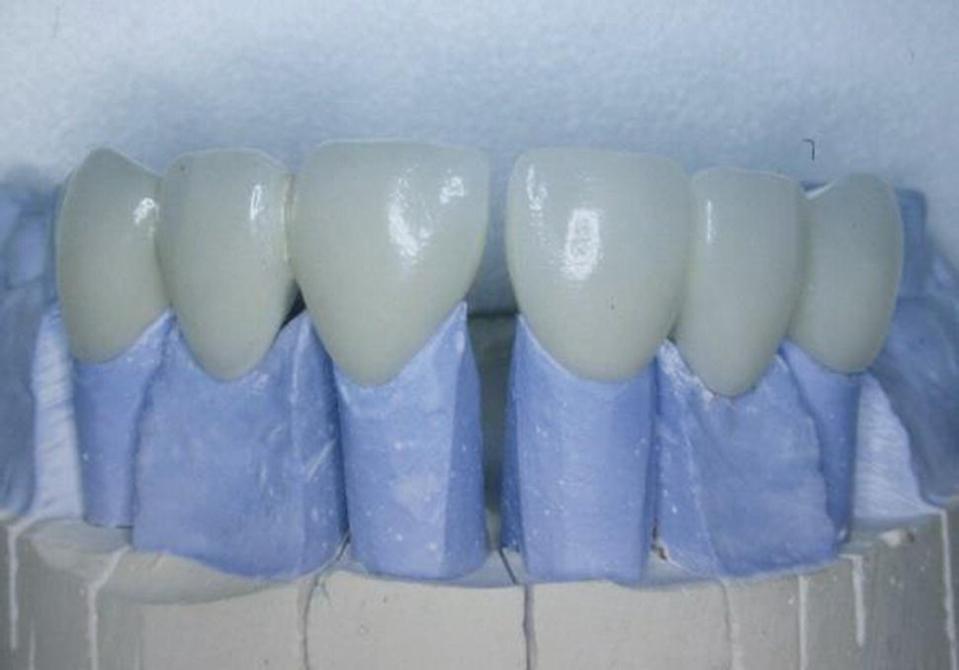
Figure 19.3 Do the crowns fit the dies?
To be able to deal with difficulties experienced during the cementation of crowns and bridges, clinicians need to have a good working knowledge of all relevant laboratory procedures.
Bridges
Bridges comprise retainers (the part of the bridge attached to abutment tooth/teeth) and pontics (the prosthetic replacement tooth attached to the retainer or retainers).
Retainers can be:
- Conventional (the abutment is prepared for a crown and the retainer is a crown incorporated into the bridge structure).
- Minimal preparation (light preparation within enamel or no preparation) which rely primarily on resin‐based adhesive cements for retention.
Bridge design, whether conventional or minimal preparation, may be:
- Cantilever: one retainer with one pontic attached.
- Fixed–fixed: one or more pontics with retainers at each end and sometimes between pontics.
- Fixed–movable: a pontic with a conventional retainer distally and a ‘male’ component mesially fitting into a slot in the distal of the medial retainer, where the long axes of the abutments is so divergent that parallel preparations would compromise the vitality of the abutment teeth.
Minimal Preparation Bridges
There is a genuine difference of opinion relating to preparations required for minimal preparation bridges. Some clinicians will do preparations as detailed in Table 19.7, others do no preparation whatsoever, and others pick and choose, depending on the circumstances and their personal preferences. The evidence for each approach is not strong and does not favour any specific approach.
Table 19.7 Features of minimum preparation bridges.
| Support | Presence of occlusal support – rests on posterior abutments and cingulum rests on posterior abutments. There is a difference of opinion between clinicians about the need for preparation with some preparing cingulum and occlusal rests similar to those required for cobalt chromium dentures, while others do no preparation. |
| Coverage | Cover should be maximised to maximise resin bonding. Axial preparation within enamel ensures maximum area for bonding, defines a single path of insertion, reduces bulbosity of the retaining wing, lowers survey line, and provides a finishing line which eases wax‐up in the laboratory. Some clinicians feel that such preparations are unnecessary. |
| Wrap around | Ideally the retentive wing should wrap around the tooth by at least 180°. This can be done by extending the retentive wing from the embrasure close to the contact distant to the pontic all the way around to the pontic/facial line angle. Those clinicians in favour of preparation will prepare vertical parallel grooves in the distant embrasure and at the pontic/facial line angle. The grooves are tapering with parallel long axes, a maximum depth <1 mm and confined to enamel. They are said to give a single path of insertion and withdrawal, edge strength and clear finish lines for the laboratory. |
| Occlusion | Occlusion on pontics is confined to light centric stops only. |
Endodontically Treated Teeth
Teeth are weakened by endodontic therapy. Endodontically treated teeth are associated with a marked increase in the failure of bridges, so these teeth should, wherever possible, be avoided in the selection of bridge abutments. Endodontically treated teeth often require crowning because of the loss of tooth tissue associated with the reason for the root treatment (caries, trauma), endodontic access and preparation of the root canals. Root canals can be used to support a coronal restoration. Posts can be either cast or directly placed. Direct posts are made of either metal or fibre. The placement of posts and cores, in particular bonded posts and cores, requires fastidious moisture control and exact compliance with manufacturer’s directions for use.
Crowns and Mandibular Incisors
Mandibular incisors are usually unsuitable for crowns because of their small size and tapering nature cervically. Therefore, every effort should be a made to avoid crowning mandibular incisors, many of which may be successfully restored using bonded composites, veneers or combinations of bonded composites and veneers.
Partial Dentures
Partial dentures are removable prostheses that replace some, but not all the teeth in a dental arch. Partially dentate patients comprise about 21% of the adult population in the UK, and are mostly 55 years of age and older. While the edentulous proportion of the adult population has fallen from 37% in 1968 to less than 10% in the UK, the proportion of partially dentate patients is increasing with increasing longevity and individuals retaining more teeth into old age.
Partial dentures are associated with poor oral hygiene and increased levels of root and coronal caries, and with increased levels of at least gingivitis, particularly in the arch of teeth in which a partial denture is worn.
Treatment Planning
To provide each patient with the most suitable partial denture(s) to address individual needs, while minimising risk to the remaining dentition, a careful considered treatment plan should be formulated before any denture treatment is undertaken.
For partial denture prosthodontics, standard history and examination procedures should be augmented by a history and examination specific to the partially dentate mouth and existing dentures (Tables 19.8–19.10).
Table 19.8 Partial denture history.
| Question | Relevance |
| Presenting complaint | If the presenting complaint relates to faults and deficiencies in partial dentures and these faults and deficiencies are not addressed, new dentures may fail for the same reasons. |
| Medical history relevant to wearing dentures: | |
|
Reduced saliva impairs denture wear and increases caries rate. |
|
Neurological conditions impair the oral control needed for the successful wearing of dentures. |
|
Poor healing, reduced saliva and risk of oral infection including denture sore mouth. |
|
Lichen planus, pemphigoid and oral ulceration inhibit denture wear. |
|
Increased risk of bisphosphonate osteonecrosis with extractions. |
|
High oral cancer risk, together with increased risk of caries and periodontal disease. |
Dental history:
|
Ridge resorption related to time since extractions. Susceptibility to caries and periodontal disease? |
| Denture history: | |
|
Frequent denture provision associated with reduced success – poor prognostic indicator. |
|
No successful dentures indicate very poor prognosis. |
|
No recent successful dentures indicate poor prognosis. |
| Oral cancer examination. | Partial denture patients may have high oral cancer risk due to age and habits. |
| Condition of soft tissues: | |
|
Chronic conditions of oral mucosa impair denture wear. |
|
If ridge is tender to digital palpation, denture loading will cause discomfort. |
| Condition of the residual alveolar ridges: | |
|
Should be eliminated before denture construction. |
|
Poor ridge quality may impair support and stability of partial dentures. |
|
Unfavourable for successful denture wearing – consider surgery. |
|
Inadequate space for partial denture should be recognised at the outset. |
|
Complicates partial denture design. |
| Condition of the abutment teeth: | |
|
Root length? Periapical condition? Endodontic status? Bone levels? Hidden caries? |
|
Crowns and restorations present. |
|
Endodontically treated teeth have poor prognosis as abutments. Endodontic complications? |
|
Mobile teeth have poor prognosis as abutments. |
|
Abutment teeth should be healthy. |
|
Kennedy classification. |
Table 19.10 Intraoral examination of dentures.
Stay updated, free dental videos. Join our Telegram channel
VIDEdental - Online dental courses


