Chapter 10
Practice of Dentistry
The modern dental office is truly a high-tech/high-touch environment. As a professional group, dentists have, for years, been well attuned to marketing and customer satisfaction. This may be due to the fact that, as the incidence of tooth decay and gum disease decreases, many dental procedures have become elective in nature—unlike medical procedures, which are generally not elective. In dentistry, with the exception of oral surgery, endodontics (root canal therapy), and sometimes periodontics (gum surgery), many treatments are done less for curing disease and restoring health than for quality of life. For this reason, cosmetic (aesthetic) dentistry has continued to be an aspirational desire for many men and women.
Historically, dentists were among the first to advertise, to use color-coordinated uniforms, open offices in shopping malls, and to attend seminars on office design, stress reduction, and the psychology of creating a positive experience for patients.
Some dentists have what is called a values-driven practice, in which the staff members have been trained to redefine their roles. The practice philosophy of “drill, fill, and bill” is replaced with one of bringing wellness to patients and improving the quality of their lives. Staff are trained to listen to patients, interpret behavior, and respond positively to confrontation and problems. Employees learn pleasant telephone manners and how to discuss financial arrangements without offending patients. Dental teams are aware of their self-image. They practice time management and stress reduction, and they set goals together. A values-centered staff makes it easier for patients to accept and want fine dentistry.
Progressive dentists with finely tuned management skills are a source of many satisfying design projects. These dentists want both their personnel and their physical environment to make people feel comfortable and confident about receiving care. To satisfy these dentists, the dental design specialist must be continually educated in changes in technology and in dental practice management. Fortunately, with the Internet, superb educational resources are available to anyone willing to spend the time visiting websites of the professional dental associations and dental practice management magazines, as well as various websites developed by dentists for the benefit of their colleagues offering advice on incorporating technology into their practices. Dentists, as a group, have historically embraced new technology, rather than feared or resisted it.
Author’s Comment: Every effort has been made to represent a wide variety of equipment manufacturers while, at the same time, looking at market leaders in each modality. With the limitation on quantity of photos and the overarching goal of familiarizing the design professional with equipment and instrumentation, choices were made in consultation with knowledgeable industry leaders. Many fine products each with unique features offer dentists a huge range of options to satisfy personal preferences.
An expression of thanks goes to Lee Palmer for his generosity in sharing his expertise and depth of experience in dental planning and equipment to help make this chapter thorough and useful to the widest number of readers.
Major Changes in Professional Practice and Technology
Much has changed in the way dentists practice, which makes this an exciting time to be learning about how technology is impacting the flow and efficiency of the modern dental office. Electronic medical records (EMR) can be found in many offices, integrating computers into every treatment room. Many monitors now have the computer built into them and, with wireless keyboard and mouse, they can be positioned anywhere the doctor wishes. Flat screen monitors are in the ceiling above the patient for entertainment and also to be able to see the examination that the doctor or hygienist is doing in real time. Another monitor in front of the assistant is used for charting the findings. Advances in diagnosis make this even more important because now the doctor or hygienist can use an FDA-approved diagnostic camera and, with 97 percent accuracy, find decay inside the tooth, between teeth, or around leaking restorations. And this is done without radiation. Another camera, The Spectra®, by Air Techniques, uses fluorescence technology to highlight areas of plaque, calculus, and caries. Cariogenic bacteria appear red, while healthy enamel appears green on a monitor. These cameras reduce the reliance on X-rays for diagnosing decay.
New products and tools currently available that are destined to become mainstream are 3D cone beam computed tomography (CBCT), digital radiography, and a handheld X-ray device called NOMAD PRO™ that is carried from room to room. There are CAD/CAM systems that create electronic impressions (no more gooey mess in the mouth) and send images to a milling machine in the dentist’s office to create crowns, inlays and overlays, thereby eliminating the need to have a temporary crown and the inconvenience of returning two or three weeks later for delivery of the permanent crown. This technology is expensive, however, and dentists will prioritize their purchases according to the specifics of their respective practices and a return on investment analysis. As an example, a dentist may decide not to own the milling machine (the “CAM” in the CAD/CAM designation) and, instead, send the digital impressions and design of the restoration to a milling lab for fabrication. In this case, the patient does have to return for another appointment but often the timeframe is days, instead of weeks. Dentists with mature practices who are thinking of retiring in a few years may not wish to make a sizable investment in technology but not having digital X-ray, for example, may make it harder to sell the practice to younger practitioners. Clearly, as dentists emerge from dental schools trained to use the latest technology, their expectations will have been set by exposure to the benefits of these advances.
LED dental lights are replacing halogen lights, thereby reducing heat and power consumption while improving illumination. LED lights are also commonly used now for curing dental materials and not only do they reduce cure times from 60 seconds to less than 5 seconds per cure, they are handheld and cordless. Small diode lasers, some now cordless and handheld like a pen, are proliferating for soft tissue procedures and will increasingly be found in every treatment room.
Screening for oral cancer falls to dentists as the first-line-of-defense health professionals to be able to identify, at an early stage, suspicious lesions and masses in the oral cavity and pharynx. Since 1996, when the CDC convened a major conclave to review and discuss this topic, followed by another such event in 2001, they have continued to produce recommendations and reports and keep the spotlight on this public health issue. These types of cancers are hard to treat and do not have good prognoses. Often the treatment is disfiguring. Those who have used tobacco and alcohol are more at risk as are younger persons and adults who have engaged in contact sports. A product like the Dental Oral Exam (DOE) by DentLight raises the bar on this type of screening and one would hope, as more dentists become familiar with this and other cancer screening modalities, that it becomes part of an annual checkup.
The Changing Environment of Diagnostic Dentistry
An optimal examination using all the technology currently available would start with digital panoramic and extra oral bitewing radiographs using minimal radiation and taking less than five minutes total time. Once seated, the exam would continue with the doctor looking at the X-rays with the patient sitting upright in the dental chair. Next, the patient would be reclined to examination position and the doctor would begin the head and neck examination and proceed intra-orally for that part of the cancer screening with the Dentlight DOE filter. Afterward, the doctor would use the SoproLife or SoproCare intraoral camera (Acteon) or the Polaris® (Air Techniques) to chart existing conditions and then use the decay-disclosing camera Spectra® (Air Techniques) or the caries detection setting of the SoproLife or SoproCare to examine for active decay. With the SoproCare camera the examination could continue by documenting gingivitis, calculus, and plaque build-up. All of this is done without exposing patients to radiation.
Green Design and Sustainability
Numerous projects in this book have achieved LEED® certification, a process that is discussed in detail in Chapter 13. A very forward-thinking oral surgeon took this to new heights in designing his office in a high-rise office/residential tower in San Francisco. For details and photos, see “Unique Projects” at the end of this chapter.
HIGH-TOUCH PATIENT AMENITIES
Many adults dread a visit to the dentist as a result of painful and frightening childhood experiences. When they enter the treatment room, their blood pressure becomes elevated, muscles constrict, and stress hormones are released into their bloodstream in a classic “fight-or-flight” response. This prevents many from seeking anything other than emergency care for an abscess, root canal, or periodontal disease that may have progressed to an advanced state. These individuals do not seek elective procedures or cosmetic dentistry. However, if they have a positive treatment experience that is relatively painless and interventions are in place to relax them and to reduce stress, it is possible to change their negative childhood associations. The overall ambience of the office from the time they enter the waiting room is the first line of defense (Figures 10-1, 10-2, and 10-3; and Color Plate 32, Figures 10-149 and 10-150). First impressions do matter. Interesting ceiling design, indirect lighting, art glass, an open and welcoming reception desk, and color palette can do much to put people at ease (Figures 10-4, 10-5, 10-6; Color Plate 25, Figures 10-7a and b; and Color Plate 32, Figures 10-149 and 10-150). In the dental treatment room, amenities such as DVDs or videos are very effective as positive diversions (Figure 10-8 and Figure 10-9). Offering options and choices allows patients to feel more in control in a threatening situation.
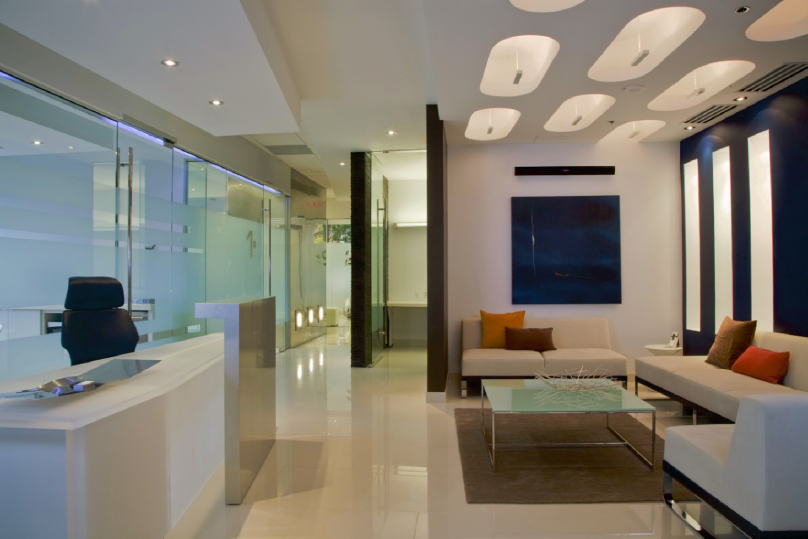
Figure 10-1. Reception waiting area.
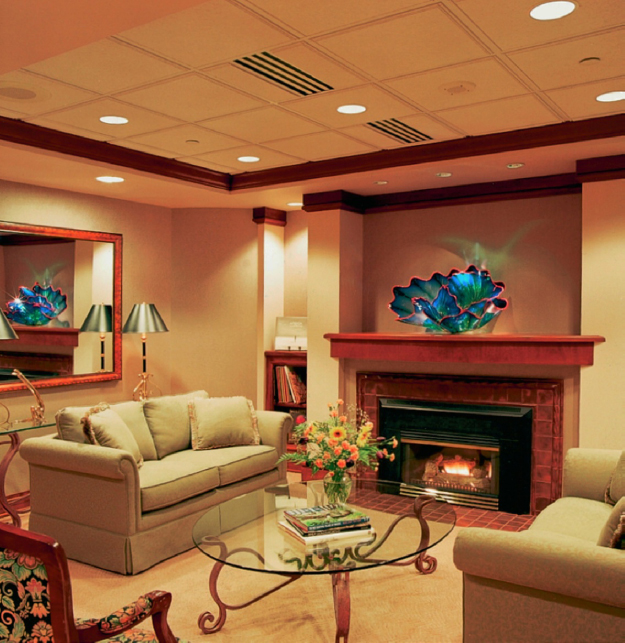
Figure 10-2. A living room ambience focusing on a fireplace creates a comfortable waiting experience for patients.
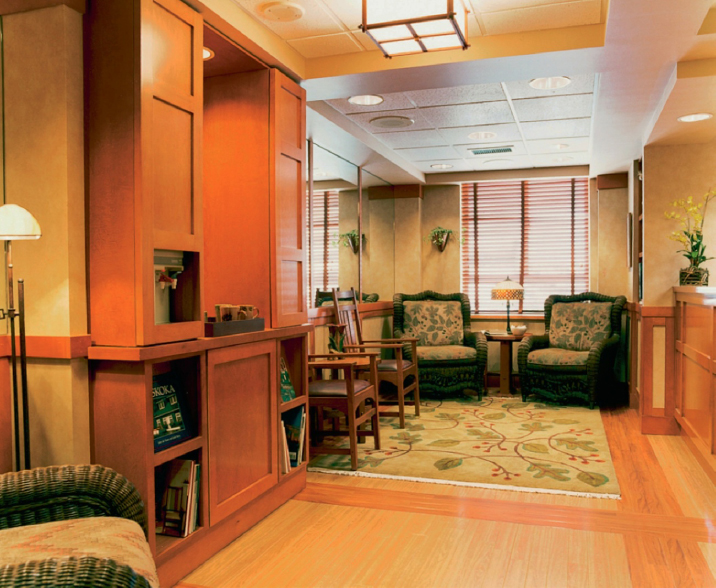
Figure 10-3. Casual furniture and residential-style accessories create a relaxed waiting environment for patients. Note the built-in hot and cold water dispenser.
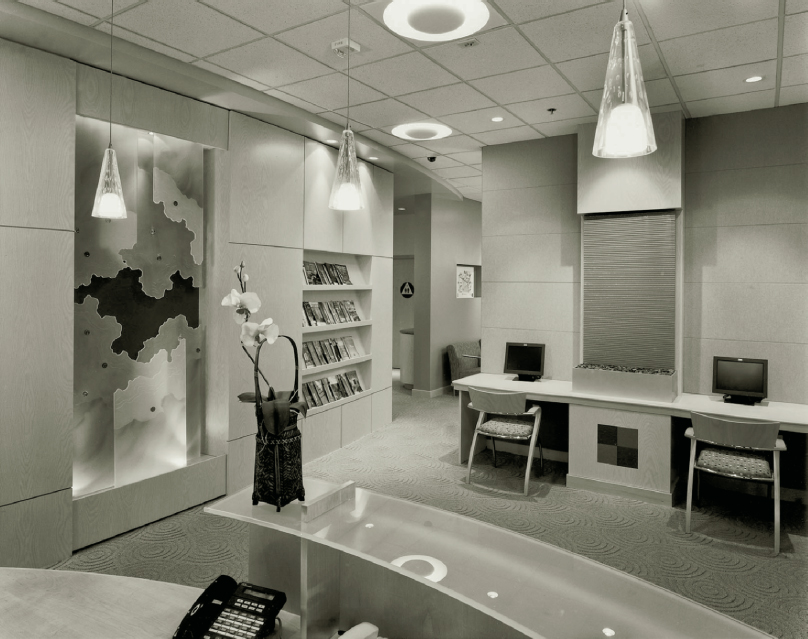
Figure 10-4. Check-in and reception, faculty dental practice.
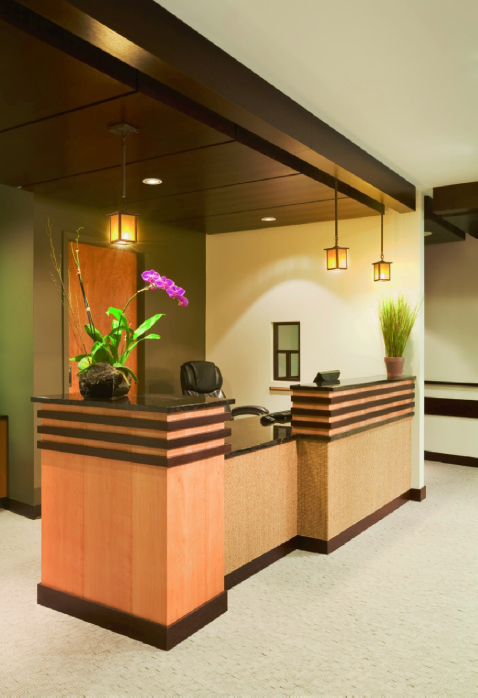
Figure 10-5. Reception desk.
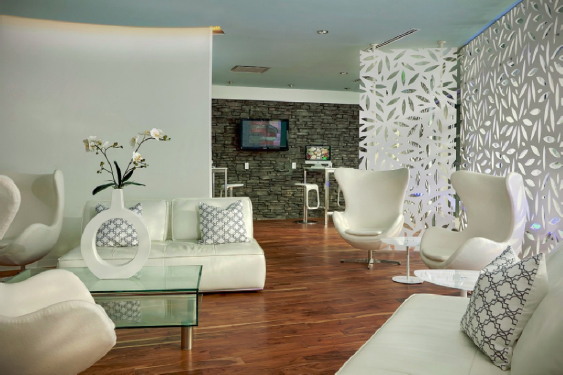
Figure 10-6. Waiting area, Atlanta Dental Spa.
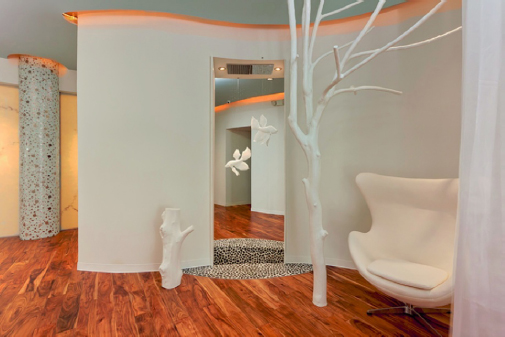
Figure 10-7a. Water feature in waiting area, Atlanta Dental Spa.
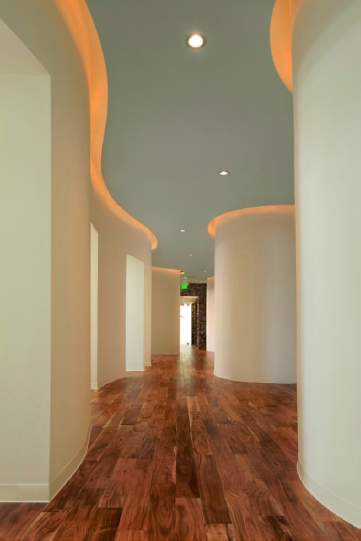
Figure 10-7b. Internal hallway, Atlanta Dental Spa.
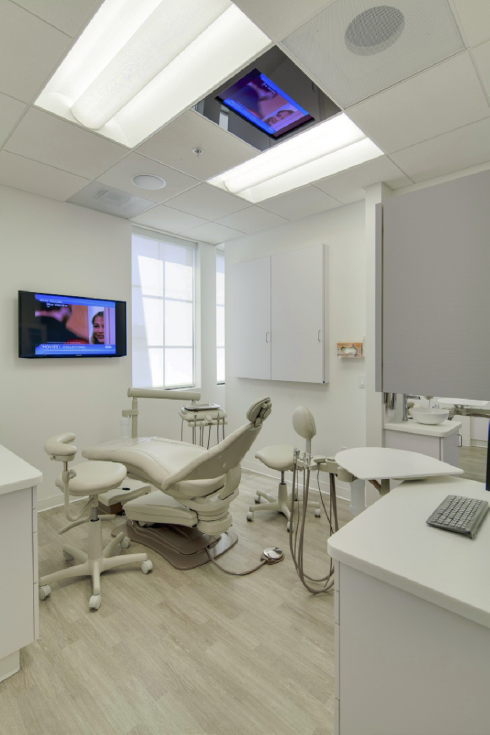
Figure 10-8. Dental treatment room with flat panel monitor in ceiling.
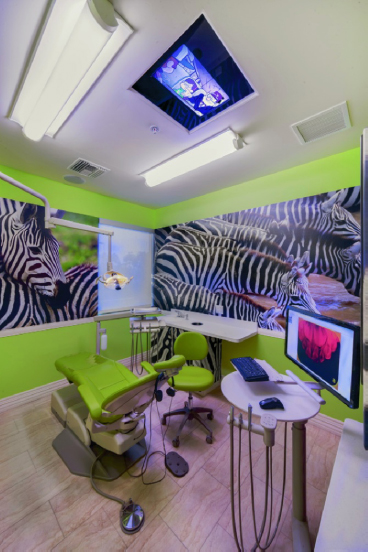
Figure 10-9. Pediatric dental treatment room.
There are no lengths to which dentists will not go to make patients feel comfortable and relaxed. Some of these amenities include an electric massage pad laid on the dental chair, heated aromatherapy pillows, a warm blanket, hand or foot massages, pedicures, chairside CD player with headphones, virtual-reality glasses, ceiling-recessed monitor with video movies, a glass of wine prior to treatment, hot towels and fruit juice at the end of treatment, the aroma of freshly baked bread for early-morning arrivals, and a great selection of magazines. Dental spas offer a number of massages, facial, and manicure options post treatment. Research shows clearly that having options and choices reduces stress and one of those choices should be “no bells and whistles.” Nevertheless, it is worthwhile to distract and entertain patients in the treatment room since a considerable body of research demonstrates that such diversions are highly effective in reducing stress, especially in a clinical setting.
INTERVIEW QUESTIONNAIRE—AN IMPORTANT DESIGN TOOL
Dentistry allows for highly personalized practice methods, which must be set by the dentist before the space planner can begin. The interview questionnaire in the Appendix of this book is useful for documenting practice preferences and equipment. Prior to filling out the questionnaire, a general discussion should occur relevant to the doctor’s long-term goals—perhaps a 10-year plan. Is the goal to bring partners into the practice, to get this one going and then open other locations, or to retire in 10 years and sell the practice? This information will influence the project budget, space allocation, room for growth, and equipment selections.
The information gathered from the questionnaire can be translated into an effective space-planning program. Occasionally, dentists moving into new offices will bring outdated dental equipment with them, which might necessitate a less-than-optimal treatment room layout. Others buy sleek, state-of-the-art equipment that allows the designer to create an efficient treatment room. This chapter will acquaint the designer with the equipment and general requirements for the practices of general dentistry (including prosthodontics and cosmetic dentistry), pediatric dentistry (pedodontics), orthodontics, periodontics, oral surgery, and endodontics. While guidelines will be given, remember that the organization of dental offices is somewhat less standardized than that of medical facilities, owing to the number of options in size and design of the operatory or treatment room. The equipment, the location of casework, and the preferred style of delivery of instrumentation (rear, over the patient, or side) will determine the size and layout of the treatment room. As an aside, the preferred term for operatory is now “treatment room” unless surgery is performed there, as in oral surgery, although many dentists still use the term “operatory.”
Therefore, although there is an optimal design of a treatment room, other choices will also be presented. That which is common to all dental suites will be discussed under General Dentistry. Modifications required for other dental specialties will be discussed thereafter.
PLAN THE SPACE BEFORE SIGNING A LEASE
Dentists tend to do the same thing that physicians do—namely, to lease a space prior to engaging a space planner. While the dentist may know that he or she needs four treatment rooms to be functional, without a space plan, it will be impossible to know how that space will lay out and if it will yield four treatment rooms of optimal size. This is affected by the shape of the space and the location of structural columns, as well as the overall dimensions of the area, and perhaps the desire to have north light in the treatment rooms. A wiser course of action is to meet with a space planner prior to committing to the space. If the configuration of the space results in an awkward layout, undersized treatment rooms, and poor adjacencies with respect to critical functions such as sterilization and overall flow through the office, it is better to recognize these conditions early rather than have to live with them for the next 10 years or more. Another space in the building may be available that would result in a better layout. As dentists know well, efficiency makes a tremendous difference, whether it is a convenient reaching distance while seated at the dental chair, the number of staff it takes to run the office, or the resulting stress inefficiency places on the dentist and chairside assistants as they move through a busy schedule.
Extraordinary Teamwork Required
The design and construction of a dental office require a level of team collaboration and coordination that has no parallel in the design of a medical office. A matter of inches can make a critical difference in the efficiency of a treatment room. The interior designer or architect’s role is analogous to that of a symphony conductor, carefully timing and integrating all the instruments or, in this case, the work of the dental equipment planner, computer network specialist, audiovisual media consultant, electrical and mechanical subcontractors, and dental equipment installers. A good general contractor experienced at building dental offices is essential. The complexity of this effort cannot be overestimated—precision is everything.
CODES AND REGULATORY AGENCY REVIEW
A review of codes should start with the State Business and Professions Code if one exists. The State Dental Board and Public Health Department should also be consulted. Any or all of the above may have policies and procedures relevant to infection control, pharmaceutical control log, calibration of equipment, patients’ rights, and so forth, some of which have no impact on the physical design of the office. If the dentist uses general anesthesia or a type of anesthesia that renders the patient incapable of self-preservation in an emergency (oral surgery, and possibly pediatric, or restorative/aesthetic dentistry cases), this triggers many code issues as the patient is deemed “at risk for loss of life-preserving protective reflexes.” In some states, the use of general anesthesia mandates licensing by the department of health services, Medicare certification, or accreditation by a recognized agency. These issues are explained in detail in Chapter 5 under Plastic Surgery, headings Office-Based Surgery and Accreditation, Licensing, and Medicare Certification. See also Chapter 8, under Ambulatory Surgical Centers, heading Storage of Medical Gases, and Chapter 14, Researching Codes and Reference Materials.
Americans with Disabilities Act
The Americans with Disabilities Act (ADA) applies to medical and dental offices. Most architects and designers are very familiar with ADA regulations. Since there is no formal local enforcement of this national civil rights legislation, it is local building departments that review it during the plan check. Building inspectors can be quite rigorous about compliance to the point of taking out a measuring tape and not approving a door setback that is supposed to be 18 inches on the pull side, if it falls short by even an inch. The same is true for toilet rooms, all of which must be ADA compliant unless they have access only from the doctor’s private office and that person is an owner of the building.
However, based on discussions with a number of architects and planners of dental offices, it seems that the ADA is interpreted differently by building departments even within the same region with respect to treatment rooms and task areas such as sterilization. For example, since a person in a wheelchair may not be able to perform the tasks required of a dental assistant in the treatment room or sterilization area, the 36-inch clearance for a wheelchair on the assistant’s side of the room may not be required, nor would the opening for room entry, in this case, be required to be 36 inches since the opening on the dentist’s side would be 36 inches. Other jurisdictions require 36-inch clearance on all sides of the dental chair as well as wheelchair clearance under every sink in a treatment room. It has been reported to the author (but not verified) that OSHA has an interpretive newsletter that, in essence, states that task-oriented stand-up workstations at the ADA limit of a 34-inch height can injure the worker’s back. As a result, in some jurisdictions sterilization workstations are approved at the 36-inch height.
Dentists are accustomed to packing a lot into small spaces. Small labs, or break rooms with doors opening into the room barely scraping the edge of the cabinet are no longer possible under the design restrictions of the Americans with Disabilities Act. All rooms must be wheelchair accessible and have an 18-inch wall area on the pull side of the door. The use of pocket doors solves some of these problems although the traditional type that slide into the wall are not aesthetically appealing and are a nuisance to access when needing repair. In recent years, sliding doors that travel on the face of the wall called “barn doors” have become increasingly popular as a design statement.
Building Codes and Construction Methods
Refer to Chapters 13 and 14 for relevant information on these topics. In most cases, these issues are the same for medical and dental offices.
Occupational Safety and Health Administration and the Environmental Protection Agency
To avoid redundancy, the reader should refer to Chapter 3, heading OSHA Issues for a discussion of standards affecting medical and dental offices. What follows is a discussion of items specific to dental practices. It should be noted that around the country a number of Occupational Safety and Health Administration (OSHA) compliance consultants are available to dentists and physicians to survey their offices for proper techniques and also to train staff. OSHA regularly inspects dental offices.
EPA Disposal Requirements
Although it is assumed that most dental practices are digital and film is no longer used, there are perhaps some practices that haven’t yet made the switch.
Film Processing
The Environmental Protection Agency (EPA) is concerned with the capture and certified disposal of film-processing solutions or, at least, the fixer. This is in effect in almost all states, although some allow silver recovery systems to process fixer with disposal into the city sewer system. Of course, the darkroom will become extinct as digital imaging becomes even more widespread.
Amalgam and Mercury
In some states, old amalgam removed from patients and collected by traps in the office vacuum system must be disposed of through certified hazardous waste haulers. The amalgam also contains mercury, which is regulated as parts per million (ppm) in the air. More sophisticated gathering methods for amalgam and residual mercury are now available in central vacuum systems.
Lead from Film Packets
The storage of lead from intraoral X-ray film packets after processing and certified disposal is fairly common, but this does not affect design as several years’ collection of wrappers can be compressed into a 1-cubic-foot box. Few offices being constructed today would still use traditional film.
Hazardous Waste and Sharps
There is a gap between what OSHA considers biohazardous (medical) waste within the working environment and what the EPA considers hazardous waste during disposal. OSHA mandates that any material or waste that has contacted saliva or blood be stored within the office in marked waste containers declaring it as biohazardous. This is ostensibly to alert employees not to reach into these waste containers unprotected or to handle the waste during disposal without proper barriers in place. The EPA, however, does not consider the same waste, in general, as hazardous after it leaves the dental office. The concentration of blood and saliva is seldom significant enough to cause a health hazard. The problem lies in the misinterpretation of how to dispose of the waste. If it is red bagged, then the EPA and the waste haulers and landfill personnel must treat it as biohazardous medical waste. However, if it is disposed of properly, no special precautions are necessary during disposal.
Sharps can be stored in a type of sharps container called an Isolyser, which is filled with a high level of liquid disinfectant. Once the container is full, a catalyst powder is added and the solution becomes an impenetrable mass of polymer that seals all of the sharps from the environment. A label is applied over the original BioHazard emblem, declaring the waste as treated, and as solid waste, it can be disposed of like any other trash. Refer to the Casework and Modular Cabinetry sections in this chapter for ideas to accommodate sharps containers and waste collection neatly and out of view in the treatment room. The designer needs to check local codes to see if the office needs a separate storage area (usually a small room or closet near the staff or service entrance) for biohazardous waste until the certified hauler removes it.
OSHA
It should be noted that OSHA has both state and federal agencies. National OSHA standards may be interpreted differently by state OSHA agencies. Both must be consulted.
Hazardous Materials Standard
All materials an employee comes into contact with must be examined for known health or safety hazards and labeled if found to be dangerous. This involves mandatory recordkeeping of an inventory of hazardous products and a readily available book of Materials Safety Data Sheets (MSDS) for reference in case of spills or contact with hazardous materials. Offices must have a dedicated eyewash in any area in which hazardous materials are used (Figure 10-10). It must be placed where an employee can reach it within 10 seconds of occurrence, which generally means placing it in the sterilization area or possibly the dental lab. There has to be a minimum of one in a dental office in a centrally located area. A permanent eyewash station has only a cold-water line. The types of hazardous materials that may be found in a dental office are phosphoric acid, sodium hypochlorite, phenols, and hydrofluoric acid. In the dental lab, fumes from methyl methacrylates and ethyl methacrylates need to be exhausted to the outdoors, not the plenum. This requires a good ventilation fan.
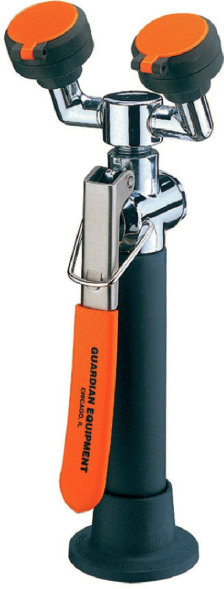
Figure 10-10. GVR5022 vandal-resistant eyewash.
Bloodborne Pathogens Standard
This standard mandates that employees be educated as to the methods of transmission of disease, proper use of personal protective equipment, proper handling of waste and sharps, and the results of accidental needle sticks. Universal precautions should be taken with all patients. An often overlooked design factor is the addition of a washer and dryer within the facility to launder barrier gowns. This also involves a storage area for clean gowns, which have either been laundered in the facility or sent out to a commercial laundry. A hamper is needed to collect soiled gowns until they can be laundered. Putting the washer and dryer or soiled-clothing hamper in the staff lounge is prohibited by OSHA. There must be a definite separation of food, cosmetics, and eye care products from items used in the clinical practice; likewise, one cannot take contaminated items into an area where food is prepared or consumed. A good location for the laundry area is near sterilization as the washer and dryer can be monitored during use. The hamper can be placed in the staff restroom if staff use this for changing clothing, or it can be an isolated hamper next to the washer/dryer. If laundry is sent out to process, the hamper can be placed in the hazardous waste holding room.
Nitrous Oxide Scavenging and Monitoring
OSHA mandates that effective scavenging systems be used during nitrous oxide sedation to prevent over-contamination of the air for dental personnel. Nitrous oxide leaks from the face mask, putting female employees of childbearing age particularly at risk of miscarriage, premature births, and infants born with low birth weight. Some states have mandated that an electronic monitoring system be installed to alert staff when the acceptable level ppm (parts per million) of N2O has been exceeded. Proper placement of this monitoring system is a design factor, which will also impact HVAC design. A high number of air changes per hour is essential in all treatment rooms. Air supply and return should be carefully studied to ensure adequate circulation.
Government investigations determined that water from a dental hand-piece or syringe was considerably more contaminated than water samples taken from public restroom toilets when analyzed by an independent testing laboratory. As a result, many states have enacted legislation mandating that water used during treatment have no more than 200 colony forming units (CFUs) per milliliter of contamination. Dental equipment is designed to incorporate containers that can be filled with distilled water and mounted on the assistant’s cart or on the dental console. In the operatory in Figure 10-11, distilled water is carried by tubing from the cabinet-mounted bottle to the instrumentation. In this case, the dentist uses a small countertop distiller. Water purification systems like Sterisil® (sterisil.com), shown in Figure 10-12, can be placed in a utility room with a dispensing sink on the opposite (corridor) side of the wall or it can be placed in a highly visible area of the suite, as in Figure 10-13, as a marketing tool to emphasize patient safety. This unit can be retrofitted into an existing office by filling bottles at the chair but, in new construction, it can be piped to each chair via food-grade plastic tubing inside PVC conduit from a central location. Looking at the purification unit, the water starts at the left chamber and moves to each successive tank to the right. It passes through a UV light and then is stored in a holding tank. The system needs to be sized to the number of dental chairs and, in addition, must take into account the needs of sterilizers and other items in the lab that require clean water.

Figure 10-11. Distilled water reservoir for dental chair instrumentation.
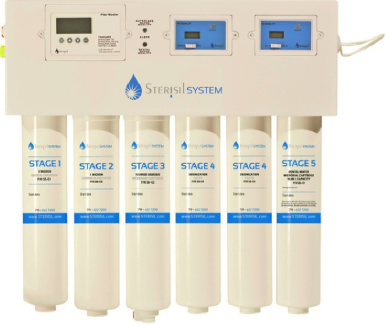
Figure 10-12. Sterisil® centralized water purification system.
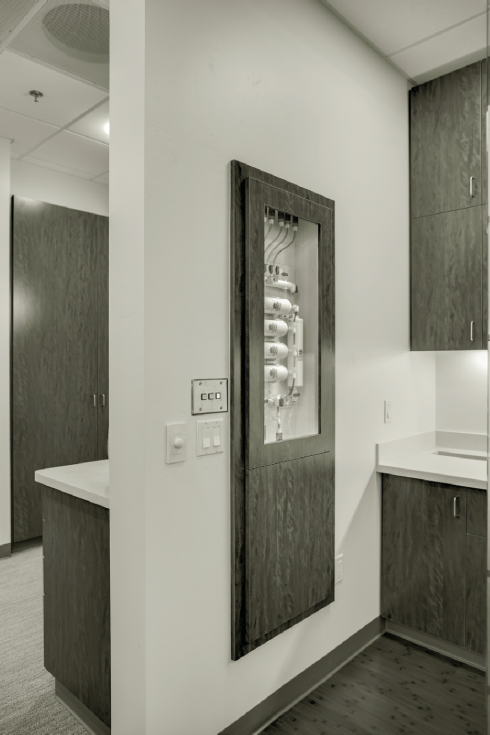
Figure 10-13. Centralized water purification system recessed into the wall.
There are several methods for achieving good water quality in the dental office. Whichever method is preferred, it must be FDA-approved and determined at the start of the project as it affects water supply design criteria.
- Design equipment to no longer use public water and instead use distilled water, reverse-osmosis water, or a new replacement solution. Even daily and weekly regimens for sterilizing or disinfecting the entire self-contained water system, using distilled water, do not guarantee that over-contamination will not occur with regular maintenance.
- Some manufacturers have effected a solution by running the public water supply to the dental units through a device that meters in a product that kills microorganisms and prevents biofilm buildup.
Almost all states and municipalities now require a separate reduced pressure (RP) back-flow preventer on any public water line connected to a dental unit regardless of what devices the dentist has put in place to treat the water. This device is too large to put into the standard dental equipment junction box, so it must be mounted remotely. This can be either cost prohibitive or space prohibitive, in which case, the first solution listed above would be the most practical alternative, as it does not require city water to be plumbed to the dental unit.
Exposure to Radiation
The safe use of X-ray machines is generally regulated by the State Board of Health and assigned to a radiological health subdepartment. OSHA only inspects facilities to make sure they are following these regulations as they pertain to the protection of employees. OSHA, itself, has no specific radiology standards. Regulations affecting the design of dental suites follow.
- Most states require that a health physicist review floor plans and potential locations of equipment to determine proper radiation barrier materials and acceptable locations for operating controls. The physicist will need to know the specifications of the X-ray equipment with respect to radiation emitted and the physicist’s report must be submitted to the building department along with the construction documents.
- The federal minimum barrier requirement for dental-type X-ray machines is a standard wall constructed with wood or metal studs and covered on both sides by one layer of ⅝-inch-thick gypsum board. An operator does not need to be behind an approved barrier as long as he or she is 72 inches or more from the source of the radiation and not in the primary beam trajectory. No one other than the patient can be in the primary beam trajectory, which means approved barriers must exist to prevent exposing staff or patients in adjacent areas during X-ray (Figures 10-14 and 10-15).
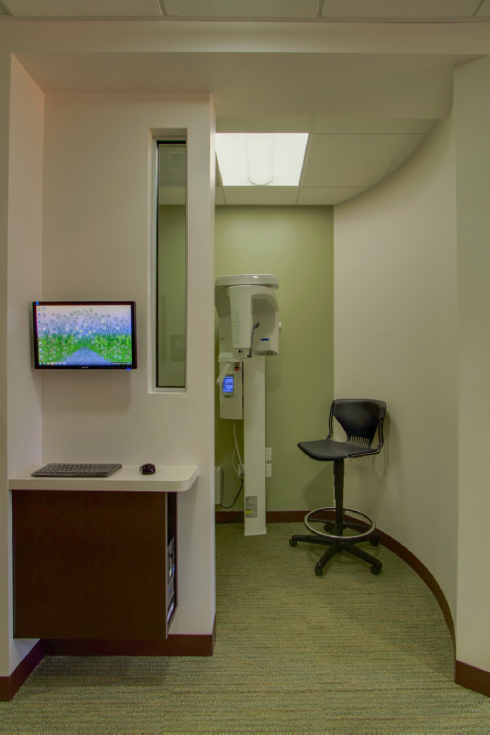
Figure 10-14. Control station for X-ray.
(Design: Kui Tan; Utgard Construction; Photo copyright © Nathan Padilla Bowen)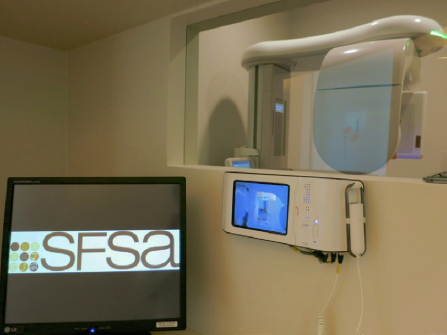
Figure 10-15. Control area for cone beam X-ray, San Francisco Surgical Arts Inc.
(Courtesy of Dr. Nima Massoomi, DMD, M.Ed, MD)- Typically, the only lead barrier requirement is immediately behind a cephalometric X-ray head holder and only if the space behind it is routinely occupied, although some states have more rigorous standards. This may include lead lining in modular dental furniture systems and/or in stud and drywall partitions. When a secondary entrance to the room exists, a photoelectric eye deactivation of the X-ray beam may be required if someone tries to enter during an exposure. Through-the-wall X-ray cabinets may be required to have switches on cabinet doors so that the X-ray will work only when one set of doors is fully closed (Figure 10-16).
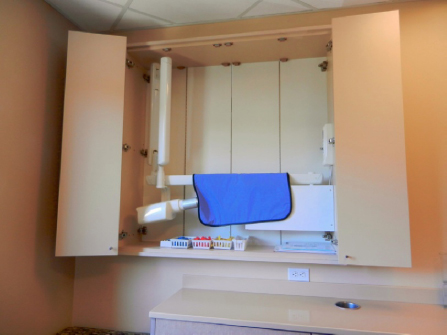
Figure 10-16. Through-the-wall digital X-ray cabinet.
(Photo: Jain Malkin) - A cephalometric X-ray device is generally found only in orthodontic and oral surgery practices, but may occasionally be found in general dentistry practices as well. State guidelines often require that the X-ray machine operator be able to see the patient during the exposure of a panoramic X-ray because the patient is essentially trapped inside a moving machine and can be injured if he or she tries to exit unexpectedly during exposure (Figure 10-17). Some states have misinterpreted this requirement and mandated that the operator be able to see the patient during any X-ray exposure. It is important to check requirements with the state agency and then provide a location for the operator that allows viewing of the patient from behind an approved barrier or from a distance 6 feet away from the radiation source and never in the primary beam trajectory. The use of half-inch-thick glass in the operator viewing windows is probably the most common method for compliance. Refer to Chapter 6 for examples of protective barriers and resources. Nuclear Associates in Carle Place, New York, is a major supplier of lead-impregnated acrylic barriers.
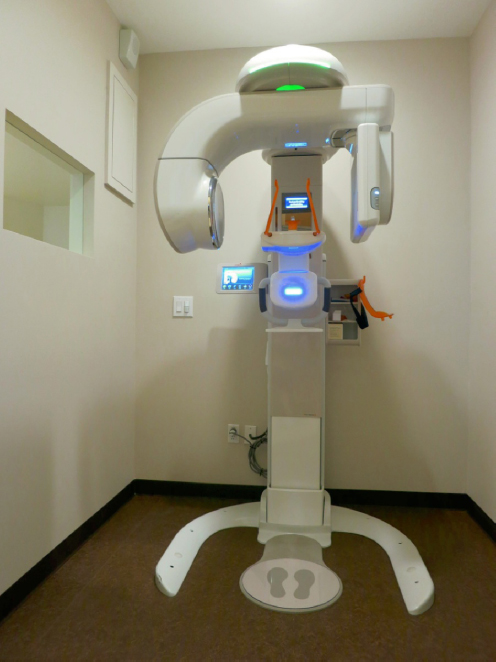
Figure 10-17. Vatech PaXReve 3D cone beam X-ray unit, San Francisco Surgical Arts Inc.
(Courtesy of Dr. Nima Massoomi, DMD, M.Ed, MD)
- Typically, the only lead barrier requirement is immediately behind a cephalometric X-ray head holder and only if the space behind it is routinely occupied, although some states have more rigorous standards. This may include lead lining in modular dental furniture systems and/or in stud and drywall partitions. When a secondary entrance to the room exists, a photoelectric eye deactivation of the X-ray beam may be required if someone tries to enter during an exposure. Through-the-wall X-ray cabinets may be required to have switches on cabinet doors so that the X-ray will work only when one set of doors is fully closed (Figure 10-16).
- Most states have laws that cover the design of the darkroom as well as the developing process and exposure. This edition of the book has dropped the detail of how to design a darkroom because they are rare in dental offices today.
NEW TECHNOLOGY TRANSFORMS THE DENTAL OFFICE
New technology is changing the fundamental way dentists practice, making it possible to achieve a level of integration and efficiency in practice management that is almost effortless once the proper software and hardware have been employed and networked. Think of the traditional series of documentation and communication steps that were required for charting treatment, scheduling visits, discussing costs, documenting insurance codes, preparing lab slips, recording payments, filing insurance claims, and sending out statements. The same information is written or typed over and over with much repetition and little value gained. While there are still some small dental offices that have not yet gone digital, they are in the minority. The paperless office is the norm today.
The Paperless Office
In the paperless office there is total connectivity among all aspects of practice management and clinical care. Computers located at all workstations, including treatment rooms, enable a seamless transfer of information that starts with scheduling the patient and ends with electronically processing insurance claims. Recall appointments can be scheduled from the treatment room without having to rely on one pivotal person at the front desk as the chief appointment maker. In small offices, the person seated at the front desk often runs the show, sending out statements as well. When he or she is absent, the practice may come to a grinding halt. Cross-training enables support staff to do several jobs. Chairside assistants have become so comfortable with computers, that they can post procedures, schedule, and even accept payment right in the treatment room. This frees the front desk assistant to focus on sending marketing letters to patients and collecting accounts receivable and insurance, in addition to general overview of scheduling, posting payments, and handling in-office collections.
Multiple Applications for Treatment Room Computers
In a paperless office, any notes or letters from referring dentists are scanned into the patient’s electronic clinical record, which is easier to access and takes less space to store, can be transmitted to other locations, and is less likely to be lost. Once the computer is in the treatment room, there is an array of peripheral items that can be added such as cosmetic imaging, digital X-ray, digital intraoral camera, and software for presenting complete treatment plans with estimates of cost, as well as patient education and entertainment programs. The real benefit is that patients are being better served: intraoral video cameras, digital radiography, and chairside microscope magnification improve the ability to find and treat problems earlier. In fact, dental operatories often have three monitors with specific placement varying upon the style of delivery of instrumentation. The assistant will have one behind the patient’s head, the dentist will have a medical-grade monitor “shared” with the patient to the left of the patient’s chest, and there will often be one in the ceiling directly over the patient’s head for entertainment (see Figure 10-8, Figure 10-9, and Figure 10-18).
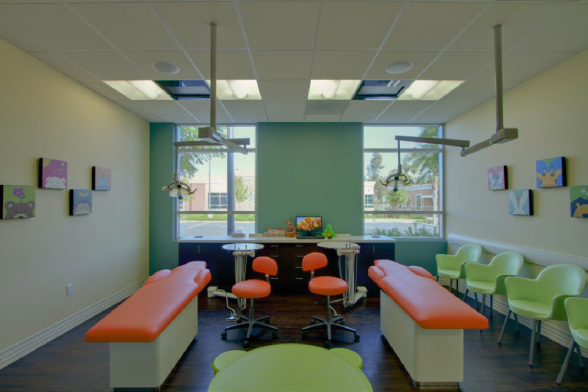
Figure 10-18. Pediatric dentistry treatment room.
The Technology Wave
Intraoral Video Camera
The intraoral video camera enables intraoral or extraoral visualization at magnification from 5 to 35 times, depending on the mode. It is the greatest visual tool for dentists since the mirror. The system consists of a hand-piece (which is actually a tiny lens) that looks like a pen and a computer monitor (Figure 10-19), although the images can be displayed on any monitors in the room. The computer system can produce hard copy or electronic images for the patient or insurance use. A built-in freeze frame makes it easy to create a “show and tell” presentation for the patient, and, with appropriate software, images can be captured and downloaded to the patient chart or placed in a digital “photo album.” This software makes it easy to assemble case presentations by using the computer to search for images by type and then further refine the search by gender, age, tooth number, upper or lower, and so on.

Figure 10-19. Intra-oral camera Sopro 717.
The newest renditions of the intraoral camera such as the Sopro (acteongroup.com) have made it possible to go beyond human vision to see cracked teeth, broken amalgams, chamber pulp, surface slate, and tooth decay. Broken or leaking restorations can be documented and photos sent to insurance companies as proof of work that needs to be done. The SOPROLIFE® (Figure 10-20) has the ability to look at the collagen of the tooth structure and can find interproximal caries. The SOPROCARE®, has the capabilities of a regular camera and can see and document plaque, calculus, and gingivitis. The Iris USB intraoral camera by Digital Doc® (digi-doc.com) is another of the newest devices. Spectra® (airtechniques.com) uses fluorescence for early detection of caries, plaque, and calculus, identifying problems while it is much easier to treat them. In this process, LEDs project violet blue light onto the surface of the tooth that makes the cariogenic bacteria appear red on the monitor while the healthy tooth enamel appears green. These devices have very tiny LEDs and are a significant diagnostic tool that not only enhances the visibility of areas of the mouth that are difficult to see but it also makes it much easier to educate patients about restorative treatment.

Figure 10-20. SOPROLIFE® intraoral dental camera.
Extraoral cameras are used to photograph the full face or smile. These images can be uploaded to an imaging program to show how the face will change after dental treatment. They are typically used in orthodontic practices and also in cosmetic or aesthetic dentistry. If a digital camera is used, the image can be directly captured by a software program that morphs the face to show how it will change with the proposed dental treatment. Some dental offices have an imaging room where photos are taken and in which an assistant trained to manipulate the software can prepare cosmetic dentistry case presentations (see Figures 10-39, 10-75, and 10-121). The imaging area needs a countertop work surface to accommodate the monitor and keyboard and to provide a place for the assistant to work. This room may also contain a panoramic or combination panoramic/cephalometric X-ray.
Digital Impressions
No more gagging on impression trays with goop. The iTero does digital impressions with an intraoral digital scanner (see Figure 10-127).
Digital Radiography
The advantages of digital dental radiography are numerous. It eliminates the cost of film, chemistry, and processors. It eliminates the darkroom and the need to clean the processor roller rack as well as the need to dispose of the lead film packs and processor chemicals. In addition, it exposes patients to considerably less radiation, and issues of under- or overexposed film are resolved by being able to manipulate a digital image. Digital radiography is discussed in detail later in this chapter.
Handheld X-Ray
The NOMAD PRO™ handheld X-ray device (see Figures 10-42 and 10-43) works with digital sensors, film, and phosphor plates. It has integrated shielding and a backscatter shield. One device can serve three to four operatories, saving the expense of a wall-mounted intraoral X-ray between every two rooms.
Operating Microscope and Magnified Video Dentistry
Ceiling- or wall-mounted microscopes in the treatment room are used by anyone who desires to see better: endodontists, prosthodontists, periodontists, general dentists, and occasionally, dental hygienists (Figure 10-21). The operating microscope enables dentists to work at high-level magnification (2 to 21 times) coupled with coaxial illumination. Telescopic loupes (eyeglasses only) provide 2- to 4-power magnification. The microscope may have accessories added such as video cameras, digital cameras, 35-mm film cameras, and/or a dental assistant’s binoculars. Operating microscopes are being built into many offices today due to the significant ergonomic advantage of being able to sit up straight, looking forward at the microscope, rather than bending over the patient. This reduces head and neck injuries. Seiler (seilermicro.com) manufactures this type of microscope.
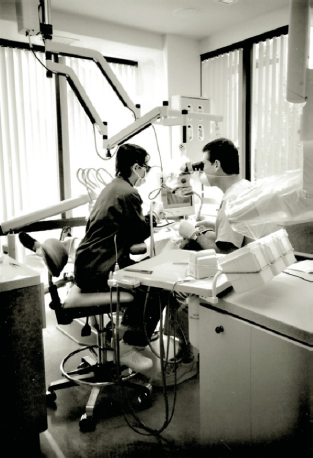
Figure 10-21. Endodontist using ceiling-mounted operating microscope that enables the doctor to sit erect during the procedure rather than bent over the patient’s head.
Another option that addresses ergonomic issues is magnified video dentistry. Lengthy procedures can be performed while sitting up straight and looking forward at magnified images on an eye-level monitor. Developed by MagnaVu (magnavu.com), some dentists (according to commentary on the vendor’s website) feel it is easier to use than a microscope because it has better depth of field that can be set and not have to be adjusted continually. They also feel it is not as much of an obstruction between them and the patient (Figure 10-22). It does not require a computer, but images can be uploaded to a computer if desired. An additional feature is the VELscope oral cancer screening system attachment, which can be mounted to the device.
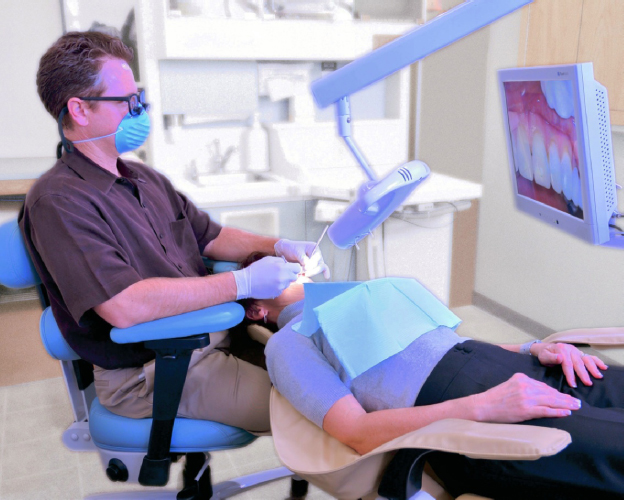
Figure 10-22. Magnified video dentistry system.
Networked Computer Systems
Networked multiple treatment room computer systems integrating clinical software, digital X-ray, and dental practice management software create a paperless office and a seamless transfer of information. In today’s high-tech dental environment, a network specialist should be part of the design team.
Triple Monitors
Each treatment room will have three monitors for the patient and clinical staff explained previously.
Air Abrasion
Air abrasion is an alternative to conventional high-speed hand-piece (drill) dentistry; however, it is appropriate only for certain types of treatments. A small stream of particles (powder), under extremely high pressure, literally dissolves cavities. When the decay is removed, a small tooth-colored filling is inserted. Air abrasion can also be used as a diagnostic tool to probe hidden decay in lieu of “watching and waiting” for a potential problem to get worse. It is minimally invasive and eliminates the vibration and microfracturing associated with rotary hand-pieces. It is often used with a rapid curing light that cures composite materials or bleaches quickly, compared with conventional methods.
Cosmetic Imaging
With the widespread use of digital cameras, photo-quality ink-jet printers, and inexpensive image capture software, cosmetic imaging is taking center stage to help dentists demonstrate aesthetic treatment results to patients. Cosmetic cases can involve extensive work and high fees. Dramatically changing someone’s smile is professionally, as well as financially, rewarding compared with routine dentistry and discounted fees paid by dental plans.
Lasers
Lasers have been developed for both hard and soft tissue. They can be used to treat periodontal disease in a process called root planing. After tartar is removed using an ultrasonic scaler, the NdYAG laser is used to reduce bacteria associated with periodontal disease. A diode laser enables cosmetic dentists to sculpt the gum line. Not as common is the ErbiumYAG laser that was developed for hard tissue. These may be used for removal of tooth decay and cavity preparation as well as resin restorations. Lasers are also used in oral surgery and for cleaning out root canals in endodontic practices. Endodontists apply the light energy of lasers to treat targeted tissues without affecting the surrounding tissue to gain access to the infected nerve and to clean and disinfect the root canal. It is also useful to seal off blood vessels and nerve endings to reduce postoperative swelling and pain. Used for dental caries, current research shows no differences in postoperative results compared with cavity preparation in the conventional air turbine/bur technique, except that laser treatment usually does not require local anesthesia. Some dentists prefer electrosurgery to lasers. For dentists who use lasers, there are no special space or design accommodations that need to be made. They are portable and can be moved from room to room. As the beam is narrowly focused in the mouth, it doesn’t pose any environmental safety hazards; lasers are often used in treatment rooms without doors. The patient and clinical staff must wear goggles to protect their eyes and a sign must be posted when lasers are in use. Most states require that lasers be licensed like X-ray machines. The NdYAG and ErbiumYag lasers may require dedicated outlets or air supply at full line pressure and possibly water connection.
Chairside Patient Education/Entertainment
Patient education includes viewing images taken by the intraoral video camera, looking at digital X-rays, and watching DVD presentations on specific dental procedures or conditions. Many patient education programs are available to run on the computer network. While the assistant is readying the treatment room or while waiting for the local anesthetic to take effect, the patient can be educated so that the dentist’s time can be optimized by not having to explain the procedure. They also support the hygienist by eliminating repetitive treatment explanations. Many of these programs can be used in the waiting room or the treatment room to stimulate a desire for cosmetic dentistry.
Stay updated, free dental videos. Join our Telegram channel
VIDEdental - Online dental courses


