14
Maxillary Anesthesia I: Pulpal Anesthesia
Introduction
This chapter on pulpal anesthetic methods for the upper arch (maxillary) teeth addresses the following procedures.
- Buccal infiltration anesthesia and the variation known as the modified cotton roll approach.
- Intra‐ and extraoral infraorbital nerve block as an approach to block the anterior superior alveolar nerve.
- Posterior superior alveolar nerve block (PSA) and the variation known as the modified Adatia technique.
- High tuberosity approach to block the maxillary nerve (V2) through the mucobuccal fold.
- Transpalatal approach (also known as the greater palatine canal technique) to block the maxillary nerve (V2).
The chapter also reviews certain aspects affecting the anesthesia of maxillary teeth to provide a fuller understanding of the anesthetics used.
Maxilla
The thin layer of porous cortical bone in the maxilla is perforated by many small foramina through which the anesthetic solution can diffuse (DuBrul 1988). As the tooth apices are very close to the cortical surface (Table 2.7, Chapter 2), the technique of choice in most cases is buccal infiltration, in light of its efficacy, simplicity, and safety. Another advantage to the technique is that more than one tooth can be anesthetized with more infiltration.
Maxillary Nerve (V2)
The second division of the trigeminal (cranial nerve V), the maxillary nerve, distributes to three superior alveolar nerves (anterior, middle, and posterior) that innervate the dental pulp. In over 80% of individuals these branches intermingle in a superior dental plexus at the dental apices (Table 2.3, Chapter 2), although the middle superior alveolar nerve is missing in just under 50% (Table 2.2, Chapter 2). As those circumstances render independent block of each branch very difficult, the procedure actually used is buccal infiltration near the apex of the teeth, which affects all three.
Buccal Anesthesia of the Upper Molars
Inserting the needle in the buccal cavity around the upper molars may involve three types of anesthetic techniques, depending on needle depth and angle (Figure 14.1): the deeper the penetration and the wider the angle, the greater the number of teeth affected, although the risk of causing hematomas by penetrating pterygoid plexus vessels is also greater.
- Buccal infiltration of the molars is the simplest and most effective technique for anesthetizing molar pulp. As the needle need not be inserted very deeply, the risk of hematoma is minimal.
- PSA (Posterior superior alveolar nerve block) or the tuberosity approach is a more complex technique because the needle is inserted higher and at a wider angle to skirt around the posterior wall of the maxilla (tuberosity) and reach the foramina through which the one to four branches forming this nerve trunk transmit. This technique anesthetizes molars as well as premolars, albeit less effectively. The likelihood of causing hematoma is logically greater with this method and part of its clinical efficacy is due to the buccal infiltrative effect, for the solution diffuses across the molars.
- The high tuberosity approach is designed to block the maxillary nerve (V2) in the pterygopalatine fossa. This technique is even more difficult and arbitrary than the tuberosity approach due to the lack of osseous references to guide the needle during injection. The needle is inserted at a much greater height and wider angle to reach the pterygopalatine fossa, greatly raising the risk of hematoma and other adverse effects. This method anesthetizes molars, premolars, and the palate on the side injected.
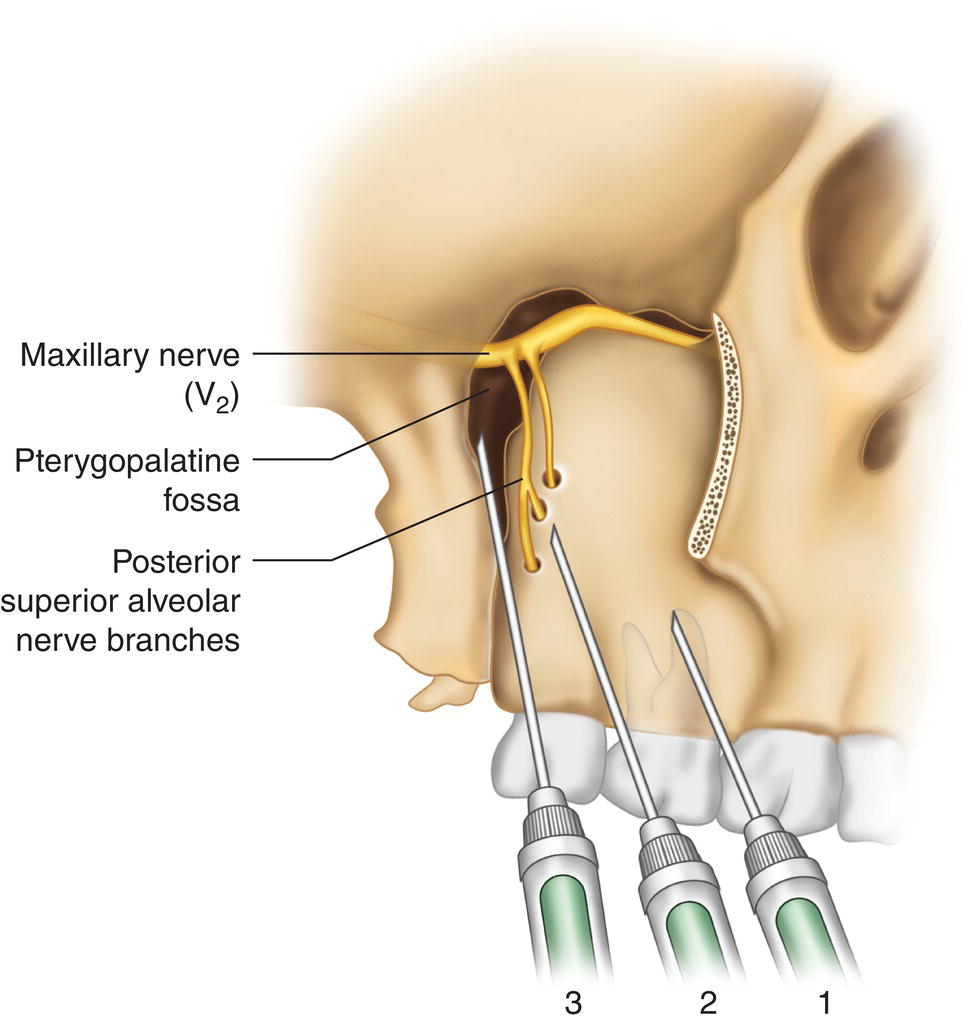
Figure 14.1 Needle 1, short, buccal infiltrations (4% positive aspirations); needle 2, longer, posterior superior alveolar nerve branch blocks (5% positive aspirations); needle 3, longest, maxillary nerve (V2) block in pterygopalatine fossa (13% positive aspirations).
Buccal Infiltration
This technique has a number of synonyms: supraperiosteal buccal infiltration (all modern techniques are supraperiosteal), buccal infiltration, and anesthesia of the plexus.
This is by far the technique most commonly used to anesthetize maxillary tooth pulp, given its simplicity, efficacy, and safety. It consists essentially of administering the local anesthesia around the teeth to be treated, crossing the periosteum, the cortical bone, and the trabecular or spongy bone to reach the dental apex and anesthetize the pulp and adjacent tissues (Figure 14.2).
Zones Anesthetized
- Tooth (pulp and periodontal ligament) injected, often extending to the adjacent mesial and distal teeth.
- Buccal cavity, including fibromucosa (alveolar mucosa, gingiva, and interdental papillae), bone, and periosteum.
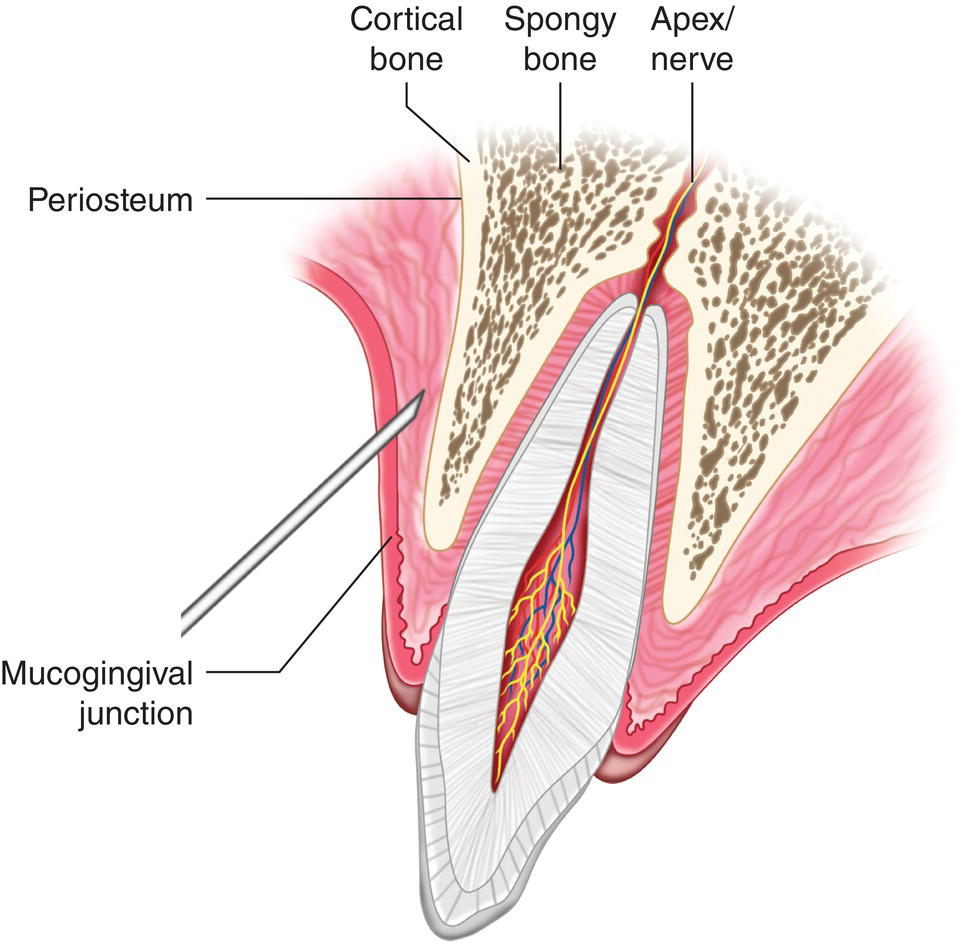
Figure 14.2 Insertion of needle immediately below the mucogingival junction with the solution crossing the periosteum, cortical, and spongy bone to reach the nerve at the entrance to the dental apex.
Technique
- Short (20–25 mm), 25G or 27G needle.
- Dentist’s and patient’s positions.
- Dentist at 9:00 to 10:00 o’clock.
- Patient in supine position with head slightly hyperextended to enable the dentist to administer the anesthesia to the anterior and posterior teeth on the right side and turn the patient’s head as required if the anesthesia is to be administered to the posterior teeth on the left side.
- Bring the roof of the buccal cavity in the area to be anesthetized into view with the non‐injection hand.
- For anterior teeth (incisors and canines), pull the upper lip upward and ask the patient to open their mouth (Figure 14.3).
- For posterior teeth (premolars and molars), pull the cheek and labial commissure outward and slightly upward to firmly stretch the jugal mucosa (Figure 14.4). Ask the patient to half‐close their mouth to prevent the coronoid apophysis of the mandible from shifting forward (and getting in the way) as it does when the mouth is wide open (Figure 14.5).
- Needle insertion.
- With the non‐injection hand stretch and tense the (lax, mobile, dark) buccal alveolar mucosa and then insert the needle; a tense buccal cavity is readily visible, facilitating painless penetration. Insert the needle as close to the apex of the tooth to be treated as possible (key to success), introducing the tip of the needle only 2–3 mm underneath the mucosa.
- The periosteum and bone are rarely touched with this technique but if that happens draw the needle back slightly to avoid impact.
- Inject immediately above the mucogingival junction (line between the attached gingiva and the alveolar mucosa) for the following reasons.
- As the surface of the maxilla is buccally concave, the surface of the bone is farther from the root in the apical direction, in the central incisors due to the position of the anterior nasal spine and in the molars to the position of the zygomatic apophysis of the malar bone.
- As the submucosa is less lax than the roof of the buccal cavity due to the proximity of the attached gingiva, when the needle is inserted immediately above the mucogingival junction the anesthetic solution is kept in a smaller area in closer contact with the bone, tending to diffuse to the apex. If it were injected at the roof of the buccal cavity, it would tend to diffuse to softer tissues and away from the bone.
- Since the injected liquid is stored a little beyond the tip of the needle, the insertion site should always be slightly mesial relative to the tooth.
- With the non‐injection hand stretch and tense the (lax, mobile, dark) buccal alveolar mucosa and then insert the needle; a tense buccal cavity is readily visible, facilitating painless penetration. Insert the needle as close to the apex of the tooth to be treated as possible (key to success), introducing the tip of the needle only 2–3 mm underneath the mucosa.
- Aspire before injecting. Aspiration is positive in 2% of anterior teeth and 4% of molars (Annex 22).
- Injection proceeds to minimal intervention (minimum volume/minimum injection time) criterion. Injection pain is greatly reduced with this four‐step technique.
- First inject only one or two drops of anesthetic solution within 1–2 seconds and wait 60 seconds after withdrawing the needle to anesthetize the soft tissue around the injection zone.
- Inject another one or two drops at the same site (normally identifiable by tiny blood droplets caused by the first insertion) during 1–2 seconds and wait 30 seconds after withdrawing the needle.
- Inject a larger amount of anesthetic (about an eighth of a cartridge or 0.25 ml) slowly within 7–10 seconds and, after aspirating, wait 30 seconds after withdrawing the needle. Note that just a small amount is injected to reinforce the preceding injections and begin pulpal anesthesia.
- After aspirating, slowly inject the full amount of anesthesia envisaged at the same site, after aspiration.
Note: Clinical studies have shown that anterior maxillary (incisor) infiltrations are painful, only slightly less than palatal infiltrations (hence heeding the importance of minimal intervention criterion), whereas infiltration in the maxillary molars is one of the least painful techniques (Annex 23; Bataineh and Al‐Sabri 2017). Another advantage is that anesthetizing the soft tissues (happily) fails to confirm patients’ expectation of a more painful second than first injection (Martin et al. 1994; Meechan and Day 2002; Paschos et al. 2006; Badcock et al. 2007; Kuscu et al. 2014).
- Amount of anesthetic to be used. Clinical studies today recommend slightly larger amounts than classical texts to ensure good pulpal anesthesia (Mikesell et al. 1987; Premdas and Pitt Ford 1995; Brunetto et al. 2008; Guglielmo et al. 2011; Sreekumar and Bhargava 2011).
- In anterior teeth: a little less than a full 1.8‐ml cartridge, 1.5 ml, for instance.
- In posterior teeth: a full cartridge or slightly more, 1.8–2.5 ml.
Note: In children under 6–8 years, the dose should be halved.
- The submucosa lump or blister forming must not be touched to enable the anesthetic to spread across the periosteum, cortical, and spongy bone to reach the apex and from there the nerve fibers in the teeth (Figure 14.2). Massaging the blister forces the anesthetic to spread along the pathway of least resistance, the lax soft tissues, carrying it away from the injection site and lowering the concentration at the target zone and hence the capacity to diffuse toward the dental apex.
- Subjective symptoms of anesthesia. Soft tissue anesthesia, defined by patients as dullness, numbing, tingling, itching, pins and needles feeling, or fattening in the lip (Table 13.1, Chapter 13) varies depending on the injection site.
- In anterior teeth. Soft tissue anesthesia begins in the upper lip, labial commissure, and even the ala nasi within 2 minutes.
- In posterior teeth. As labial anesthesia is scant, especially where molars are concerned, a waiting period of at least 5 minutes must be allowed. Alternatively, some clinicians insert a probe in the mucosa to determine soft tissue anesthesia.
- Time needed for pulpal anesthesia. In 70% of individuals anesthesia is effective in less than 2 minutes (Annex 21), although the recommended waiting period is 5 minutes from the time of injection. Where the minimal intervention criterion is followed, a minute or more may be necessary.
- Soft tissue anesthesia usually lasts 3–4 hours (200 minutes) (Annex 21), a fact which the patient should be notified of after treatment.
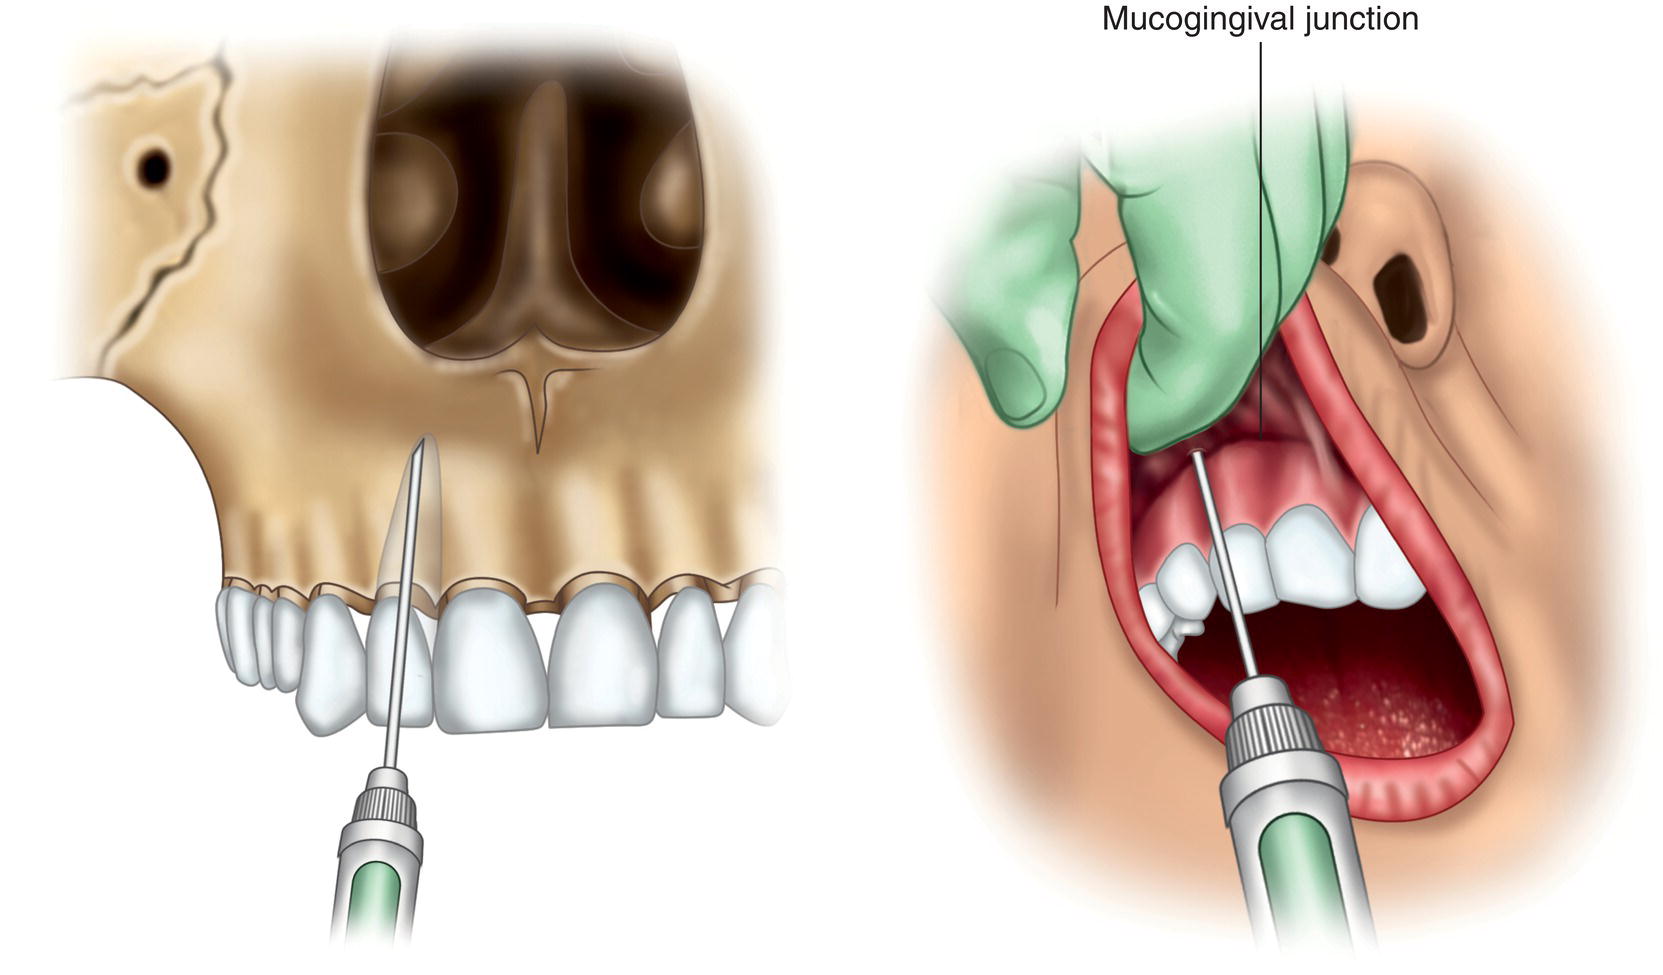
Figure 14.3 Insertion of needle alongside the mucogingival junction in anterior teeth, with the patient’s mouth wide open, pulling the upper lip upward.
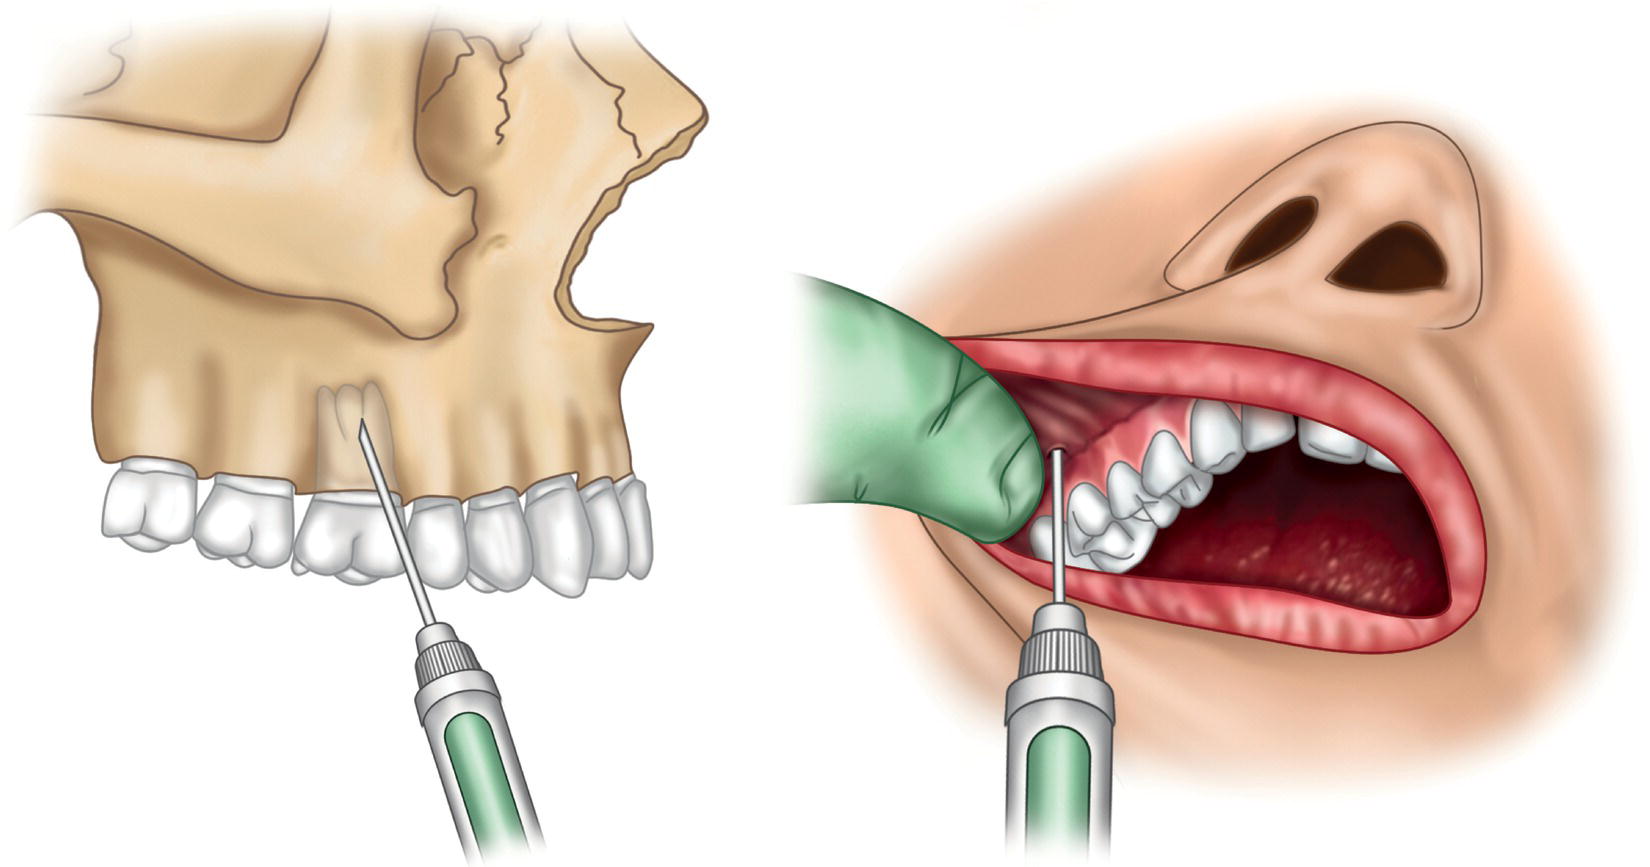
Figure 14.4 Insertion of needle alongside the mucogingival junction in molars, pulling the labial commissure outward and upward, and asking the patient to partially close their mouth.
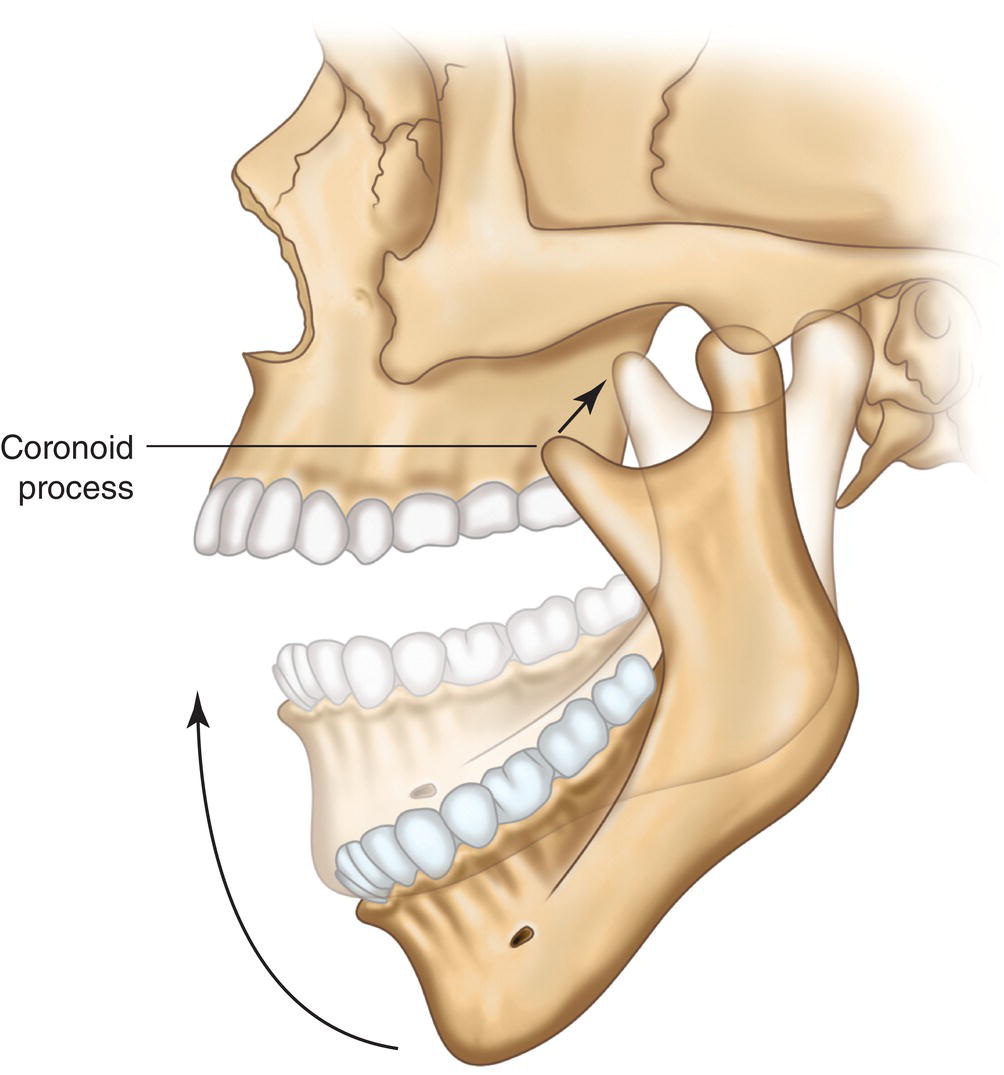
Figure 14.5 Partially closed mouth in which the coronoid process rises, leaving room to reach the molars buccally.
Efficacy of this Technique
Clinical studies have proven the efficacy of this technique to be high (Table 14.1), with success rates of 95% in posterior and 98% in anterior teeth in adults with a powerful solution such as 4% articaine, 1:100 000 epinephrine (10 μg/ml) (A‐100), and around 87% and 95% of a standard lidocaine solution (L‐100). Palatal reinforcement with a small amount of anesthetic solution (±0.25–0.3 ml) raises pulpal anesthetic efficacy and duration, particularly in posterior teeth with palatal roots (Aggarwal et al. 2011; Guglielmo et al. 2011; Ulusoy and Alacam 2014).
Complications Specific to this Technique
The most common of the very few complications associated are listed below.
- Appearance of small, asymptomatic intraoral hematomas in the submucosa that disappear spontaneously in a few days and that are attributable to repeated needle insertion in the same site as recommended for minimal intervention.
- Injection site inflammation in 2% of cases (Moore et al. 2006), which also subsides spontaneously in a few days.
- Failure to anesthetize the pulp is uncommon with this technique, as noted. In some individuals failure in the central incisors may be due to thickening of the anterior nasal spine and in molars to thickening of the zygomatic arch of the malar bone.
Factors That Lead to Success
- The tooth. Poorer results are obtained with molars than with anterior teeth (Cowan 1964; Certosimo and Archer 1996) for two reasons: (i) cortical thickening at the zygomatic crest and (ii) separation of the palatal roots.
- The anesthetic solution. While 2% lidocaine, 1:100 000 epinephrine (L‐100) delivers good results, success rates are higher with powerful solutions such as 4% articaine, 1:100 000 epinephrine (A‐100) or 2% lidocaine, 1:50 000 epinephrine (L‐50) (Annex 21). The use of powerful solutions such as A‐100 is therefore preferred in adults, given that in such cases the potency of the solution enhances penetration and the capacity to cross the periosteum, cortical, and spongy or trabecular bone to reach the dental apex and bathe the nerve fibers, intensifying the effect and lengthening the duration of pulpal anesthesia (Annex 21).
- The volume of solution injected. As clinical tests have shown that overly small volumes lead to a higher number of failures (Mikesell et al. 1987; Premdas and Pitt Ford 1995; Brunetto et al. 2008), the volumes specified above are preferred.
- The waiting time. The recommended waiting time is 5 minutes after completing injection (Mikesell et al. 1987; Certosimo and Archer 1996) (Annex 21).
Table 14.1 Successful (%) pulpal anesthesia in anterior and posterior teeth with buccal infiltration (electrical pulp tester assessment).
Source: Data from Annex 21.
| Successful pulpal anesthesia (%) | ||
|---|---|---|
| Anesthetic solution | Anterior teeth 1 ml | First molar 1.8 ml |
| 2% lidocaine + 1:100 000 epinephrine (L‐100) | 95 | 87 |
| 4% articaine + 1:100 000 epinephrine (A‐100) | 98 | 95 |
Modified Cotton Roll Approach
Jorgensen and Hayden recommended using a cotton roll to raise the success rate (Jorgensen and Hayden 1970).
The technique is the same as specified above except that a small cotton roll is placed at the roof of the buccal cavity before injecting the solution and held firmly against the mucosa with the non‐injection index finger or thumb. The needle is inserted between the roll and the mucogingival junction, maintaining the pressure on the roll during and for a few minutes after injection (Figure 14.6).
The aim is to create a nearly closed deposition area in the lax alveolar soft tissue to hinder diffusion along that initially easier route (carrying it away from the injection site) and force the solution to diffuse across the cortical layer of the bone to the apices.
Infraorbital Nerve Block
Infraorbital nerve block is not recommended for routine dental treatment (Kleier et al. 1983; Roberts and Sowray 1987; Jastak et al. 1995) and is consequently seldom used because (i) the buccal infiltration alternative is simpler, safer, and more effective and (ii) many patients reject the approach psychologically for fear of injury to the eye (Jastak et al. 1995; Malamed 2004).
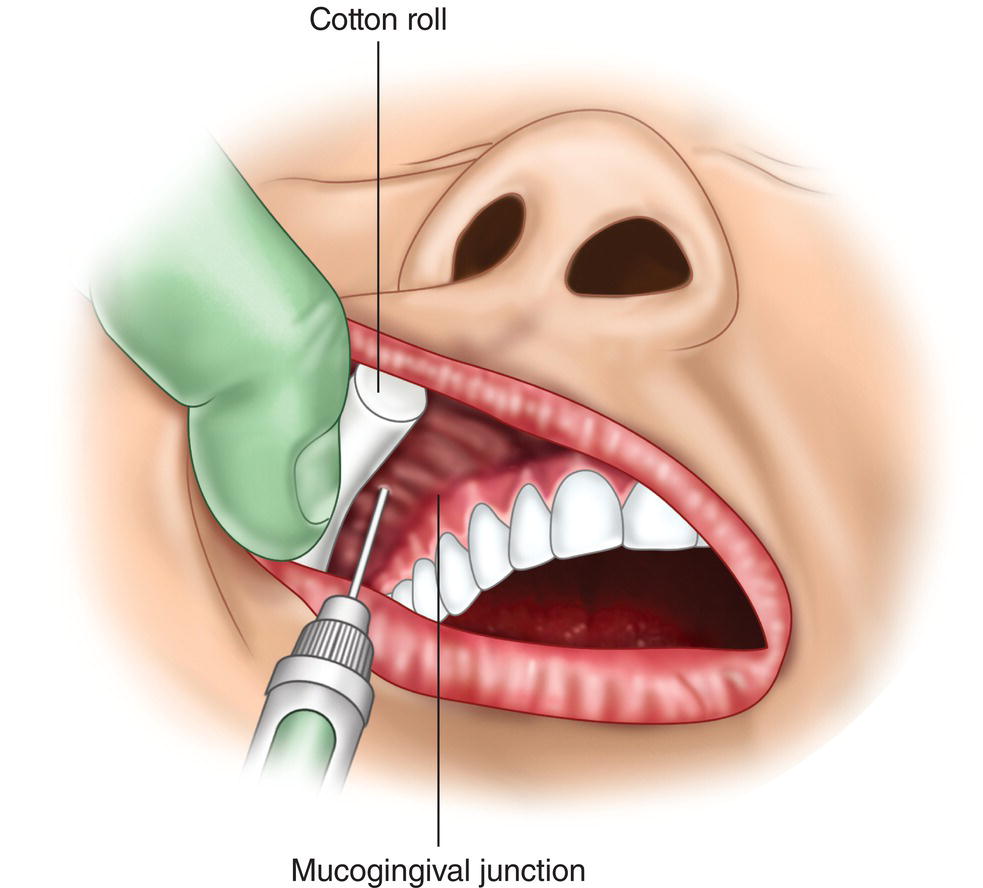
Figure 14.6 Cotton roll in the roof of the buccal cavity to trap the anesthetic solution between it and the mucogingival junction, forcing diffusion toward the periosteum, cortical, and spongy bone.
The technique theoretically aims to fully block the anterior and partially anesthetize the middle alveolar nerve by diffusing the anesthetic solution across the infraorbital foramen to anesthetize the incisors, canines, and premolars on the side injected.
The technique has two variations, intraoral (the most common) and extraoral or transcutaneous, normally used by oral and maxillofacial surgeons. The drawback to the extraoral approach is that it is more painful (Karkut et al. 2010) and poses more local complications (Kleier et al. 1983; Karkut et al. 2010), although as it does not involve the canine fossa, it is useful in infectious or inflammatory processes affecting the roof of the buccal cavity in the zone (Jastak et al. 1995; Malamed 2004).
Uses
- Circumstances for using either the intraoral or the extraoral approach.
- Surgical operations on the anterior aspect of the maxilla on the side injected, such as surgical extraction of impacted canines, apicoectomies, epulis extractions, and maxillary sinus surgery (Kleier et al. 1983; Roberts and Sowray 1987).
- Multiple tooth treatments, for theoretically it calls for a smaller volume of anesthesia, avoiding the need for multiple injections in restorations and extractions (Kleier et al. 1983; Jastak et al. 1995; Malamed 2004).
- After buccal infiltration failure in anterior teeth (Kleier et al. 1983; Roberts and Sowray 1987; Jastak et al. 1995; Malamed 2004).
- Additional circumstances for use of the extraoral approach only.
Zones Anesthetized
- Anesthesia of the anterior and middle superior alveolar nerves.
- Teeth, including pulp and periodontium of the canine, first premolar and second premolar on the side injected. The central and lateral incisors and the first molar on the side injected are likewise anesthetized, albeit only partially.
- Buccal cavity, including fibromucosa (alveolar mucosa, gingiva, and interdental papillae), bone and periosteum around incisors, canines and premolars on the side injected.
- Maxillary sinus, anterior and lateral walls and floor.
- Anesthesia of the peripheral branches of the infraorbital nerve affects the skin on the upper lip, ala nasi, and lower eyelid on the side injected.
Intraoral Technique
- Long (35–38 mm), 27G or 25G needle.
- Dentist’s and patient’s positions:
- Dentist at 8:00–10:00 o’clock.
- Patient in supine position with their neck slightly extended. Mouth moderately open. If the neck is bent rather than extended, the patient’s chest interferes with the syringe.
- Location of the infraorbital foramen.
- Ask the patient to look straight ahead. In 85% of individuals, the foramen lies on the imaginary line joining the pupil and the longitudinal axis of the second premolar (Annex 2). The line also runs very close to the labial commissure on the side injected (Figure 14.7).
- With the non‐injection index finger, feel the slight depression on the rim of the orbit at the point crossed by the imaginary line running from the pupil. That is the zygomaticomaxillary suture, normally found at a point two‐fifths inward on the lower orbital rim (Figure 14.8).
- Run the finger downward from there along the lower infraorbital rim for 5–10 mm until it reaches the infraorbital depression (infraorbital nocht, which is where the infraorbital foramen lies) (Annex 2). Hold the finger in that position, pressing gently (Kleier et al. 1983; Karkut et al. 2010).
- Retract the upper lip with the non‐injection thumb to view the anterior maxillary teeth and the plexus on the buccal aspect of incisors, canines, and premolars, while tensing the roof of the buccal cavity (Figure 14.9).
- There are two possible approaches to the infraorbital foramen.
- The vertical or direct or second premolar approach, deemed here to be the better of the two, for in 85% of individuals the infraorbital foramen lies on or near the extended second maxillary premolar axis (Annex 2) (Figure 14.8).
- Insert the needle at the roof of the buccal cavity over the second premolar with the bevel facing the bone (so that when the anesthetic solution is injected it diffuses toward the infraorbital foramen) and separated from the alveolar bone by around 5 mm to prevent premature contact with the roof of the canine fossa as the needle travels toward the infraorbital foramen (Bennett 1984; Jastak et al. 1995) (Figure 14.9).
- Place the needle parallel to the longitudinal axis of the second premolar and guide it gently toward the infraorbital foramen underneath the tip of the non‐injection index finger. The needle courses along the second premolar cementoenamel junction (CEJ) to the infraorbital foramen for about 30–35 mm (Annex 2) or, if measured from the roof of the buccal cavity, for around 15 mm (Jastak et al. 1995; Malamed 2004).
Note: Remember that injection around premolars and molars is much less painful than around anterior maxillary teeth (Annex 23).
In a variation on this approach, which is nearly direct, the reference is the first rather than the second premolar (Malamed 2004).
- Oblique or from the midline or from the lateral incisor.
- Insert the needle at the roof of the buccal surface in alongside the lateral incisor, obliquely, i.e. on the imaginary line running from the mesial incisal angle to the gingival distal angle, with the bevel facing the bone (so that when the anesthetic solution is injected it diffuses toward the infraorbital foramen) and separated from the alveolar bone by around 5 mm to prevent premature contact with the roof of the canine fossa as the needle travels toward the infraorbital foramen.
- Advance the needle obliquely and gently toward the infraorbital foramen underneath the tip of the index finger. This route is less direct and somewhat longer, with the needle running along 20 mm of soft tissue (Bennett 1984; Roberts and Sowray 1987).
Note: Remember that injections around the anterior maxillary teeth are among the most painful, nearly as painful as palatal injections (Annex 23).
Another variation is from the canine, a less oblique and slightly shorter approach.
- The vertical or direct or second premolar approach, deemed here to be the better of the two, for in 85% of individuals the infraorbital foramen lies on or near the extended second maxillary premolar axis (Annex 2) (Figure 14.8).
- The tip of the needle reaches the infraorbital foramen underneath the tip of the non‐injection index finger. It impacts the roof of the infraorbital foramen (lower rim of the orbit), preventing penetration in the orbit. The infraorbital foramen runs downward and medially (toward the nose) in nearly 60% of individuals and downward only in 20% (Annex 2).
- Aspire before injecting: 1% of cases are positive (Karkut et al. 2010).
- Inject a 1.8‐ml cartridge over the course of 40–60 seconds (Berberich et al. 2009; Karkut et al. 2010). The index finger should feel the deposition. As the bevel faces the bone, the anesthesia is distributed toward the entrance to the infraorbital foramen.
- Massage the area after injection, pressing gently with the index finger for a few seconds (Karkut et al. 2010) to enhance diffusion of the solution inside the foramen.
- Subjective symptoms of anesthesia (numbness, tingling, etc.) (Table 13.1, Chapter 13) appear in 1–3 minutes in the upper lip, nasi ala, and lower eyelid. Pulpal anesthesia is reached in 5–10 minutes (Berberich et al. 2009; Karkut et al. 2010) and the soft tissue remains anesthetized for 3–4 hours (Feige 1978; Corbett et al. 2010).
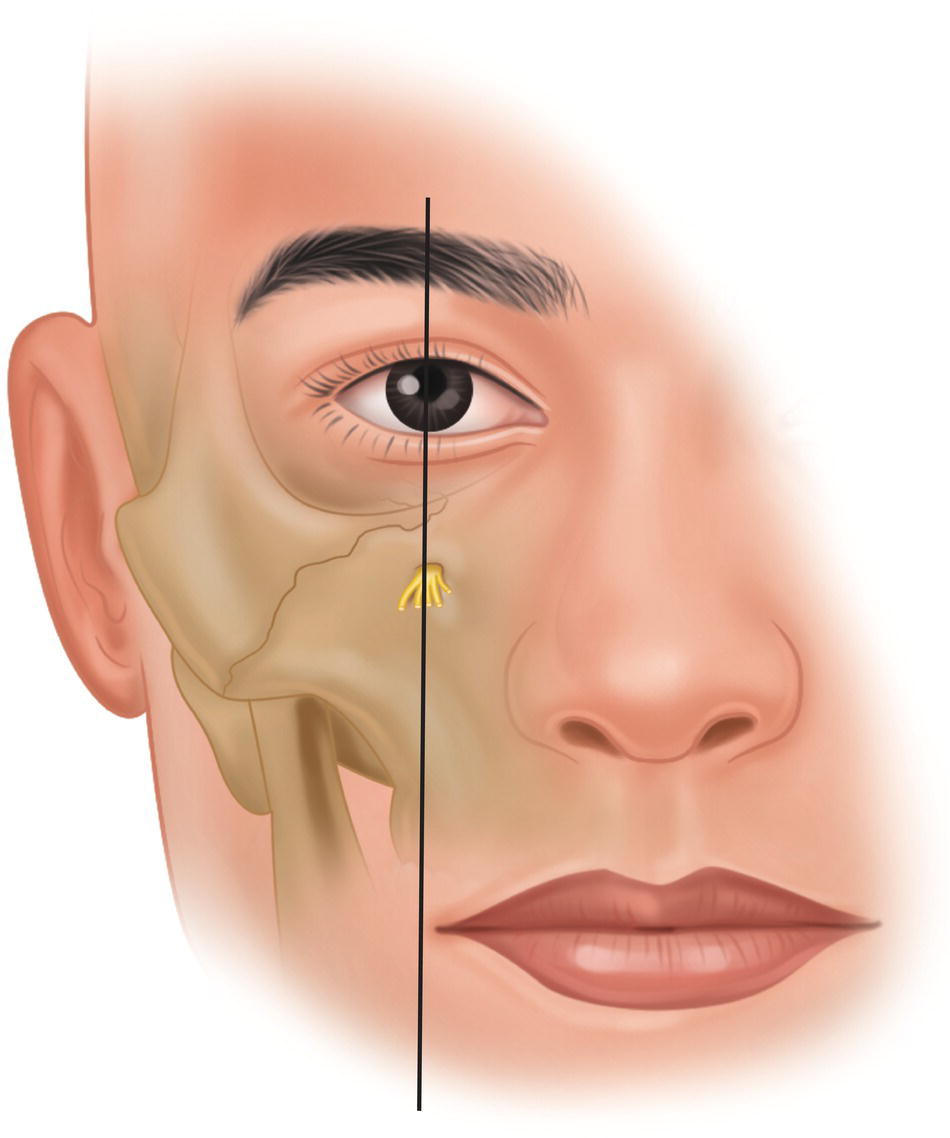
Figure 14.7 Infraorbital foramen on the imaginary line joining the pupil (looking straight ahead) and the labial commissure.

Figure 14.8 Infraorbital foramen on the axis extending upward from the second maxillary premolar at a point two‐fifths inward on the lower orbital rim.
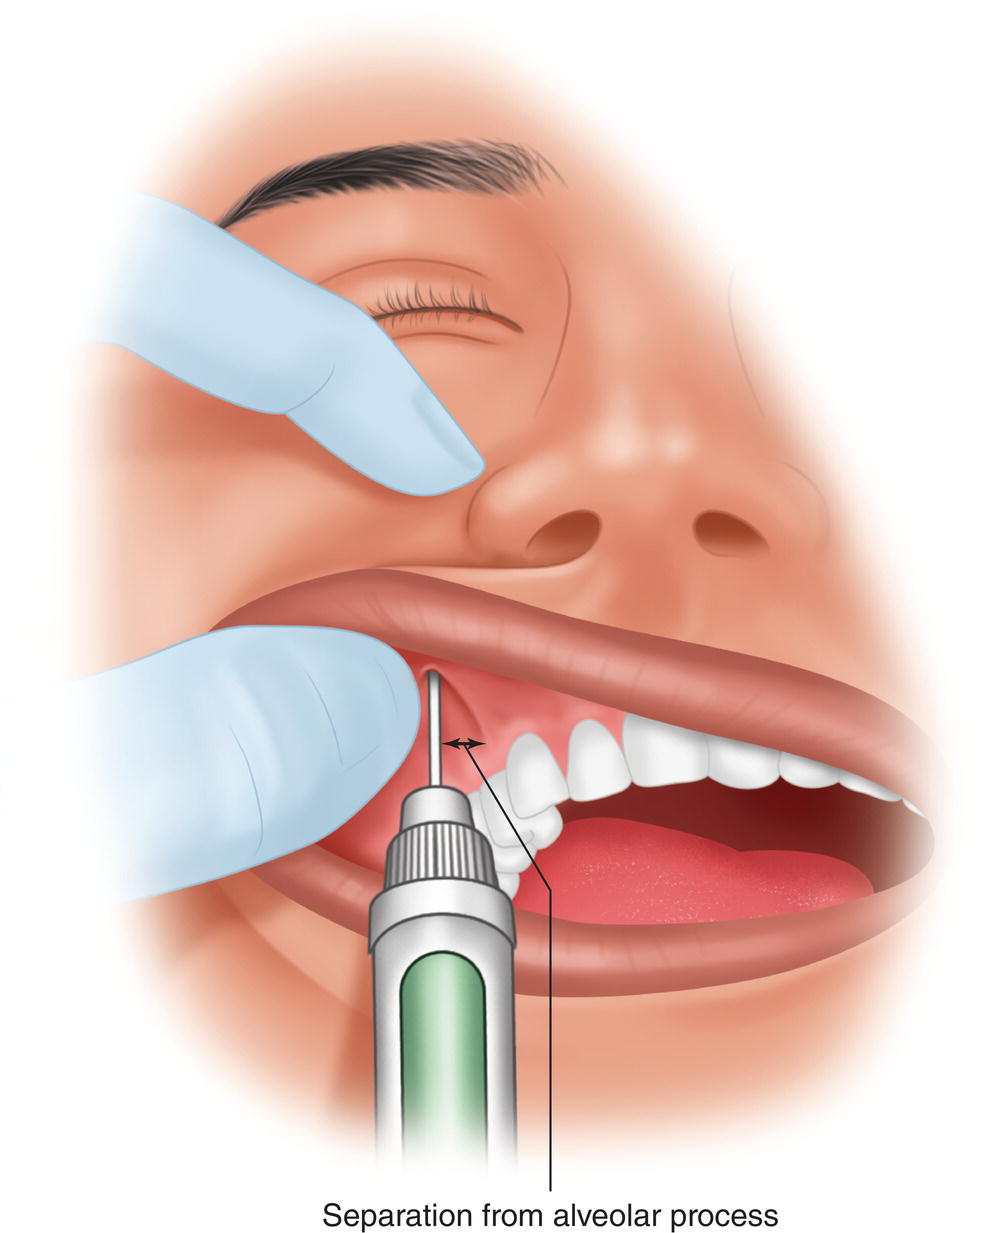
Figure 14.9 Non‐injection index finger over the skin on the infraorbital foramen as the thumb lifts the upper lip, keeping the needle a few millimeters away from the alveolar process and running it parallel to the axis of the second premolar (direct or vertical approach).
Extraoral Technique
- Needle. Either (i) short (20–25 mm) double‐tip, cartridge‐like, caliber 27G or 25G, or (ii) short, strong insulin syringe. Remember that the route is shorter and the needle has to penetrate the skin and firm subcutaneous tissue.
- Dentist’s and patient’s positions as in the intraoral approach.
- Location of the infraorbital foramen. As in the intraoral approach.
- Ask the patient to close their eyes for protection while disinfecting the skin in the suborbital area and for psychological reasons because extraorbital injection of the infraorbital foramen is not a pleasant sight.
- Insert the needle in the skin below the non‐injection index finger rests, marking the location of the infraorbital foramen.
- Hold the needle with the bevel toward the skin so that when injected the anesthetic solution diffuses toward the infraorbital foramen (Kleier et al. 1983).
- As the foramen follows a downward and inward course (Annex 2), place the needle at a site slightly inward of and lower than the mark on the skin at an angle of around 45° and tilted slightly outward.
- Insert the needle in the skin and continue until touching bone. Inject around 0.2 ml to anesthetize the soft tissues and wait 30 seconds before removing the needle (Kleier et al. 1983; Roberts and Sowray 1987).
- When re‐inserting, use the needle as a probe to locate the entrance to the infraorbital foramen or a site near it (Karkut et al. 2010). Push the needle in no more than 10 mm (Kleier et al. 1983; Karkut et al. 2010). Remember that the soft tissue over the foramen is around 7 mm thick and the needle must not penetrate into the foramen more than 1–3 mm (Kleier et al. 1983; Karkut et al. 2010). Do not try to penetrate the foramen, but merely to reach a nearby site to prevent the risk of penetrating the orbit and affecting the eye (Saeedi et al. 2011).
- Aspire before injecting. Aspiration is positive in 1% of cases (Karkut et al. 2010).
- Inject the rest of the cartridge (1.6–1.7 ml) over the course of 40–60 seconds. During this operation, the non‐injection index finger should feel the deposition of the solution underneath the skin. As the bevel faces the bone the anesthesia is distributed toward the infraorbital foramen.
- After injection massage and gently press the area with the index finger for a few seconds (Karkut et al. 2010) to enhance diffusion of the solution toward the inside the foramen.
- The subjective symptoms of anesthesia are as described for the intraoral approach.
Efficacy of this Technique
As Table 14.2 shows, according to clinical trials pulpal anesthesia is successful, on the side injected, in 25% of maxillary incisors, in around 90% in canine and premolars, and 60% in the first maxillary molar (Figure 14.10) after injecting 1.8 ml of standard lidocaine solution (L‐100). The pulp is anesthetized in around 3 minutes on average (Corbett et al. 2010). The effect is most intense after 5–10 minutes.
Table 14.2 also shows that the results with the intra‐ and extraoral approaches are very similar, although poorer tooth‐by‐tooth than obtained with buccal infiltration anesthesia.
Complications Specific to this Technique
- A facial hematoma may appear under the lower eyelid in 2% of cases due to injury to the inferior facial vein or some vascular nervous package in the infraorbital foramen (Phillips 1943; Berberich et al. 2009; Karkut et al. 2010). It disappears spontaneously in 10–14 days (Berberich et al. 2009; Karkut et al. 2010).
- Moderate to severe postoperative pain in the area in 1% of cases, lasting normally 1–3 days (Berberich et al. 2009).
- Temporary double vision (diplopia) in nearly 3% of patients with the extraoral technique (Kleier et al. 1983; Karkut et al. 2010), even one case with intraoral technique (Ceylan et al. 2010), disappearing with the effect of the anesthesia.
- Needle penetration in the eyeball (Weinand et al. 1997; Chan et al. 2011; Saeedi et al. 2011) (Figure 14.11). This is very unusual because the needle normally impacts the roof of the infraorbital foramen. Nonetheless, if the needle crosses the roof of the foramen or if the roof is missing, it may impact the posterior side of the globe and injure the retina, causing the following harm.
- Acute and immediate ocular pain (Weinand et al. 1997; Chan et al. 2011). In some cases pain is absent but other symptoms appear several minutes later (Saeedi et al. 2011).
- Dilated (mydriasis) or immobile pupil or failure to react to light (Chan et al. 2011; Saeedi et al. 2011).
- Loss of visual acuity and vision impaired by floating spots (Chan et al. 2011).
- Blood extravasation to the conjunctiva (ecchymosis) (Saeedi et al. 2011) or avulsed or extruded orbit (exophthalmos) (Chan et al. 2011).
- Ocular infection (endophthalmitis) (Weinand et al. 1997).
- Needle penetration in the eyeball (Weinand et al. 1997; Chan et al. 2011; Saeedi et al. 2011) (Figure 14.11). This is very unusual because the needle normally impacts the roof of the infraorbital foramen. Nonetheless, if the needle crosses the roof of the foramen or if the roof is missing, it may impact the posterior side of the globe and injure the retina, causing the following harm.
Table 14.2 Successful (%) pulpal anesthesia with the infraorbital nerve technique (electrical pulp tester assessment and standard anesthetic solutions L‐80 or L‐100).
| Intraoral | Extraoral | ||||
|---|---|---|---|---|---|
| Tooth | Feige (1978) n = 62 | Berberich et al. (2009) n = 40 | Karkut et al. (2010) n = 40 |
Corbett et al. (2010)a n = 28 | Karkut et al. (2010) n = 40 |
| Central incisor (%) | 40 | 15 | 15 | 11 | 15 |
| Lateral incisor (%) | 50 | 28 | 22 | 18 | 22 |
| Canine (%) | 100 | 85 | 92 | 93 | 92 |
| First premolar (%) | 100 | 82 | 90 | 89 | 87 |
| Second premolar (%) | 100 | 75 | 80 | 96 | 82 |
| First molar (%) | — | 52 | 70 | — | 65 |
| Amount injected (ml) | 0.5 | 1.8 | 1.8 | 1.0 | 1.8 |
| Solution injected | L‐80 | L‐100 | L‐100 | L‐80 | L‐100 |
L‐80 → 2% lidocaine + 1:80 000 (12.5 μg/ml) epinephrine.
L‐100 → 2% lidocaine + 1:100 000 (10 μg/ml) epinephrine.
a Using “the wand” (computer‐controlled local anesthetic).
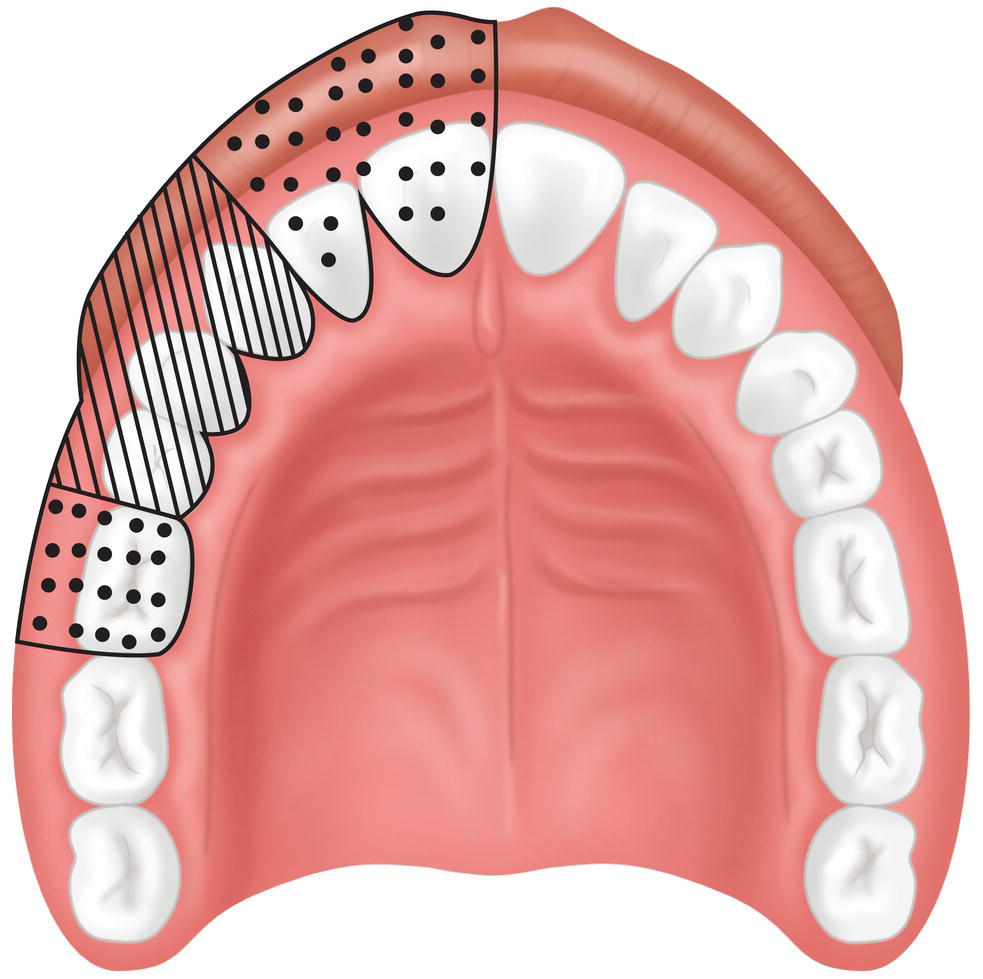
Figure 14.10 Efficacy of anesthesia: greatest in ruled area and only partial in dotted area.

Figure 14.11 Needle penetration through the infraorbital foramen at the posterior part of the eyeball.
Source: Redrawn from Saeedi (2011).
All such cases require the intervention of an ophthalmologist. This rare complication may be more frequent in the extraoral approach because the needle may be inserted too horizontally, thereby entering the infraorbital canal more deeply (Saeedi et al. 2011).
Remarks
Infraorbital nerve block aims to anesthetize the one to four branches of the anterior superior alveolar nerve that innervate incisors, canines, and occasionally the first premolar (Chapter 2). It is scantly effective for a number of reasons.
- In the infraorbital foramen, the anterior superior alveolar nerve branches lie at a distance of around 10–15 mm from the infraorbital foramen (Table 2.3, Chapter 2) and in some series 20% of individuals at over 20 mm (FitzGerald and Scott 1958; Heasman et al. 1984). They are therefore normally at a considerable depth and difficult to reach.
- If the needle penetrates the infraorbital canal the risks include (i) damaging the neurovascular bundle, sufficient reason to avoid this maneuver and confide in diffusion of the solution in the area around the infraorbital foramen (Haglund and Evers 1985; Evers and Haegerstam 1981) and (ii) penetrating the orbit and affecting the eye (Weinand et al. 1997; Saeedi et al. 2011).
- Accessory foramina appear in 15% of individuals, and in 15% of those they may be multiple (Annex 2). These accessory foramina may be located at a considerable distance from the main infraorbital foramen (Kadanoff et al. 1970; Leo et al. 1995) in up to 40% of individuals in some series (Kadanoff et al. 1970). These are important findings because they explain why anesthetic block may not be successful in the infraorbital foramen (Leo et al. 1995; Canan et al. 1999).
- Anterior superior alveolar nerve block via the infraorbital foramen is insufficient to anesthetize incisor and canine pulp because these teeth may be cross‐innervated contralaterally or even by the nasopalatine nerve (Hoffer 1922a; Phillips 1943; Phillips and Maxmen 1941; Cook 1949; Roda and Blanton 1994). Supplementary buccal infiltration is therefore required.
In practice much of the efficacy of this technique depends on the buccal diffusion of the anesthetic solution, since the anterior wall of the maxilla (along which the anterior superior alveolar nerve branches course) is very thin (Cook 1950a). For that reason the teeth actually anesthetized are the canine and premolars and surrounding tissue (Figure 14.10). Generally speaking, then, the advantages of this technique over simple buccal infiltration are nearly negligible.
Posterior Superior Alveolar Nerve Block
Posterior superior alveolar nerve block (PSA) is also known as zygomatic or tuberosity anesthesia because the idea is to carry the anesthetic solution to the maxillary tuberosity.
This method is somewhat more complex than buccal infiltration in molars because the needle must be inserted a little higher and at an angle to skirt over the buccinator muscle insertion, avoid the posterior wall of the maxilla (tuberosity), and reach the foramina through which the one to four branches of this nerve trunk transmit (Figure 14.12). The risk of hematomas due to injury to the vessels in the zone is also higher. Recent clinical tests have questioned its efficacy and utility, as the success rate for anesthetizing maxillary molars is no higher than in simple buccal infiltration (Padhye et al. 2011; Al‐Delayme 2014).
Stay updated, free dental videos. Join our Telegram channel
VIDEdental - Online dental courses


