Key points
- •
Intraoral vertical ramus osteotomy is a useful osteotomy for mandibular setback and rotational movements of the mandible.
- •
The correct placement of the osteotomy is critical to the preservation of proximal segment muscle attachments.
- •
Preservation of adequate proximal segment medial pterygoid attachment is necessary to prevent condylar sag.
- •
Intraoral vertical ramus osteotomy has a low incidence of neurosensory dysfunction.
- •
Intraoral vertical ramus osteotomy avoids unfavorable condylar loading and may simultaneously address skeletal malocclusion and temporomandibular joint symptoms.
Introduction
Intraoral vertical ramus osteotomy (IVRO) is a useful technique in the management of horizontal mandibular excess, mandibular asymmetry, and correction of minor mandibular deficiency. Originally performed through an extraoral approach, with the introduction of the power oscillating saw, the procedure has been performed transorally for more than 30 years. The goal of the procedure is to perform a full-thickness vertical osteotomy through the mandibular ramus posterior to the mandibular foramen with the creation of a proximal segment consisting of the condyle and posterior ramus and a distal segment containing the anterior ramus, coronoid process, inferior alveolar nerve, and tooth-bearing mandible. It is a technically straightforward procedure that can be performed efficiently and with low morbidity. This article reviews the technical considerations, technical modifications, and potential pitfalls in performing IVRO.
Surgical technique
Preoperative planning
Horizontal mandibular excess can be addressed using IVRO with posterior positioning of the distal segment. Mandibular asymmetry, where there is an anticipated need for rotation around one ramus, can be efficiently managed with IVRO. Unilateral IVRO can be combined with contralateral sagittal split osteotomy (SSO) when correction of mandibular asymmetry dictates setback on one side and advancement on the other side. Minor mandibular advancement (1–2 mm) is permissible with IVRO with preservation of the medial pterygoid muscle attachment. Small mandibular advancements are possible because preservation of the proximal segment medial pterygoid attachment will favor forward rotation of the proximal segment and assure contact with the advanced distal segment while preserving condylar seating.
Patients with symptomatic temporomandibular joint (TMJ) disorders may benefit from IVRO over SSO because of a condylotomy effect. With IVRO, muscle positioning of the proximal segment prevents unphysiologic joint loading. As with modified mandibular condylotomy, IVRO may prevent new or increased joint symptoms and possibly improve preexisting symptoms. In contrast to modified mandibular condylotomy where medial pterygoid attachment is intentionally stripped from the proximal segment to promote condylar sag, in IVRO, stripping of the medial pterygoid must be avoided to assure condylar seating and stable postoperative occlusion.
There are limitations to the amount of setback that is possible with IVRO. Generally, up to 10 mm of mandibular setback can be achieved. However, in the authors’ experience with the class III Caucasian population, the requirement for mandibular setback of this magnitude is unusual and there is likely coexisting maxillary deficiency that should be addressed. Unless internal fixation is planned, the magnitude of setback is limited by the requirement to preserve the proximal segment medial pterygoid muscle attachment. Stripping of the medial pterygoid muscle to facilitate segment overlap can lead to condylar sag and bite instability at the time of maxillomandibular fixation (MMF) release. Additionally, unopposed activity of the lateral pterygoid muscle on the proximal segment can lead to condylar subluxation. In the authors’ experience, 5 to 6 mm of setback can be performed while keeping adequate medial pterygoid muscle attachment to obviate internal fixation. Early IVRO techniques, which did not emphasize preservation of medial pterygoid attachment, were associated with a 14% incidence of open bite after MMF release. Modified IVRO techniques, which preserve medial pterygoid attachment, limit this complication.
Preservation of medial pterygoid attachment requires that the magnitude of setback is not greater than the width of the proximal segment muscle attachment. If the planned setback exceeds the width of medial pterygoid attachment, the entire muscle will be stripped with obligatory proximal and distal segment overlap. When treatment planning, it is important to remember that the greater the mandibular setback planned, the wider the proximal segment needs to be to maintain sufficient medial pterygoid muscle. Virtual surgical planning is particularly helpful in making these determinations because the amount of proximal-distal segment overlap can be viewed preoperatively, the location of the mandibular foramen assessed, and the vertical osteotomy planned accordingly. If it is determined intraoperatively that adequate medial pterygoid attachment cannot be maintained, internal fixation should be considered to ensure condylar seating and proximal segment stability. Alternatively, such cases can be planned for SSO.
Internal fixation is technically more challenging with IVRO because of limited access and visibility. Right-angled instrumentation has enhanced the ability to apply internal fixation with IVRO, often obviating percutaneous access. Unless rigid internal fixation is used, a 2- to 3-week period MMF followed by 3 to 4 weeks of guiding elastic use is required after IVRO.
IVRO has limited applicability when mandibular advancement is indicated. Only small amounts of mandibular advancement (1–2 mm) can be achieved without creating an unacceptable gap between the proximal and distal segments. Further, advancement of the soft tissue envelope may promote distraction of the condyle. In the setting of 2-jaw surgery, vertical ramus shortening with posterior impaction of the maxilla will enhance condylar seating and may resist the tendency for unfavorable proximal segment positioning with planned small advancements. Conversely, when posterior vertical lengthening is planned with 2-jaw surgery, soft tissue envelope distracting forces, along with mandibular advancement, may promote unfavorable condylar positioning and impact ultimate occlusal stability.
When significant counterclockwise rotation of the distal mandibular segment is anticipated, as in correction of a class III anterior open bite, IVRO should be used cautiously, if at all. As noted earlier, closing rotations cause vertical lengthening of the soft tissue envelope, which promotes distraction of the proximal segment, and occlusal instability. Only small closing rotations should be considered, such as with a presurgical edge-to-edge incisor relationship.
A clear consideration in choosing IVRO over SSO is the statistically significant lower incidence of neurosensory disturbance in the distribution of the inferior alveolar nerve following surgery. When considering performing 2-jaw surgery with mandible first surgery, SSO is preferred because of the relative ease of internal fixation.
Preparation and patient positioning
- •
Patients are placed supine on the operating table.
- •
Nasoendotracheal intubation and general anesthesia are performed.
- •
Local anesthetic with epinephrine is infiltrated at the planned incision site, and inferior alveolar nerve block is performed.
Surgical approach
- •
Mucosal incision is made medial to the external oblique ridge and 2 to 3 mm lateral to the mucogingival junction extending anteriorly from the level of the occlusal plane to the first mandibular molar.
- •
Periosteum is elevated to expose the lateral ramus from the inferior border of the ramus to the sigmoid notch.
- •
Periosteum should be elevated from the inferior border of the mandible at the inferior extent of the planned osteotomy to minimize the risk of injury to the marginal mandibular branch of the facial nerve.
- •
Periosteum is not elevated from the posterior border of the ramus.
- •
Sufficient temporalis tendon is stripped from the anterior border and lateral aspect of the coronoid process to release tension in the buccal flap.
Technical notes
- •
Care should be taken to make the mucosal incision within 2 to 3 mm of the mucogingival junction to limit formation of a scar band and food trap.
- •
To prevent stripping of the periosteum from the posterior ramus border, use of the Levasseur-Merrill retractor should be avoided.
Surgical procedure
Step 1: identification of osteotomy location
- •
A Bauer retractor is placed to protect the contents of the sigmoid notch.
- •
The antilingular prominence is identified.
- •
A trial osteotomy is marked 7 to 8 mm anterior to the posterior border of the mandible, just posterior to the antilingular prominence, at the level of the mandibular foramen with the 11.7 × 7.0-mm oscillating blade.
- •
Confirm the correct placement of the trial osteotomy ( Figs. 1 and 2 ).
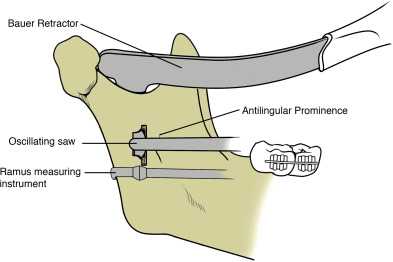
Fig. 1 Trial osteotomy at the level of the mandibular foramen and behind the antilingular prominence.
Fig. 2 Operator view of antilingular prominence and trial osteotomy.
Technical notes
- •
The antilingular prominence, on the lateral surface of the ramus, is the lateral representation of the lingula on the medial surface of the ramus and is a useful but imperfect landmark. Osteotomies performed within the antilingual prominence may enter the mandibular foramen or canal.
- •
A second Bauer retractor may be placed in the antegonial notch to facilitate visualization of the lateral ramus, though one Bauer retractor is usually sufficient.
- •
To assist in judging the anterior-posterior location of the osteotomy, a sharply curved Freer elevator is helpful to estimate distance to the posterior border. A ramus measuring instrument with a laryngeal mirror or 30° endoscope visualization may be used to confirm correct osteotomy placement. When using the ramus measuring instrument, the instrument must closely approximate the posterior border of the mandible. If the ramus measuring instrument is not well adapted to the posterior border, the osteotomy will likely be placed too far posteriorly.
- •
The longer (11.7 × 12.0 mm) oscillating blade should not be routinely used to minimize the risk of injury to structures medial to the ramus.
Step 2: superior osteotomy
- •
The trial osteotomy is extended through the medial cortex of the ramus.
- •
The cutting edge of the blade is directed superiorly, and the osteotomy is continued superiorly through the sigmoid notch.
- •
The depth of the blade is decreased as the thinner portion of the ramus just below the sigmoid notch is approached to avoid damage to structures medial to the ramus.
- •
The Bauer retractor may be lifted slightly from the sigmoid notch to allow space for the blade to complete the most superior portion of the osteotomy.
Technical notes
- •
The shaft of the blade is stabilized along the lateral ramus as a pivot for the cutting edge.
- •
The oscillating saw cuts most efficiently with the application of light pressure and a back-and-forth motion of the saw handpiece.
- •
Applying excessive pressure with the cutting edge of the oscillating saw results in less efficient cutting and may lead to handpiece overheating.
Step 3: inferior osteotomy
- •
Remove the upper Bauer retractor from the sigmoid notch and place a lower Bauer retractor in the antegonial notch.
- •
Without removing the saw from the completed superior osteotomy, redirect the cutting edge in an inferior direction.
- •
Below the antilingular prominence, the osteotomy is directed anteriorly to maximize proximal segment width.
- •
The distance from the osteotomy to the posterior border of the ramus is monitored as the osteotomy progresses inferiorly and the osteotomy is redirected anteriorly as needed.
- •
The osteotomy is completed through the inferior border of the mandible, and separation of the proximal segment and distal segment is confirmed.
Technical notes
- •
Avoid creating a posteriorly directed inferior osteotomy that results in a narrow and short proximal segment with inadequate medial pterygoid attachment. A separate, more anteriorly directed inferior osteotomy should be made if the osteotomy is progressing too posteriorly or in cases with planned large setback where medial pterygoid attachment must be maximized ( Figs. 3 and 4 ).


